Each installer must evaluate the specic characteristics of the particular wall on which the cabinets are to be installed to ensure the proper fastening solution
is used and the product is fastened safely and securely. This may require hardware or fastening methods which are different from, or in addition to, this general
outline. RSI does not warrant the installation of this product.
Cada instalador debe evaluar las características especícas de la pared en particular en el que los armarios se van a instalar para asegurar la solución adecuada
jación se utiliza y el producto se sujeta de manera segura. Esto puede requerir métodos de hardware o de jación que son diferentes de, o además de, este
esquema general. RSI no garantiza la instalación de este producto.
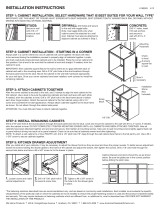
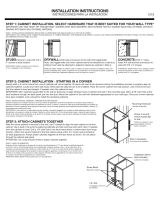
PASO 3: UNIR LOS GABINETES
Después de jar el gabinete de la esquina a la pared, usa abrazaderas en “C" para alinear el gabinete siguiente al primero. Usa un nivel para garantizar que los
gabinetes contiguos queden a ras y a nivel entre ellos. Si es necesario usa cuñas para nivelar. Taladra un oricio piloto de 3,17 mm en el marco frontal arriba y
debajo del lugar donde irán las bisagras de las puertas. Coloca el segundo gabinete a los primeros con un tornillo núm. 8 de 6,35 cm e instala al ras para darle
un mejor aspecto. Siempre une los gabinetes por el marco frontal como se muestra. Nunca jes los gabinetes por el panel lateral.
ATENCIÓN: Debes taladrar oricios piloto para unir los gabinetes.
STEP 4: INSTALL REMAINING CABINETS
Drill a 3/16" pilot hole at the stud locations through the back panel and into the stud. Level and mount the cabinet to the wall
with #10 x 3" screw. If needed, shim the cabinet to level. DO NOT COMPLETELY TIGHTEN MOUNTING SCREWS UNTIL ALL
CABINETS HAVE BEEN ATTACHED TOGETHER. After all cabinets have been attached together and are level and secure, then
tighten all mounting screws. Take care to seat mounting screws tightly against back rail or panel without driving into back rail
or panel material. Check to be sure that all cabinets remain level after tightening. NOTE: To attach a wall cabinet to a TALL
PANTRY unit, drill a 1/8" pilot hole 7/8" deep through the wall cabinet face frame to the tall pantry unit. Use a #8 x 1-5/8" screw
to secure cabinets together.
PASO 4: INSTALACION DE LOS GABINETES RESTANTES
Taladre un oricio guía de 3/16 pulgada en la ubicación de los montantes a través del panel trasero y en el montante. Nivele y monte el gabinete a la pared
con tornillos de #10 x 3 pulgadas. NO APRIETE COMPLETAMENTE LOS TORNILLOS HASTA QUE EL TODOS LOS GABINETES ESTÉN ACOPLADOS ENTRE
SÍ. Después de acoplar todos los gabinetes entre sí y que estén jos y a nivel, apriete todos los tornillos de montaje. Tenga cuidado de asentar los tornillos
rmemente contra el panel o riel trasero sin penetrar en el material del panel o riel trasero. Revise para asegurarse de que todos los gabinetes permanezcan
a nivel después de apretar los tornillos. NOTA: Para jar un gabinete de pared a una unidad de DESPENSA ALTA, taladre un oricio guía de 1/8 pulgada a 7/8
pulgada de profundidad a través del marco de supercie del gabinete de pared hacia la unidad de despensa alta. Use un tornillo de #8 x 1-5/8 pulgadas para
jar los gabinetes entre sí.
STEP 5: KITCHEN DRAWER ADJUSTMENT
After you install all of your cabinets, it may be necessary to adjust the drawer fronts so they are level and have the proper
reveals. Loosen the screws holding the drawer glides to the frame of the cabinet and adjust the drawer, then tighten the
screws.
PASO 5: AJUSTE DE LAS GAVETAS DE COCINA
Después de instalar todos los gabinetes, puede ser necesario ajustar los frentes de las gavetas para que estén a nivel y tengan el espacio apropiado. Para un
ajuste mejor, aoje los tornillos que sostienen los deslizadores de gavetas al marco de los gabinetes y ajuste la gaveta, apriete luego los tornillos. Taladre un
oricio guía de 1/8 pulgada a través del segundo oricio de abajo y pase un tornillo de #8 x 5/8 pulgada para jar la gaveta en su lugar.
1. Loosen screw and make vertical adjustments.
1. Aoje el tornillo y haga los ajustes verticales
*The fastening solutions described here are recommendations only, and are based on commonly used installations. Each
installer must evaluate the specic characteristics of the particular wall on which the cabinets are to be installed to ensure
the proper fastening solution is used and the product is fastened safely and securely. This may require hardware or fastening
methods which are different from, or additional to, what is described here. THE MANUFACTURER DOES NOT WARRANT THE
INSTALLATION OF THIS PRODUCT.
*Las soluciones de sujeción aquí descritas representan únicamente recomendaciones y se basan en procedimientos tradicionales de instalación. Cada
instalador debe evaluar las características especícas de la pared en particular donde se instalarán los gabinetes para garantizar que se use la solución de
sujeción apropiada y que el producto quede jo de manera segura. Ello podría requerir métodos o herrajes de sujeción distintos o adicionales a los aquí
descritos. EL FABRICANTE NO GARANTIZA LA INSTALACIÓN DE ESTE PRODUCTO.
Cabinet drawers and doors
should line up as shown below
Las puertas y gavetas de los gabinetes deben
estar alineadas como se muestra abajo.