Page is loading ...

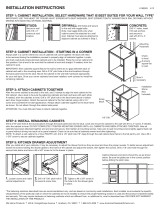
STEP 1: CABINET INSTALLATION. SELECT HARDWARE THAT IS BEST SUITED FOR YOUR WALL TYPE*
IMPORTANT: USE “PAN HEAD” OR “ROUND HEAD” SCREWS WITH SEAT WASHERS. SEAT SCREWS TIGHTLY AGAINST BACK RAIL OR PANEL WITHOUT
DRIVING INTO BACK RAIL OR PANEL MATERIAL
PASO 1: INSTALACION DE GABINETES. SELECCIONE LA HERRAJERIA QUE MAS SE ADECUA AL TIPO DE SU PARED.*
IMPORTANTE: USA TORNILLOS DE “CABEZA PLANA BISELADA" O “CABEZA REDONDA" CON ARANDELAS DE ASIENTO. COLOCA LOS TORNILLOS FIRMEMENTE CONTRA EL PANEL O EL RIEL TRASERO
SIN INSERTARLOS EN EL PANEL O EL RIEL
STUDS: Secure to wall with #10 x
3" screws at stud location.
MONTANTES: Fíjelo a la pared con tornillos de
# 10 x 3 pulgadas en los montantes.
DRYWALL: Drill holes and secure to the wall with toggle bolts.
Note: Use toggle bolts only when cabinet cannot be attached to a wall stud.
Cabinet must also be attached to adjacent cabinet as outlined in Step 3.
PANEL DE YESO: Taladre los oricios y je la unidad a la pared conpernos acodillados. Nota: Use
pernos acodillados sólo cuando el gabinete no se pueda jar a los montantes de pared. El gabinete
también se debe jar al gabinete adyacente como se indica en el paso 3.
CONCRETE: Drill ¼" holes,
insert #10 wall anchors and secure to
wall with #10 x 3" screws.
CONCRETO: Taladre oricios de ¼ pulgada, inserte
anclas de expansión de #10 y fíjelo a la pared con
tornillos de # 10 x 3 pulgadas.
STEP 2: CABINET INSTALLATION - STARTING IN A CORNER
Always start in a corner where two runs of cabinets will come together. All doors will need to be removed during the installation process to properly align all
cabinets together. Locate and mark wall studs where planned cabinets are to be installed. Place the corner cabinet into that position. Use a level to be sure
that the cabinet is level and straight. If needed, shim the cabinet to level.
IMPORTANT: Shim cabinets square (at) to the wall so there are no gaps between back of cabinet and wall in the mounting area. Drill a 3/16" pilot hole at the
stud locations through the back panel and into the stud. Mount the cabinet to the wall with hardware appropriate for your wall type. Once your corner cabinets
have been installed, work outward to install the remaining cabinets.
PASO 2: INSTALACIÓN DEL GABINETE – EMPEZAR POR UNA ESQUINA
Siempre empezar por la esquina donde se unen dos hileras de gabinetes. Durante la instalación es necesario quitar todas las
puertas para alinear correctamente todos los gabinetes al unirlos. Localizar y marcar las vigas de la pared elegidas para instalar los
gabinetes. Colocar el gabinete de la esquina en ese lugar. Usa el nivel para garantizar que el gabinete quede nivelado y derecho. Si
es necesario usa cuñas para nivelar.
IMPORTANTE: Usa cuñas en los gabinetes para que queden a escuadra (pegado) con la pared sin dejar espacios entre el fondo
del gabinete y la pared en el área de montaje. Taladra un oricio piloto de 4,76 mm donde está la viga, a través del panel trasero y
dentro de la misma. Monta el gabinete en la pared con el herraje correcto según el tipo de pared. Después de instalar los gabinetes
de la esquina, prosigue con los demás.
STEP 3: ATTACH CABINETS TOGETHER
After the corner cabinet is secured to the wall, use C-clamps to align the next cabinet to the rst
cabinet. Use a level to be sure the adjoining cabinets are ush and level with each other. If needed,
shim the cabinets to level. Drill a 1/8" pilot hole in the face frame above or below each door hinge
location. Attach the second cabinet to the rst cabinet using a #8 x 2½" screw and countersink
for best appearance. Always attach cabinets together at the face frame as shown. Do not attach
through the cabinet side panel.
ATTENTION: You must drill pilot holes to attach cabinets together.
PASO 3: UNIR LOS GABINETES
Después de jar el gabinete de la esquina a la pared, usa abrazaderas en “C" para alinear el gabinete siguiente
al primero. Usa un nivel para garantizar que los gabinetes contiguos queden a ras y a nivel entre ellos. Si es
necesario usa cuñas para nivelar. Taladra un oricio piloto de 3,17 mm en el marco frontal arriba y debajo del
lugar donde irán las bisagras de las puertas. Coloca el segundo gabinete a los primeros con un tornillo núm. 8
de 6,35 cm e instala al ras para darle un mejor aspecto. Siempre une los gabinetes por el marco frontal como
se muestra. Nunca jes los gabinetes por el panel lateral.
ATENCIÓN: Debes taladrar oricios piloto para unir los gabinetes.
Shim if necessary
Usa cuñas si es necesario
Check to level &
ensure square at
to wall
Verica la nivelación y que
quede pegado contra la
pared a escuadra
Mounting Hardware
Herrajes de Montaje
INSTALLATION INSTRUCTIONS
INSTRUCCIONES PARA LA INSTALACIÓN
1219
Installation Shims
(Not Included)
Cuñas (no incluidas)
Scrap Block
Bloque de madera
1/8" DIA.
1/8 pulgada (.3175 cm)
de diámetro

STEP 4: INSTALL REMAINING CABINETS
Drill a 3/16" pilot hole at the stud locations through the back panel and into the stud. Level and mount the cabinet to the wall with #10 x 3" screw. If needed, shim
the cabinet to level. DO NOT COMPLETELY TIGHTEN MOUNTING SCREWS UNTIL ALL CABINETS HAVE BEEN ATTACHED TOGETHER. After all cabinets have
been attached together and are level and secure, then tighten all mounting screws. Take care to seat mounting screws tightly against back rail
or panel without driving into back rail or panel material. Check to be sure that all cabinets remain level after tightening.
NOTE: To attach a wall cabinet to a TALL PANTRY unit, drill a 1/8" pilot hole 7/8" deep through the wall cabinet face frame to the tall pantry unit. Use a
#8 x 1-5/8" screw to secure cabinets together.
PASO 4: INSTALACION DE LOS GABINETES RESTANTES
Taladre un oricio guía de 3/16 pulgada en la ubicación de los montantes a través del panel trasero y en el montante. Nivele y monte el gabinete a la pared con tornillos de #10 x 3 pulgadas. NO APRIETE
COMPLETAMENTE LOS TORNILLOS HASTA QUE EL TODOS LOS GABINETES ESTÉN ACOPLADOS ENTRE SÍ. Después de acoplar todos los gabinetes entre sí y que estén jos y a nivel, apriete todos los tornillos
de montaje. Tenga cuidado de asentar los tornillos rmemente contra el panel o riel trasero sin penetrar en el material del panel o riel trasero. Revise para asegurarse de que todos los gabinetes permanezcan a nivel
después de apretar los tornillos.
NOTA: Para jar un gabinete de pared a una unidad de DESPENSA ALTA, taladre un oricio guía de 1/8 pulgada a 7/8 pulgada de profundidad a través del marco de supercie del gabinete de pared hacia la unidad
de despensa alta. Use un tornillo de #8 x 1-5/8 pulgadas para jar los gabinetes entre sí.
STEP 5: KITCHEN DRAWER ADJUSTMENT
After you install all of your cabinets, it may be necessary to adjust the drawer fronts so they are level and have the proper reveals. To better secure adjustment,
loosen the screws holding the drawer glides to the frame of the cabinet and adjust the drawer, then tighten the screws. Drill a 1/8" pilot hole through the second
hole below and drive a #8 x 5/8" screw to x the drawer in place.
PASO 5: AJUSTE DE LAS GAVETAS DE COCINA
Después de instalar todos los gabinetes, puede ser necesario ajustar los frentes de las gavetas para que estén a nivel y tengan el espacio apropiado. Para un ajuste mejor, aoje los tornillos que sostienen los
deslizadores de gavetas al marco de los gabinetes y ajuste la gaveta, apriete luego los tornillos. Taladre un oricio guía de 1/8 pulgada a través del segundo oricio de abajo y pase un tornillo de #8 x 5/8 pulgada
para jar la gaveta en su lugar.
*The fastening solutions described here are recommendations only, and are based on commonly used installations. Each installer must evaluate the specic
characteristics of the particular wall on which the cabinets are to be installed to ensure the proper fastening solution is used and the product is fastened safely
and securely. This may require hardware or fastening methods which are different from, or additional to, what is described here. RSI DOES NOT WARRANT THE
INSTALLATION OF THIS PRODUCT.
*Las soluciones de sujeción aquí descritas representan únicamente recomendaciones y se basan en procedimientos tradicionales de instalación. Cada instalador debe evaluar las características especícas de la
pared en particular donde se instalarán los gabinetes para garantizar que se use la solución de sujeción apropiada y que el producto quede jo de manera segura. Ello podría requerir métodos o herrajes de sujeción
distintos o adicionales a los aquí descritos. RSI NO GARANTIZA LA INSTALACIÓN DE ESTE PRODUCTO.
1. Loosen screw and make vertical
adjustments.
1. Aoje el tornillo y haga los ajustes verticales.
2. Cabinet drawers and doors should line up as
shown below.
2. Las puertas y gavetas de los gabinetes deben estar alineadas como se
muestra abajo.

FINISHING UNFINISHED CABINETS
DAR ACABADO A GABINETES SIN ACABADO
Fill screw holes made in face frame stiles with wood putty.
For best results sand with 180-220 grit ne sand paper just prior to staining cabinets. Use a tack cloth to thoroughly wipe the surface and remove excess dust. A
surface that is improperly prepared will not stain or paint correctly. Stain or paint your cabinets according to the nish manufacturer’s recommended instructions.
Applying a coat of toner before staining will aid in a more consistent nish. Wood cabinets display color variation, mineral streaks and grain differences these
differences in stain tone is normal. A surface that is improperly prepared will not stain or paint correctly. Stain or paint your cabinets according to the nish
manufacturer’s recommended instructions.
Rellena, con masilla para madera, los oricios para tornillo hechos en los travesaños del marco.
Para mejores resultados, lija antes de teñir los gabinetes con papel de lija de grano 180-220. Usa un paño adherente para limpiar bien la supercie y eliminar el exceso de polvo. Una supercie sin preparación adecuada
no absorberá bien el tinte o la pintura. Tiñe o pinta tus gabinetes según las instrucciones recomendadas por el fabricante para el acabado. La aplicación de una capa de tónico antes de teñir ayudará a dar un acabado
más consistente. Los gabinetes de madera presentan diferentes vetas, variaciones de colores y hasta vetas minerales. Tales diferencias de tonalidad del teñido son normales. Una supercie sin preparación adecuada no
absorberá bien el tinte o la pintura. Tiñe o pinta tus gabinetes según las instrucciones recomendadas por el fabricante para el acabado.
Pull distance: 42" min. to 45" max.
What is pull distance?
Pull distance refers to the distance from the corner where two
walls meet out to the furthest side panel of the blind base cabinet.
Distancia de separación: 1.07 m mín. hasta 1.14 m máx.
¿Qué es la distancia de separación?
La distancia de separación se reere a la distancia desde la esquina donde se unen
las dos paredes hasta el panel lateral más lejano del gabinete de base ciega.
3" FILLER
RELLENO DE 7.6 CM
2" HARDWARE CLEARANCE
ESPACIO DE 5.1 CM PARA LOS HERRAJES
= OPEN SPACE
= ESPACIO LIBRE
ADJACENT CABINET
GABINETE ADYACENTE
BLIND BASE CABINET
GABINETE DE BASE CIEGA
36"
42"– 45"
COUNTERTOP CLEAT / LISTÓN DEL MOSTRADOR
WALL / MUR / PARED
WALL / PARED
BLIND BASE CABINET INSTALLATION
INSTALACIÓN DEL GABINETE DE BASE CIEGA
Place the blind base cabinet into the corner. Make sure the
cabinet is pulled out from the corner the correct distance
specied on your design layout.
Place the adjacent cabinet into place. You may need to install
a base ller to provide the proper clearance for doors or
decorative hardware.
Coloca el gabinete de base ciega en la esquina. Asegúrate de que el gabinete
esté separado de la esquina la distancia correcta según se especica en el diseño.
Coloca el gabinete adyacente en su posición. Puedes necesitar instalar un relleno
de base para lograr el espacio adecuado para puertas o herrajes decorativos.
C-CLAMP
ABRAZADERA EN C
WALL
PARED
BLIND BASE CABINET
GABINETE DE BASE CIEGA
3" FILLER
RELLENO DE 7.6 CM
ADJACENT CABINET
GABINETE ADYACENTE

LAZY SUSAN BASE CABINET INSTALLATION
INSTALACIÓN DEL GABINETE DE BASE CON BANDEJA CIRCULAR GIRATORIA
the
wall
with
hardware
appropriate
for your wall type.
Locate and mark all stud locations. Install 2"x4" framing
material as cleats to support the countertop. Use a level
to ensure the cleats are level. Drill 3/16" pilot holes through
the cleat and into the stud. Mount the cleat to the wall with
hardware appropriate for your wall type.
Attach cabinets together and secure them to the wall
according to installation steps 3 and 4.
Localiza y marca todas las ubicaciones para los pernos. Instala el material de
enmarcado de 5.1 cm x 10.2 cm como listones para sostener el mostrador.
Usa un nivel para garantizar que los listones estén nivelados. Perfora oricios
piloto de 3/16" a través del listón y en el perno. Monta el listón en la pared con
el herraje correcto según el tipo de pared.
Instala los gabinetes juntos para asegurarlos a la pared de acuerdo con los pasos
de instalación 3 y 4.
COUNTERTOP CLEAT
LISTÓN DEL MOSTRADOR
HINGE ADJUSTMENT
AJUSTE DE LA BISAGRA
Review the illustrations below to locate the hinge on your specic cabinet.
Consulte las ilustraciones a continuación para localizar la bisagra particular a su modelo.
UP/DOWN
ARRIBA/ABAJO
UP/DOWN
ARRIBA/ABAJO
LEFT/RIGHT
IZQUIERDA/DERECHA
UP/DOWN
ARRIBA/ABAJO
LEFT/RIGHT
IZQUIERDA/DERECHA
UP/DOWN
ARRIBA/ABAJO
IN/OUT
AFUERA/ADENTRO
LEFT/RIGHT
IZQUIERDA/DERECHA

RSI Home Products, 400 E. Orangethorpe Avenue, Anaheim, CA 92801 • www.rsihomeproducts.com
RSI HOME PRODUCTS, INC. LIMITED WARRANTY
GARANTÍA LIMITADA DE RSI HOME PRODUCTS, INC.
RSI Home Products a subsidiary of American Woodmark Corporation.
What This Warranty Covers: RSI Home Products, Inc. ("RSI") warrants its parts and products to be free of substantial defects in materials and workmanship from the original date of
purchase under normal home use. This warranty is offered only to the original consumer purchaser and may not be transferred.
How Long The Warranty Lasts: Coverage for nished kitchen cabinets, vanity cabinets, and vanity tops lasts for the life of the product. Coverage for vanity cabinet combos, medicine
cabinets, mirrors, light bars and bath storage cabinets lasts for 5 years from the original date of purchase. Coverage for unnished kitchen cabinets lasts 1 year.
What RSI Home Products Will Do Under The Warranty: During the warranty period, RSI, at its option, will repair or replace any part or product that proves to have substantial defects
in materials or workmanship, or RSI will provide an equivalent replacement product. In keeping with our policy of continuous product improvement, RSI reserves the right to change
specications in design and materials without notice and with no obligation to retrot products we previously manufactured.
How State Law Applies: This warranty gives you specic legal rights, and you may also have other rights that vary from state to state.
IMPLIED WARRANTIES: RSI DISCLAIMS ANY IMPLIED WARRANTY OF MERCHANTABILITY, AND THERE ARE NO WARRANTIES THAT EXTEND BEYOND THE DESCRIPTIONS ON THE FACE
HEREOF. TO THE EXTENT THAT SUCH DISCLAIMER IS NOT VALID UNDER APPLICABLE LAW, ANY IMPLIED WARRANTY SHALL BE COEXTENSIVE IN DURATION WITH THIS WARRANTY.
Wood, Cultured Marble and Solid Surface Technology Characterisics, Aging and Printing Limitations: Because of the varying natural characteristics of wood and the effects of
aging, product shown in displays and/or printed materials may not be an exact match to new cabinetry you will receive. Depending on wood characterisics, the age of a sample and the
environment of the showroom, samples will show some degree of variation from new product. In addition, you should not expect all doors, drawer fronts, trim or molding to match exactly in
either nish or grain. Variation in wood, cultured marble and solid surface technology material is normal and unavoidable. In addition, it is not possible to exactly match our colors in printed
materials. Therefore, you should view the actual samples when making your color selection.
What This Warranty Does Not Cover: This warranty does not cover any problems or damage which result from improper transportation, improper installation, mishandling, misuse,
abuse, neglect, abnormal use, commercial use, improper maintenance, non-RSI repairs, accidents, or acts of God, such as hurricanes, re, earthquakes or oods. This warranty and any
applicable implied warranties do not cover incidental or consequential damages arising from any defects in the product, such as labor charges for installation or removal of the product or
any associated products. This warranty does not cover defects or damage caused by normal wear & tear, alterations, environmental conditions, humidity absorption, or mold. In addition,
variations in wood grain, nish color, aging or other natural wood and stain characteristics are not considered defects and are not covered by this warranty. Some states do not allow the
exclusion or limitation of incidental or consequential damages, so the above limitation or exclusion may not apply to you.
How to Obtain Warranty Service: If you need replacement parts or would like to make a warranty claim, please contact our Customer Service Representative by mail, email, fax or
telephone at the address or phone numbers listed on this page. All warranty claims must include the model number of the product, copy of the original receipt and the nature of the
problem. In addition, RSI may at its discretion require inspection of the installation site or authorize the prepaid return of the claimed defective part. Merchandise not pre-approved for return
will not be accepted and the associated claim not accepted.
Products should be examined for defects prior to installation. This warranty also does not cover labor charges for installation or removal of the product or
any associated products. If upon inspection you nd our product has a damaged or missing part, it may not be necessary to return the unit to the store of
purchase. Please contact RSI customer service to possibly obtain a replacement part.
Qué Cubre la Garantía: RSI Home Products, Inc. ("RSI") garantiza que sus piezas y productos no tendrán defectos signicativos de materiales o fabricación a partir de la fecha original de compra, bajo condiciones de
uso doméstico normal. Esta garantía se ofrece sólo al consumidor original y no puede transferirse.
Cuánto Dura la Garantía: La cobertura para gabinetes de cocina acabados, gabinetes de tocador y mostradores de tocador, comprende la vida útil del producto. La cobertura para los kits combinados de gabinete para
tocador, botiquines de medicinas, espejos, barras de luces, y gabinetes de baño dura 5 años desde la fecha original de compra. La cobertura para gabinetes de cocina sin acabado es de 1 año.
Que hará RSI Home Productos Bajo la Garantía: Durante el período de garantía RSI, a su discreción, reparará o reemplazará cualquier parte o producto que muestre cualquier defecto signicativo de materiales o
fabricación, o RSI lo reemplazará con un producto equivalente. De acuerdo con lo establecido en nuestra política de mejora continua del producto, RSI se reserva el derecho de cambiar las especicaciones de diseño y
materiales sin previo aviso y sin ninguna obligación de renovar los productos fabricados previamente.
Cómo Repercuten las Leyes Estatales: Esta garantía le otorga derechos legales especícos y es posible que también goce de otros derechos que varían de un estado a otro.
GARANTÍAS IMPLÍCITAS: RSI SE EXIME DE CUALQUIER GARANTÍA IMPLÍCITA DE COMERCIABILIDAD; NO EXISTEN OTRAS GARANTÍAS MÁS ALLÁ DE LAS AQUÍ DESCRITAS. EN CASO DE QUE ESTA EXENCIÓN
DE RESPONSABILIDAD NO TENGA VALIDEZ EN VIRTUD DE LAS LEYES APLICABLES, CUALQUIER GARANTÍA IMPLÍCITA TENDRÁ LA MISMA DURACIÓN QUE LA PRESENTE GARANTÍA.
Características y Envejecimiento de la Madera, el Mármol Cultivado y Materiales de Tecnología de Supercie Sólida, y Limitaciones de los Materiales Impresos: Debido a las características variables naturales
de la madera y a los efectos del envejecimiento, el producto mostrado en la exhibición y/o en los materiales impresos puede no coincidir exactamente con los gabinetes nuevos que usted recibirá. Dependiendo de las
características de la madera, la edad de la muestra y las condiciones ambientales de la sala de exhibición, las muestras variarán en cierto grado, del producto nuevo. Adicionalmente, usted no deberá esperar que todas
las puertas, caras de los cajones, acabados o molduras tengan acabados o vetas idénticos. Las variaciones en la madera, el mármol cultivado y el material de tecnología de supercie sólida son normales e inevitables.
Además, es imposible reproducir nuestros colores en el material impreso. Por consiguiente, usted debe ver las muestras reales al elegir su color.
Lo Que esta Garantía No Cubre: Esta garantía no cubre ningún problema o daño como resultado de la transportación inadecuada, instalación inapropiada, manipulación incorrecta, uso incorrecto, abuso, negligencia,
uso indebido, uso comercial, mantenimiento inadecuado, reparaciones no autorizadas por RSI, huracanes, incendio, terremotos o inundaciones. Esta garantía y cualquier otra garantía implícita correspondiente, no
cubre daños incidentales o secundarios resultado de cualquier defecto en el producto, tales como cargos por mano de obra por la instalación o retiro del producto o de cualquier producto relacionado. Esta garantía no
cubre defectos ni daños causados por uso y desgaste normales, alteraciones, condiciones ambientales, absorción de la humedad, o moho. Adicionalmente, las variaciones en la veta de la madera, el color del acabado,
el envejecimiento u otras características de la madera o el tinte no se considerarán defectos y no están cubiertos por esta garantía. Algunos estados no permiten la exclusión o limitación de daños incidentales o
secundarios, por lo que las limitaciones o exclusiones anteriores podrían no aplicarse en su caso.
Cómo Recibir Servicio de Garantía: Si necesita piezas de reemplazo o le gustaría hacer una reclamación de garantía, por favor contacte a nuestro Representante de Atención al Cliente por email, fax o teléfono, por
medio de la dirección o el número de teléfono provistos en esta página. Todas las reclamaciones de garantía deben incluir el número de modelo del producto, copia del recibo original y la naturaleza del problema.
Además RSI podrá, a su discreción, requerir una inspección del sitio de la instalación o autorizar la devolución prepagada de la pieza defectuosa por la cual se hace la reclamación. No se aceptará ninguna mercancía
cuya devolución no haya sido previamente aprobada ni ninguna reclamación relacionada con tal mercancía.
Antes de la instalación, los productos deben examinarse en busca de defectos. Esta garantía tampoco cubre los cargos por mano de obra relacionados
con la instalación o retiro del producto o productos relacionados. Si al inspeccionar el producto usted encuentra que falta una pieza o que alguna de ellas
está dañada, puede que no sea necesario devolver la unidad a la tienda donde la compró. Por favor contacte a atención al cliente de RSI para determinar
la posibilidad de obtener una pieza de reemplazo.
Important health notice. Some of the building materials used in this home (or these building materials) emit formaldehyde. Eye, nose, and throat irritation, headache, nausea and a
variety of asthma-like symptoms, including shortness of breath, have been reported as a result of formaldehyde exposure. Elderly persons and young children, as well as anyone with a
history of asthma, allergies, or lung problems, may be at greater risk. Research is continuing on the possible long-term effects of exposure to formaldehyde. Reduced ventilation may allow
formaldehyde and other contaminants to accumulate in the indoor air. High indoor temperatures and humidity raise formaldehyde levels. When a home is to be located in areas subject to
extreme summer temperatures, an air-conditioning system can be used to control indoor temperature levels. Other means of controlled mechanical ventilation can be used to reduce levels
of formaldehyde and other indoor air contaminants. If you have any questions regarding the health effects of formaldehyde, consult your doctor or local health department.
Aviso de salud importante. Algunos de los materiales de construcción usados en esta vivienda (o estos materiales de construcción) emiten formaldehído. La irritación en ojos, nariz y garganta; los dolores de cabeza,
náusea y otros síntomas parecidos al asma, como la falta de aire, han sido identicados como consecuencias de la exposición al formaldehído. Las personas de la tercera edad y los niños pequeños, así como
quienquiera que haya padecido de asma, alergias o problemas pulmonares, pueden enfrentar mayor riesgo. Es continua la investigación de las posibles consecuencias a largo plazo por exposición al formaldehído. La
poca ventilación puede causar que el formaldehído u otros contaminantes se acumulen en la atmósfera interior. Las altas temperatura y humedad en interiores incrementan los niveles de formaldehído. Para viviendas
ubicadas en zonas de temperaturas extremas durante el verano puede usarse un sistema de aire acondicionado a n de controlar los niveles de temperatura en interiores. Otros medios de ventilación mécanica
controlada pueden usarse para reducir los niveles de formaldehído y otros contaminantes del aire en interiores. Si tienes alguna pregunta o duda con respecto a los efectos del formaldehído sobre la salud, consulta a tu
médico o llama al departamento de salud local.
WARNING: This product can expose you to chemicals including Wood Dust which are known to the state of California to cause cancer. For more information go to www.
P65Warnings.ca.gov/products.
Advertencia: Este product puede exponerte a sustancia químicas, incluso aserrín, que el Estado de California reconoce como causante de cáncer. Para más información, visita www.P65Warnings.ca.gov/products.
Each installer must evaluate the specic characteristics of the particular wall on which the cabinets are to be installed to ensure the proper fastening solution is used and the product is fastened
safely and securely. This may require hardware or fastening methods which are different from, or in addition to, this general outline. RSI does not warrant the installation of this product.
Cada instalador debe evaluar las características especícas de la pared en particular en el que los armarios se van a instalar para asegurar la solución adecuada jación se utiliza y el producto se sujeta de manera segura.
Esto puede requerir métodos de hardware o de jación que son diferentes de, o además de, este esquema general. RSI no garantiza la instalación de este producto.
/