Page is loading ...

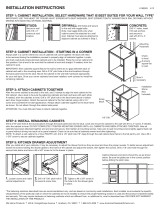
CORNER SINK BASE CABINET
ARMOIRE DE COIN SOUS ÉVIER SUR PLANCHER
GABINETE DE BASE DE FREGADERO ESQUINADO
ASSEMBLY & INSTALLATION INSTRUCTIONS • INSTRUCCIONS POUR L’INSTALLATION • INSTRUCCIONES PARA LA INSTALACION
U180049/0313
Model Number(s):
No du modele:
Numero(s) de:
KCSB36
CSB36OHD
*ACTUAL SIZE
*TAILLE RÉELLE
*TAMAÑO REAL
(BP)
(SBP)
(SBP)
(RBP)
(DBP)
(FC)
(TK )
(LSP)
S7
14x
*WD*
8x
BR
6x
KC2
2x
S2
24x
*

2
1
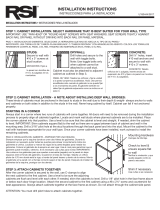
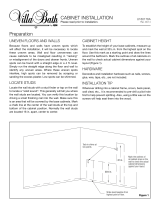
Install the diagonal back panel (DBP) to the bottom panel (BP).
Installez le panneau diagonal arrière (DBP) sur le panneau inférieur (BP).
Instala el panel trasero diagonal (DBP) en el panel inferior (BP).
Install plastic brackets (BR) on diagonal back
panel (DBP). Brackets are not pre-drilled.
Install screws directly through the bracket
into the panel.
Installez les supports en plastique (BR) sur le
panneau diagonal arrière (DBP). Les supports ne
sont pas pré-percés. Enfoncez les vis directement
à travers le support dans le panneau.
Instala los soportes plásticos (BR) en el
panel trasero diagonal (DBP). Los soportes
no están pretaladrados. Instala los tornillos
directamente en el panel, a través del soporte.
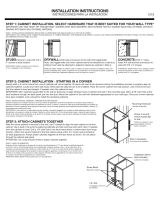
Install the two shorter side panels (SBP) to the bottom panel.
Installez les deux panneaux latéraux plus courts (SBP) sur le panneau du inférieur.
Instala los dos paneles laterales más cortos (SBP) en el panel inferior.
3
S2*
4x
S7*
2x
(BP)
(DBP)
(DBP)
(BP)
(DBP)
(SBP)
(S7)
(S7)
(S7)
(SBP)
(S7)
(S7)
(S7)
S7
4x
WD*
4x
4x
2x
BR
2x
(WD)

*STUD
FINDER
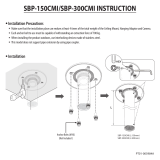
STEP 3:
36” 36”
STEP 5:
INSTALL REMAINING CABINETS
Drill a 3/16" pilot hole at the stud locations through the
back panel and into the stud. Level and mount the
cabinet to the wall with #10 x 3" screw. If needed, shim
the cabinet to level. DO NOT COMPLETELY TIGHTEN
MOUNTING SCREWS UNTIL ALL CABINETS HAVE BEEN
ATTACHED TOGETHER. After all cabinets have been
attached together and are level and secure, then
tighten all mounting screws. Take care to seat mount-
ing screws tightly against back rail or panel without
driving into back rail or panel material. Check to be
sure that all cabinets remain level after tightening.
STEP 2:
COUNTERTOP CLEAT INSTALLATION – Locate and mark all stud
locations. Use 2x4 framing material as cleats to support the
countertop. Use a level to ensure the cleats are level. Drill ⁄”
pilot holes through the cleat and into the stud. Mount the
cleat to the wall with hardware appropriate for your wall type.
IMPORTANT: USE “PAN HEAD” OR “ROUND HEAD” SCREWS
WITH SEAT WASHERS. SEAT SCREWS TIGHTLY AGAINST BACK
RAIL WITHOUT DRIVING INTO BACK RAIL OR PANEL MATERIAL
STEP 1:
CABINET INSTALLATION. SELECT HARDWARE THAT IS
BEST SUITED FOR YOUR WALL TYPE*
STUDS:
Secure to wall with #10 x 3"
screws at stud location.
DRYWALL:
Drill holes and secure to the wall with toggle bolts.
Note: Use toggle bolts only when cabinet cannot be
attached to a wall stud. Cabinet must also be
attached to adjacent cabinet as outlined in Step 3.
CONCRETE:
Drill 1/4" holes, insert #10 wall anchors
and secure to wall with #10 x 3" screws.
STEP 3:
Use C-clamps to align the adjacent cabinets to the Corner
Sink Cabinet. Use a level to ensure the cabinets are ush
and level with each other. Drill a ⁄” pilot hole in the face
frame above or below each door hinge location. Attach
the adjacent cabinets to the corner cabinet using #8 x 2⁄”
screws and countersink for best appearance.
STEP 4:
corner cabinet should be 36” from the wall in both
are no gaps between the back of the adjacent cabinets and
IMPORTANT: Shim cabinets square (at) to the wall so there
locations through the back rail of the adjacent cabinets
corner cabinets have been installed, work outward to
ATTENTION: You must drill pilot holes to attach
cabinets together.
The fastening solutions described here are recommendations only, and are based on commonly used installations. Each installer must evaluate the
DOES NOT WARRANT THE INSTALLATION OF THIS PRODUCT.
CORNER SINK BASE CABINET
INSTALLATION INSTRUCTIONS
/