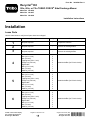
Toro Recycler Kit, 60in TURBO FORCE Side Discharge Mower Installation guide
- Type
- Installation guide
This manual is also suitable for
Toro Recycler Kit, 60in TURBO FORCE Side Discharge Mower is designed for efficient lawn mowing and side discharge of grass clippings. It provides a clean and precise cut, enhancing the appearance of your lawn. The kit includes baffles and kickers to ensure proper airflow and optimal grass discharge, ensuring a well-manicured lawn. Its compatibility with 60-inch TURBO FORCE decks makes it a suitable upgrade for your lawn care equipment. Installation is straightforward, detailed instructions are provided in the manual, and the kit includes all the necessary hardware for a hassle-free setup.
Toro Recycler Kit, 60in TURBO FORCE Side Discharge Mower is designed for efficient lawn mowing and side discharge of grass clippings. It provides a clean and precise cut, enhancing the appearance of your lawn. The kit includes baffles and kickers to ensure proper airflow and optimal grass discharge, ensuring a well-manicured lawn. Its compatibility with 60-inch TURBO FORCE decks makes it a suitable upgrade for your lawn care equipment. Installation is straightforward, detailed instructions are provided in the manual, and the kit includes all the necessary hardware for a hassle-free setup.


-
 1
1
-
 2
2
-
 3
3
-
 4
4
-
 5
5
-
 6
6
-
 7
7
-
 8
8
-
 9
9
-
 10
10
-
 11
11
-
 12
12


Toro Recycler Kit, 60in TURBO FORCE Side Discharge Mower Installation guide
- Type
- Installation guide
- This manual is also suitable for
Toro Recycler Kit, 60in TURBO FORCE Side Discharge Mower is designed for efficient lawn mowing and side discharge of grass clippings. It provides a clean and precise cut, enhancing the appearance of your lawn. The kit includes baffles and kickers to ensure proper airflow and optimal grass discharge, ensuring a well-manicured lawn. Its compatibility with 60-inch TURBO FORCE decks makes it a suitable upgrade for your lawn care equipment. Installation is straightforward, detailed instructions are provided in the manual, and the kit includes all the necessary hardware for a hassle-free setup.
Ask a question and I''ll find the answer in the document
Finding information in a document is now easier with AI
Related papers
-
Toro 131-4183 Installation guide
-
-
-
-
Toro 42in Recycler Kit, Riding Mower User manual
-
-
-
Toro 42in Recycler Kit, 2007 and After Riding Mower Installation guide
-
-