VINYL SHUTTERS
installation instructions:
electric drill
1/4” & 11/64” drill bit
hammer
shutter fasteners
screws
TOOL & MATERIAL
CHECKLIST
IMPORTANT INFO
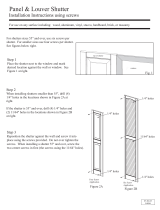
• FOR USE ON: Wood, aluminum, vinyl, stucco, hardboard, brick or masonry.
• For shutters up to 43”, use four shutter fasteners per shutter.
• For Shutters over 44”, use six shutter fasteners per shutter.
• NOTE: Shutters need room to expand/contract, be sure not to over tighten fasteners. To prevent shutters
from warping, proper installation must be followed. Wall anchors will be required for shutters installed on
any type of masonry.
• NOTE: To remove shutters, do not attempt to pull out the shutter-loks. Instead, simply slide a pair of snips
behind the shutter to cut the shutter-lok off at the shank.
SAFETY INSTRUCTIONS
Make sure to use the correct tools recommended.
Wear safety goggles.
Follow xture, power tools, and paint manufacturers’ instructions and users manuals.
Use common sense and follow good construction practices.
General Installation
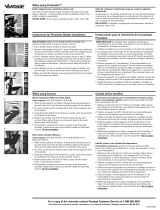
1. Place the shutter next to the window and mark desired location against
the wall or window.
2. Keep shutter fasteners aligned uniformly by drilling ¼” holes into the
shutter and 2½” into the wall. On brick, position holes over mortar joints.
Do not attach shutters at this time.
3. With the ¼” holes drilled into the shutter and wall, remove the shutter
from the wall. Enlarge the holes in the shutter by using a ¼” drill bit.
4. Reposition the shutter against the wall. Grasp the shutter fastener
supporting shank and push it through the shutter hole and into the wall
surface. Tap the shutter fastener gently with a hammer to snug the shut-
ter against the siding. Do not over tighten, or this will cause the shutter to
dimple. Repeat this step for all holes.
Board-N-Batten
1. Place the shutter next to the window and mark desired location against
the wall or window.
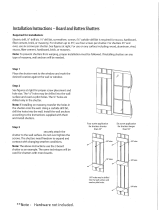
2. See gures at right for proper screw placement and hole size. The ¼”
holes may be drilled into the wall surface and used as pilot holes. The ¼”
holes are drilled only in the shutter.
Note: If installing on masonry, transfer the holes in the shutter onto the
wall. Using a carbide drill bit, drill the holes into the wall. Install the wall
anchors according to the instructions supplied with them and install
shutters.
3. Use the enclosed screws to securely attach the shutter to the wall
surface. Do not over tighten the screws. The shutters need freedom to
expand and contract with changing weather conditions.
Note: The above instructions use the 3 board shutter as an example.
The same techniques will be used for shutters with more boards.
We Can Help. Call (866) 607-0453
www.ekenamillwork.comIndustry leading manufacturer of urethane, PVC, wood, rustic, and metal millwork


