Page is loading ...

Panel & Louver Shutter
Installation Instructions using screws
top of shutter
window
Step 1
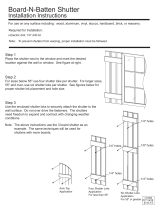
Place the shutter next to the window and mark
desired location against the wall or window. See
Figure 1 at right.
Fig. 1
Four Screw
Application
Six Screw
Application
07-02-03
I-0096
For use on any surface including: wood, aluminum, vinyl, stucco, hardboard, brick, or masonry.
1/4" holes
1/4" holes
11/64" holes
Step 3
Reposition the shutter against the wall and screw it into
place using the screws provided. Do not over tighten the
screws. When installing a shutter 55" and over, screw the
two center screws in first (the screws using the 11/64" holes).
1/4" holes
1/4" holes
Step 2
When installing shutters smaller than 55", drill (4)
1/4" holes in the locations shown in Figure 2A at
right.
If the shutter is 55" and over, drill (4) 1/4" holes and
(2) 11/64" holes in the locations shown in Figure 2B
at right.
For shutters sizes 55" and over, use six screws per
shutter. For smaller sizes use four screws per shutter.
See figures below right.
Figure 2A
Figure 2B
/


