Endurathane Wall Panels
Installation Guide
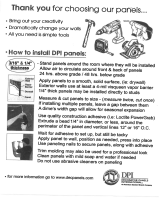
Tools Required
Circular saw or table saw, jigsaw or sabre saw, level,
measuring tape, chalk line, power or cordless drill, 4” drill
bits or extension, framing square or speed square, wood
rasp and fasteners. Please refer to the table below for
appropriate fastener.
Application for 1 1/4” Thick Panels
8” oc horizontally, three (3) rows along each siding panel,
one (1) row 1” from the top stone edge, one (1) row 1”
from the bottom stone edge, and one (1) row at the panel
center; at least two (2) fasteners from each row hit a stud
(1” edge distances). See Figure 1, specimen diagram.
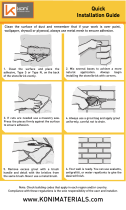
Preparation
Drywall/Wood Preparation – The wood or drywall must
be well attached to the framing studs. Make sure studs
are straight and true to avoid bulges or dips in the nished
wall. On existing structures make sure to remove any
loose siding and replace rotten wood or OSB. Scrape off
loose caulk. Remove all downspouts, light xture, vents
etc in the area to be covered with Endurathane Wall Panel.
Application for 1 1/2” Thick Panels
4” oc horizontally, three (3) rows along each siding panel,
one (1) row 1” from the top stone edge, one (1) row 1”
from the bottom stone edge, and one (1) row at the panel
center; at least three (3) fasteners from each row hit a
stud (1” edge distances). See Figure 2, specimen diagram.
Drywall/Wood Light Gauge Metal (20-25) Heavy Gauge Metal (18+)
Head - Flat Head - Bugle Head - Scavenger
Drive - #2 Phillips Drive - #2 Phillips Drive - #2 Phillips
Length - 2 1/2” Length - 2 5/8” Length - 2 5/8”
Diameter - #9 Gauge - #8 Gauge - #8
Point - Type 17 Point - Streaker Point - Drill
Thread Size - 11 TPI - 18 TPI - 18
Coating - Ruspert ™ Coating - Black/Gray Phosphate Coating - Black/Gray Phosphate
Head - Flat Head - Bugle Head - Bugle
Drive - #2 Phillips Drive - #2 Phillips Drive - #2 Phillips
Length - 2 1/2” Length - 2 5/8” Length - 2 5/8”
Diameter - #9 Gauge - #8 Gauge - #8
Point - Type 17 Point - Drill Point - Drill
Thread Size - 11 TPI - 18 TPI - 18
Coating - Ruspert ™ Coating -GrabberGard Coating - GrabberGard
Substrate
Interior InstallationExterior Installation