Page is loading ...

GrimmSpeed Install Guide Series
Installing the GrimmSpeed Universal Internal Wastegate Bracket
Updated 10/16/12
Introduction: This guide will illustrate the installation of the GrimmSpeed
Universal Internal Wastegate Bracket. The difficulty here is relatively low, so take
your time and enjoy the job!
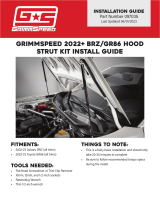
Tools: The tools listed below are suggested for this task (figure 1). Optional tools
are noted.
- 4.5mm Allen
- 7/16in wrench
- Whichever wrench you need to remove/install IWG bracket on your
particular turbo
Figure 1: Tools
Tips: If the c-clip on your turbo is very small, using a thin washer will ensure that
the GrimmSpeed rod end doesn’t slip off, allowing your IWG to leak. Also, a dap of
red Loctite will ensure that the machine screw holding your tensioner to the bracket
stays put.
7/16in Wrench
4.5mm Allen

Procedure:
1. Begin by collecting your tools and popping your hood. This’ll be quick!
2. If installed, remove your OEM internal wastegate. You’ll need to remove it from
both the wastegate flapper arm and the compressor housing.
3. Collect the parts to your GrimmSpeed Universal IWG Bracket and assemble
as shown below. Don’t worry too much about length, as you’ll adjust it once
mounted. Note that the tensioner assembly may be mounted on the top or
the bottom of the bracket, depending on your turbo fitment.
Figure 2: Included hardware
*4.5mm allen wrench not included

Figure 3: Assembled tensioner
Figure 4: Assembled bracket
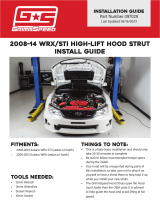
4. Next, install the complete assembly onto your turbo. Reusing the bolts that
held your OEM internal wastegate to the compressor housing, loosely install
the GrimmSpeed bracket. Now is the appropriate time to decide whether the
tensioner fits best on the top or the bottom of the bracket, depending on your

application. You can see on our MAP 20g that the tensioner fits better below
the bracket than above.
Figure 5: Installing bracket
5. Now we’ll tension and finish installation. The length of the tensioner is
adjusted by ½ turn at a time. With the mounting bracket slightly loose, set
the length of the tensioner such that it just fits over your stud, as shown
below. Using a 7/16in wrench, tighten the jam nut against the rod end to lock
the location of the threaded stud.
Install bracket bolts

Figure 6: Setting tension
Figure 7: Tighten tensioner to bracket
Tighten machine screw
Set tension

Figure 8: Tighten jam nut
Tighten jam nut

6. Reinstall the c-clip or pin onto your flapper arm stud. If your clip or pin is
very small, you may wish to use a thin washer to ensure that the tensioner
doesn’t slip off during use.
Figure 9: Install c-clip or pin
7. Reinstall the c-clip or pin onto your flapper arm stud. If your clip or pin is
very small, you may wish to use a thin washer to ensure that the tensioner
doesn’t slip off during use.
Reinstall c-clip or pin

Figure 10: Tighten compressor housing bolts
That’s it! You should be all set to go. If you notice that your IWG is leaking, check
your tension and shorten the tensioner if necessary.
Tighten two (2) bolts
/