Page is loading ...

Bioenno Power SC-4850JUD CC/CV Series User Manual
12V/24V/36V/48V CC/CV SOLAR CHARGE CONTROLLER FOR LFP
THIS CONTROLLER IS FACTORY SET FOR LITHIUM IRON PHOSPHATE BATTERIES
OVERVIEW
Thank you for choosing the Bioenno Power SC-4850JUD Series CC/CV Solar Charge Controller. Your
product comes in 50A Maximum Load Current and is designed to be used with Lithium Iron Phosphate
(also commonly known as LiFePO4 or LFP) batteries and can be additionally set for AGM and SLA. The
controller uses our proprietary CC/CV Constant Current/ Constant Voltage circuitry to ensure maximum
compatibility and performance with the Bioenno Power battery. Your Solar Charge Controller comes
equipped with an LCD display with a visual presentation of usage status for your solar system and
additionally features our smart technology chipset which allows your Solar Charge Controller to
automatically function at the correct mode of operation as well as the ability to manually adjust
between different modes of operation and load power delivery.

SPECIFICATIONS
Rated Voltage: 12V/24V/36V/48V
Maximum Load Current: 50A
Input Voltage Range: <50V*
Load Disconnect: 9.9V/11.2V/13.2V/14V (Depending on voltage of system)
Efficiency: 95%~97% (In optimum conditions)
Operation Temperature: -31°F to 131°F (-30°C to 50°C)
Dimensions: 7.95 in. x 5.19 in. x 2.41 in. (202 mm x 132 mm x 61 mm)
Weight: 1.61 lbs. (0.73 kg)
*Note: This solar charge controller can accept any voltage under 50V but it will not boost the voltage if the panel voltage is less
than the battery voltage. Make sure your panel voltage is higher than your battery voltage for optimum performance.
OPERATION PROCEDURE ORDER
1) Make sure the total rated current of the Solar Panel Array and Load are less than the rated
current of your Solar Charge Controller – in this case your maximum current is 50A
2) Make sure the polarity of the wiring from your Solar Panel Array, Battery and Load are
correctly matched to prevent the risk of a short circuit which may damage unprotected
devices
3) Mount you Solar Charge Controller to your selected surface and fasten it securely using
screws
4) Check whether the Battery voltage and Solar Panel Array voltage is within the requested
range
5) Loosen the screw terminals on your Solar Charge Controller – there are 6 screw terminals
total from left to right in this order: Solar Panel Positive, Solar Panel Negative, Battery
Positive, Battery Negative, Load Positive and Load Negative
6) Connect the Battery’s input to your Solar Controller using the two screw terminals in the
middle marked with the Battery pictogram, you may need an adapter – attach the wiring
securely but do not over-torque your Solar Charge Controller’s terminals
7) Connect your Load to your Battery’s output using the Battery as the buffer between the
Solar Panel Array and the Load (we DO NOT recommend using the Load Terminals for most
uses) – attach the wiring securely but do not over-torque your Solar Charge Controller’s
terminals
8) Connect the Solar Panel Array to the Solar Panel Input on your Solar Charge Controller using
the two screw terminals on the left marked with the Solar Panel pictogram – attach the
wiring securely but do not over-torque your Solar Charge Controller’s terminals
9) Your Solar Charge Controller should assume standard operation herein

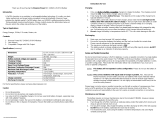
VARIABLE VOLTAGE/HIGH CURRENT DISPLAY
STATUS CODES
INDICATOR
STATE
DESCRIPTION
MEANING
CHARGE/
PANEL
No Icons
PANEL OFF, FUNCTION ICON OFF
No Solar Panel detected
Panel Icon On
Function Icon Off
PANEL ICON ON, FUNCTION ICON
NOT INDICATING
Solar charging stopped
Panel Icon On
Function Icon On
PANEL AND FUNCTION ICON ON,
BATTERY ICON IS SCROLLING
Solar Panels are
charging Battery
LOAD
Function Icon On
Light Bulb Icon On
BOTH INDICATORS ARE ON SOLID
Load is ON
Function Icon Flashing
Light Bulb Icon On
LOAD INDICATOR ON, FUNCTION
INDICATOR FLASHING
Load is OFF
BATTERY
Battery Icon Empty
NO BARS
Battery requires
charging
Battery Icon Scrolling
SCROLLING BARS
Battery is charging
Battery Icon Full
FULL BARS, NO SCROLLING
Battery is fully charged
INDICATOR ICONS
Solar Panel: Solar Panel (icon may be solid or flashing depending on current usage or situation)
Battery: Battery (icon may be solid, scrolling or empty depending on current usage or situation)
Load: Light Bulb (icon may be solid or flashing depending on current usage or situation)
Function: Arrow (icon may be solid or flashing depending on current usage or situation)

SCREEN, INTERFACE AND FUNCTION PARAMETERS

FAULTS AND REMEDIES
MANUAL MODE RESET/OVERRIDES
This unit has multiple programmed settings for 12V only, 24V only, 36V only, 48V only and AUTO – the
AUTO setting is the recommended setting as it will accommodate for all voltages.
1. Press Menu Button (Left Button) to cycle to 48V
2. Hold down Menu Button for 5 seconds or until display begins flashing
3. Toggle ON/OFF/DOWN Button (Right Button) and cycle to AUTO (recommended setting) or
other settings depending on your application
4. Hold down Menu Button for 5 seconds and wait for unit to reboot in correct mode
*For AGM/SLA Battery modes, please contact us below for instructions on the proper override sequence
to change the mode on your unit.
ERROR CODE
PHENOMENON
REMEDY
E01
BATTERY LOW VOLTAGE
CHECK OPERATION MODE,
CONFIRM OPERATION MODE IS
SET DEFAULT TO “AUTO” OR SET
TO CORRECT VOLTAGE IF YOU
ALREADY HAVE A SPECIFIC
SYSTEM ASSEMBLED
E02
OVERLOAD, LOAD IS OFF
DECREASE LOAD
E03
SHORT CIRCUIT, LOAD IS OFF
REMOVE BATTERY AND LOAD,
CONFIRM THERE IS NO REVERSE-
POLARITY, RE-ATTACH IN
CORRECT CONFIGURATION
E04
OVERVOLTAGE ON BATTERY,
LOAD IS OFF
CHECK BATTERY, CONFIRM
BATTERY IS APPROPRIATELY
SIZED FOR APPLICATION
E05
OVERCURRENT ON SOLAR
PANEL, CONTROLLER HAS
STOPPED CHARGING
CHECK PANEL OUTPUT, LOWER
PANEL OUTPUT IF TOO HIGH
*Note: In the event of a short circuit, your Solar Charge Controller trip an auto-reset fuse – disconnect load immediately, let it
stand for 10-20 minutes, the internal fuse will automatically reset during this period. Before resuming operation, confirm your
load does not exceed the 30A Maximum Load Current of your Solar Charge Controller.

Contact Us
Mail: Bioenno Power E-mail: sale@bioennopower.com
3657 W. McFadden Ave. Phone: +1 888 336-7864
Santa Ana, California 92704
/