Round heads of
bolts outside
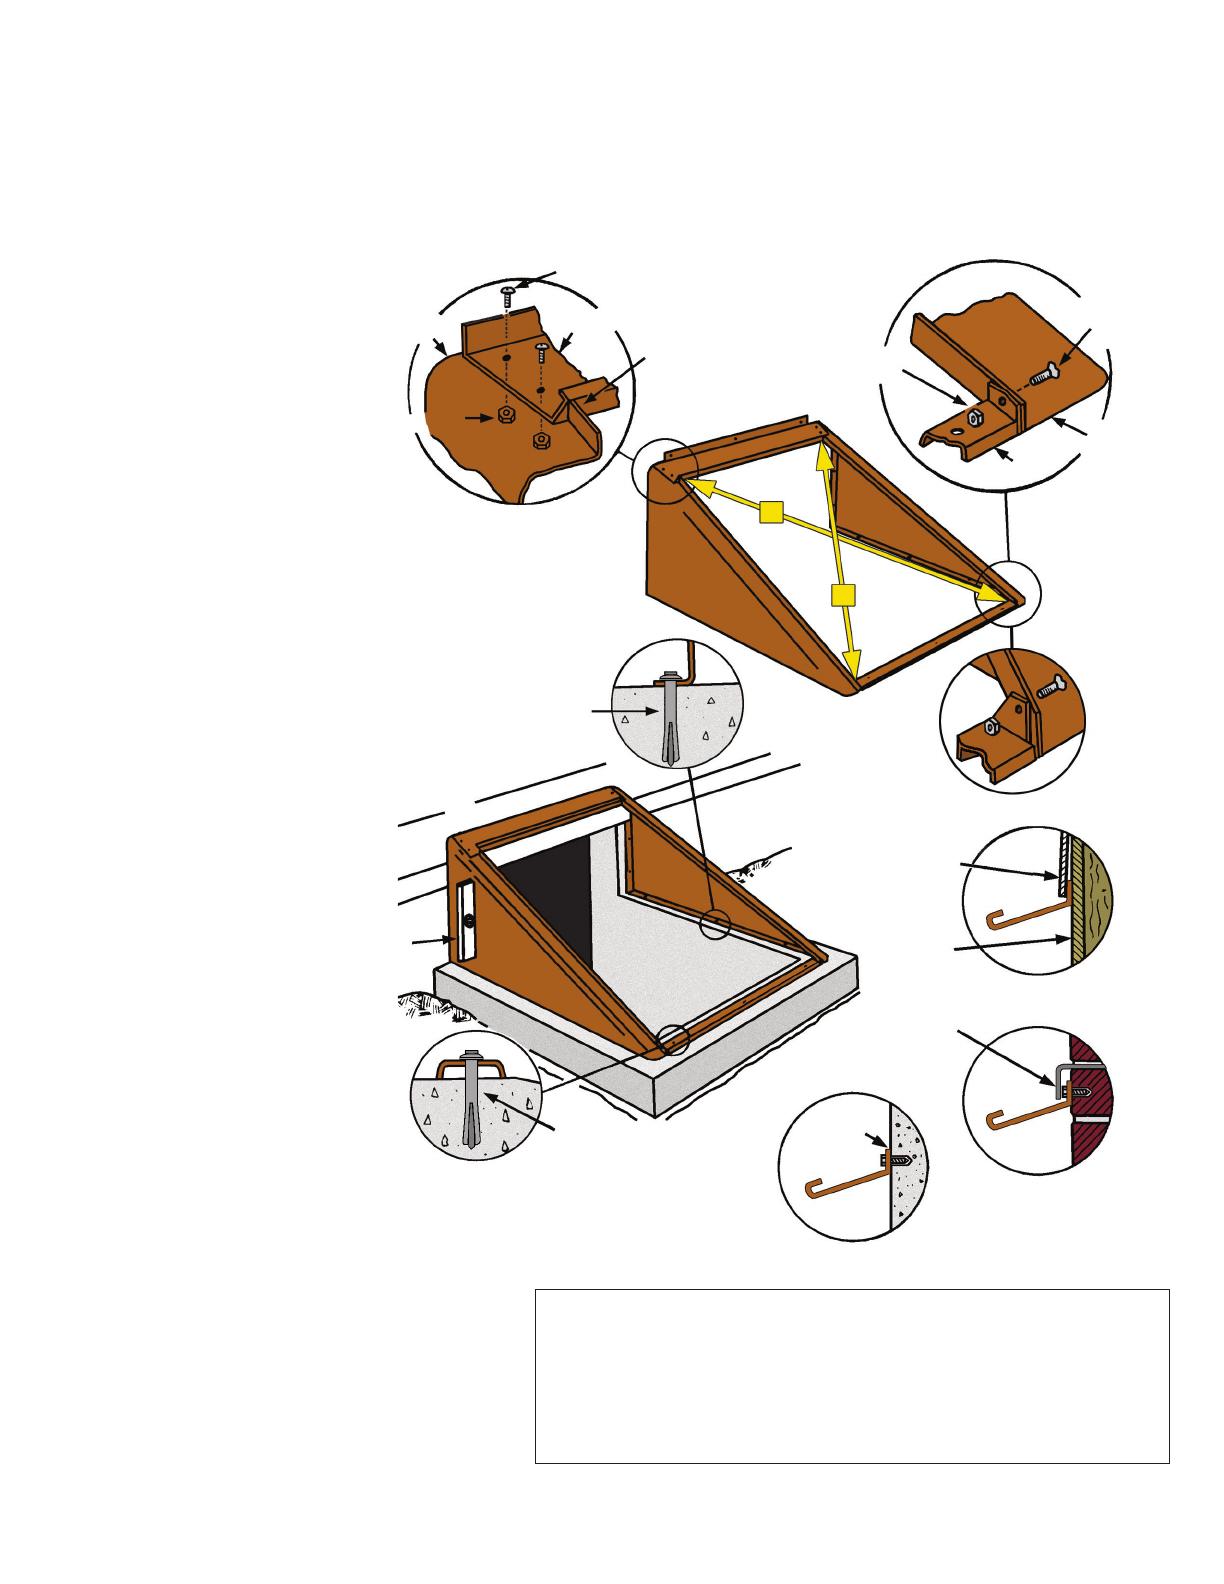
IMPORTANT:
Caulk vertical seam
between header
and side piece on
both sides
Left
side piece
Round
heads of bolts
outside
Header
Nuts under
Nuts
inside
Sill
Right side
piece
FRAME
CONSTRUCTION
MASONRY
CONSTRUCTION
#1A
#1B
Sill
Drill 1/4” anchor holes
and secure side piece
ange to concrete with
nail driven anchors
Shingle or
Clapboard
Size SL Door:
Position Sill
so that sloped
edge of mounting
tabs are towards
the house
Header
Sheathing
Flashing
(by others)
Caulk
#2B
Level
#2A
Header
Header
A
B
Drill 1/4” anchor
holes and secure sill
to concrete with three
nail driven anchors
#1
Before installing the door, verify that
you have all the parts shown and that
you have the tools required for instal-
lation, which are listed on page 1 of
these instructions. If you are replacing
an existing door, mix a small batch of
concrete and patch any holes in the
present concrete caused by the anchors
that held the old door in place.
STEP 1: Frame Assembly: The BILCO
basement door consists of six parts (the
names of the parts are on page 1) plus
a set of gas spring operators, and the
hardware* packed with this instruction
sheet. Start frame assembly by attaching
header to side pieces with four round
head bolts as shown in Figure #1A.
The header must rest on top of the side
pieces, with heads of bolts outside and
nuts below. Tighten bolts with wrench to
complete header installation.
Next, attach sill to side pieces using two
round head bolts as shown in Figure #1B.
It is essential that the heads of bolts are
on the outside and the nuts are inside
as shown.
STEP 2: Anchoring the door frame to
the house and areaway foundation:
Move assembled door frame into place
on foundation areaway. Make sure the
vertical edge of side pieces are ush
against the house. For replacement
applications, siding may need to be
removed and replaced to position door
frame properly. Place a level against
each side piece and check plumb
as shown in Figure 2A. Square door
by measuring diagonal dimensions
as shown in Figure 1. Shift frame as
required until measurements A and B
are equal.
With the door plumb and square, mark
all anchor hole locations on foundation
areaway and wall with pencil or marker.
Remove frame from areaway and drill all
masonry holes. Use a 1/4” bit for the side
panel anchor holes and a 1/4” bit for the
sill anchor holes. Once all anchor holes
are drilled, reposition the frame on the
areaway and anchor each side piece to
areaway foundation using (3) 1/4” x 2”
nail driven anchors provided as shown
in Figure 2A. Anchor the sill to areaway
foundation using (3) 1/4” x 2” nail driven
anchors provided.
Page 2
Installing the door on an areaway that is smooth, level and
properly sized to t the door
The BILCO basement door will shed water in all normal conditions only when installed and caulked in accordance with these instructions.
If there are no rain gutters above, a diverter must be installed to prevent roof water from owing directly onto the door. If the foundation areaway
that you are installing the door on is not smooth and level, or does not t the door properly, see the bottom of page 3 of these instructions.
*Hardware
(6) 1/4” x 1/2” round head bolts & nuts
(9) 1/4” x 2” nail driven anchors
(4) 5/16” x 1-1/4” hinge & cotter pins
(2) Lower spring brackets
(4) 5/16” x 3/4” bolts & nuts
(1) Pair of gas springs & fasteners
(4) Rubber bumpers
Finish anchoring vertical ange and header to wall using the
appropriate fasteners for the wall construction as shown in
Figure 2B. (Note: these fasteners are not included in the
hardware package).
When anchoring is complete, replace shingles as required
and caulk all around the exterior of the frame where it meets
the masonry with polyurethane caulk (opaque). (Do not caulk
using mortar).
IMPORTANT: Caulk vertical seams between header and side pieces as shown in Figure #1A.
Note: 5/16” fasteners are not used on doors with torsion rod lift assistance


