American Standard Mirror with Medicine Cabinet 6771 User manual
- Type
- User manual
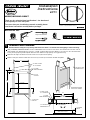
American Standard Mirror with Medicine Cabinet 6771 is designed to provide ample storage space for your bathroom essentials and enhance the functionality of your bathroom. With its sleek and modern design, it seamlessly complements any bathroom décor.
The mirror features adjustable hinges, allowing you to customize the viewing angle for optimal convenience. The included glass shelves offer ample space to organize your toiletries, cosmetics, and other bathroom items, keeping them within easy reach.
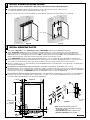
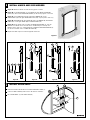
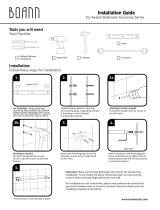
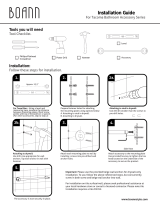
The medicine cabinet is constructed from durable materials to ensure longevity and provide reliable performance. The installation process is straightforward, and the included instructions guide you through each step to ensure proper mounting.
American Standard Mirror with Medicine Cabinet 6771 is designed to provide ample storage space for your bathroom essentials and enhance the functionality of your bathroom. With its sleek and modern design, it seamlessly complements any bathroom décor.
The mirror features adjustable hinges, allowing you to customize the viewing angle for optimal convenience. The included glass shelves offer ample space to organize your toiletries, cosmetics, and other bathroom items, keeping them within easy reach.
The medicine cabinet is constructed from durable materials to ensure longevity and provide reliable performance. The installation process is straightforward, and the included instructions guide you through each step to ensure proper mounting.


-
 1
1
-
 2
2
-
 3
3
-
 4
4


American Standard Mirror with Medicine Cabinet 6771 User manual
- Type
- User manual
American Standard Mirror with Medicine Cabinet 6771 is designed to provide ample storage space for your bathroom essentials and enhance the functionality of your bathroom. With its sleek and modern design, it seamlessly complements any bathroom décor.
The mirror features adjustable hinges, allowing you to customize the viewing angle for optimal convenience. The included glass shelves offer ample space to organize your toiletries, cosmetics, and other bathroom items, keeping them within easy reach.
The medicine cabinet is constructed from durable materials to ensure longevity and provide reliable performance. The installation process is straightforward, and the included instructions guide you through each step to ensure proper mounting.
Ask a question and I''ll find the answer in the document
Finding information in a document is now easier with AI
Other documents
-
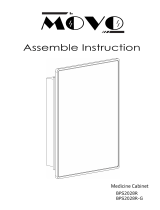 MOVO BPS2028R Installation guide
-
Taylor Technologies K-9780 Owner's manual
-
 DANYA B BR170434WH Operating instructions
-
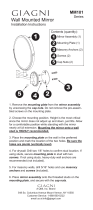
 Giagni MM101-ORB Installation guide
-
 Giagni MM101-ORB Installation guide
-
WaterWorks HGPH31 Installation guide
-
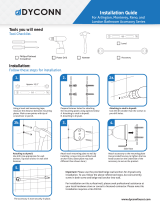 Dyconn Faucet BATPH-CHR Installation guide
-
Dyconn BLN4SET24-ORB Operating instructions
-
 BOANN BNAS4PK24 Installation guide
-
 BOANN BNBATPH Installation guide


