Copyright © 2014 Ruckus Wireless, Inc. Page 2 of 4
Published September 2014, Part Number 800-70633-001 Rev B
STEP 4: LOG INTO THE AP
As specified earlier, the AP should be directly connected to
your computer (through one of the Ethernet ports) and
powered on, ready for setup.
1 On your computer, open a Web browser window.
2 In the browser, type this URL to connect to the AP:
https://192.168.0.1
3 Press <Enter> to initiate the connection. When a secu-
rity alert dialog box appears, click OK/Yes to proceed.
4 When the Ruckus Wireless Admin login page appears,
enter the following:
• Username: super
• Password: sp-admin
5 Click Login.
STEP 5: CUSTOMIZE THE WIRELESS SETTINGS
1 On the Web interface menu, click Configuration >
Radio 2.4G or Configuration > Radio 5G. The
Configure :: Wireless :: Common options appear.
2 Verify that the following options are active:
• Channel: SmartSelect
• Country Code: If you are not located in the United
States, select your current country.
3 Click Update Settings if you made any changes.
4 Click any of the “Wireless #” tabs at the top of the page.
5 In Wireless Availability, click Enabled.
6 Delete the text in the SSID field, then type a name for
your network that will help your users identify the AP in
their wireless network connection application.
7 Click Update Settings to save your changes.
8 Repeat Steps 4-7 for each Wireless # interface that you
want to enable.
9 Click Logout to exit the Web interface.
10 When the Ruckus Wireless Admin login page reappears,
you can exit your browser.
11 Disconnect the AP from the computer and from the cur-
rent power source, and then restore your computer to its
original network connection configuration.
STEP 6: PLACE THE AP IN YOUR SITE
1 Move the AP to its permanent location (accessible to
both power and network connections). Refer to
(Optional) Mounting Instructions
for physical installation.
2 Use an Ethernet cable to connect the PoE port to the
appropriate device:
• The ISP’s or carrier’s network device
• The Ethernet switch that is connected to the ISP’s or
carrier’s network device
3 Connect the AP power adapter (or PoE power supply) to
the AP, then to a convenient power source.
4 Verify that the PoE port LED is lit.
After a short pause to re-establish the Internet connection,
you can test the AP.
STEP 7: VERIFY THE INSTALLATION
1 Using any wireless-enabled computer or mobile device,
search for and select the wireless network you previously
configured.
2 If you can connect, open a browser and link to any public
Web site.
Congratulations! Your wireless network is active and ready
for use.
FOR MORE INFORMATION
You can now use the wireless network to log into the AP’s
Web interface. For information on how to configure the AP,
refer to the Ruckus Wireless ZoneFlex Indoor Access Point
User Guide.
(OPTIONAL) MOUNTING INSTRUCTIONS
The R600 can be mounted to a T-bar, wall or ceiling a using
the enclosed mounting kits. Refer to the following sections:
• Mounting on a Flat Surface
• Mounting on a Recessed Drop-Ceiling T-Bar
• Mounting on a Flush Drop-Ceiling T-Bar
• Mounting on a Truss or Pole
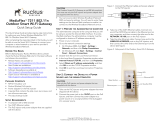
Mounting on a Flat Surface
1 Use the Mounting Template on the last page of this
Quick Setup Guide as a template to mark the locations
for drill holes on the mounting surface. There are two
sets of keyholes available on the AP. One allows the AP
to be mounted to a wall or ceiling. The other allows the
R600 to be mounted to an accessory bracket (not
included).
2 Use a 5mm drill bit to drill holes approximately 25mm
into the mounting surface (A in Figure 3
).
3 Insert the anchors and mounting screws into the mount-
ing surface, leaving approximately 1/4” (6 mm) of the
screw heads protruding for the AP enclosure.
4 Insert the unit removal pin into the hole on the side of
the AP to release the locking mechanism (B in Figure 3
).
5 Place the AP onto the mounting screws so that the screw
heads enter the mounting holes on the AP enclosure,
and push the AP down to lock in place.
6 Remove the unit removal pin to release the locking
mechanism and secure the AP.
7 To remove the AP, insert the unit removal pin into the
hole on the side of the AP to unlock, then push the AP up
to release the AP enclosure from the mounting screws.
Figure 3. Flat surface mounting
Default AP Settings (For Your Reference)
Network Names (SSIDs) Wireless1—Wireless8
(2.4GHz radio)
Wireless9—Wireless16 (5GHz
radio)
Security (Encryption method) Disabled for each wireless
interface
Default Management IP
Address
192.168.0.1
Optional: If You Want To Switch from DHCP (Default):
If you anticipate logging into the AP regularly to perform
monitoring or maintenance once it is in place, you may want
to consider assigning a static IP address to the AP.
In a default AP configuration, the AP uses a DHCP-
assigned IP address.
A. On the menu, click Configuration > Internet.
B. Click the
Static IP option.
C. Fill in the
IP Address and Mask fields.
D. Click Update Settings to save your changes.
Note: If you will be using PoE, then you will need a Cat 5e
(or better) Ethernet cable to connect the AP to the PoE
injector or switch.