
THANK YOU
We appreciate the trust and confi dence you have placed in ETi Solid State Lighting, Inc. through the purchase of this LED product.
Visit us online to see our full line of products. Thank you for choosing ETi!
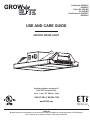
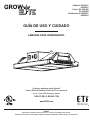
USE AND CARE GUIDE
INDOOR GROW LIGHT
Questions, problems, missing parts?
Call ETiSSL Customer Service
8 a.m. - 5 p.m., CST, Monday - Friday
1-855-ETI-SSLI (1-855-384-7754)
www.ETiSSL.com
Ordering # 55402161
55403161
Part # GL-250-MV
GL-500-MV
Certifi cation # 55402161
55403161

2
Table of Contents
Table of Contents . . . . . . . . . . . . . . . . . . . . . . . . . . . . . . . . . . . 2
Safety Information . . . . . . . . . . . . . . . . . . . . . . . . . . . . . . . . . . 2
Warranty . . . . . . . . . . . . . . . . . . . . . . . . . . . . . . . . . . . . . . . . . . 2
Pre-Installation . . . . . . . . . . . . . . . . . . . . . . . . . . . . . . . . . . . . . 3
Planning Installation . . . . . . . . . . . . . . . . . . . . . . . . . . . . . . . 3
Tools/Hardware Required . . . . . . . . . . . . . . . . . . . . . . . . . . . . 3
Package Contents . . . . . . . . . . . . . . . . . . . . . . . . . . . . . . . . . 3
Additional Parts Available to Purchase . . . . . . . . . . . . . . . . . 3
Installation . . . . . . . . . . . . . . . . . . . . . . . . . . . . . . . . . . . . . . . . 4
Care and Cleaning . . . . . . . . . . . . . . . . . . . . . . . . . . . . . . . . . . 6
Troubleshooting . . . . . . . . . . . . . . . . . . . . . . . . . . . . . . . . . . . . 6
Safety Information
WARNING: Carefully read and understand the information
given in this manual before beginning the assembly and
installation. Failure to do so so could lead to electric shock,
fi re, or other injuries which could be hazardous or even fatal.
WARNING: Ensure the electricity to the wires you are
working on is shut off. Either remove the fuse or turn off the
circuit breaker.
WARNING: This product must be installed in accordance
with the applicable installation codes by a person familiar with
the construction and operation of the product and the hazards
involved.
WARNING: Risk of electrical shock. To reduce the possibility
of serious injury, always take the proper precautions and
unplug the fi xture before moving or cleaning.
CAUTION: To prevent eye damage, avoid looking directly at
the unshielded LEDs.
CAUTION: Ensure the fuse or circuit breaker provides
suffi cient amperage for the 105°C rated power cord.
NOTICE: Suitable for operation in ambient temperatures not exceeding
45°C/113°F. The temperature of the environment should be controlled
via a mechanical ventilation system, cooling system, or other means
to ensure the temperature within the growing space remains below
45°C/113°F when the Grow Light is in operation.
NOTICE: This equipment has been tested and found to comply with the
limits for a Class B digital device, pursuant to Part 15 of the FCC Rules.
These limits are designed to provide reasonable protection against harmful
interference in a residential installation.
This equipment generates, uses and can radiate radio frequency energy
and, if not installed and used in accordance with the instructions, may
cause harmful interference to radio communications. However, there is
no guarantee that interference will not occur in a particular installation.
If this equipment does cause harmful interference to radio or television
reception, which can be determined by turning the equipment off and on,
the user is encouraged to try to correct the interference by one or more of
the following measures:
□ Reorient or relocate the receiving antenna.
□ Increase the separation between the equipment and the receiver.
□ Connect the equipment into an outlet on a circuit different from that to
which the receiver is connected.
□ Consult the dealer or an experienced radio/TV technician for help.
WARNING: Changes or modifi cations not expressly approved
by the party responsible for compliance could void the user’s
authority to operate the equipment.
Warranty
This product is warranted for a period of 5 years from the date of original purchase against defects in materials and workmanship. If this
product should fail to operate due to defects in material or workmanship within 60 months of purchase, see www.ETiSSL.com for details.
This product will be repaired or replaced, at ETi’s option. This warranty is expressly limited to repair or replacement of product and liability
for direct, incidental, or consequential damages is hereby expressly excluded. Some states do not allow exclusions of direct, incidental or
consequential damages, so the above limitation of exclusion may not apply to you. This warranty gives the consumer specifi c legal rights,
which vary from state to state.
WARRANTY IS VOID IF PRODUCT IS NOT USED FOR THE PURPOSE WHICH THIS PRODUCT IS MANUFACTURED.

3 WWW.ETiSSL.COM
Please contact 1-855-384-7754 or further assistance.
Pre-Installation
PLANNING INSTALLATION
Before beginning assembly, installation or operation of product, make sure all parts are present. Compare parts with the package
contents list. If any part is missing or damaged, do not attempt to assemble, install or operate the product. Contact customer service for
replacement parts.
NOTE: Keep your receipt and these instructions for proof of purchase.
If you are unfamiliar with electrical installations, we recommend you contact a qualifi ed electrician to do the installation.
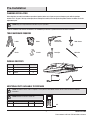
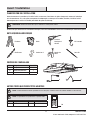
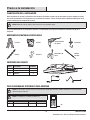
TOOLS/HARDWARE REQUIRED
Ladder Gloves
Power Drill
with drill bits
Hook Screws
Chains S hooks Cord clips Cable ties
PACKAGE CONTENTS
Part Description Quantity
A Grow Light 1
B Power Cable 1
C V Hook 2
A
ADDITIONAL PARTS AVAILABLE TO PURCHASE
NOTE: The remote control is sold as a separate accessory. Please contact ETiSSL Customer Service 1-855-384-7754 for additional
information.
NOTE: Hardware not shown to actual size.
Part Description Quantity Model #
AA Remote Control 1 90600366
AA
BC

4
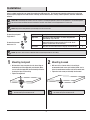
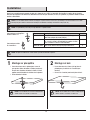
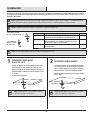
1
Mounting to drywall
□ Drill two holes large enough to clear the closed fl aps of
the butterfl y nut on the toggle bolt (not included). Make
sure to fasten the toggle bolt into the butterfl y nut before
inserting the fl aps into the ceiling.
□ Tighten the toggle bolt.
Installation
Select a suitable location that can support the weight of the LED Grow Light. The light must be mounted a minimum of 8 inches from
adjacent lighting equipment and from materials including, but not limited to, walls, ceilings, movable partitions, and other combustible
materials.
NOTE: When determining the desired location for suspension mounting the light fi xture, make sure the light fi xture is located directly below
the electrical outlet and that the distance between the electrical outlet and the end of the light fi xture is less than 10 ft.
NOTE: Separate mounting hardware (not included) not shown to actual size.
2
Mounting to wood
□ Drill two 1/16 in. diameter holes in the ceiling to
accommodate hook screws (not included). Make sure to
fasten the combo wood-machine end into the metal hook.
□ Tighten the hook screw (not included) into the wood.
For mounting to drywall:
Toggle bolt x 2
Part Description Quantity
Toggle Bolts Consisting of a No. 10-24 bolt 2-7/8 inches long with two
tapered wings 1 by 5/16 inch.
2
Studs Measuring 1-3/4 inches overall and having 1-1/4 inches of
wood screw threads on one end and at least six No. 10-24
machine screw threads on the other end.
2
Metal Hooks With a No. 10-24 threaded hole that engages the bolt threads. 2
For mounting to wood:
Hook screw x 2
NOTE: Eye hooks can be used as an alternate method of attaching the fi xture to the ceiling.
NOTE: If using eye hooks in the ceiling instead, attach
the chain to the eye hooks with S hooks.
NOTE: If using eye hooks in the ceiling instead, attach
the chain to the eye hooks with S hooks.

5 WWW.ETiSSL.COM
Please contact 1-855-384-7754 or further assistance.
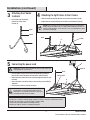
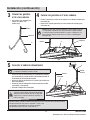
4
Attaching the light fi xture to the V hooks
□ Slide the V hook (C) through the holes on one side of the Grow Light (A).
□ Repeat with the second V hook (C) on the other end of the Grow Light (A).
NOTE: Product should be suspended using metal chain and hooks with weight
bearing capacity exceeding 22 lbs. for ordering number 55402161 and 31 lbs. for
ordering number 55403161. S hooks must be ≤ 0.1 in. (2.5 mm) diameter to fi t the
holes in the grow light (A).
Installation (continued)
3
Attaching the V hooks
to chains
□ Use S hooks (not included) to
connect the chains to the
V hooks (C).
5
Connecting the power cord
NOTE: Make sure the distance between the electrical outlet and the end
of the light fi xture is less than 10 ft.
□ Plug the power cord (B) into the end of the grow light (A) and then
plug the other end of the power cord (B) into an electrical outlet.
□ Attach the power cord to the chains (not included) with cable ties (not
included).
□ Secure the power cord to the ceiling using cord clips (not included), if
applicable.
□ Use the power switch to activate the fi xture.
CAUTION: When suspension mounting, make sure
the light fi xture is located directly below the electrical
outlet. Excess cord should be secured to the chains (sold
separately) with cable ties (not included).
NOTICE: Once installed, the electrical cord should be visible over its entire 10 ft. length and:
□ Should not be concealed or extended through a wall, fl oor, ceiling, or other parts of the building structure.
□ Should not be located above a suspended ceiling or dropped ceiling.
□ Should not be permanently affi xed to the building structure.
□ Should not be subject to strain or possible physical damage.
S Hook
C
Power switch
B
C
A
A
S Hook
Chain
Chain
Chain
Cable Tie

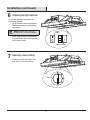
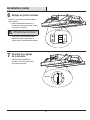
6
6
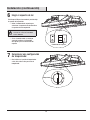
Choosing the light spectrum
This LED grow light allows you to choose the
preferred light spectrum.
□ Flip the spectrum switch to select either the
Flowering light spectrum or the Vegetating
light spectrum.
NOTE: This fi xture can be connected to
GrowElite remote control model # 90600366.
□ Set the spectrum switch to Remote Control
if using the Remote Control (sold separately)
for full spectrum control.
7
Selecting a timer setting
□ Turn the arrow on the Timer knob to 2 Hrs,
4 Hrs, 6 Hrs, or 8 Hrs to start the timer.
Installation (continued)
Power
switch
Spectrum Switch
Timer
Remote
control
Flower
Veg

7 WWW.ETISSL.COM
Please contact 1-855-384-7754 or further assistance.
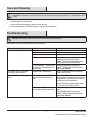
Care and Cleaning
CAUTION: Before attempting to clean the fi xture, disconnect the power to the fi xture by turning the breaker off or removing the fuse from the
fuse box.
□ Clean the fi xture with a soft, dry cloth.
□ Do not use cleaners with chemicals, solvents, or harsh abrasives.
□ Do not use liquid cleaner on the LEDs, LED driver, or wiring inside the light fi xture.
Troubleshooting
WARNING: Before doing any work on the fi xture, disconnect power to the light fi xture.
Minor problems often can be fi xed without the help of an electrician.
Problem Possible Cause Solution
The fi xture will not light. The power is off. Ensure the power supply is on.
The circuit breaker is off. Ensure the circuit breaker is in the on position.
There is a defective switch. Contact a qualifi ed electrician.
The power cord is loose. Remove the power cord from the outlet. Ensure
the power cord is fi rmly inserted into the
GrowElite
TM
light fi xture and then plug the other
end of the power cord back into the outlet.
If using the GrowElite
TM
Remote Control,
the grow light is not connected to the
remote control.
Review the troubleshooting section of the
GrowElite
TM
Remote Control Instruction Manual -
model number 90600366.
The fuse blows or the circuit breaker
trips when the light is turned on.
The power cord is grounding out. Contact a qualifi ed electrician or call customer
service 1-855-384-7754.
The timer does not turn the grow light on
and off.
If using the timer on the GrowElite
TM
Grow Light, the fi xture needs to be
reset.
Turn the GrowElite
TM
light fi xture off. Make sure the
Spectrum Switch is on Flower or Veg and then turn
the light back on. Turn timer dial to 2 hrs to test if
the light stays on for the 120 minutes.
Contact ETi Solid State Lighting customer service
at 1-855-384-7754 for further assistance.
If using the GrowElite
TM
Remote Control,
the Grow Light settings are not correct.
Make sure the Spectrum Switch is set to Remote
Control.
Review the troubleshooting section of the
GrowElite
TM
Remote Control Instruction Manual -
model number 90600366.

Questions, problems, missing parts?
Call ETiSSL Customer Service
8 a.m. - 5 p.m., CST, Monday - Friday
1-855-ETI-SSLI (1-855-384-7754)
www.ETiSSL.com
Retain this manual for future use.
Page is loading ...
Page is loading ...
Page is loading ...
Page is loading ...
Page is loading ...
Page is loading ...
Page is loading ...
Page is loading ...
Page is loading ...
Page is loading ...
Page is loading ...
Page is loading ...
Page is loading ...
Page is loading ...
Page is loading ...
Page is loading ...
-
 1
1
-
 2
2
-
 3
3
-
 4
4
-
 5
5
-
 6
6
-
 7
7
-
 8
8
-
 9
9
-
 10
10
-
 11
11
-
 12
12
-
 13
13
-
 14
14
-
 15
15
-
 16
16
-
 17
17
-
 18
18
-
 19
19
-
 20
20
-
 21
21
-
 22
22
-
 23
23
-
 24
24


Eti 55402161 Operating instructions
- Type
- Operating instructions
- This manual is also suitable for
Ask a question and I''ll find the answer in the document
Finding information in a document is now easier with AI
in other languages
- français: Eti 55402161 Mode d'emploi
- español: Eti 55402161 Instrucciones de operación
Related papers
-
Eti 55403161 Installation guide
-
-
-
-
-
Eti 564212420 User guide
-
-
-
-
Eti 56574142 User guide
Other documents
-
Stonco Slim Flood LED (TF) Install Instructions
-
 Commercial Electric 54599191-A-2PK Installation guide
-
 Rivet 51391 User manual
-
 SILENTAIRE 559011010 Operating instructions
-
 Pixi PTC14A1C Installation guide
-
Signature Hardware 479853 BALIDO Pendant User manual
-
Signature Hardware 479860 User manual
-
Good Earth Lighting GL1328-AL3-14LFC Operating instructions
-
Defiant TM-016-A User manual
-
 Commercial Electric 2011001502 Operating instructions


