Page is loading ...

Metra. The World’s Best Kits.
®
MetraOnline.com © COPYRIGHT 2020 METRA ELECTRONICS CORPORATION REV. 6/2/20 INST95-HDIF
INSTALLATION INSTRUCTIONS
95-HDIF
Attention! Let the vehicle sit with the key
out of the ignition for a few minutes before
removing the factory radio. When testing the
aftermarket equipment, ensure that all factory
equipment is connected before cycling the
key to ignition.
KIT FEATURES
• ISO DDIN radio provision
• Complete inner fairing for a factory look
• Stainless steel hardware
• Painted high-gloss black
Note: Intended for use with 6.5” or 6.75” aftermarket speakers
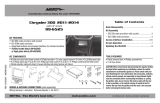
KIT COMPONENTS
• A) Inner fairing • B) Radio bracket with spacers • C) Speaker grilles • D) Speaker rings • E) (8) #8 x 5/8” Phillips screws • F) (8) #8-32 machine screws
• G) (8) #8-32 nuts • H) (8) #8 washers
TOOLS REQUIRED
Panel removal tool • Snap-ring pliers
• Phillips screwdriver • 5/16” socket wrench
• T25, T27 Torx screwdriver
• 3/16”, 5/32” Allen (hex) wrench
• 1/2”, 7/8”, 9/16” open ended wrench
TABLE OF CONTENTS
Fairing Disassembly........................................... 2-5
Kit Preparation ................................................... 6-7
Kit Assembly ..........................................................7
WIRING & ANTENNA CONNECTIONS
(sold separately)
Wiring Harness: 70-9800
Antenna Adapter: not required
Steering wheel control interface: ASWC-1
A B C D
E F
HG
Harley Davidson FLH (batwing fairing) 1998-2013

1.800.221.0932
|
MetraOnline.com
2
Attention! Due to how involving it is to
remove the fairing, it is highly advisable
to read the steps beforehand to get a clear
understanding of what is to be expected. If
the process seems too complex, it is best to
seek a professional to perform this job. Also,
it would be best if pictures are taken during
the process, and all hardware bagged and
tagged. Take notice also how the factory
wiring is routed throughout the fairing. This
will have to be duplicated in reassembly.
1. Remove (4) T27 Torx screws from the
inner fairing. (Figure A)
2. Remove (3) T27 Torx screws securing the
outer fairing, removing the middle one
last. Once the middle screw is removed
the outer fairing will be loose. Take
caution not to drop the outer fairing and
windshield. (Figure B)
FAIRING DISASSEMBLY
3. Unplug the headlight, then remove the
outer fairing. (Figure C)
4. Remove (4) 3/16 Allen screws securing
the radio. Unplug the radio, then slide
the radio out toward the rear of the bike.
(Figure D)
5. Unplug the left and right turn signal
indicators.
Continued on the next page
(Figure B) (Figure D)
(Figure A) (Figure C)

REV. 6/2/2020 INST95-HDIF
3
(Figure F)
(Figure G)(Figure E)
6. Remove (4) connectors attached to the
fairing support brace by sliding them
off. (Figure E)
7. Remove (2) screws securing each fairing
support brace; 3/16” Allen screw towards
the inside, T25 Torx screw towards the
outside. (Figure F)
8. Remove the ignition switch and locking
collar. (Figure G)
a. Turn the forks to the right, then put
the key in the ignition.
b. Using a panel tool, slightly lift up
the switch to access the release
button underneath. (see inset)
c. Push the button and turn the key
slightly to the left. This should
release the switch.
d. Using a 7/8” open ended wrench,
remove the locking collar, then the
spacer below it.
Continued on the next page
FAIRING DISASSEMBLY (CONT.)

1.800.221.0932
|
MetraOnline.com
4
9. Remove (1) T25 Torx screw and washer
from each side of the switch panel. Turn
the forks to the left, slightly pull the
panel out to gain access underneath,
then unplug the switch panel connector.
Remove the switch panel.
Note: If the forks lock, insert a flat-blade
screwdriver into the ignition switch hole.
There will be a notch cut-out inside.
Slightly turn to the right to unlock
the forks.
10. Remove (2) Torx screws securing each
turn signal, then remove the turn signal
and front chrome trim. (Figure H)
(Figure I)
(Figure H)
(Figure J)
(Figure K)
(Figure L)
11. Remove the clutch cable.
a. Loosen up the clutch lever:
Slide the rubber boot up from
the clutch adjustment cable, then
using a 9/16” and 1/2” open ended
wrench, break the locking nut free.
Screw the adjustment nut in to
provide slack in the clutch lever.
(Figure I)
b. Remove the snap ring from the pivot
pin under the clutch lever, then pull
the pin out. (Figure J)
c. Remove (2) T27 Torx screws and
washers securing the clutch lever
to the clutch bracket, then remove
the lever. (Figure K)
d. Pull the anchor pin out from the
clutch cable. (Figure L)
e. Pull the clutch cable thru the fairing,
just enough to clear the fairing.
Continued on the next page
FAIRING DISASSEMBLY (CONT.)

REV. 6/2/2020 INST95-HDIF
5
12. Unplug the cigarette lighter, then
remove it by unscrewing the outer cover
which is inside the fairing. Keep your
fingers in the cigarette lighter to prohibit
it from spinning.
13. Remove (2) T25 Torx screws securing the
speakers, then unplug and remove
the speakers.
14. Unscrew the rubber boot from the reset
switch, then remove the switch.
(Figure M)
15. Unplug the speedometer and tach
gauges. Remove (2) screws securing the
black plastic brackets to each gauge
(4 in total), then remove the gauges
from the back. (Figure N)
(Figure N)
(Figure M) (Figure O)
16. Unplug but do not remove the
remaining gauges. They will be removed
at the bench.
17. Carefully pry outwards on the bottom
of the fairing to release the fairing and
fairing lower bracket from the dowel
pins in the forks. (Figure O)
18. Lift the fairing slightly up to gain access
to the fairing lower bracket, then grab
and remove the bracket from the fairing.
The fairing should be completely free at
this point. Have patience in this step as
the fairing will most likely get caught
up being removed. Take the fairing
to the bench for further removal of
components.
Continue to Kit Preparation
FAIRING DISASSEMBLY (CONT.)

1.800.221.0932
|
MetraOnline.com
6
KIT PREPARATION
From the factory fairing:
1. Remove (2) 5/16” nuts securing each
gauge, then push the gauges thru the
front of the fairing. (Figure A)
2. Remove the rubber grommet from the
clutch cable pass-through hole.
(Figure A)
To the 95-HDIF fairing:
1. Push each of the gauges thru the front
of the fairing, then secure them with the
factory hardware. (Figure B)
2. Insert the rubber grommet into the
clutch cable pass-through hole.
(Figure B)
Continued on the next page
(Figure A)
(Figure B)

REV. 6/2/2020 INST95-HDIF
7
KIT PREPARATION
(CONT.)
KIT ASSEMBLY
1. Secure the
radio bracket
to the radio
using the screws supplied with the
radio. (Figure A)
2. Locate the factory wiring harness and
antenna connector in the fairing and
complete all necessary connections to
the radio. Metra recommends using the
proper mating adapter from Metra and/
or Axxess. Test the radio for
proper operation.
3. Reassemble the fairing in reverse
order of disassembly to complete the
installation, using the radio/bracket
assembly instead of the factory radio.
Due to differences in vehicle design,
optional spacers have been provided.
(Figure B)
(Figure B)
(Figure A)
Speaker grilles:
3. Screw the (4) #8-32 machine screws
provided into the holes in the
speaker
ring
that are countersunk. Take note that
the (8) holes in the ring are different.
The screws will need to be threaded into
the proper holes in order to retain the
screws. (Figure C)
4. Place the
speaker grill
onto the
fairing
,
with the recessed portion towards the
back. Place the
speaker ring
on top of
the
speaker grill
.
Secure the ring/grille
assembly to the fairing using the (4) #8 x
5/8” Phillips screws provided. (Figure D)
5. Place the aftermarket speaker onto
the ring/grille assembly, lining up the
holes in the speaker with the (4) #8-32
machine screws previously assembled.
Secure the speaker using the (4) #8
washers and (4) #8-32 machine nuts
provided. (Figure E)
6. Repeat steps 3-5 for the opposite side.
Continue to Kit Assembly
Optional spacers if needed
(Figure C)
(Figure D)
(Figure E)

Metra. The World’s Best Kits.
®
MetraOnline.com © COPYRIGHT 2020 METRA ELECTRONICS CORPORATION REV. 6/2/20 INST95-HDIF
INSTALLATION INSTRUCTIONS
95-HDIF
KNOWLEDGE IS POWER
Enhance your installation and fabrication skills by
enrolling in the most recognized and respected
mobile electronics school in our industry.
Log onto www.installerinstitute.com or call
800-354-6782 for more information and take steps
toward a better tomorrow.
®
Metra recommends MECP
certified technicians
If you are having difficulties with the installation
of this product, contact our Tech Support line
either by phone at 386-257-1187, or email at
techsupport@metra-autosound.com. Before
doing so, look over the instruction booklet a
second time and ensure that the installation was
performed exactly as the instruction booklet
is stated. Have the vehicle apart and ready to
perform troubleshooting steps before contacting
Metra/Axxess Tech Support.

The World’s best kits.
®
MetraOnline.com © COPYRIGHT 2020 METRA ELECTRONICS CORPORATION REV. 6/2/20 INST95-HDIF
INSTRUCCIONES DE INSTALACIÓN
95-HDIF
¡Precaución!
Todos los accesorios, interruptores,
paneles de controles de clima y especialmente las
luces del indicador de las bolsas de aire deben estar
conectados antes ciclar la ignición. Además, no quite
el radio de fábrica con la llave en la posición o de
encendido ni con el vehículo funcionando.
COMPONENTES DEL KIT
• A) Máscara • B) Soporte de radio con espaciadores • C) Parrillas para bocinas • D) Anillos para bocinas • E) (8) tornillos Phillips #8 x 5/8”
• F) (8) tornillos para máquina de cabeza roscada #8-32 • G) (8) pernos #8-32 • H) (8) rondanas #8
HERRAMIENTAS REQUERIDAS
Herramienta para remoción de paneles
• Pinzas para anillos de resorte
• Destornillador Phillips • Llave de tubo de 5/16”
• Destornillador T25, T27 Torx
• Llave Allen (hexagonal) de 3/16”, 5/32”
• Llave fija 1/2”, 7/8”, 916”
INDICE
Desensamble de máscara ................................. 2-5
Preparación del kit ............................................. 6-7
Ensamble del kit ....................................................7
CABLEADO Y CONEXIONES DE ANTENA
(se venden por separado)
Arnés de cables: 70-9800
Adaptador de antena: No requerido
Interfaz de control al volante: ASWC-1
CARACTERÍSTICAS DEL KIT
• Provisión de radio ISO DDIN
• Máscara interna completa para un aspecto de fábrica
• Construcción en acero inoxidable
• Pintado negro brillante
Nota: Diseñado para usar con bocina de mercado secundario de 6.5” o 6.75”
Harley Davidson FLH
(máscara deflectora)
1998-2013
A B C D
E F
HG

1.800.221.0932
|
MetraOnline.com
DESENSAMBLE DE MÁSCARA
2
¡Atención! Debido a la complejidad que
implica retirar la máscara, es ampliamente
recomendable que lea los pasos con
antelación para que entienda bien qué debe
hacer. Si el proceso le parece demasiado
complejo, es mejor que solicite la ayuda de
un profesional para que realice este trabajo.
Asimismo, es mejor que tome fotografías
durante el proceso, además de colocar
en bolsas y etiquetar toda la tornillería.
También preste atención a la forma en que
está colocado el cableado de fábrica en toda
la máscara. Tendrá que repetir la misma
distribución durante el rearmado.
1. Quite (4) tornillos T27 Torx de la máscara
interior. (Figura A)
2. Retire (3) tornillos T27 Torx que fijan la
parte exterior de la máscara, retirando
al último el que se encuentra en medio.
Cuando haya retirado el tornillo de en
medio, se aflojará la máscara externa.
Tenga cuidado de no dejar caer la
máscara exterior ni el parabrisas.
(Figura B)
3. Desconecte el faro; posteriormente,
retire la máscara exterior. (Figura C)
4. Quite (4) tornillos Allen de 3/16 que
fijan el radio. Desconecte el radio;
posteriormente, deslice el radio hacia
afuera en dirección a la parte posterior
de la motocicleta. (Figura D)
5. Desconecte las direccionales izquierda
y derecha.
Continua en la siguiente pagina
(Figura B) (Figura D)
(Figura A) (Figura C)

REV. 6/2/2020 INST95-HDIF
DESENSAMBLE DE MÁSCARA (CONT.)
3
(Figura F)
(Figura G)(Figura E)
6. Retire (4) conectores que fijan el tirante
de soporte de la máscara deslizándoles.
(Figura E)
7. Quite (2) tornillos que fijan cada uno de
los tirantes de soporte de la máscara; el
tornillo Allen de 3/16” hacia adentro y el
tornillo T25 Torx hacia afuera. (Figura F)
8. Retire el interruptor de arranque y el
collar trabador. (Figura G)
a. Gire las horquillas pinza a la derecha;
posteriormente, coloque la llave en
el arranque.
b. Usando una herramienta de panel,
suba ligeramente el interruptor para
acceder al botón de liberación que
se encuentra debajo.
c. Presione el botón y gire la llave
ligeramente a la izquierda. De esta
manera el interruptor debe quedar
liberado.
d. Usando una llave fija de 7/8”,
retire el collar trabador y luego, el
espaciador que está debajo.
Continua en la siguiente pagina

1.800.221.0932
|
MetraOnline.com
4
DESENSAMBLE DE MÁSCARA
(CONT.)
9. Quite (1) tornillo T25 Torx y rondana de
cada extremo del panel del interruptor.
Gire las horquillas pinza hacia la
izquierda, sacando ligeramente el panel
para tener acceso a la parte inferior;
posteriormente, desconecte el conector
del panel del interruptor. Quite el panel
del interruptor.
Nota: Si las horquillas pinza se
bloquean, inserte un destornillador
plano dentro del orificio del interruptor
de arranque. No habrá ninguna muesca
recortada en el interior. Gire ligeramente
a la derecha para desbloquear las
horquillas pinza.
10. Quite (2) tornillos Torx que fijan cada
direccional, después retire la direccional
y la moldura de cromo frontal.
(Figura H)
(Figura I)
(Figura H)
(Figura J)
(Figura K)
(Figura L)
11. Retire el cable del embrague.
a. Afloje la palanca del embrague:
Deslice la zapata de hule hacia
arriba desde el cable de ajuste de
embrague; posteriormente, utilice
una llave fija de 9/16” y 1/2” para
liberar el perno de bloqueo. Atornille
el perno de ajuste para dar juego en
la palanca del embrague. (Figura I)
b. Retire el anillo de resorte del broche
de pivote bajo la palanca del
embrague para después sacar el
broche. (Figura J)
c. Quite (2) tornillos T27 Torx y rondanas
que fijan la palanca del embrague
al sujetador del embrague para
después, quitar la palanca. (Figura K)
d. Jale el broche de anclaje del cable del
embrague. (Figura L)
e. Saque el cable del embrague a través
de la máscara lo suficiente para
liberarla.
Continua en la siguiente pagina

REV. 6/2/2020 INST95-HDIF
5
DESENSAMBLE DE MÁSCARA
(CONT.)
12. Desconecte el encendedor;
posteriormente, retírelo al destornillar
la cubierta exterior que está dentro de
la máscara. Sostenga el encendedor con
los dedos para evitar que gire.
13. Quite (2) tornillos T25 Torx que fijan las
bocinas; posteriormente, desconecte y
retire las bocinas.
14. Destornille la zapata de hule del
interruptor de reconexión para después,
retirar el interruptor. (Figura M)
15. Desconecte el velocímetro y los
medidores del taquímetro. Quite (2)
tornillos que fijan los sujetadores de
plástico negro en cada uno de los
medidores (4 en total); posteriormente,
retire los medidores de la parte
posterior. (Figura N)
(Figura N)
(Figura M) (Figura O)
16. Desconecte los medidores restantes,
pero no los quite. Los retirará en el
banquillo.
17. Utilice una palanca para levantar
cuidadosamente la parte inferior de la
máscara para liberarla y el sujetador
inferior de la misma de las espigas en
las horquillas pinza. (Figura O)
18. Levante la máscara ligeramente para
tener acceso al sujetador inferior de
la máscara; posteriormente, sostenga
y retire el sujetador de la máscara. La
máscara estará completamente suelta
en este momento. Tenga paciencia al
realizar este paso ya que es probable
que la máscara se enrede al momento
de quitarla. Lleve la máscara al
banquillo para retirar los componentes
adicionales.
Continuar la preparación del kit

1.800.221.0932
|
MetraOnline.com
6
PREPARACIÓN DEL KIT
De la máscara de fábrica:
1. Quite (2) pernos de 5/16” que fijan el
medidor; después, empújelos a través
del frente de la máscara. (Figura A)
2. Retire el pasacables de hule desde el
orificio del cable del embrague.
(Figura A)
A la máscara 95-HDIF:
1. Presione cada uno de los medidores
a través del frente de la máscara para
fijarlos con la tornillería de fábrica.
(Figura B)
2. Inserte el pasacables de hule dentro
del orificio pasacables del embrague.
(Figura B)
Continua en la siguiente pagina
(Figura A)
(Figura B)

REV. 6/2/2020 INST95-HDIF
7
ENSAMBLE DEL KITPREPARACIÓN DEL KIT
(CONT.)
1. Sujete los
soportes al radio
usando los
tornillos que vienen con el radio.
(Figura A)
2. Localice el arnés de cableado de
fábrica y el conector de la antena en la
máscara y realice todas las conexiones
necesarias al radio. Metra recomienda
el uso de adaptadores de acoplamiento
adecuados de Metra o de Axxess. Pruebe
el radio para asegurarse de que
funciona bien.
3. Vuelva a armar la máscara de la
manera inversa a cómo la desarmó
para terminar la instalación, usando
el ensamblado de radio/sujetador en
lugar del radio de fábrica. Debido a las
diferencias que existen en los diseños de
vehículos, se han incluido espaciadores
opcionales. (Figura B)
(Figura B)
(Figura A)
Parrillas para bocinas:
3. Atornille los (4) tornillos para máquina de
cabeza roscada
#8-32 incluidos a través de
los orificios avellanados en el anillo de la
bocina. Dese cuenta de que los (8) orificios
en el anillo son distintos. Será necesario
atornillar los orificios adecuados con el fin
de sostener los tornillos. (Figura C)
4. Coloque la
parrilla para bocinas
sobre
la
máscara
, con la parte empotrable en
dirección posterior. Coloque el
anillo de
bocina
en la parte superior de la
parrilla
para bocinas
. Sujete el ensamble del anillo/
parrilla a la máscara usando los (4) tornillos
Phillips #8 x 5/8” incluidos. (Figura D)
5. Coloque la bocina de mercado secundario
del ensamble de la parrilla/anillo, alineando
los orificios a la bocina con los (4) tornillos
para máquina de cabeza roscada #8-32
ensamblados anteriormente. Fije la bocina
usando las (4) rondanas #8 y (4) pernos de
máquina #8-32 incluidos. (Figura C)
6. Repita los pasos 3 a 5 para el lado opuesto.
Continúe con el Ensamble del Kit
Espaciadores opcionales si es necesario
(Figura C)
(Figura D)
(Figura E)

The World’s best kits.
®
MetraOnline.com © COPYRIGHT 2020 METRA ELECTRONICS CORPORATION REV. 6/2/20 INST95-HDIF
INSTRUCCIONES DE INSTALACIÓN
95-HDIF
KNOWLEDGE IS POWER
Enhance your installation and fabrication skills by
enrolling in the most recognized and respected
mobile electronics school in our industry.
Log onto www.installerinstitute.com or call
800-354-6782 for more information and take steps
toward a better tomorrow.
®
Metra recomienda técnicos
con certificación del Programa
de Certificación en Electrónica
Móvil (Mobile Electronics
Certification Program, MECP).
EL CONOCIMIENTO ES PODER
Mejore sus habilidades de instalación y
fabricación inscribiéndose en la escuela de
dispositivos electrónicos móviles más reconocida
y respetada de nuestra industria. Regístrese en
www.installerinstitute.com o llame al
800-354-6782 para obtener más información y
avance hacia un futuro mejor.
Si tiene dificultades con la instalación de este
producto, comuníquese con nuestra línea de soporte
técnico, ya sea por teléfono al 386-257-1187, o envíe
un correo electrónico a techsupport@metra-
autosound.com. Antes de hacerlo, revise el folleto
de instrucciones por segunda vez y asegúrese de
que la instalación se realizó exactamente como
se indica en el manual de instrucciones. Tenga el
vehículo separado y listo para realizar los pasos de
solución de problemas antes de ponerse en contacto
con el soporte técnico de Metra / Axxess.
/