Page is loading ...

Camera Controller
WV-RM70E
Before attempting to connect or operate this product,
please read these instructions completely.
FRANÇAIS
DEUTSCH
ENGLISH
ESPAÑOL

CAUTION:
Before attempting to connect or operate this prod-
uct, please read the label on the bottom.
CAUTION
RISK OF ELECTRIC SHOCK
DO NOT OPEN
CAUTION:
TO REDUCE THE RISK OF ELECTRIC
SHOCK, DO NOT REMOVE COVER (OR
BACK), NO USER SERVICEABLE PARTS
INSIDE.
REFER SERVICING TO QUALIFIED SERVICE
PERSONNEL.
The lighthing flash with arrowhead symbol,
within an equilateral triangle, is interned to
alert the user to the presence of uninsulat-
ed "dangerous voltage" within the product's
enclosure that may be of sufficient magni-
tude to constitute a risk of electric shock to
persons.
The exclamation point within an equilateral
triangle is intended to alert the user to the
presence of important operating and main-
tenance (servicing) instructions in the litera-
ture accompanying the appliance.
WARNING:
TO PREVENT FIRE OR ELECTRIC SHOCK HAZARD, DO NOT EXPOSE THIS APPLIANCE TO RAIN OR MOISTURE.
ENGLISH VERSION
We declare under our sole responsibility that the product to
which this declaration relates is in conformity with the stan-
dards or other normative documents following the provisions of
Directive EEC/89/336.
Noi dichiariamo sotto nostra esclusiva responsabilità che il
prodotto a cui si riferisce la presente dichiarazione risulta con-
forme ai seguenti standard o altri documenti normativi conformi
alle disposizioni della direttiva CEE/89/336.
Wij verklaren als enige aansprakelijke, dat het product waarop
deze verklaring betrekking heeft, voldoet aan de volgende nor-
men of andere normatiefve dokumenten, overeenkomstig de
bepalingen van Richtlijn 89/336/EEC.
Vi erklærer os eneansvarlige for, at dette produkt, som denne
deklaration omhandler, er i overensstemmelse med den
følgende standarder eller andre normative dokumenter i følge
bestemmelserne i direktiv 89/336/EEC.
Vi deklarerar härmed värt fulla ansvar för att den produkt till
vilken denna deklaration hänvisar är i överensstämmelse med
standarddokument, eller andra normativa dokument som
framstölls i Direktiv 89/336/EEC.
Ilmoitamme yksinomaisella vastuullamme, että tuote, jota tämä
ilmoitus koskee, noudattaa seuraavia standardeja tai muita
ohjeellisia asiakirjoja, jotka noudattavat direktiivin 89/336/EEC.
säädöksiä.
Vi erklærer oss alene ansvarlige for at produktet som denne
erklæringen gjelder for, er i overensstemmelse med følgende
normer eller andre normgivende dokumenter som fælger
bestemmelsene i direktiv 89/336/EEC.

-1-
CONTENTS
PREFACE ...................................................................................................................................................................... 2
FEATURES .................................................................................................................................................................... 2
PRECAUTIONS ............................................................................................................................................................. 3
MAJOR OPERATING CONTROLS AND THEIR FUNCTIONS ....................................................................................... 4
CONNECTIONS ............................................................................................................................................................ 7
OPERATING PROCEDURE ........................................................................................................................................... 13
SPECIFICATIONS ......................................................................................................................................................... 32
ENGLISH
The serial number of this product may be found on the bot-
tom of the unit.
You should note the serial number of this unit in the space
provided and retain this book as a permanent record of your
purchase to aid identification in the event of theft.
Model No.
Serial No.

-2-
PREFACE
The WV-RM70E Camera Controller, when combined
with the optional WV-CP610 and WV-BP510 series
CCTV Camera, enables remote control of camera set-
tings.
Also it is available to receive the alarm (motion detec-
tor) signal multiplexed with the video signal from the
WV-CP610 and WV-BP510 series camera.
FEATURES
The WV-RM70E Camera Controller enables remote con-
trol of the following functions:
• Remote control of camera settings for the WV-
CP610 and WV-BP510 series camera, including
Electronic Sensitivity Up, Electronic Shutter, and
more.
• Remote control of camera and auxiliary equipment,
by using optional receiver and accessories, includ-
ing:
1. Remote control of Pan/Tilt Head and Camera
Housing.
2. Remote control of Motorized Zoom Lens :
Focus, Zoom and Iris.
Also it is available to receive the alarm (motion detec-
tor) signal multiplexed with the video signal from the
WV-CP610 and WV-BP510 series camera.

-3-
PRECAUTIONS
• Do not attempt to disassemble the unit.
In order to prevent electric shock, do not remove
screws or covers. There are no user-serviceable
parts inside.
Do refer to all servicing to qualified service person-
nel.
• Handle the unit with care.
Do not abuse the unit. Avoid striking, shaking, etc.
It could be damaged by improper handling or stor-
age.
• Do not expose the unit to rain or moisture, or try to
operate it in wet areas.
Do take immediate action if the unit becomes wet.
Turn the power off and refer servicing to qualified
service personal. Moisture can damage the unit
and also create the danger of electric shock.
• Do not use strong or abrasive detergents when
cleaning the unit body.
Do use a dry cloth to clean the unit when dirty.
In case the dirt is hard to remove, use a mild deter-
gent and wipe gently.
• Do not operate the unit beyond its temperature,
humidity or power source ratings.
Do not use the unit in an extreme environment
where high temperature or high humidity exist. Use
the unit under conditions where temperatures are
within −10˚C - +60˚C (14˚F - 140˚F) and humidity is
below 90%.
The input power source is 12 V DC (10.8 - 16.0 V
DC).

-4-
MAJOR OPERATING CONTROLS AND THEIR FUNCTIONS
REMOTE
OPERATE
Camera Controller WV-RM
70
PROG
ALARM
RESET
NORMAL
SYSTEM
ALARM OFF
ON
OFF
INOUT
TERM VIDEO CAMERA DC12V IN
GNDGND
ALARM OUT
RESET OUT
DATA
T(A) T(B) R(A) R(B)
q
w e r t y u i o !0 !1 !2 !3 !4 !5 !6

-5-
1. Power Indicator (OPERATE)
This indicator lights up when DC power is supplied
to the DC 12V Input Terminal.
2. PC Remote Indicator (REMOTE)
This indicator lights up when this controller is con-
trolled remotely by Personal Computer.
3. Left Switch (A)
This switch is used to move the cursor (in the
Setup Menu) in the left direction or move the
Pan/Tilt Head toward the left direction.
4. Down Switch (C)
This switch is used to move the cursor (in the Setup
Menu) in the down direction or move the Pan/Tilt
Head toward the down direction.
5. Up Switch (D)
This switch is used to move the cursor (in the Setup
Menu) in the up direction or move the Pan/Tilt Head
toward the up direction.
6. Set Switch
The mode selected in the setup menu is enabled
by pressing this switch.
7. Right Switch (B)
This switch is used to move the cursor (in the Setup
Menu) in the right direction or move the Pan/Tilt
Head toward the right direction.
8. Mode Selection Switch
(NORMAL/ALARM OFF/SYSTEM)
This switch is used to select the activated mode.
Refer to the Mode Selection on page 13 for more
details.
9. Program Switch (PROG)
This switch is used to display the Program Menu on
the monitor screen by pressing this switch for more
than 2 seconds,
10. Alarm Reset Switch (ALARM RESET)
When the unit is in the alarm mode, this indicator
starts blinking. Press this switch to cancel alarm
and the indicator light turns off.
11. Alarm Terminal
RESET OUT: When the controller resets the acti-
vated alarm by pressing the Alarm Reset
Switch, the alarm reset output signal is provid-
ed at this terminal for the Time Lapse VTR.

-6-
ALARM OUT: The alarm output signal is provided
at this terminal for the Time Lapse VTR.
12. Data Terminal
These terminals are used to transmit / receive
control data to / from a Personal Computer. Use
data grade cable, suitable for RS-485 (2 shielded,
twisted pairs), cable length may be extended up to
1,200m (4,000 ft.).
Designation
Direction
T (A)
Personal Computer ← Controller
T (B)
Personal Computer ← Controller
GND
R (A)
Personal Computer → Controller
R (B)
Personal Computer → Controller
GND
13. Termination Switch (TERM ON/OFF)
This switch is used to enable termination of this
controller’s data terminal.
14. Video Output Connector (VIDEO OUT)
A 1.0 Vp-p / 75Ω composite video signal is provid-
ed at this connector.
15. Camera Input Connector (CAMERA IN)
This connector accepts either a colour or B/W com-
posite video signal from the camera. Also, VD2, to
synchronize camera in vertical timing, and data, to
control camera site devices, are multiplexed
through this connector.
16. DC 12V Input Terminal (DC 12V IN)
This terminal accepts 12V DC (10.8 - 16.0V DC)
power source.

-7-
CONNECTIONS
1. Dip Switch Setting
Before connecting this controller, confirm the Dip
Switch Setting if the system setting change is required.
Pulse (VTR): +5V DC approx. 500msec.
Initially, VTR position is selected at the factory.
2. Set switch (SW2) on the board to choose the char-
acter display mode on the monitor.
NOR : White with Black border
REV : Black with White border
Initially, normal (NOR) position is selected at the
factory.
OPC
VTR
REV
NOR
REV
NOR
SW1
SW2
SW5
SW3
SW4
Front
Rear
1. Set switch (SW1) on the board to
choose the alarm reset output sig-
nal as either Open Collector (OPC)
or Pulse (VTR).
Open Collector (OPC) :
16V DC 100mA max.
3. Confirm switches (SW3) on the
board are set to the position as
shown. These switches are used
only for factory test.
4. Confirm switch (SW4) on the
board is set to the "VS" position.
This switch is used only for fac-
tory test.
1234
OFF
VD
VS

-8-
5. Set switch (SW5) on the board to choose the data
line selection mode for data terminal.
4 LINE : normal connections are
made.
2 LINE : simplified connections
are made.
Initially, 4 LINE is selected
at the factory.
The above switching should be made by qualified
service personal or system installers.
2. Connection of Alarm Output Terminal
• Make sure the polarity of the buzzer to meet with
this terminal.
The positive (+) terminal of
the buzzer should be con-
nected with the Alarm Output
Terminal.
• The Alarm Output Terminal is
composed of the Open
Collector Output and the
capacity is 16V DC, 100mA
or less.
2LINE
4LINE
GND
ALARM OUT
RESET OUT
(1) In case the buzzer is operable within the capacity
of Alarm Output Terminal, connect buzzer as
shown right.
(2) In case the buzzer is not operable within the
capacity of Alarm Output Terminal, the external
relay unit should be used as shown below.
GND
ALARM OUT
RESET OUT
NC NO
+12V
C
NC : Normally Closed
NO : Normally Open
C : Common
To Buzzer
Relay
Buzzer

-9-
3. System Connections
■ Basic Connection
TL
Camera WV-CP610
Camera WV-CS300
Pan/Tilt
Receiver
Camera Controller WV-RM70E
Time Lapse VTR
Monitor
Motion Detect
Output
Personal Computer
RS-485
Converter
(RS-485/
RS-232C)

-10-
■ System 100 ■ System 300
TL
TL
Time Lapse VTRPC
WV-CU101
WV-CS300
WV-BS200
WV-CP610 WV-CP610
WV-RM70E
WJ-SW208
WJ-MP404
WJ-SQ508
WV-CU300
RS-485 RS-485
ALARM OUT
WV-RM70E
Converter
(RS-485/
RS-232C)
Converter
(RS-485/
RS-232C)
Monitor
PC
Monitor
Time Lapse
VTR

-11-
■ Cable-loss Compensation Setting
The maximum cable length in the system is approximately 1,200 meter.
See the diagram below and set up the cable-loss compensation switch for each unit accordingly.
For examples:
Position of the
switch of WV-RM70E
0 ≤ A < 500 → S
500 ≤ A < 900 → M
900 ≤ A < 1,200 → L
Position of the Position of the
switch of WV-RM70E switch of WJ-MP404
S: 0 ≤ A + B < 500 → S
S: 500 ≤ A + B < 900 → M
S: 900 ≤ A + B < 1,200 → L
M: 500 ≤ A + B < 900 → S
M: 900 ≤ A + B < 1,200 → M
L: → S
WV-RM70
WV-RM70
WJ-MP404
Am
Am
1,200m
Bm
Camera
WV-RM70E
Camera
WV-RM70E WJ-MP404

-12-
4. Connection with the Personal
Computer
■ 4 Data Line (Dip Switch SW5 : 4 LINE)
■ 2 Data Line (Dip Switch SW5 : 2 LINE)
T(A)
T(B)
R(A)
R(B)
R(A)
R(B)
T(A)
T(B)
Personal Computer Camera Controller
T(A)
T(B)
R(A)
R(B)
R(A)
R(B)
T(A)
T(B)
Personal Computer Camera Controller
T(A)
T(B)
R(A)
R(B)
R(A)
R(B)
T(A)
T(B)
R(A)
R(B)
T(A)
T(B)
Personal Computer Camera Controller
T(A)
T(B)
R(A)
R(B)
Data Terminal
Camera Controller
Transmit Data
Receive Data

-13-
OPERATING PROCEDURE
Before starting the following procedures, all system components should be turned on.
1. Mode Selection
This controller can select the activated mode by selecting Mode Selection Switch located on the front panel.
Switch Position Functions
NORMAL
ALARM OFF
SYSTEM
Activated Mode
Normal Mode
Alarm Off Mode
System Mode
Function 1 : Controller setup
Function 2 : Camera Setup (for WV-CP610 series)
Function 3 : Camera Control
Function 4 : Receiver Control
Function 5 : Alarm Control
Function 6 : Remote Control by Personal Computer
Function 1 : Controller setup
Function 2 : Camera Setup (for WV-CP610 series)
Function 3 : Camera Control
Function 4 : Receiver Control
Function 6 : Remote Control by Personal Computer
Function 1 : Controller setup
Function 5 : Alarm Control
Function 6 : Remote Control by Personal Computer
(Except Camera Site Control)

-14-
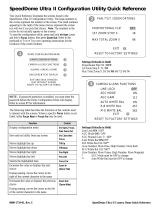
2. Entering Program Menu
By pressing the Program (PROG) Switch for more
than 2 seconds, when Mode Selection Switch is
selected at Normal (NORMAL) position or Alarm
Off (ALARM OFF) position, the following displays
appear on the monitor screen.
Fig. 1
As shown in Fig. 2, the Program Menu has four main
sub menus: Camera Control, Receiver Control, Camera
Setup and Controller Setup. These sub menus are fur-
ther divided in to additional submenus.
Program Menu
Camera Control Iris Control
Sens Up Control
Shutter
BLC
AGC
White Balance
Receiver Control Pan/Tilt Control (Manual)
Zoom/Focus Control
AUX 1, 2 Control
Wiper/Defroster
Pan Action
(Auto/Random Panning)
Camera Set Up
Controller Set Up System
Communication
Fig. 2
Move the cursor to the desired program by pressing the
Up (D) Switch or the Down (C) Switch on the con-
troller, then press the Set Switch to select program
where the cursor is positioned.
** Program Menu **
Camera Control *
Receiver Control *
Camera Set Up *
Controller Set Up *

-15-
3. Camera Control
Move the cursor to the “Camera Control” position
by pressing the Up (D) Switch or the Down (C)
Switch, then press the Set Switch to display the fol-
lowing display on the monitor screen.
Fig. 3
Press the Set Switch repeatedly to select the desired
functions. The function is selected as shown in the fol-
lowing sequence.
→ Iris → Sens Up → Shutter → BLC →
← ATW, AWC ← AGC ←
3-1. Lens Iris Control
The following function is available only when speci-
fied lens is mounted on the specified camera.
1. Display the Iris Menu as shown in Fig. 4 by repeat-
ing the previous procedures.
Fig. 4
2. Press the Right (B) Switch to open the lens iris or
press the Left (A) Switch to close the lens iris.
Adjust the lens iris by pressing the switches to
obtain the proper picture exposure.
While pressing the switches, the character is
inversely displayed on the monitor screen.
3. By pressing both of these switches at the same
time for one second, the lens iris is set to the facto-
ry preset condition.
** Program Menu **
Camera Control *
Receiver Control *
Camera Set Up *
Controller Set Up *
←
close Iris open
→
B
←
close Iris open
→

-16-
3-2. Electronic Sensitivity Up
The following function is available only when speci-
fied camera with the electronic sensitivity feature is
used.
1. Display the Sens Up Menu as show in Fig. 5 by
repeating the previous procedures.
Fig. 5
2. Press the Up (D) Switch or the Down (C) Switch to
select the desired mode, “Off”, “Auto” or “Manu”.
3. When selected “Auto” or “Manu” mode, press the
Right (B) Switch to select a higher sensitivity up
setting, or press the Left Switch to select a lower
sensitivity up setting.
3-3. Electronic Shutter
The following function is available only when speci-
fied camera with the electronic shutter feature is
used.
1. Display the Shutter Menu as shown in Fig. 6 by
repeating the previous procedures.
Fig. 6
2. Press the Up (D) Switch or the Down (C) Switch to
select the desired mode, “On” or “Off”.
3. When selected “On” mode, press the Right (B)
Switch to select faster shutter speeds or press the
Left (A) Switch to select slower shutter speeds.
↑
Sens Up
↓
:off
↑
Sens Up
↓
:
←
A x10
→
↑
Shutter
↓
:off
↑
Shutter
↓
:
←
/10000
→

-17-
3-4. Back Light Compensation (BLC)
The following function is available only when speci-
fied camera with the Auto/Preset BLC Function is
used.
1. Display the BLC Menu as shown in Fig. 7 by
repeating the previous procedures.
Fig. 7
2. Press the Up (D) Switch or the Down (C) Switch to
select the desired mode, “Off”, “Auto” or “Preset”.
3-5. Gain Control
The following function is available only when speci-
fied camera with the AGC feature is used.
1. Display the AGC Menu as shown in Fig. 8 by
repeating the previous procedures.
↑
BLC
↓
:Auto
↑
AGC
↓
:On
Fig. 8
2. Press the Up (D) Switch or the Down (C) Switch to
select the desired mode, “On” or “Off”.
3-6. White Balance
The following function is available only when the
specified camera with the ATW/AWC White
Balance Function is used.
1. Display the ATW, AWC Menu as shown in Fig. 9 by
repeating the previous procedures.
←
ATW,AWC
→
:ATW
Fig. 9

-18-
2. Press the Right (B) Switch or the Left (A) Switch to
select desired mode, “ATW” or “AWC”.
After completing the above settings, press the
Program (PROG) Switch to return the previous
Program Menu as shown in Fig. 1.
To return to the normal camera picture, press the
Program (PROG) Switch again.
4. Receiver Control
Press the Program (PROG) Switch for more than 2 sec-
onds to display the Program Menu.
Move the cursor to the “Receiver Control” position by
pressing the Up (D) Switch or the Down (C) Switch,
then press the Set Switch to display the following dis-
play on the monitor screen.
Fig. 10
** Program Menu **
Camera Control *
Receiver Control *
Camera Set Up *
Controller Set Up *
↑
Tilt
↓
/
←
Pan
→
B
Press the Set Switch repeatedly to select the
desired functions. The function is selected as
shown in the following sequence.
→ Tilt/Pan → Zoom/Focus → Aux →
← Pan Action ← Wiper/Defroster ←
Note : Normally, a WV-RC100, WV-RC150 or WV-
RC160 Receiver is required to perform the fol-
lowing functions.
4-1. Pan/Tilt Control (Manual Operation)
1. Display the Tilt/Pan Menu as shown in Fig. 11 by
repeating the previous procedures.
↑
Tilt
↓
/
←
Pan
→
Fig. 11
/