Garmin Edge 605 User manual

Type
User manual

This manual is also suitable for

Garmin Edge 605 is a GPS-enabled bike computer that provides accurate ride data and helps you navigate your cycling routes. It comes with preloaded maps and allows you to create custom routes, track your speed, distance, time, and calories burned. The Edge 605 also features a built-in altimeter to track elevation gain and loss, and it's compatible with ANT+ sensors for heart rate, speed, and cadence. Additionally, it offers wireless data transfer to your computer for further analysis and sharing.

Garmin Edge 605 is a GPS-enabled bike computer that provides accurate ride data and helps you navigate your cycling routes. It comes with preloaded maps and allows you to create custom routes, track your speed, distance, time, and calories burned. The Edge 605 also features a built-in altimeter to track elevation gain and loss, and it's compatible with ANT+ sensors for heart rate, speed, and cadence. Additionally, it offers wireless data transfer to your computer for further analysis and sharing.

EDGE
®
605/705
MB
GPS-ENABLED BIKE COMPUTER
quick reference guide
WARNING: This product contains a lithium-ion battery. See the Important
Safety and Product Information guide in the product box for important
battery safety information.
Buttons
power
Press and hold to turn the Edge
on/off.
Press to turn the backlight on/off.
mode
Press to return to the previous
page.
Press and hold to switch bike
proles.
reset/lap
Press and hold to reset the timer.
Press to create a new lap.
WARNING: Always consult your physician before you begin or modify any
exercise program. See the Important Safety and Product Information guide
in the product box for product warnings and other important information.
thumb stick/enter
Move the thumb stick to scroll
through menus, options, and data
elds.
Press in the thumb stick to select
options and to acknowledge
messages.
start/stop
Press to start/stop the timer.
menu
Press to open the menu page.
Press and hold to lock/unlock the
Edge buttons.
in/out
Press to zoom in/out on the map
page and the altimeter page.
Resetting the Edge
If your Edge is locked up/frozen,
press mode and reset/lap
simultaneously to reset the Edge.
This does not erase any of your data
or settings.
Clearing User Data
CAUTION: This
deletes all user-entered
information.
1. Turn off the Edge.
2. Press and hold
mode and
until the message appears.
3. Select
Yes to clear all user data.
Icons
Battery charge level
Battery charging
Satellite icon changes from
blank to 3D when receiving
satellite signals.
Heart rate sensor active
Cadence sensor active
Power sensor active
Keylock active
Step 1: Charge the
Battery
You can charge the Edge using the
AC charger or the USB cable and
your computer.
NOTE: To prevent
corrosion, thoroughly
dry the mini-USB
port, weather cap, and
surrounding area before
charging or connecting to
a personal computer.
To charge the Edge:
1. On the back of the Edge,
pull up the weather cap
from the mini-USB port.
2. Plug the mini-USB end of the AC
or USB cable into the mini-USB
port on the back of the Edge.
Mini-USB port
under weather
cap
3. Plug the other end into a
standard wall outlet (AC) or
an available USB port on
your computer (USB).
Step 2: Install the
Edge
For best GPS reception, position the
bike mount so the front of the Edge
is oriented toward the sky. You can
install the bike mount on the stem or
the handlebars. The stem installation
(shown here) provides a more sturdy
location. The optional wedge should
be used under the mount for a better
viewing angle.
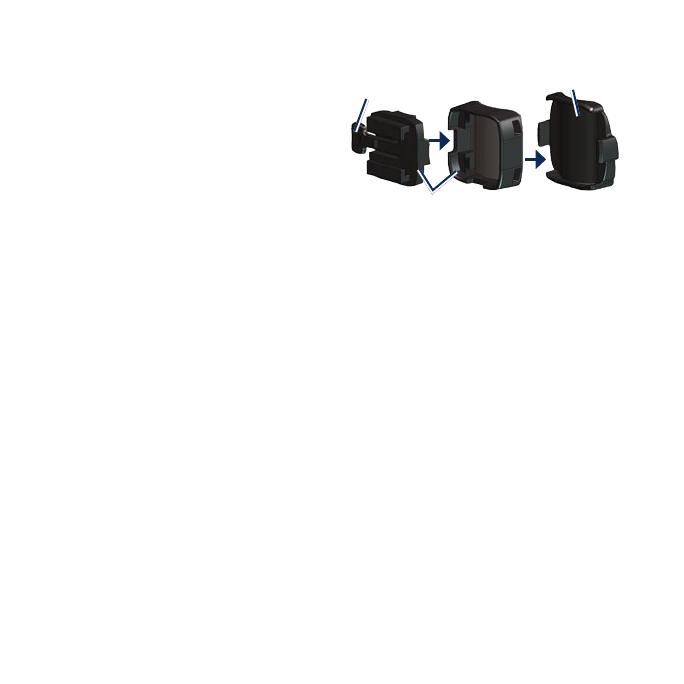
To install the Edge on your
bike stem:
1. Place the wedge on the bike
stem, and then place the bike
mount on the wedge. Make sure
the release lever is on the left.
Wedge
Bike mount
Release
lever
For horizontal bars: Separate and
remove the top part of the mount,
turn it 90 degrees, and replace it.
Continue with step 2.
For bars with a diameter less than
1 in (25.4 mm): Place the additional
rubber pad under the bike mount to
increase the diameter of the bar. The
rubber pad also prevents the mount
from slipping. Continue with step 2.
2. Attach the bike mount
securely using two cable
ties. Make sure the cable ties
are threaded through both
parts of the bike mount.
3. Align the Edge with the bike
mount so that the Edge is
parallel to the stem.
Release
lever
Cable ties
4. Slide the Edge to the left
until it snaps into place.
To release the Edge:
Press down on the release lever, and
slide the Edge to the right.
Step 3: Turn on Your
Edge
Press and hold to turn on
your Edge. Follow the on-screen
conguration instructions.
Step 4: Acquire
Satellite Signals
It may take 30–60 seconds to acquire
signals. Go outdoors to an open area.
For the best reception, make sure the
front of the Edge is oriented toward
the sky.
Step 5: Save Your
Home Location
(Optional)
You can set a home location for the
place you return to most often.
1. Press menu > select
Where To > Find Places >
Favorites > Go Home.
2. Follow the on-screen instructions.
Step 6: Set Up
Sensors (Edge 705)
If your Edge included a heart rate
monitor or GSC
10 speed and
cadence sensor, the ANT+Sport
sensors are already paired. Press
menu. The and icons stop
ashing when the sensors are paired.
Heart Rate Monitor
Wear the heart rate monitor directly
on your skin, just below your
breastplate. It should be snug enough
to stay in place during your run.
1. Push one tab on the strap
through the slot in the heart rate
monitor. Press the tab down.
2. Wet both electrodes on the back
of the heart rate monitor to create
a strong connection between
your chest and the transmitter.
Heart Rate Monitor (Back)
Electrodes
Tab
Heart Rate Monitor Strap
Heart Rate Monitor (Front)
Slot
3. Wrap the strap around your
chest and attach it to the other
side of the heart rate monitor.
NOTE: The Garmin logo
should be right-side up.
4. Turn on the Edge and bring it
within range (3 m) of the heart
rate monitor. The
heart rate
icon appears on the menu page.
GSC 10
Both magnets must be aligned with
their respective indication lines for
the Edge to receive data.
To install the GSC 10:
1. Place the GSC 10 on the rear
chain stay (on the side opposite
the drive train). Loosely attach
the GSC 10 using two cable ties.
2. Attach the pedal magnet to the
crank arm using the adhesive
Cable tie
Pedal magnet on
crank arm
Indication
line
Reset button
Cable ties
Indication
line
GSC 10 on rear chain stay
mount and a cable tie. The
pedal magnet must be within
5 mm of the GSC 10 and the
indication line on the pedal
magnet must line up with the
indication line on the GSC 10.
3. Unscrew the spoke magnet
from the plastic piece. Place
the spoke in the groove of
the plastic piece and tighten
slightly. The magnet can face
away from GSC 10 if there is
not enough room between the
sensor arm and the spoke. The
magnet must be aligned with
the sensor arm indication line.
4. Loosen the screw on the sensor
arm and move it to within 5 mm of
the spoke magnet. You can also
tilt the GSC 10 closer to either
magnet for improved alignment.
5. Press the
Reset button on the
GSC 10. The LED turns red,
GSC 10 and magnet alignment
Spoke magnet
Sensor arm
indication line
Pedal magnet
GSC 10
then green. Pedal to test the
sensor alignment. The red LED
blinks each time the crank arm
passes the sensor, and the green
LED blinks each time the wheel
magnet passes the sensor arm.
NOTE: The LED blinks
for the rst 60 passes after
a reset. Press Reset again
if you require additional
passes.
6. When everything is aligned
and working correctly, tighten
the cable ties, sensor arm,
and spoke magnet.
Step 7: Set YourSet Your
Proles
The Edge uses information that you
enter about yourself and your bike to
calculate accurate ride data.
To set your user prole:
Press menu > select Settings >
Prole & Zones > User Prole.
Use the
thumb stick
to change the
eld values.
To set your bike prole:
Press menu > select Settings >
Prole & Zones > Bike Prole.
Step 8: Go for a Ride!
Press mode to view the bike
computer page. Press start to start
the timer. After completing your ride,
press stop. Press and hold lap/reset
to save your ride data.
Step 9: Download Free
Software
1. Go to www.garmin.com/edge.
2. Follow the on-screen instructions
to download Garmin Training
Center
®
or Garmin Connect
.
Step 10: Transfer
History to Your
Computer
1. Plug the small end of the
USB cable into the mini-USB
port on the back of the Edge
(under the weather cap).
2. Connect the larger end of the
USB cable to an available
USB port on your computer.
3. Open Garmin Connect or
Garmin Training Center.
Follow the upload instructions
included with the software.
More Information
For more information about the Edge
functions and settings, refer to the
owners manual.
Product Registration
Help us better support you by
completing our online registration
today. Go to http://my.garmin.com.
Keep the original sales receipt, or a
photocopy, in a safe place.
© 2008 Garmin Ltd. or its subsidiaries
Garmin
®
is a trademark of Garmin Ltd. or its subsidiaries, registered in the USA and other
countries. Garmin Training Center
®
, Edge
®
, Garmin Connect
, GSC
10, Dynastream
, ANT
,
and ANT+Sport
are trademarks of Garmin Ltd. or its subsidiaries. These trademarks may not be
used without the express permission of Garmin. Other trademarks and trade names are those of
their respective owners.
Garmin International, Inc., 1200 East 151st Street, Olathe, Kansas 66062, USA Tel. (913)
397.8200 or (800) 800.1020 Fax (913) 397.8282
Garmin (Europe) Ltd., Liberty House, Hounsdown Business Park, Southampton, Hampshire, SO40
9RB UK Tel. +44 (0) 870.8501241 (outside the UK) 0808 2380000 (within the UK) Fax +44 (0)
870.8501251
Garmin Corporation, No. 68, Jangshu 2nd Road, Shijr, Taipei County, Taiwan Tel.
886/2.2642.9199 Fax 886/2.2642.9099
For the latest product information and accessories, visit the Garmin Web site at www.garmin.com.
October 2008 Part Number 190-00813-01 Rev. C Printed in Taiwan
  • Page 1 1
  • Page 2 2
  • Page 3 3
  • Page 4 4
  • Page 5 5
  • Page 6 6
  • Page 7 7
  • Page 8 8
  • Page 9 9
  • Page 10 10
  • Page 11 11
  • Page 12 12

Garmin Edge 605 User manual

Type
User manual
This manual is also suitable for

Garmin Edge 605 is a GPS-enabled bike computer that provides accurate ride data and helps you navigate your cycling routes. It comes with preloaded maps and allows you to create custom routes, track your speed, distance, time, and calories burned. The Edge 605 also features a built-in altimeter to track elevation gain and loss, and it's compatible with ANT+ sensors for heart rate, speed, and cadence. Additionally, it offers wireless data transfer to your computer for further analysis and sharing.

Ask a question and I''ll find the answer in the document

Finding information in a document is now easier with AI