Page is loading ...

User Manual
GSC 100
Global
Satellite Communicator

WARNINGS
GOOD JUDGEMENT
This product is an excellent navigation aid and communications
tool, but does not replace the need for careful orienteering and
good judgement. Never rely solely on one device for
navigating.
USE CARE
The Global Positioning System (GPS) is operated by the U.S.
Government, which is solely responsible for the accuracy and
maintenance of GPS.
The accuracy of position fixes can be affected by the periodic
adjustments to GPS satellites made by the U.S. Government
and is subject to change in accordance with the Department of
Defense civil GPS user policy and the Federal Radionavigation
Plan.
USE CAUTION
Accuracy can also be affected by poor satellite geometry.
When the accuracy warnings appear on the screen, use the
data with extreme caution.
USE PROPER ACCESSORIES
Use only Magellan cables and antennas; the use of non-
Magellan cables and antennas may degrade performance or
damage the receiver, and will void the warranty.
LICENSE AGREEMENT
Magellan grants you, the purchaser, the right to use the
software supplied in and with the GSC 100 Global Satellite
Communicator (the “SOFTWARE”) in the normal operation of
the equipment. You may make copies only for your own
personal use and for use within your organization.
The SOFTWARE is the property of MAGELLAN and/or its
suppliers and is protected by United States copyright laws and
international treaty provisions; therefore, you must treat this
SOFTWARE like any other copyright material.

You may not use, copy, modify, reverse engineer or transfer
this SOFTWARE except as expressly provided in this license.
All rights not expressly granted are reserved by MAGELLAN
and/or its suppliers.
RADIATION WARNING
Although no single value of “safe
radiation level” has been agreed upon
by all countries, the American National
Standards Institute (ANSI/LEEE C95.1
- 1992) recommends that people
should not be exposed to radiation
stronger than 1 milliwatt per square
centimeter at the frequencies used in
the Magellan GSC 100. Due to the
GSC 100 transmission times being
very brief, the amounts are well within
acceptable limits as set forth by the
American National Standards Institute.
LIGHTNING WARNING
Due to the extension capability of the ORBCOMM telescopic
antenna located on the GSC 100, it is strongly advised that
operations of the GSC 100 cease when thunderstorm or
electrical storm conditions are present.
OBTAINING LICENSING FOR ORBCOMM
COMMUNICATORS
Use of the ORBCOMM System outside the United States has
only been authorized by a limited number of foreign
Governmental Authorities. Use of the ORBCOMM System
outside the United States is permissible only when all
necessary permits, approvals and authorizations have been
received from the applicable foreign Governmental Authorities.
RADIO FREQUENCY RADIATION

In addition, use of the GSC 100 outside the United States is
only permissible if it has been “type approved” for use in that
country or territory. Both the ORBCOMM System and the GSC
100 may need to be approved prior to use in a foreign country
or territory. For information on those countries or territories in
which use of the ORBCOMM System and the GSC 100 is
authorized, please contact ORBCOMM or your local service
provider.
NOTICE OF COPYRIGHT PROTECTION
Copyright 1998 Magellan Corporation, 960 Overland Court,
San Dimas, CA 91773 USA. World Rights Reserved.
No part of this publication may be stored in a retrieval system,
transmitted or reproduced in any way, including but not limited
to photocopy, photograph, magnetic or other record, without
the prior written permission of Magellan Systems Corporation.
Magellan™, GSC 100™ are the trademarks of Magellan
Systems Corporation.
ORBCOMM™ is the trademark of Orbital Communications
Corporation.
GlobalGram
SM
is a registered service mark of ORBCOMM
Global LP.
Part No. 22-60104-000

Contents
INTRODUCTION ...........................................................1
Welcome to the GSC 100 ...........................................1
Packing List ................................................................2
Conventions Used in this Manual...............................2
Messaging Activation .................................................3
GETTING STARTED......................................................4
Receiver Description ..................................................4
Keypad Description ..............................................4
Softkeys ................................................................ 5
Arrow Keys........................................................... 5
Power Key............................................................. 5
Light Key .............................................................. 5
Home Key ............................................................. 5
Menu Key ............................................................. 5
Enter Key .............................................................. 5
Escape Key............................................................ 6
Alphanumeric Keys .............................................. 6
Installing the Battery ..................................................7
Charging the Battery...................................................8
Turning the Receiver “ON” & “OFF” ........................9
GPS Initialization .......................................................9
Proper Handling - Signal Reception.........................12
System (SYS) Modes ...............................................14
GPS Mode ..........................................................14
ORBCOMM Mode .............................................14
AUTO Mode.......................................................14
Creating a GlobalGram.............................................15
Sending a GlobalGram .............................................18

Receiving a GlobalGram ..........................................20
Your First Position Fix..............................................21
Saving Your First Waypoint......................................22
Creating a GOTO......................................................25
Navigating with the GSC 100...................................25
REFERENCE................................................................26
General Usage...........................................................26
Turning the Receiver ON....................................26
Turning the Receiver OFF ..................................27
Inputting Data .....................................................27
Turning the Light ON and OFF ..........................27
The Main Menu ..................................................28
System (SYS) Modes ...............................................29
GPS Mode ..........................................................29
ORBCOMM Mode .............................................29
AUTO Mode.......................................................29
Messaging Operations ..............................................30
Selecting ORBCOMM Mode .............................30
Initialization........................................................31
Preferred Gateway Control Center (GCC) .........32
Default Characters ..............................................33
Font Size .............................................................33
Display Characters Setting .................................34
Auto Message Check ..........................................35
Address Book .....................................................36
Viewing an Address ............................................ 36
Creating a New Address ..................................... 37
Editing an Address .............................................. 38
Deleting an Address ............................................ 38
Capturing an Address.......................................... 39

GCC Addresses (Speed Dial) .............................40
Messages...................................................................41
Requesting Message Check ................................41
Messaging Icons .................................................42
Viewing Received GlobalGrams ........................43
Creating a GlobalGram.......................................45
Sending Standard GlobalGrams.......................... 47
Sending STORE & FWD Globalgrams .............. 49
Sending a GlobalGram to a GSC 100.................51
Selecting Recipients from the Address Book .....52
Inserting Symbols & Characters into GlobalGrams
......................................................................53
Viewing Created GlobalGrams...........................54
Accessing the Mailbox .......................................55
Editing a GlobalGram.........................................56
Copying a GlobalGram.......................................57
Replying to a GlobalGram..................................58
Forwarding a GlobalGram..................................59
Deleting a Message.............................................61
Message Status ...................................................62
GPS Operations ........................................................63
Selecting GPS Mode...........................................63
GPS Icons ...........................................................64
NAV Screens.......................................................65
Viewing the POSITION Screen .......................... 65
Viewing the NAV 1 Screen ................................. 66
Viewing the NAV 2 Screen ................................. 66
Customizing the NAV Screens............................ 67
NAV 1 Screen ............................................... 68
NAV 2 Screen ............................................... 69

PLOT Screens.....................................................69
Viewing the POINTER Screen ........................... 69
Viewing the PLOT Screen .................................. 70
Changing the Plotter Scale.................................. 71
Using PAN N SCAN........................................... 71
Setting a GOTO Using PAN N SCAN................ 72
Clearing Plotter Track ......................................... 72
Viewing the ROAD Screen ................................. 73
Waypoints ...........................................................73
Saving a Position Fix as a Waypoint................... 73
Receiver Generated Waypoint Name .................. 74
User Defined Waypoint Name ............................ 74
Creating a Waypoint............................................ 75
Accessing the Waypoint Menu ........................... 76
Viewing a Waypoint ............................................ 77
Accessing the Waypoint Function Menu ............ 78
Editing a Waypoint.............................................. 78
Projecting a Waypoint ......................................... 79
Deleting a Waypoint............................................ 80
Routes .................................................................81
Activating a GOTO Route .................................. 82
Accessing the Route Menu ................................. 83
Creating a Multi-Leg Route ................................ 84
Activating and Deactivating a Route .................. 85
Reversing a Route ............................................... 86
Viewing the Route Summary (Edit Option)........ 86
Viewing the Legs of a Route............................... 87
Inserting a Leg in a Route................................... 87
Deleting a Leg..................................................... 88
Adding a Leg ...................................................... 89
Replacing a Waypoint ......................................... 90
Navigating (Activating) a Leg ............................ 91

Deleting a Route ................................................. 91
Creating an MOB (Man OverBoard) Route........ 92
Creating a Backtrack Route ................................ 92
Last Fix Buffer....................................................92
Viewing a LAST FIX.......................................... 93
Viewing the LAST FIX Trip Summary Screen... 93
Setup Options ...........................................................94
GPS Setup...........................................................94
Initializing the Receiver...................................... 94
Setting the Coordinate System............................ 95
Setting the Elevation Mode................................. 96
Setting Velocity Averaging.................................. 97
Setting Speed Units............................................. 97
Setting Distance Units ........................................ 97
Setting Elevation Units ....................................... 98
Setting North Reference...................................... 98
Selecting Map Datum ......................................... 98
Selecting Waypoint Sort...................................... 99
Selecting the Last Fix Interval ............................ 99
Plot Setup ............................................................ 99
General Setup ...................................................100
Selecting Time Format...................................... 100
Setting the Light Timer ..................................... 100
Sampling ........................................................... 101
Setting NMEA Port and Baud Rate .................. 102
Selecting RS-232 Port and Baud Rate .............. 103
Selecting Clear Menu........................................ 103
Contrast ............................................................. 103
Additional Features ................................................105
Viewing ORBCOMM SAT STATUS Screen ...105
Viewing GPS SAT STATUS Screen .................106
Viewing the Odometer......................................107

Resetting the Odometer and/or Trip Odometer 107
Viewing the Clock ............................................107
Viewing the SUN/MOON Screen.....................108
GPS Simulator ..................................................108
ORBCOMM Demo ..........................................109
Erasing Last Fixes ............................................109
Accessing the ABOUT Screen ......................... 110
Erasing Track from the Plotter Screen.............. 110
Erase All Waypoints from Waypoint List ......... 110
Clearing Receiver Memory .............................. 111
Performing a Hardware Reset........................... 111
ICONS .......................................................................... 112
Warnings and Other Messages.................................... 115
Troubleshooting ........................................................... 119
Contacting Customer Service .................................123
NMEA Data Messages.................................................125
Available Datums .........................................................132
Specifications ...............................................................133
Coordinate Systems......................................................135
What is GPS? ...............................................................138
What is ORBCOMM?..................................................141
Where to Get More Information .................................145
Abbreviations ...............................................................148
City Reference Chart ...................................................150
Connecting External Power/Devices ..........................157
Glossary........................................................................160
Index.............................................................................169

Magellan GSC 100 Global Satellite Communicator 1
INTRODUCTION
Welcome to the GSC 100
Congratulations on your purchase of the Magellan GSC 100
Satellite Communicator, the world’s first hand-held global
satellite communicator. You now have the ability to send and
receive GlobalGrams, e-mail messages, to and from anywhere on
Earth. Because the GSC 100 uses standard e-mail protocols,
sending and receiving GlobalGrams is easy. Communicate to any
e-mail (Internet, X.400) address or another GSC 100. And, with
its integrated GPS capability, the GSC 100 not only lets you know
where you are, it guides you anywhere you want to go. You can
identify your position, plot and track your course or store
waypoints. Your GSC 100 will get you anywhere and back again
at the push of a button. You can also relay your position to
anyone, anywhere - no matter how remote you may be - with a
GSC 100 GlobalGram. And with its rugged, splashproof
construction, the GSC 100 is ready for action, no matter where
your adventures may take you.
To help you get started using your new GSC 100, turn to the
section titled “Getting Started.” This quick-start session will
have you sending and receiving GlobalGrams as well as
recording landmark locations and navigating in no time at all. It
is important to note that, prior to use, you must activate the unit
within the ORBCOMM network, as they are the service provider.
Activation Instructions have been provided to assist you in
activating your GSC 100. A Quick Reference Guide has been
provided to assist in operating the unit while making your way
outdoors. After you’ve learned the basics, the rest of this manual
will give you detailed information about all the features and
functions of your GSC 100 Satellite Communicator. A Reference
Section, Troubleshooting, and Appendix, with Glossary, are
included as well.

2 Magellan GSC 100 Global Satellite Communicator
Packing List
Before you begin using your new unit, make sure that all the
items listed on the GSC 100 box are included. If any of the items
are missing or damaged, contact Magellan customer service
immediately at (800) 707-9971.
Optional accessories are available from your local GSC 100
Global Satellite Communicator dealer.
Conventions Used in this Manual
The reference section of this manual is designed to assist you in
the use of your GSC 100. Each topic in the reference section
includes a brief description of the activity chosen as well as a
detailed description of the keys to press and sample screens
showing how the function is performed. In the reference section
you will be given instructions to follow. Bolded words indicate
the key or keys to be pressed; italics indicate the name of the
screen to be viewed; and, ALL CAPS indicate a menu item to be
selected.
Also in the reference section are alerts to inform you of some
cautions or notes that will assist you in using your Magellan GSC
100 Satellite Communicator.
The stop sign indicates the information enclosed is very
important and should be read before moving on.
The Magellan logo denotes information that can help you use or
understand your receiver. While this information is not required
to perform the activity, it may provide you with a better
understanding of the activity or shortcuts you can use.

Magellan GSC 100 Global Satellite Communicator 3
Messaging Activation
Prior to use, your GSC 100 unit must be activated within the
ORBCOMM network by your local service provider. A set of
Activation Instructions have been included with your GSC 100 to
guide you through the activation process. Included in the
Activation Instructions are the instructions, forms, payment
information and a list of contacts. Activation allows your service
provider to open an active account so that you can begin to send
and receive GlobalGrams using your GSC 100. During the
activation process you will receive a unique e-mail address for
your GSC 100. Future system enhancements, or issues, will be
communicated to you to keep you up and running. Activation
procedures differ from country to country and should be verified
by your local service provider.
During the activation process you will need the serial number for
your unit. The serial number can be found on the outside of your
GSC 100 box; on a sticker on the inside of the battery door; on
the COPYRIGHT screen displayed during start-up; or on the
ABOUT screen accessed from the GENERAL SETUP menu.
Also, prior to using the messaging capabilities, you must initialize
your GSC 100’s GPS receiver. This will allow the unit to acquire
a position and find the ORBCOMM satellites needed to transmit/
receive GlobalGrams as well as display the ORBCOMM satellite
schedule.
To legally operate a GSC 100, it is the responsibility of the user
to obtain permission from the local telecommunications
regulatory authorities of the country you are operating within.
Using your GSC 100 in any country without permission causes
you to run the risk of confiscation of your unit or legal action
from local authorities. Normal practice for taking
telecommunication equipment into another country is to apply
for a license prior to travel. If a license has not been obtained
before travel, the equipment may be put into storage by local
authorities until such time as a license is obtained.

4 Magellan GSC 100 Global Satellite Communicator
GETTING STARTED
Receiver Description
This section will outline the basic layout of the GSC 100 and the
functions associated with the various keys.
Keypad Description
The GSC 100 keypad consists of four SOFTKEYS, a four-way
arrow keypad, a POWER key, a LIGHT key, a HOME key, a
MENU key, an ESCAPE key, an ENTER key and 30
ALPHANUMERIC keys.
GPS Antenna
(inside receiver)
4-way Arrow Keypad
Softkeys
POWER Key
LIGHT Key
ORBCOMM Telescopic Antenna
(rotates and extends upward)
(when removed - used as external ORBCOMM antenna port)
ESCAPE Key
MENU Key
RS-232/NMEA
Ext. Power Port
HOME Key
External GPS Antenna Port
ENTER Key
Keypad
(symbols & numbers)

Magellan GSC 100 Global Satellite Communicator 5
Softkeys
There are four softkeys which are located just below the GSC 100
screen. These softkeys are used to control the operation of the
unit and provide you with specific options particular to a given
screen or function. Softkey function designations appear at the
bottom of the screens and correspond to the options listed. These
options differ from screen to screen. To execute any option listed,
press the corresponding softkey.
Arrow Keys
The four-way arrow keypad is used to scroll through menu items
or to move the cursor during alphanumeric entries. When one of
the arrow directions is pressed, the cursor will continue to move
until the key is released.
Power Key
The Power key turns the unit “ON” or “OFF.”
Light Key
This key controls the backlights for the screen and keypad.
Home Key
The Home key returns the user to the Main Menu screen from any
function within the unit.
Menu Key
The Menu key calls up a menu of available functions relative to
the current screen display.
Enter Key
The Enter key accepts data input and is used to select items from
menu screens.

6 Magellan GSC 100 Global Satellite Communicator
Escape Key
The Escape key is used to cancel the last executed action. For
example, if pressing the Enter key from a menu allows the user to
view Satellite Status, then pressing the Escape key immediately
after the Enter key will return the user to the previous screen.
Alphanumeric Keys
The Alphanumeric keys are labeled with two characters each.
Primary characters are the letters and secondary characters are
numbers and symbols located in the upper right corner of the
keys. To access the secondary characters, press the ALT key and
then press the key containing the number or symbol that you wish
to use. To type capital letters you must have the CAPS key
depressed prior to pressing the key. Both the ALT and CAPS
keys are toggle keys so you will have to press them again to de-
activate them. To access symbols that are not found on any of the
keys, press the ALT key and then the SYM key which is the
symbol key when in the ALT mode. A symbol pop-up menu will
appear allowing you to move through it using the ARROW
keypad. When you find the
symbol you wish to use, highlight
it, press ENTER and it will be
inserted where the cursor is
positioned. Within the SYMBOLS
MENU there is also an option to
include the TIME, DATE or
POS TIME DATE
;
#
,
“
^
_
[
]
~
<>

Magellan GSC 100 Global Satellite Communicator 7
Position (POS) into your GlobalGram. The POS information is
your last calculated GPS coordinates, including time, date and
datum stamp. This information can be edited within the message.
Installing the Battery
The GSC 100 runs on either external power or battery power.
The unit uses one 9.6 VDC Rechargeable NiCad Battery Pack
installed in the snap-open back panel.
To install the battery pack, turn the GSC 100 on its face,
making sure to protect the screen and keypad. Using a finger,
push the battery door latch, shown above, downward. Holding
the battery door from both sides, open it towards you. Stretch
Battery Pack Clip
GSC 100 Battery Clip
Press down when connecting or disconnecting the two clips
GSC 100
Battery Clip
Battery Door
Battery Pack
Battery Door
Latch
Battery Pack
Clip
Prior to using your GSC 100 you should open the battery door,
make sure the battery pack is connected and then apply external
power to charge the battery, as it ships uncharged.

8 Magellan GSC 100 Global Satellite Communicator
out the battery pack and release the snap on the side of the
battery pack clip, shown above. Pull the GSC 100 and the
battery pack clips apart. You will have up to fifteen minutes to
replace the battery before internal memory (messages,
addresses, waypoints and routes) is lost. Take a replacement
NiCad battery pack, available from Magellan, and clip it onto
the GSC 100 battery clip and close the battery door.
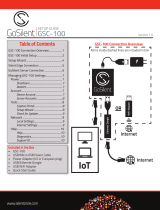
Charging the Battery
When the battery is low, depicted by the low battery icon shown
in the status bar, you will need to recharge it for further use. To
charge the 9.6 VDC Rechargeable NiCad Battery Pack, supplied
with your GSC 100, you will need to connect the data power
extension cable to the RS-232/Power port located on the side of
the unit. Then connect the AC power cable into the data power
extension cable and plug into external power. You will be able to
operate the unit while the battery is charging although it will take
longer to charge. It is recommended that you charge the battery
while you are not using your unit to assure that the battery pack
gets fully charged. It will take 6 hours of un-interrupted charging
to fully recharge the battery pack.
It is imperative that, when connecting external power to your
GSC 100, the connectors are properly aligned so as not to
damage the pins.

Magellan GSC 100 Global Satellite Communicator 9
Only the Magellan-supplied 9.6 VDC Rechargeable NiCad
Battery Pack will work with your GSC 100. Do not attempt to
use any other batteries as they may not work with your unit and
any damage caused by their use will void the warranty.
Turning the Receiver “ON” & “OFF”
To turn the GSC 100 “ON”, press the POWER key and wait for
the unit to scroll through the start-up screens.
To turn the unit “OFF” press the same POWER key. This will
start a shutdown sequence that counts down the seconds until the
unit actually turns “OFF.” To immediately turn the receiver
“OFF” press the POWER key again. This bypasses the
countdown and the unit turns “OFF” immediately.
GPS Initialization
When you are using the unit for the first time, move the unit 300
or more miles without the unit taking a position fix or perform a
system reset, you will need to initialize the GSC 100 with the
current location, elevation, local time and date information. This
is because the constellation of 24 GPS satellites circling the globe
are in constant motion and before your receiver can tell you
where you are, it needs to know roughly where the satellites are,
relative to itself. It does this with the use of an almanac where it
has stored in memory a general location, a time and a date. The
almanac tells the receiver which satellites will be in view. Using
the location and time you enter, the receiver can quickly find
satellites and calculate your position sooner. Without
initialization, the unit will take a longer period of time to provide
position information or locate GPS or ORBCOMM satellites.

10 Magellan GSC 100 Global Satellite Communicator
ORBCOMM
GPS UNINITIALIZED
PRESS ENTER TO
INITIALIZE OR
ESCAPE TO
CONTINUE
ATTENTION!
If your unit does not display the ATTENTION screen on power-
up, go to the SETUP OPTIONS section of this manual for
further instructions.
Upon power-up the unit will scroll
through three initial ID screens
stopping on the ATTENTION
screen. The first screen is the
MAGELLAN ID screen.
The next screen to be displayed is
the COPYRIGHT and POWER
SOURCE screen.
The final screen is the ORBCOMM
ID screen.
The ATTENTION screen prompts
you to initialize the unit prior to
further use. By pressing ENTER
you will be brought to the
INITIALIZATION screen where you
will enter your location, time and
date information. Press ENTER.
MAGELLAN
COPYRIGHT 1998
MAGELLAN CORP.
BATTERY
POWER
/