Shark BS60 User manual

Type
User manual

Shark BS60 is a versatile cycling computer that provides essential data for both speed and cadence tracking. Its dual sensor design allows you to choose between measuring speed or cadence, ensuring accurate readings for different cycling scenarios. With Bluetooth 5.0 and ANT+ connectivity, you can pair it with your smartphone or other compatible devices to monitor your progress and track your fitness goals. The long battery life of up to 600 hours ensures uninterrupted use during your rides.

Shark BS60 is a versatile cycling computer that provides essential data for both speed and cadence tracking. Its dual sensor design allows you to choose between measuring speed or cadence, ensuring accurate readings for different cycling scenarios. With Bluetooth 5.0 and ANT+ connectivity, you can pair it with your smartphone or other compatible devices to monitor your progress and track your fitness goals. The long battery life of up to 600 hours ensures uninterrupted use during your rides.

CR1632
Sensor
Sensor & LED
21 3 4
CR1632
5. Select Sensor 6. Magnet detection distance
Speed : Green LED blink twice Cadence : Red LED blink twice
1.Speed sensor
① Install the battery &
Check the
boot LED blinks
3 times.
Do not detect magnet within
5 seconds.
Confirm green LED
blinks twice.
(※Refer to picture below)
2. Cadence sensor
Install the battery &
Check the
boot LED blinks
3 times.
Magnet detection within
5 seconds.
Confirm red LED blinks twice.
(※Refer to picture below)
Magnet detection
https://oobik.bike
SPEED or CADENCE
SELECTIVE MEASUREMENT DUAL SENSOR
1. Specification
Product : Cycling Speed or Cadence Single Sensor
Model : B SHARK-M (BS-60)
Size : 40 x 25 x 11.75mm
Weight : 11g ( Incl. Battery, Magnet )
Battery type : CR1632 (DC 3V)
Battery Life : Up to 600h
Temperature : -20℃ to 60℃
Range : 120km/h, 260rpm
Wireless : Bluetooth 5.0, ANT+
2. Warranty & Service
This product was shipped after its own quality/management
inspection and is sold in accordance with consumer compensation
regulations.
The warranty period is one year from the date of purchase of the
product
In the event of a failure in normal use within the warranty period, contact
the service center and send the receipt and product to us for free of
charge.
Paid service items
①Products that warranty has expired..
②Failure/damage cause by user negligence or accident
Warning
This product contains a coin / button cell battery.
If the coin / button cell battery is swallowed, it can cause severe
internal burns in just 2 hours and can lead to death.
Keep new and used batteries away from children.
If the battery compartment does not close securely, stop using the
product and keep it away from children.
If you think batteries might have been swallowed or placed inside
any part of the body, seek immediate medical attention.
Battery
Spoke magnet
Ring magnet
(air inlet)
Dual lock pad
(For frame)
Cadence magnet
(pedal)
3. Component
Small rubber ring
(For ring magnet)
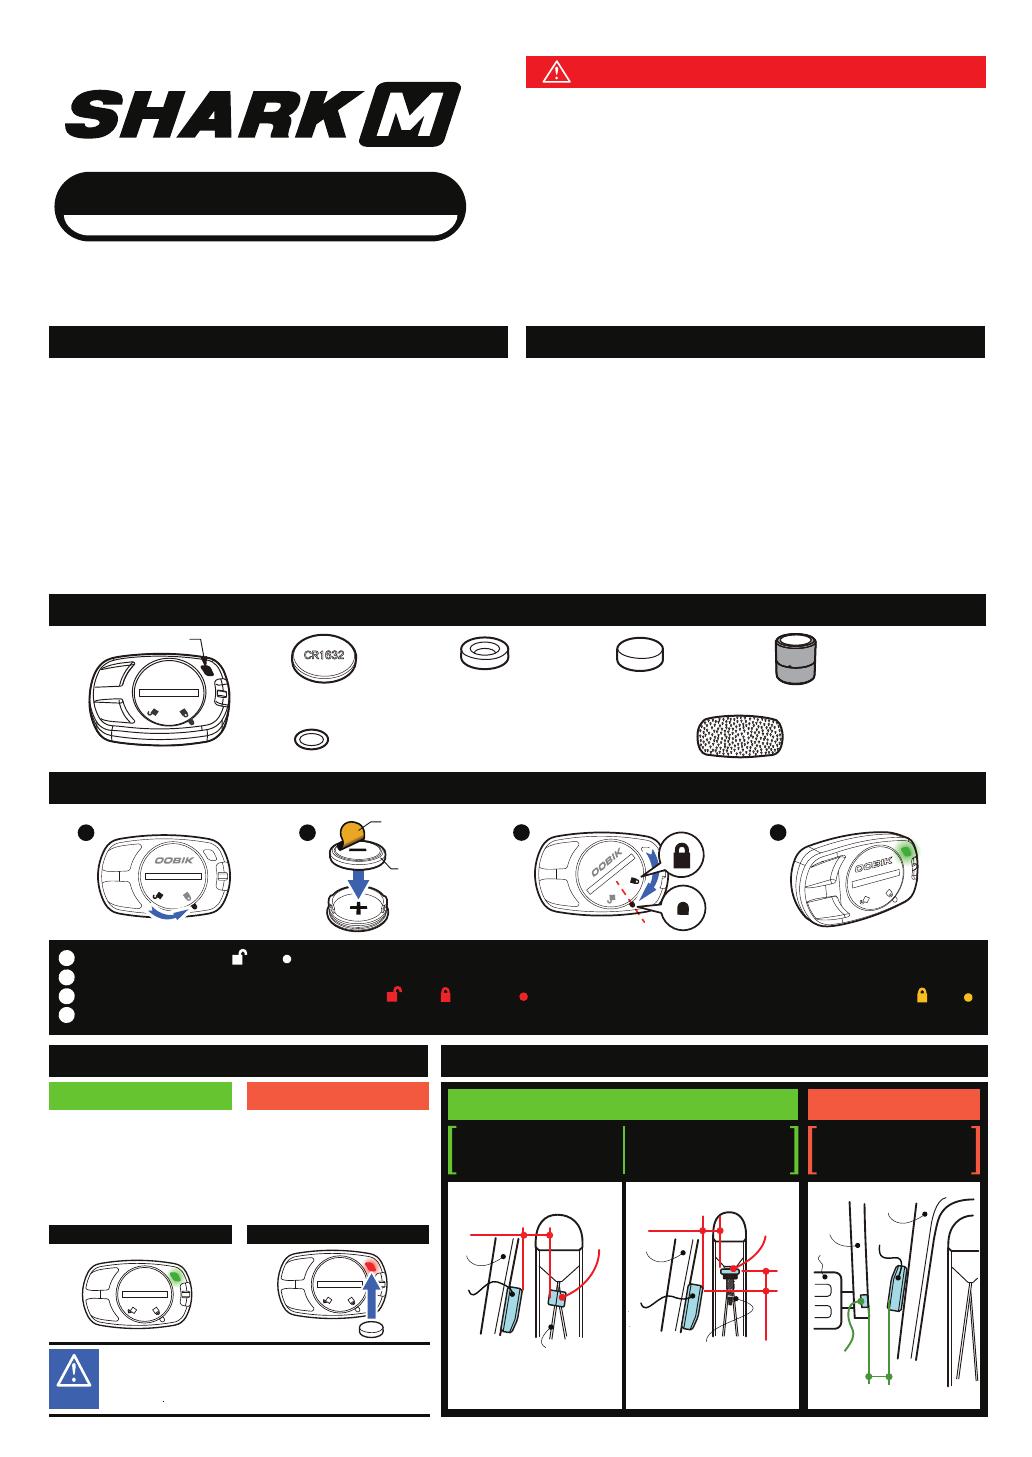
4. Battery install / Replace
※When inserting the battery cover, make sure to check the mark on the cover before installing.
Remove insulation
paper.
1 Remove Battery cover : and rotate consistently to separate the cover.
2 Inserting battery : Remove the insulating paper attached to the (-) terminal of the CR1632 battery and insert it into the battery cover.
3 Insert Battery Cover : Insert the center point of and to match press to close completely, and install the cover to match and .
4 Confirm operation : Battery contact and green LED flashing. (※ Refer to10. LED Display Status)
You can select sensor only after installing the battery.
The setting is maintained unless the battery is removed.
If you want to change the sensor, you need to remove and reinsert
the battery.
Caution
[ MTB, hybrid bike ]
[ Road bike ]
Spoke magnet
detection distance
Cadence magnet
detection distance
Ring magnet
detection distance
Max10mm
Max25mm
Ring
magnet
Spoke
Presta valve
5~22mm
Spoke
magnet
Cadence
magnet
Max15mm
Crank
arm
Pedal
Sensor
Sensor
Sensor
Speed sensor (※Ring or spoke magnet) Cadence sensor
Frame
Frame
Frame
2
. Install ring magnet
(※For Presta valve only, may not be possible depending on rim and valve specifications.)
1. Ring magnets can be detected when
the speed sensor is 5~22mm apart.
(※
Refer to‘6. Sensor detection distacne
)
Tire
Frame
Sensor
8. Install : Speed sensor
1. Install spoke magnet
Loosen the screw cap attached to the
spoke magnet, attach it to the spoke so
that the magnet faces the sensor, and
then turn the screw cap again to fix it.
(※If sensor and the spoke magnet
collide, attach it to the other side)
1. Attach the cadence magnet
- Attach to the pedal bolt groove of the crank arm.
2. Attach the dual lock pad
- Remove the protective film on the back of the dual lock
pad and attach it to the frame opposite the magnet.
- Attach the main body to the dual lock pad.
A. General bicycle (MTB, Road, Hybrid)
How to install magnet
A. MTB, hybrid, road bike B. Spinning bike
Frame
Crank arm
Cadence magnet
7. Install : Cadence sensor
Pedal bolt
groove
Frame
Crank arm
Caution : Install only one of the ring and spoke magnet. If both are installed at the same time, it may cause data errors and product failure.
Spoke
Sensor
Frame
Spoke
magnet
Ring
magnet
< Rubber ring>
Fixing screw
or
Small rubber
ring
< Fixing screw>
Pedal bolt
groove Cadence magnet
Frame
Sensor
Break pad
Flywheel
Ring or cadence
magnet
How to install spoke magnet
How to install ring magnet
- Remove the fixing screw at the bottom of the air inlet by turning it as shown in the picture
below.
- Insert the ring magnet first, then insert the fixing screw or small rubber ring to fix it.
B. Spinning bicycle
1. After checking the attachment position to make sure that the
magnet does not interfere with the brake pad and other parts
when the flywheel is rotating, Attach a ring or cadence magnet.
2. Use Dual Lock pad to attach the product to the position of the
frame where the magnet and sensor match.
9.
Cautions for park/stop
For battery life, keep the distance at least 5cm
magnet away from the sensor when park/stop.
Caution
O
X
GOOD BAD
Color
Saving
mode
Power
on
Green
Red
Green
Red
2
23
3
1
- -
1
- -
-
Detect
Sensor
Magnet
10. LED display status
(※Power saving mode:about 30 min after stop)
Over 10%
Less 10%(Replace battery)
Speed magnet detect (5 times)
Cadence magnet detect (5 times)
Battery
※If battery is insufficient, the product may malfunction.
This device complies with part 15 of the FCC Rules. Operation is subject to the following two conditions: (1)
This device may not cause harmful interference, and (2) this device must accept any interference received,
including interference that may cause undesired operation.
Any changes or modifications (including the antennas) to this device that are not expressly approved by the
manufacturer may void the user's authority to operate the equipment.
This equipment complies with FCC RF Radiation exposure limits set forth for an uncontrolled environment.
This device and its antenna must not be co-located or operating in conjunction with any other antenna or
transmitter.
  • Page 1 1
  • Page 2 2
  • Page 3 3

Shark BS60 User manual

Type
User manual

Shark BS60 is a versatile cycling computer that provides essential data for both speed and cadence tracking. Its dual sensor design allows you to choose between measuring speed or cadence, ensuring accurate readings for different cycling scenarios. With Bluetooth 5.0 and ANT+ connectivity, you can pair it with your smartphone or other compatible devices to monitor your progress and track your fitness goals. The long battery life of up to 600 hours ensures uninterrupted use during your rides.

Ask a question and I''ll find the answer in the document

Finding information in a document is now easier with AI