Page is loading ...

Using the
KODAK PROFESSIONAL Device Calibration
Software with the
KODAK PROFESSIONAL LED II
Printers 20P/20R
Part No. 6B6640

©Eastman Kodak Company, 2001
All rights reserved. Contents of this publication may not be reproduced in any form
without permission from Eastman Kodak Company.

March 2001 iii
Contents
1 Calibrating the Printer ...........................................................................................................................1-1
Starting the Device Calibration Software ..............................................................................................1-2
Starting the Calibration Application and Exposing a Test Target .........................................................1-3
Obtaining Densities ...............................................................................................................................1-6
Obtaining Densities from a File ......................................................................................................1-6
Using the Densitometer to Read Densities ....................................................................................1-7
Obtaining Densities from the Centralized Densitometer (NT Only) ................................................1-8
Completing the Calibration .................................................................................................................1-10
2 Troubleshooting ....................................................................................................................................2-1
Calibration Graph ..................................................................................................................................2-1
Calibration Errors ..................................................................................................................................2-2
Numeric Calibration Error Codes ...................................................................................................2-2
Non-Numeric Calibration Error Messages ...................................................................................2-11
Densitometer Errors ............................................................................................................................2-12
3 Using Additional Calibration Features ..................................................................................................3-1
Installing the Calibration Software ........................................................................................................3-1
System Requirements ....................................................................................................................3-1
Installation Procedure ....................................................................................................................3-2
About the Kodak Professional Device Calibration Software .................................................................3-5
Application Window Definitions ......................................................................................................3-5
Starting the Device Calibration Software ..............................................................................................3-7
Editing the Log Settings ........................................................................................................................3-7
Adding, Updating, and Deleting Devices ..............................................................................................3-9
Adding a Device .............................................................................................................................3-9
Updating a Device ........................................................................................................................3-10
Deleting a Device .........................................................................................................................3-12

Contents
iv March 2001
Advanced Features of the LED II Calibration Software ......................................................................3-13
Viewing Graphs ............................................................................................................................3-13
Applying a Master Balance (NT Systems Only) ...........................................................................3-18
Sending LUTs ..............................................................................................................................3-20
Sending Targets ...........................................................................................................................3-22
Editing the Device Configuration ..................................................................................................3-25
Creating a Density File for Use with Calibration ...........................................................................3-36
File Formats .................................................................................................................................3-36
Installing the Densitometer .................................................................................................................3-37
4 Installing and Using the Centralized Densitometer Application ............................................................4-1
Installing the Centralized Densitometer Application .............................................................................4-1
System Requirements ....................................................................................................................4-1
Installation Procedure ....................................................................................................................4-2
Using the Centralized Densitometer Application ..................................................................................4-5
Adding a Printer .............................................................................................................................4-6
Deleting a Printer ...........................................................................................................................4-7
Changing Printer Information .........................................................................................................4-9
Changing the Densitometer Port ..................................................................................................4-10
Measuring Densities During a Calibration Cycle ..........................................................................4-12
Viewing Calibration Graphs ..........................................................................................................4-13

March 2001 1-1
1 Calibrating the Printer
This section includes instructions for calibrating the Kodak Professional LED
Printers 20P/20R, Generations l and ll.
Kodak provides calibration applications for Windows NT and Macintosh systems.
See “Installing the Calibration Software” on page 3-1 for installation instructions.
See Section 3, Using Additional Calibration Features, for details about the
windows and dialog boxes for the application software and for additional
procedures not performed with each calibration.
Calibration is the process for creating and maintaining a Look-Up Table (LUT) that
produces the correct color balance for all images printed on the Printer. There is
sufficient variation among printers that each printer must be calibrated separately.
Before calibrating, make sure that:
• the paper path is threaded
• the printer status is “Online and Ready”
• no other printer applications are active
• the calibration application is running
• within the Kodak Professional Device Calibration software:
— at least one device is defined (see “Adding, Updating, and Deleting
Devices” on page 3-9)
— any needed changes to the configuration file are in place (see “Editing the
Device Configuration” on page 3-25)
• the densitometer is connected and calibrated
• the paper processor is in control

Calibrating the Printer
1-2 March 2001
You need to calibrate the printer when you start the system up each day. You also
need to calibrate the printer when
• you change paper
• print quality is questionable
• the temperature at the site changes more than 5° F (2.8° C)
• if running more than one shift, at the beginning of each shift
NOTE: Most windows displayed in this section are from the Windows NT version
of the software. The windows for the Macintosh version of the software are
similar.
For information about editing the calibration settings (for example, you may want
to display a calibration graph only if calibration is out of tolerance), see “Editing
the Device Configuration” on page 3-25.
Starting the Device Calibration Software
1. Open the KODAK PROFESSIONAL Device Calibration application.
The display shows the KODAK PROFESSIONAL Device Calibration window.
If the device you need to calibrate does not appear on the window, you need
to add a calibration device. See “Adding, Updating, and Deleting Devices” on
page 3-9.
2. Select the icon for the LED Printer.
3. Click the Calibrate icon.
LED Printer
icon

Calibrating the Printer
March 2001 1-3
The display shows the LED Calibration Application window.
Starting the Calibration Application and Exposing a
Test Target
IMPORTANT: The settings in the configuration file for the selected device
determine some of the actions and messages in this procedure.
The configuration file is specific to your lab and its operations. For
more information about the configuration file, see “Editing the
Device Configuration” on page 3-25.
1. Click Go to start the calibration cycle.
Downloading LUTs and Sending Test Print highlights.

Calibrating the Printer
1-4 March 2001
NOTE: Once the application has started, the red stoplight is active and you
can click the icon to stop the calibration procedure.
If you click the red stoplight icon, the display shows the following dialog
box.
Otherwise, if the configuration file specifies to Ask if processor is in control,
the display shows the Process In Control dialog box.
The processor is critical to printer calibration. You can calibrate the printer
only if the processor is in control.

Calibrating the Printer
March 2001 1-5
2. Click Yes.
The display shows the Choose Start LUT dialog box.
NOTE: The highlighted LUT in the dialog box above is the most recent
calibration LUT.
3. Click either Load Selected LUT or Load Custom LUT (or Cancel to cancel
the calibration process).
If you click Load Selected LUT, the system automatically downloads the
highlighted LUT to the printer to create a test print. When the test print has
been sent, the Scanning Processed Print with Densitometer status icon on
the LED Printer Calibration window highlights.
Continue with “Obtaining Densities” on page 1-6.
4. If you selected Load Custom LUT in step 3:
From the Open dialog box, select or type the name of the LUT file you want
and click Open.
The system automatically downloads the LUT file to the printer.
When the test print has been sent to the printer, the Scanning Processed
Print with Densitometer status icon on the KODAK LED Printer Calibration
window highlights.

Calibrating the Printer
1-6 March 2001
Obtaining Densities
There are three methods for obtaining densities:
• from a file
• from a densitometer
• from a centralized densitometer (NT only and if the Centralized Densitometer
application is installed on your network)
The contents of the calibration configuration file determine which method you use
(see “Editing the Device Configuration” on page 3-25).
Obtaining Densities from a File
If the configuration settings include obtaining the density data from a file, the
display shows the Waiting for Density File dialog box.
If the configuration settings do not include obtaining the density data from a file,
go to either:
• “Using the Densitometer to Read Densities” on page 1-7
• “Obtaining Densities from the Centralized Densitometer (NT Only)” on
page 1-8
NOTE: To create a density file, see “Creating a Density File for Use with Calibration”
on page 3-36.
1. Click OK to continue with the calibration process.
2. Go to “Completing the Calibration” on page 1-10.

Calibrating the Printer
March 2001 1-7
Using the Densitometer to Read Densities
NOTE: For LED Gen I devices, you read only one neutral strip.
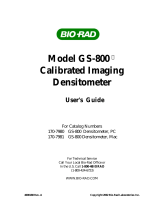
Do the following to scan the neutral (gray) patches on the processed test print into
the densitometer (refer to your densitometer manual for detailed instructions on
using the densitometer):
1. Slide the lever on the densitometer to position 15. Align the edge of the test
print with the lever on the densitometer. Gently feed the test print through the
densitometer to scan the patches labeled “even”.
2. Slide the lever on the densitometer to position 20. Align the edge of the test
print with the lever on the densitometer. Gently feed the test print through the
densitometer to scan the patches labeled “odd”.
3. Slide the lever on the densitometer to position 30. Align the edge of the test
print with the lever on the densitometer. Gently feed the test print through the
densitometer to scan the patches labeled “both”.
If the test print is read successfully, several messages will appear in the status
bar; the final message indicates that the densitometer values have been
successfully received. Go to “Completing the Calibration” on page 1-10.
If the test print is not read successfully, refer to Section 2, Troubleshooting.
Test print
Lever

Calibrating the Printer
1-8 March 2001
Obtaining Densities from the Centralized
Densitometer (NT Only)
NOTE: For more information about installing and using the Centralized
Densitometer Application, see Section 4, Installing and Using the
Centralized Densitometer Application.
If the configuration settings include obtaining the density data from the centralized
densitometer application, the status bar shows a message.
1. Open the Centralized Densitometer Application.

Calibrating the Printer
March 2001 1-9
The display shows the window for the Centralized Densitometer Application.
2. Highlight the device.
3. Click Measure (or select Operations->Measure) to measure the target
images.
4. At the densitometer, measure the densities (see “Using the Densitometer to
Read Densities” on page 1-7).
When the densities are measured, the status bar on the Centralized
Densitometer Application window shows “Ready.”
The density measurements are automatically sent to the LED printer’s host
computer.
Continue with “Completing the Calibration.”

Calibrating the Printer
1-10 March 2001
Completing the Calibration
1. If calibration is in tolerance, the display shows the LUT Attributes dialog
box.
a. Type a name or comment in the dialog box. The comment you enter will
appear on the Send LUT to Printer dialog box to identify the LUT file with a
name that is meaningful to you (up to 75 characters).
b. Click OK.
The new printing LUT is calculated and downloaded. The status bar shows
“Calibration Complete.”
2. If calibration is out of tolerance, it may be necessary to run four or more
iterations of the calibration cycle to achieve a successful calibration.

Calibrating the Printer
March 2001 1-11
If the print densities are out of tolerance, the display shows a graph that
allows you to select the type of data and planes that you want to see
displayed.
a. Click OK.

Calibrating the Printer
1-12 March 2001
If specified in the configuration file, the display shows a list of options.
Re-read the densitometer values is most useful when the graphs show
an unusual plot. Rereading the test print lets you validate the graph, then
returns you to the Out of Tolerance dialog box.
Iterate again using a newly calculated calibration LUT allows you to
keep printing test prints with the newly created LUT without having to save
the LUT table.
Calculate and download a printing LUT and stop: When you select this
option, the LUT is calculated and the file is saved with the creation date
and time as its name.
Cancel and return the printer to its original state saves nothing. Any
corrupted data created after you saved the last time is thrown away.
b. Select one of the four options to try to complete the calibration
successfully.

March 2001 2-1
2 Troubleshooting
This section describes the problems that you may occasionally have when using:
• the KODAK Device Calibration Software and the Calibration Software for the
KODAK PROFESSIONAL LED II Printer
• the X-RITE DTP36 Densitometer
Calibration Graph
The graph below is an indication that the calibration performed was out of
tolerance.
This may be result from invalid densitometer readings. It is necessary to perform
another calibration cycle if you see a graph that looks like the one above.

Troubleshooting
2-2 March 2001
Calibration Errors
Numeric Calibration Error Codes
Code Status Message Possible Cause/Subsystem Possible Solution
1 The following file is
locked:_filename_.
The system is trying to access a
file that is currently in use.
Close any other applications that
may be accessing the file.
2 The following file is
protected:_filename_.
The system is trying to access a
protected file.
Change the protections on the file
to grant access to the user.
3 The following file was not
found:_filename_.
The system was trying to access
a file that it could not find.
Verify that the filename on one of
the configuration dialog windows is
correct.
4 Error:_oserror_occurred
during operation:_operation_
on file:_filename_.
An operating system error
occurred.
• Rerun the application.
• Reboot the operating system
5 The following file is in an
incorrect format:_filename_.
The file does not conform to the
application specification.
Verify the file format.
6 The following file already
exists:_filename_.
The system is trying to save to a
file that already exists.
• Delete the existing file.
• Change the filename.
7 There is not enough space to
create:_filename_.
The system is trying to save a file
but there is not enough disk
space.
Remove any unnecessary files to
increase free disk space.
8 There are too many files to
open _filename_.
Too many files are open. Close some files and or
applications.
9 You do not have permission
to open file _filename_.
The file permission is invalid. Rerun the application.
10 Error copying print LUT to
DP2 folder (can’t open
_filename_.
The folder doesn’t exist or is read-
only.
Modify the protection on the folder.

Troubleshooting
March 2001 2-3
11 Error creating DP2 LUT
folder
A folder of the same name may
exist.
Change the selected folder name.
101 No response from
device:_devicename_.
The device is not responding to
the system.
Verify that the device is connected
and on-line.
102 Device not
found:_devicename_.
The system was trying to access
a device that it could not find.
Verify that the device name on one
of the configuration dialog
windows is correct.
103 The following device is
indicating it is not
ready:_devicename_.
The device is not ready. Wait several minutes and try the
activity again.
104 The following device is
busy:_devicename_.
The device is busy. Wait several minutes and try the
activity again.
105 The following device is not a
TTY port:_devicename_.
The port name in the
configuration file does not refer to
a valid serial port.
Change the port name in the
configuration file to a valid serial
port.
106 The following device is
closed:_devicename_.
The serial port closed during
system reading.
• Verify that no other application
is accessing the port.
• Restart the application.
107 No data on
device:_devicename_.
No data is available for the
system to read on the serial port.
• Verify that the densitometer is
connected correctly.
• Restart the application.
108 Error:_oserror_occurred
during operation:
_operation_ on device:
_devicename_.
An operating system error
occurred.
• Rerun the application.
• Reboot the operating system
• If problem continues, call for
service.
109 Invalid Device ID:
_devicename_.
A new device was created with an
incorrect device ID.
Edit the device ID to reflect the
correct device ID.
Code Status Message Possible Cause/Subsystem Possible Solution

Troubleshooting
2-4 March 2001
110 Unable to perform operation:
_operation_
Status Message:_statmsg_
Error Message:_errmsg_.
An unknown device error
occurred.
Use the information in the status
message and error message to
resolve the device error.
111 There is insufficient memory
for the requested operation
on device:_devicename_.
The application does not have
enough memory to complete the
operation.
Close the other applications and
unnecessary windows.
112 A communications time-out
occurred during operation on
device:_devicename_.
The connection between the
printer and host computer was
lost.
Check that all cables are properly
connected.
113 A device driver for the
following device could not be
found:_devicename_.
The application could not find the
necessary device software to
communicate with the printer.
Make sure that the Calibration
Application and ASPI SCSI device
driver are installed correctly.
114 An error occurred during
communications to the
following device:
_devicename_.
• The cable between the printer
and the host computer is worn.
• One or more of the
connections between the
printer and the host computer
has malfunctioned.
• Check that all cables are
properly connected.
• Check the cables and
connections between the printer
and the host computer for wear
and if necessary, replace them.
115 An operation error occurred
during communications to
the following device:_
devicename_.
• The cable between the printer
and the host computer is worn.
• One or more of the
connections between the
printer and the host computer
has malfunctioned.
• Check that all cables are
properly connected.
• Check the cables and
connections between the printer
and the host computer for wear
and if necessary, replace them.
116 A software warning has been
issued by the following
device: _devicename_ Error
Message: _errmsg_
A software error has occurred on
the printer.
Resolve printer error condition.
Code Status Message Possible Cause/Subsystem Possible Solution
/