Page is loading ...

AquaScape
®
Spa Showerhead
Utilisation de la douche
Waterpik
®
AquaScape
®
Cabezal de ducha tipo spa
Waterpik
®
AquaScape
®
Instruction Manual
Manuel d’instructions
Manual de Instrucciones
Model: ASD-833
ASD-839
INSTALLATION
Easy to follow instructions on how to install your new
AquaScape
®
Showerhead. Follow steps in the order shown, for
best results.
TOOLS NEEDED
7/8” open end wrench is recommended.
(Wrap pivot ball with a soft cloth to prevent fittings from
scratching.)
PREPARE
1. Remove old showerhead from shower pipe. Be sure to remove
old pipe tape from threads if necessary.
2. Wrap pipe tape (included) 2 to 3 times around the threads on
the shower pipe
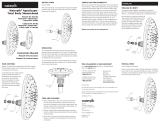
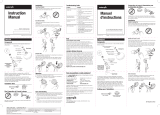
A
.
Wrap pipe tape here
Pivot ball
Wing nuts Shower pipe
Pipe adapter
Lock ring
(black washer should be inside)
INSTALLATION
3. Upon opening the package, pipe adapter will be attached
to lock ring. Remove pipe adapter from lock ring by turning
counter clockwise.
4. Attach showerhead to curved shower arm by hand tightening
clockwise. Wrap a soft cloth around pivot ball and tighten with
an open end 7/8” wrench.
5. Screw pipe adapter onto shower pipe and tighten. Wrap a soft
cloth around pipe adapter and tighten with an open end 7/8”
wrench.
6. Make sure black washer is inside lock ring. Lift showerhead
and showerarm (assembled in step 3) into position at shower
pipe level, lining up the ribs on the pipe adapter with the
grooves in the end of the showerarm. Slide lock ring onto pipe
adapter and tighten by hand until snug.
7. Test for leaks. Tighten connections as needed.
CARE AND CLEANING:
1. Clean filter screen at least once a year, or whenever you notice
a drop in water pressure.
2. Soaking and cleaning nozzles with household vinegar will help
remove mineral build-up.
3. Do not clean or rinse the showerhead with harsh chemicals,
heavy-duty cleaners, or abrasives; this may damage parts or
finish and will void warranty.
LIMITED LIFETIME WARRANTY
Water Pik, Inc. warrants to the original purchaser of this product
that it is free from defects in material and workmanship for as
long as the original purchaser owns this product. Water Pik will
at our election, replace any part of the product which in our
opinion is defective, provided that the product has not been
abused, misused, altered or damaged after purchase. (This
includes damage due to use of tools or harsh chemicals). In the
event an item has been discontinued we will replace with what
we deem to be the closest product. Water Pik is not responsible
for labor charges, installation, or other consequential cost. The
responsibility of Water Pik shall not exceed the original purchase
price of the product.
This warranty gives you specific legal rights. You may also have
other rights that vary where you reside. Save your receipt as
proof of purchase is required for warranty action.
HOW TO USE THE AQUASCAPE
®
SPA SHOWERHEAD
TO ADJUST ARM UP OR DOWN:
1.
S
lightly loosen the wing nut. (Do not unscrew all the way.)
Loosen and re-tighten one at a time.
2.
R
otate arm and head to the desired position, holding the unit in
place until you re-tighten the wing nut(s).
3.
Y
ou may notice that the arm stops only in certain adjustment
angles. This is normal operation of the locking feature.
TO ADJUST ARM SIDE TO SIDE:
1. Loosen lock ring and slide it off pipe adapter
2. Re-position onto the pipe adapter and re-tighten the lock ring
Wing nuts
Lock ring
RainFall
Pulsating Massage
Optimal Adjustment Angles
OPERATION
1. Rotate the control ring for different settings.
ENJOY YOUR NEW SHOWERHEAD!
TROUBLESHOOTING GUIDE
Problem Solution
No water flow from
installed shower head:
a Confirm previous shower washer is
not in the j-pipe.
b Confirm the hose is properly
installed, try switching ends.
c Confirm there is only one washer in
the pivot ball.
Low water pressure or
missing spray patterns
a Clean shower head in vinegar/water
solution. (See care section).
b Clean screen and flow regulator.
Leaking at pipe pivot ball
connection:
a Confirm one single washer is seated
on top of the screen.
b Grate bar of soap across the j-pipe
threads to act as a sealant.
Showerhead and/or
bracket stiff to change
angle
a Immerse pivot ball and large nut
of the bracket in hot water or use
a blow dryer for several minutes
and then use a towel to loosen the
large nut.
For Fixed Mount: install FM shower
head to provide additional leverage
to change angle of spray. (Contact
Water Pik for further assistance).
POMME DE DOUCHE AQUASCAPE
®
SPA
INSTRUCTIONS D’INSTALLATION
Instructions simples pour une installation facile de la pomme
de douche AquaScape
®
. Pour les meilleurs résultats, suivez les
étapes dans l’ordre démontré.
OUTILLAGE NÉCESSAIRE
Clé plate de 7/8 po (recommandé).
(Envelopper l’articulation sphérique avec un chiffon doux pour
éviter d’érafler la surface).
PRÉPARATION
1. Séparer la vieille pomme de douche du tuyau d’alimentation.
Veiller si nécessaire à éliminer sur le filetage tout résidu de
ruban ou autre produit d’étanchéité.
2. Appliquer 2 à 3 spires de ruban d’étanchéité de tuyauterie
(fourni) sur l’extrémité filetée du col de cygne
A
.
Appliquer le ruban
d’étanchéité ici
Écrou à oreilles
Articulation sphérique
Raccord d’adaptation
Tuyau d’alimentation de la douche
Bague de blocage
(joint noir à l’intérieur)
FRANÇAIS
INSTALLATION
3. Dans le produit livré, le raccord d’adaptation est connecté à la
bague de blocage. Séparer le raccord d’adaptation de la bague
de blocage (rotation dans le sens antihoraire).
4. Fixer la pomme de douche sur le col de cygne courbé–serrer à
la main (sens horaire). Protéger l’articulation sphérique avec un
chiffon doux; serrer avec une clé plate de 7/8 po.
5. Visser le raccord d’adaptation sur le tuyau d’alimentation de
la douche; serrer. Protéger le raccord d’adaptation avec un
chiffon doux; serrer avec une clé plate de 7/8 po.
6. Vérifier la présence du joint noir à l’intérieur de la bague de
blocage. Soulever l’ensemble pomme de douche/col de cygne
(assemblé à l’étape 3) jusqu’au niveau d’alimentation de la
douche; positionner côte à côte. Enfiler la bague de blocage sur
le raccord d’adaptation; bien serrer à la main.
7. Effectuer une inspection de recherche des fuites. Serrer les
connexions selon le besoin.
UTILISATION DE LA DOUCHE
AQUASCAPE
®
SPA
RÉGLAGE DE LA POSITION DU
COL DE CYGNE:
1.
D
esserrer légèrement l’écrou à oreilles (ne pas dévisser
complètement). Desserrer et resserrer – un écrou à la fois.
2.
F
aire pivoter le col de cygne et la pomme de douche pour les
placer à la position désirée; maintenir l’ensemble en place
pendant le resserrage de chaque écrou à oreilles.
3.
O
n peut constater que le col de cygne se cale uniquement à
certaines positions angulaires; c’est le comportement normal
de la fonction de calage.
RÉGLAGE DE LA POSITION LATÉRALE DU
COL DE CYGNE:
1.
D
esserrer la bague de blocage; faire glisser la bague pour la
séparer du raccord d’adaptation.
2.
R
epositionner la bague de blocage sur le raccord d’adaptation;
resserrer la bague de blocage.
Écrous à oreilles
Bague de blocage
Douche
Angle optimal pour le réglage
Jet de massage pulsant
A
A
Waterpik
®
(stylized) is a trademark of Water Pik, Inc. registered in the
EU, Switzerland, Mexico, Canada, and United States.
Waterpik
®
is a trademark of Water Pik, Inc. registered in Argentina,
Australia, Austria, Canada, China, Czech Republic, Hungary, India,
Japan, Poland, Russian Federation, South Africa, Switzerland,
Ukraine, and the United States.
OptiFlow
®
is a trademark of Water Pik, Inc. registered in Australia,
Canada, the EU, Hong Kong, Korea and the United States.
AquaScape
®
is a trademark of Water Pik, Inc. registered in Australia,
Canada and the United States.
© 2010 Water Pik, Inc.
Have questions or need assistance?
visit www.waterpik.com
or call for Customer Service at
1-800-525-2774
8:00 a.m. to 4:00 p.m.,
Mountain Standard Time, Monday-Friday
Water Pik, Inc.
1730 East Prospect Road
Fort Collins, CO 80553-0001
FN20008751-F AB
Printed in China. Made in China.
DATE: 22 June 2010 CLIENT: Water Pik, Inc.
FILENAME: FN20008751-FAB-ASspaInst.indd DESCRIPTION:Aquascape Spa Instruction Manual
FILE TYPE: Adobe InDesign CS4 PREPARED BY: Brian Colon FORM: 20008751-F AB
SIZE FLAT: 16.5” x 8.5” SIZE FOLDED: 2.75” x 4.25” FOLDS: accordian, bifold
DIELINE: N/A INK: Black
NOTES:
/


