Page is loading ...

2
3
4
2
3
4
5A
5B
6
8
5B
6
8
5A
Outils d’installation
Clé à molette ou pince (non fournie)
Préparation des tuyauteries pour empêcher
toute fuite
Après avoir retiré l’ancienne pomme de douche, nettoyer
soigneusement le filetage du tuyau de douche.
INSTALLATION
4. Use an adjustable wrench
or pliers to tighten pivot
ball an additional ¼ turn.
Do not overtighten.
OPERATION
The EasySelect
®
Drenching Showerhead
has spray settings that are controlled by
a spray selector knob. Simply turn the
selector knob to choose your desired
setting. The selector knob has 5
positions ranging from left to right.
The trickle (pause) setting does
not completely stop water flow in
order to prevent pressure build up
behind the showerhead.
EasySelect
®
Drenching
Sho
werhead
Pomme de douche Waterpik
®
EasySelect
®
Drenching
Regadera Waterpik
®
EasySelect
®
Drenching
Instruction Manual
Manuel d’instructions
Manual de Instrucciones
Installation Tools
Adjustable Wrench or Pliers (not included)
Pipe Preparation To Prevent Leakage
After removing old showerhead, clean threads of shower
pipe thoroughly.
INSTALLATION
and ensure that the washer is in place before reinstalling
the showerhead.
• Cleaning is required when mineral deposits appear on the
spray orifices to maintain proper working conditions. Clean
by soaking in household vinegar.
• Do not clean or rinse any part with harsh chemicals, heavy
duty cleaners, or abrasives; this may damage parts or
finish and may void warranty.
LIMITED LIFETIME WARRANTY
Water Pik, Inc. warrants to the original purchaser of
this product that it is free from defects in material and
workmanship for as long as the original purchaser owns this
product. Water Pik, Inc. will replace any part of the product
which in our opinion is defective, provided that the product
has not been abused, misused, altered or damaged after
purchase. (This includes damage due to use of tools or harsh
chemicals.) In the event an item has been discontinued we
will replace with what we deem to be the closest product.
Water Pik, Inc. is not responsible for labor charges,
installation, or other consequential cost. The responsibility
of Water Pik, Inc. shall not exceed the original purchase
price of the product. This warranty gives you specific legal
rights. Save your receipt as proof of purchase is required for
warranty action.
Have any questions or need assistance?
Go to www.waterpik.com and click on Showerheads and
FRANÇAIS
Bienvenue! Entrez dans le monde de la
douche Water Pik
Merci d’avoir acheté cette pomme de douche de marque
Waterpik
®
; entrez dans une nouvelle dimension de douche
inoubliable! Depuis que nous avons inventé la pomme de
douche masseuse en 1974, nous œuvrons sans cesse pour
améliorer le moment de la douche pour nos clients. Notre
technologie de douche dernière génération offre à la fois
détente pure et rajeunissement, le tout dans un design stylé
pour s’agencer avec votre intérieur de salle de bain.
Composants
La pomme de douche de marque Waterpik
®
est fournie
avec l’ensemble de pièces décrit ci-dessous.
EN FRANÇAIS AU VERSO
1. Enlever l’ancienne
pomme de douche.
2. Placer l’écrou à oreilles
sur le tuyau de douche
(avec l’extrémité étroite
orientée vers le mur).
3. Enfiler le raccord articulé
sur le tuyau de douche
et serrer fermement à la
main pour bien l’ajuster.
4. Serrer le raccord articulé
d’un quart de tour
supplémentaire à l’aide
d’une clé à molette ou
pince. Ne pas serrer
excessivement.
5. Fixer la pomme de
douche (5A) en serrant
l’écrou à oreilles à la
main (dans le sens
antihoraire) sur le collier
fileté de la pomme de
douche. Ne pas serrer
complètement. (5B)
6. Placer la pomme de
douche à l’emplacement
souhaité.
Remarque : L’angle
d’aspersion optimal est
de 15 degrés en partant
du mur.
7. Fixer la pomme de
douche en serrant
l’écrou à oreilles. Serrer
uniquement à la main.
(5B
ENGLISH
Welcome To The Water Pik Shower
Experience
Thank you for purchasing this Waterpik
®
brand
showerhead, and welcome to a new level of showering
enjoyment! Since we invented the massaging showerhead
in 1974, we’ve been constantly working to improve the
showering experience for our customers. Our latest
generation shower technology delivers both pure
relaxation and rejuvenation, all in a stylish design that
complements your bath décor.
Components
Your Waterpik
®
brand showerhead comes with the
included hardware seen below.
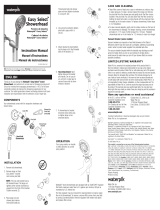
1. Remove old showerhead.
2. Place wing nut over
shower pipe (narrow end
toward wall).
3. Thread pivot ball onto
shower pipe and hand
tighten to a snug fit.
5. Attach showerhead
(5A) by hand tightening
the wing nut (counter-
clockwise) to the
threaded collar of
showerhead. Do not
secure completely.(5B)
6. Position showerhead to
preferred location.
Note: Optimum spray
angle is 15 degrees
away from the wall.
7. Secure showerhead by
tightening wing nut.
Hand tighten only. (5B)
8. Important! Always
loosen wing nut to
change showerhead
position. Do not move
showerhead by force!
click on the Ask Waterpik! link.
In the U.S., call our toll-free
Customer Assistance Line,
1-800-525-2774
In Canada, call our toll-free
Customer Assistance Line,
1-888-226-3042
Outside the U.S. write us at:
Water Pik, Inc.
1730 East Prospect Road
Fort Collins, CO 80553-0001
U.S.A.
www.waterpik.com
If product malfunctions or becomes damaged, stop use and
contact Water Pik, Inc. for replacement.
Waterpik
®
(stylized) is a trademark of Water Pik, Inc. registered
in Australia, Canada, China, EU, Hong Kong, India, Japan, Korea,
Mexico, Russian Federation, Switzerland, and the United States.
Waterpik
®
is a trademark of Water Pik, Inc. registered in Argentina,
Australia, Austria, Benelux, Canada, Chile, China, Hong Kong, India,
Japan, Korea, Mexico, Norway, Russian Federation, South Africa,
Switzerland, Ukraine, and the United States.
OptiFlow
®
registered in Australia, Canada, China, EU, Hong Kong,
India, Japan, Korea, Mexico, and the United States.
EasySelect
®
registered in Australia, Canada, China, EU, Mexico, and
the United States.
© 2013 Water Pik, Inc.
Water Pik, Inc.
1730 East Prospect Road,
Fort Collins, CO 80553-0001 U.S.A.
www.waterpik.com
Form No. 20012919-F AE
Designed in U.S.A. Made in China.
TROUBLESHOOTING GUIDE
Problem Solution
No water flow from
installed shower
head:
a Confirm previous shower washer is
not in the j-pipe.
b Confirm the hose is properly
installed, try switching ends.
c Confirm there is only one washer in
the pivot ball.
Low water pressure
or missing spray
patterns
a Clean shower head in vinegar/water
solution. (See care section).
b Clean screen.
Leaking at pipe/pivot
ball connection:
a Confirm one single washer is seated
on top of the screen.
b Grate bar of soap across the j-pipe
threads to act as a sealant.
Showerhead and/
or bracket stiff to
change angle
a Immerse pivot ball and large nut
of the bracket in hot water or use
a blow dryer for several minutes
and then use a towel to loosen the
large nut.
CARE AND CLEANING
• Remove showerhead from pipe. Then, remove filter screen
with pliers by turning counterclockwise. Clean filter screen
at least once a year, or whenever you notice a drop in
water pressure. After cleaning, reinsert the filter screen
8. Important! Toujours
desserrer l’écrou à
oreilles avant de modifier
la position de la pomme
de douche. Ne pas forcer
sur la pomme de douche
pour la déplacer!
FONCTIONNEMENT
La pomme de douche à effet rideau d’eau
EasySelect
®
est équipée de réglages
d’aspersion contrôlés par un bouton de
sélection d’aspersion. Il suffit de tourner
le bouton de sélection au réglage
souhaité. Le bouton de sélection
comporte 5 positions de gauche
à droite.
Le réglage de ruissellement
(pause) n’interrompt pas
complètement le débit
d’eau afin d’empêcher toute
accumulation de pression
en amont de la pomme de
douche.
Spray
change
selector
Filter Screen
Washer
Pivot Ball
Hand Tightening
Wing Nut
Tamis de filtration
Rondelle
Articulation
sphérique
Écrou à oreilles à
serrer à la main
Sélecteur de
changement
de débit
DATE: 26 November 2012 CLIENT: Water Pik, Inc.
FILENAME: 20012919-FAE_ASD833_Inst.indd
DESCRIPTION: ASD-833 Instruction Manual FORM: 20012919-F AE
FILE TYPE: Adobe InDesign CS6 PREPARED BY: Brian Colon
SIZE FLAT: 11.0" × 12.6875" SIZE FOLDED: 2.75" × 4.25"
FOLDS: Indicated (accordion/tri-fold) DIELINE: N.A. INK: Black
PROFILE: none
/


