Page is loading ...

ROWING MACHINE
SF-RW1005
OWNER’S MANUAL
The specifications of this product may
vary from this photo and are subject to
change without notice.
- 1 -

IMPORTANT SAFETY NOTICE
Note the following precautions before assembling and operating the machine.
1. Read this Owner’s Manual and follow the instruction carefully before using the Sunny
SF-RW1005 Rowing Machine. Make sure that it is properly assembled and tightened
before use.
2. Read all the caution labels on the SF-RW1005.
3. We recommend having two people for assembling this machine.
4. To lubricate all moving parts annually is recommended.
5. Do not wear loose clothing to avoid entangling in any moving parts.
6. Set up and operate the SF-RW1005 on a solid level surface.
7. Always wear shoes when using the machine.
8. Hydraulic cylinders get HOT during use. Do not touch the cylinders until it is cool.
9. Please keep children and pets away from the machine while it is in use. Do not allow
children to play or use the machine. This machine is designed for adults, not children.
10. Please maintain your balance while using the machine.
11. Stop exercise immediately in case of nausea, shortness of breath, faint, headache, pain,
tightness in your chest or any discomfort.
12. Do not place fingers or any other objects into the moving parts.
13. Prior to any exercise, consult with your physician first to establish the exercise
frequency, time and intensity appropriate for your particular age and condition.
14. Do not grasp the seat to move the Rowing Machine. The seat will move and it may hurt
your hand and fingers.
15. Sunny SF-RW1005 should be used by only one person at a time, and it is designed for
consumer use only.
16. Maximum user’s weight is 220LB.
- 2 -

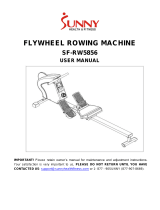
Parts list
Item
No.
Description Qty
Item
No.
Description Qty
1
Seat rail
1
21
Meter
1
2
Seat support
1
22
Hydraulic cylinders
2
3
Left hand side frame
1
23
Bolt
8
4
Right hand side frame
1
24
Left rowing handlebar
1
5
Rubber feet
2
25
Right rowing handlebar
1
6
Bolt M8×55
4
26
Foam grip
2
7
Nut
4
27
Globate cover
2
8
Flat washer
19
28
Quadrate end cap
2
9
Seat
1
29
End cap
2
10
Screw
4
30
Adjustment bracket
2
11
U-metal Protector
2
31
Adjustable knob
2
12
Roller
6
32
Bolt
2
13
Buffer
4
33
Axis
4
14
Long bolt M8×110
3
34
Rotation set
2
15
Nylon nut
15
35
U- bracket
2
16
Foot rest shaft
1
36
Reinforcing tube
1
17
Spacer sleeve
2
37
M8×20 Bolt
2
18
Pedal
2
38
Flat washer
2
19
Flat washer
2
39
Sensor
1
20
Screw
4
40
Screw
2
- 3 -

HAREWARE PACKING LIST
ASSEMBLY INSTRUCTIONS
Before beginning assembly, be sure to observe our recommendations and safety
instructions.
Step 1: Main frame assembly
1. Insert the Left hand side frame (3) and Right hand side frame (4) onto the Seat rail (1);
tighten with 4 pcs of Bolt (6), 4 pcs of Flat washer (8) and 4 pcs of Nut (7).
2. Attach the Seat (9) onto the end of the Seat support (2).Secure with 4 pcs of Screw (10)
3. Slide the well assembled Seat support (2) onto the Seat rail (1). Then use the Long
Bolts (14), Flat washers (8), Nylon Nuts (15) drill through the Roller (12) and fix them
onto the Seat Support (2).
WRENCH
(
13
、
14
、
15、Ф5)
WRENCH S6
- 4 -

Step 2: Foot rests and computer assembly
1. Insert the Foot rest shaft (16) through the holes on the pedal (18) and Spacer sleeve
(17) then through the hole of the Seat rail (1). Use the Flat washer (19) and Nylon nuts
(15) to tighten it.
2. Connect the cable and the Meter (21) to the bracket on the Seat Rail (1). Locate the
back of Meter (21) over the bracket on the Seat rail (1) and slide down to lock into
position.
Step 3: Handle bars assembly
1. Take the Left rowing handlebar (24). First slide on a resistance Adjustment bracket (30)
and then one of the Globate cover (27). Attach the handlebar to the Rotation Set (34)
on the left-hand side of the frame (3) ensuring the handlebar grip points inwards.
Repeat with the right- hand rowing handlebar.
2. Attach the Rowing handles bars (24/25) to the Rotation Set (34) at the Left/Right hand
side frames(3+4) using Bolts (23), Flat Washer(8) and Nylon nut (15).
30
- 5 -

Step 4: Hydraulic cylinders assembly
1. Attach the fixed ends of the hydraulic cylinder to the U-brackets (35) on the left and
right hand side frames (3+4) using Bolts (23), Flat washers (8) and Nylon nuts
(15).Screw on the nut (15)until the self-locking part of the nut engages on the thread of
the screw (23) and the hydraulic cylinder is not blocked.
2. The position of the Hydraulic cylinder (22) on each Rowing handlebar (24 & 25) can be
adjusted by slackening and re-tightening the Adjustable knob (31). The position
governs the tension/Resistance in the cylinders. The higher the Adjustment bracket (30)
on the rowing handlebar the Greater the tension resistance.
Step 5: Checks
1. Please make sure the Rowing Machine is properly assembled and all the bolts are
tightened.
2. When everything is in order, familiarize yourself with the machine at a low resistance
setting and make your individual adjustments.
Note:
Please keep the tool set and the instructions in a safe place as these may be required for
repairs or spare parts becoming necessary later.
- 6 -

STORAGE AND MAINTENANCE
1. Keep SF-RW1005 in a clean dry place.
2. Grasp the frame to move the SF-RW1005. Do not use the seat to move it. The seat will
move and it may hurt your hand and fingers.
3. Please remove the battery before storing the machine for a long time.
4. Clean the Seat Rail with an absorbent cloth.
5. Always make sure all the nuts and bolts are properly tightened.
6. Regular maintenance is required.
7. Replace any worn or damaged parts immediately. Only parts supplied by Sunny Health
and Fitness shall be used to repair the SF-RW1005.
- 7 -
/