Amiko Alien 2 User manual

Category
TV set-top boxes
Type
User manual
Contents
1 Safety Precautions ............................................................................................... 4
2 INTRODUCTION ..................................................................................................... 5
3 FEATURES .............................................................................................................. 6
4 Quick Start Guide.................................................................................................. 7
4.1 Front Panel ............................................................................................................................... 7
4.2 Rear Panel ................................................................................................................................ 8
4.3 Connections ............................................................................................................................. 8
4.4 Powering On/Off ................................................................................................................... 11
4.5 Remote Control ..................................................................................................................... 12
4.6 Easy Install ............................................................................................................................. 14
4.7 SCAN CHANNEL ..................................................................................................................... 16
5 Basic Operations ................................................................................................. 16
5.1 Changing channels ............................................................................................................... 16
5.2 Volume/Mute/Audio ............................................................................................................. 16
5.3 Setting audio options ........................................................................................................... 16
5.4 Display Resolution ................................................................................................................ 16
5.5 Info bar ................................................................................................................................... 17
5.6 Sleep timer ............................................................................................................................. 17
5.7 TV/SAT .................................................................................................................................... 17
5.8 Pause ...................................................................................................................................... 17
5.9 Zoom ...................................................................................................................................... 17
5.10 NVOD ................................................................................................................................... 18
5.11 Teletext ................................................................................................................................. 18
5.12 Subtitle ................................................................................................................................ 18
5.13 Quick bar.............................................................................................................................. 19
5.14 Manage of USB memory ..................................................................................................... 19
5.15 Change Satellite .................................................................................................................. 19
5.16 Change Favourites group ................................................................................................... 19
5.17 Recording ............................................................................................................................ 19
5.18 Play the recorded file when it recording ........................................................................... 21
5.19 Timeshift .............................................................................................................................. 21
5.20 Unmount USB Disk .............................................................................................................. 21
5.21 HBBTV .................................................................................................................................. 21
6 Channel ................................................................................................................ 22
6.1 TV/Radio list .......................................................................................................................... 22
6.2 Managing Channels .............................................................................................................. 24
7 EPG ....................................................................................................................... 27
Contents
2
7.1 Changing Group .................................................................................................................... 27
7.2 Find channel .......................................................................................................................... 28
7.3 EPG now/next list .................................................................................................................. 28
7.4 Switch EPG between now/next ............................................................................................ 28
7.5 Schedule list .......................................................................................................................... 28
7.6 Setting timer .......................................................................................................................... 28
7.7 Adding a new timer ............................................................................................................... 29
7.8 Editing a timer affair ............................................................................................................. 29
7.9 Deleting timer affairs ............................................................................................................ 29
8 Installation .......................................................................................................... 29
8.1 Search Satellite Channels (fixed antennal) ......................................................................... 29
8.2 Search Cable Channels (fixed antennal) .............................................................................. 33
8.3 Search Terrestrial Channels (fixed antennal) ...................................................................... 33
9 System ................................................................................................................. 34
9.1 Basic Setting .......................................................................................................................... 34
9.2 PVR/HDD Setting ................................................................................................................... 38
9.3 Net Setting ............................................................................................................................. 40
9.4 Upgrade ................................................................................................................................. 42
10 Conditional Access ............................................................................................ 43
11 Online................................................................................................................. 43
11.1 Message ............................................................................................................................... 43
11.2 Weather Forecast ................................................................................................................. 44
11.3 FAQ ....................................................................................................................................... 45
11.4 User Manual ......................................................................................................................... 45
11.5 E-book .................................................................................................................................. 46
11.6 Config ................................................................................................................................... 47
12 File List ............................................................................................................... 48
12.1 Switch File list ...................................................................................................................... 48
12.2 Sort files/Sort folder ........................................................................................................... 48
12.3 Delete files/Delete folder ................................................................................................... 48
12.4 Play Record File/Music/Movie ............................................................................................ 48
12.5 Play Picture .......................................................................................................................... 49
12.6 Online Subtitle .................................................................................................................... 49
12.7 Setting Subtitle ................................................................................................................... 50
13 Plug In ................................................................................................................ 51
13.1 Using the calculating .......................................................................................................... 51
14 Networking ....................................................................................................... 51
Contents
3
14.1 Youtube ................................................................................................................................ 51
14.2 Shoutcast ............................................................................................................................. 52
14.3 Picasa ................................................................................................................................... 53
14.4 RSS ........................................................................................................................................ 54
14.5 Opera ................................................................................................................................... 55
14.6 FTP Client ............................................................................................................................. 55
14.7 Kartina TV ............................................................................................................................ 58
15 Portal ................................................................................................................. 59
15.1 Setting Language ................................................................................................................ 59
15.2 Add App ............................................................................................................................... 59
15.3 Remove App ........................................................................................................................ 60
15.4 Move App ............................................................................................................................. 60
15.5 Run APP ................................................................................................................................ 60
15.6 Navigation Menu................................................................................................................. 60
16 Trouble Shooting .............................................................................................. 61
17 Specifications .................................................................................................... 62
About
4
1 Safety Precautions
CAUTION:
The lightning flash with
arrowhead symbol, within an
equilateral triangle, is intended
to alert the user to "dangerous
voltage" and to prevent from a
risk of electric shock.
Warning:
To reduce the risk of electric
shock, don't open the cabinet.
Refer servicing to qualified
personnel only.
The exclamation point within
an equilateral triangle is
intended to
alert the user to important
operating and maintenance
(servicing).
WARNING: Do not use this STB where contact with or immersion in water is a possibility. Do not use
near flower vase, washbowls, kitchen sinks, laundry tubs, swimming pools, etc.
WARNING: Do not put the candle or lamp stand on the cabinet; otherwise, there is the danger of
fire.
WARNING: The unit should be connected to a power supply only of the type described in the
operating instructions or as marked on the unit. If you are not sure of the type of power supply (for
example, 120 or 230 V)
to your home, consult your local dealer or local power company.
WARNING: This product install diodes. Do not open the cabinet or touch any parts in the inner
mechanism. Consult your local dealer for technical service if the opening is required.
Note: To ensure proper use of this product, please read this User manual carefully and retain for
Note: This product install diodes. Do not open the cabinet to avoid the unit direct exposure to
radiation.
Unit Cleaning: After the unit power is turned off, you can clean the cabinet, panel and remote
control with a soft cloth lightly moistened with a mild detergent solution.
Attachments: Never add any attachments and/or equipment without the manufacturer consent; as
such additions may r
esult in the risk of fire, electric shock, or other personal injury.
Locating: Slots and openings in the cabinet are provided for ventilation to protect it from
overheating. Do not block these openings or allow them to be blocked by placing the STB on a bed,
sofa, or other similar surface, nor should it be placed over a radiator or heat register.
Power-Cord Protection: Place the power-
supply cord out of the way, where it will not be walked on.
Please take special attentions to cords at plugs, convenience receptacles, and the point where they
exit from the unit.
Object and Liquid Entry:
Never put objects of any kind into this STB through openings, as they may
touch dangerous voltage points or short-out parts that could result in a fire or electric shock. Never
spill any liquid on the STB.
About
5
Note: Moisture may be formed on the lens In the following conditions:
when the unit is suddenly moved from a cold environment or an air-
condition room to a warm
place.
immediately after a heater has been turned on.
in a steamy or very humid room.
If the moisture forms inside the unit, it may not operate properly. To correct this problem, turn on the
power and wait about two hours for the moisture to evaporate.
Parts Replacement: When the unit parts need to be repl
aced, user should make sure the service
technician use the replacement parts specified by the manufacturer or having the same
characteristics as the original part. Unauthorized replacement may put the unit In the risk of fire,
electric shock or other hazar
ds.
Safety Check:
After all the maintenances and repairs are done, user is required to request the service
technician to conduct the overall safety check to ensure the machine is In the proper condition.
2 INTRODUCTION
Thank you for purchasing the HD Receiver.
This HD Receiver is fully compliant with the international DVB standard and thus transmits digital images,
sounds, information guides and teletext directly to your TV through the broadcasting.
Now you can comfortably see and receive digitally transmitted music, news, movie and sports broadcasts in
your office or at your home.
In service search section, both the automatic service search method and the manual search mode are provided.
You can save up to Endless TV and Radio services and work around with the favorite, Lock, Delete, Move and
Sort functions.
The menu is very modern and supports multiple languages. All functions can be carried out using the remote
control and some of the functions can also be carried out using the front panel. The HD Receiver is easy to use
and adaptable for future advances. Please be aware that new software may change the functions of the HD
Receiver.
If you have any difficulties concerning the operation of your HD Receiver, please refer to the relevant section of
this manual, including the Troubleshooting. This Manual will provide you with useful information on using the
HD Receiver.
About
6
3 FEATURES
MPEG-Fully DVB-S / DVB-S2 HD compliant
DVB-T/DVB-C (optional)
Endless channels (TV and Radio) programmable
Multilingual menu text support
Channel list editing
Favourite channel list editing
True-color On-Screen Display (OSD)
Full Picture In Graphic (PIG) function
Electronic Program Guide (EPG) for on screen channel information
Subtitle supported
Teletext supported by software emulation
Parental lock facility by channel and program event
Program and Channel information transfer from receiver to receiver
S/PDIF for digital audio or Dolby digital bit stream output
DiSEqC 1.0, 1.1, 1.2 and USALS
HDMI HD Video/Audio Output
USB 2.0 Host
VFD Display for service information
RTC (Real-Time-Clock)
Time Shift
Video Recording
Recording one channel and Time Shifting another channel (optional)
Conax Embedded Card Reader
FullHD 1080p output via HDMI
AVI, MKV, MPG, TS, WMA, WMV, M2TS, FLV, DAT, ASF, MP3 playback
YouTube, Shoutcast Radio, Picasa, Kartina TV, YouPorn and Portal Compatible
W
eather forecast & RSS Reader Functions
Software Upgrade support via USB, RS232 or Internet
Endless possibility with Plug-In support
Message, FAQ and User Manual support
Download files from FTP server
Base on LINUX
Basic Operations
7
4 Quick Start Guide
4.1 Front Panel
Open the hand flap on the front panel.
Hold Smartcard horizontally with the electronic chip facing upwards. Then insert the Smartcard into the slot.
Basic Operations
8
4.2 Rear Panel
4.3 Connections
This section describes how to connect your product to match your particular devices setup and to gain
optimum signal quality. The product provides various interfaces to connect to the TV, VCR or other devices.
Select the most appropriate depending on the device you have.
Warning: Connect all components before plugging any power cords into the wall outlet.
Always turn off the product, TV and other components before you connect or disconnect any
cables.
Note: If you encounter any problems setting up your product, please contact your local retailer helpline.
Basic Operations
9
4.3.1 Connecting the Antenna
1. Connect one or two satellite coaxial cable from the wall to LNB IN.
2. Connect a cable/terrestrial coaxial cable to AERIAL IN.
Note: Cable and terrestrial can't concurrence.
4.3.2 Connecting the TV
1. TV with the HDMI connector:
For the best picture quality, connect the product and TV using an HDMI cable.
2. TV with the SCART connector:
For good picture quality, connect the product and TV using a SCART cable.
3. TV with the AV connector:
To output video and audio, connect the product and TV using an AV cable.
Note:
1. When using the digital audio system, connect the product and the digital audio system using an S/PIF
cable for audio.
2. Connecting your TV directly to the audio/video output of the product will assure a more vivid picture
Basic Operations
10
and enhance your viewing enjoyment.
4.3.3 Connecting the Network
1. Connecting to the LAN:
Connect one end of the Ethernet cable to the product and the other end to the LAN router.
2. Connecting to the Wi-Fi (Wireless LAN):
You can connect the network via the Wi-Fi access point or DSL/cable modem.
a. Plug in the wireless USB dongle to the USB port.(Separate purchase required)
b. Set the options for the Wi-Fi.
Network Name (SSID): Select the network name of your Wi-Fi access point from the list.
Security Type (WEP): This product supports WEP 40/128bit ASCII and WEP 40/128bit HEX. The security
type of the Wi-Fi and the product shall be set the same.
Password: When using the security type, you must set the password. Enter the same password in the
Wi-Fi setting menu.
3. Connecting to the 3G:
Connect the network via the 3G card. Plug in the USB that has 3G card.
Note:
1. Make sure the distance between the Wi-Fi access point and the product is not too far away. This may
lower the quality of service.
2. It is recommended to purchase a wireless USB dongle distributed by RT73, RT8192cu, RT3070, RT2870,
RT2070, RT8712u, ZD1211b, ZD1211. Other products may not function or respond.
3. We recommend the network connection over a direct LAN.
Basic Operations
11
4.4 Powering On/Off
1. Connect the power cord of the product to a wall outlet.
2. Turn on the power switch of the rear panel.
3. Power on/off by pressing the [ POWER] button on the remote control or [ POWER] button on the front
panel.
? Frequently Asked Question
Q: The power of my STB has been turned on and not in Standby mode, but the TV screen showed
nothing:
A: Make sure the TV set has been set to the correct video input (not the TV channels). For example, if you
have connected the unit with the Video1 input of the TV set, the TV set has to be switched to Video1.
Q: The power of my STB has been turn on and not in Standby mode, but the TV screen showed nothing
except popup window with “No Signal” information.
A: That means the channel, which you select, is no signal. Check connection of signal cable or contact
operator.
Basic Operations
12
4.5 Remote Control
You can power on/off the receiver, operate on screen menu, and use a
variety of hot key function.
POWER
To switch your receiver on from standby or standby to on.
MUTE
Used to enable or disable the audio
NUMERIC KEYS
Used to select channels or enter programming parameters
TV / RADIO
Receiver switches between TV and Radio mode.
(ZOOM)
Press key select zoom times, from X1 to X16.
(RECALL)
Return to the previous menu or status.
AUDIO
Audio channels setup, to select audio mode; Left, Right , Stereo, Mono.
TV/SAT
Receiver switches between TV and receive mode.
INFO
To display channel status or various program information.
EPG
Display the Programs guide on screen when available.
MENU
Displays the Main Menu on the screen, or return to the previous menu
or status.
EXIT
Cancel the user selection and return to the viewing mode from a menu.
OK
To select menu option, or to updated on entry.
,KEY
To adjust volume level, or to move cursor left or right in the menu.
,KEY
To change channels, or to move cursor up or down in the menu.
P+ / P-
To move up the cursor to the next or previous page in the menu or
channel list.
V+ / V-
To adjust volume level.
PORTAL
To display the navigation menu in Opera.
RECORD
Basic Operations
13
To start the recording.
TXT
Shows teletext or subtitle information of the current channel supports.
OPTION
Shows NVOD information of the current channel supports.
Blue Button
Into the multi-screen function in full screen.
(FIND)
Use to prompt find channels sort by character.
SLEEP
Press timer key you can setup up the Standby time.
V.FORMAT
Press V.FORMAT button to switch the display mode among "Auto", "480",
"576”, 720”, 1080I" and "1080P".
FAV(FAVORITE)
To set receiver to the favorite server mode,
display the favorite channel.
SAT
Display the satellite list at normal picture.
FOLDER
Press this button to enter the Record Manager menu directly.
Time Shift
Press this button to display Time Shift info bar.
Play
To play the MP3, JPEG, or Record files. And to display Time Shift info bar.
Stop
To stop the Time Shift, recording, or MP3/JPEG player.
PAUSE
Used to select the freeze function.
Press once to freeze the screen picture.
/ (PAGE- / PAGE+)
To start Fast Backward / Forward function.
/
Switch to previous / next file when play more files
USB
To remove the USB Hard Disk safely.
/ (PREV / NEXT)
Jump to beginning / end of the file in play mode
PLAYMODE
switch playing mode to order, single cycle and circulation list.
F1
To display quickbar menu in full screen.
F2/F3
Reserved buttons.
Networking
14
4.6 Easy Install
This menu to help you set basic function quickly.
When the STB is first used, there will show the Easy
Install menu.
When you used the Factory Reset function in
System/Basic Setting/Factory Default menu, it
also will show the Easy Install menu after reboot.
Note: If the software has default channel list, the STB
will play the first channel in the list.
4.6.1 Language Setting
Language setting allows you to select the main
language.
Select the appropriate language with the [, ] and
[, ] buttons.
In this menu:
Press [P+] button to save it and go to the time Setting
menu.
4.6.2 Time Setting
Time setting allows you to set the system's time. It will
display on front panel with LCD, and info bar.
In this menu:
Press [P+] button to go to the Network Setting menu.
Press [P -] button to go to the Language Setting menu.
1. Auto update: Press [ok] button, then press [, ]
buttons, at last press [ok] button Or [, ] buttons
select an option.
a. ON: Get the time from the channel info that you
will watch.
Note: Now the date and time does not edit.
b. OFF: You need manual set the date and time.
Note: Now you can't edit the GMT offset option.
2. YY/MM/DD: Press number key to set the date.
3. Time: Press number key to set the time.
4. GMT Offset: Press [ok] button, then press [, ]
buttons, at last press [ok] button. Or [, ] buttons to
select appropriate option.
5. Summer Time: Press [ok] button, then press [, ]
buttons, at last press [ok] button Or [, ]buttons to
select ON or OFF.
4.6.3 Network Setting
Network Setting allow you setting for connect internet.
If you connect the LAN and it has DHCP service. At DHCP
Networking
15
option, press [ok] button, then press [, ] buttons, at
last press [ok] button. Or press [, ] buttons to select
ON . If not DHCP service, you need select OFF, you need
config the network by manual.
In this menu:
Press [P+] button to go to the Video Setting menu.
Press [P-] button to go to the Time Setting menu.
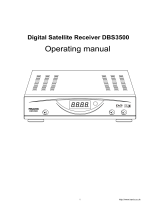
4.6.4 Video Setting
Video setting allow you setting for display format and
resolution.
1. TV Standard: Press [, ] buttons to switch video
resolution circularly by the sequence “480<->
576<-> 720<-> 1080i<->1080p<-> Auto. Or press
[ok] button, and select it with [, ] buttons, then
press [ok] button to confirm.
Note:
1) Auto means system will set the video output
resolution according to the program, its playing,
different resolution programs switching perhaps
will makes TV screen flickering.
2) When you connect with A/V or SCART, the
TV has output that only you change to resolution
the TV supports.
2. Screen ratio: Press [, ] button to switch video
resolution circularly by the sequence 4:3<->
16:9<-> Auto. Or press [ok] button, and select it
with [, ] buttons, then press [ok] button to
confirm.
4:3: Auto - Letterbox - Centre
16:9: Auto - Pillar Box - Zoom
Auto: The display format follow the channel
details
3. Conversion: Press [, ] buttons to switch the
manner circularly by the sequence
LETTER_BOX<-> PAN_SCAN<-> COMBINED<->
IGNORE. Or press [ok] button, and select it with [,
] buttons, then press [ok] button to confirm.
In this menu:
Press [P+] button to go to the Network Setting menu.
Press [P -] button to go to the Password Setting menu.
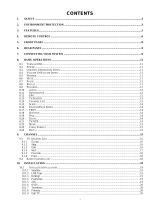
4.6.5 Password Setting
Password Setting Change the system password, the
default password is 0000.
In this menu:
Press [P+] button to go to the config Setting menu.
Press [P -] button to go to the video Setting menu.
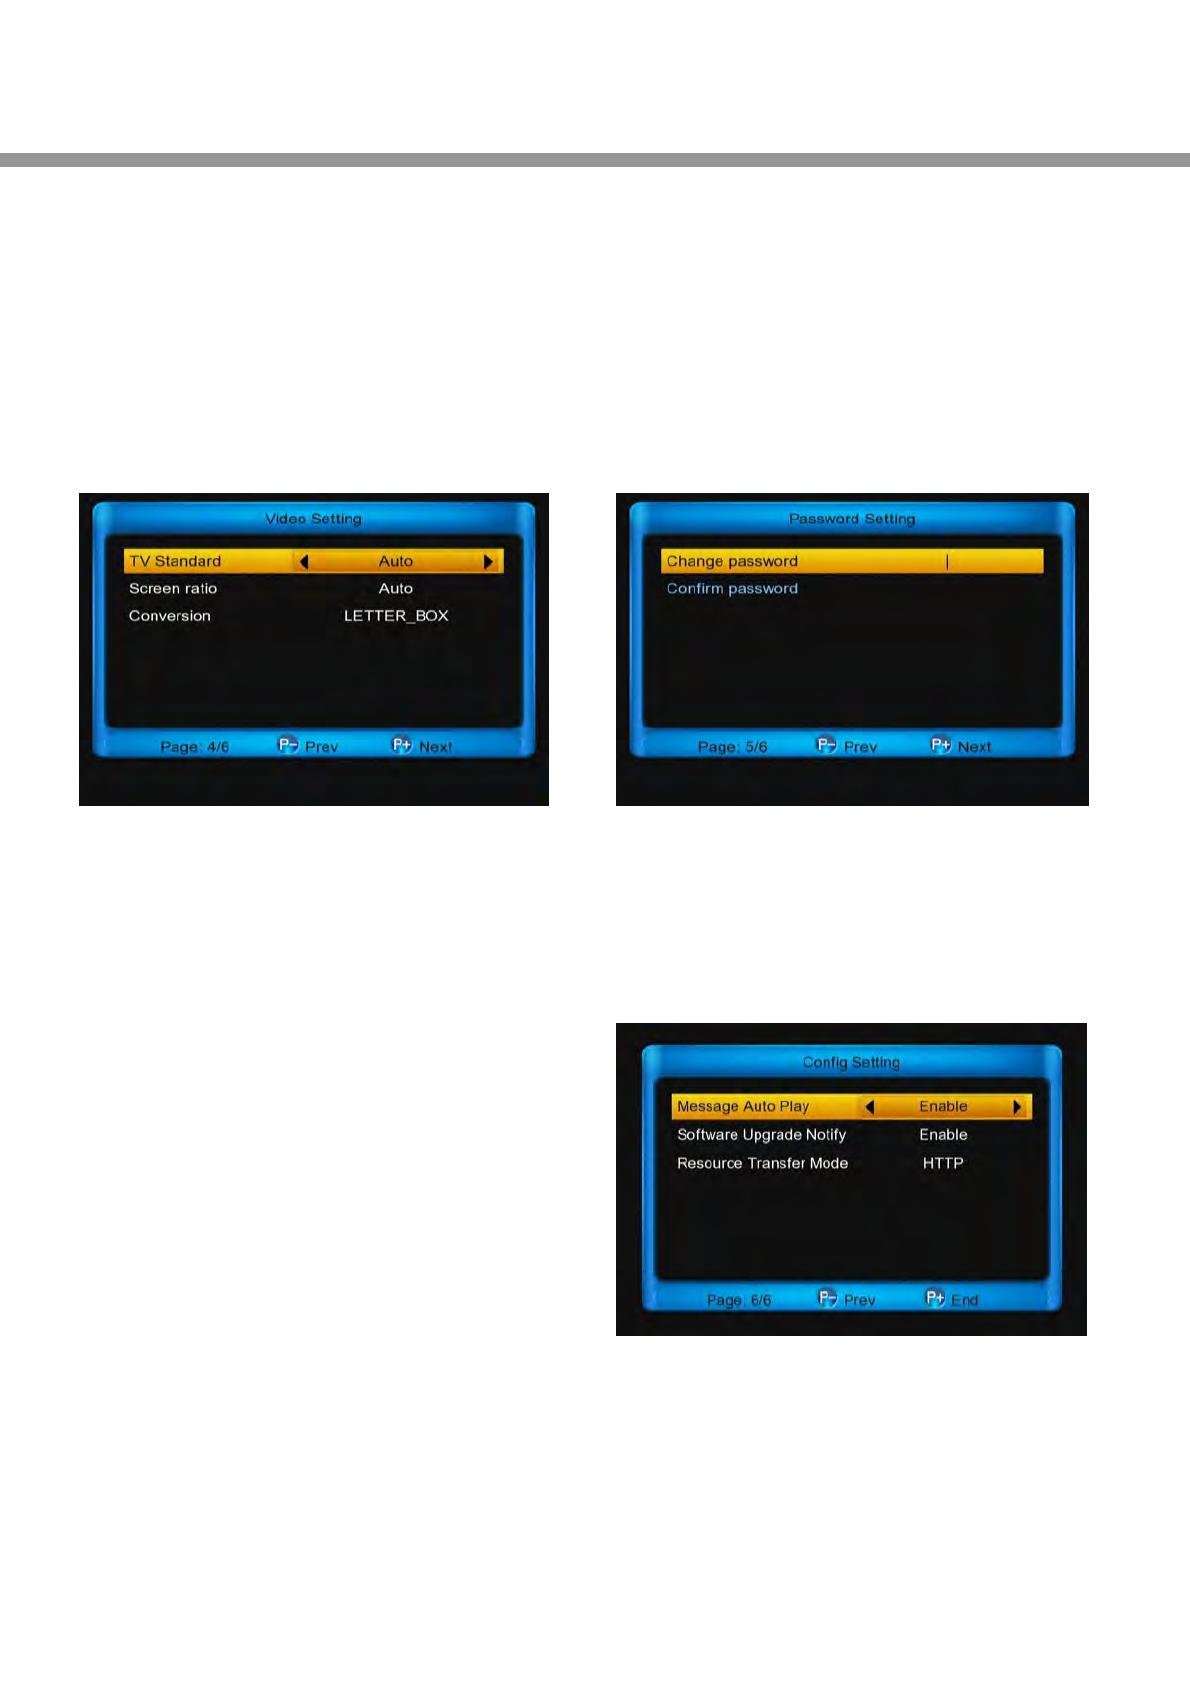
4.6.6 Config Setting
config Setting allow you config sth about online.
Message auto play: Press [, ] buttons to switch it
between Enable and Disable.
Enable : Allow the message auto play in full screen
when it play video.
Disable: The message can't auto play in full screen
when it play video.
Networking
16
Software Upgrade Notify: Press[, ] buttons to
switch it between Enable and Disable.
Resource Transfer Mode: Press [, ] buttons to
switch it between HTTP and FTP.
4.7 SCAN CHANNEL
Go to menu/Install/Satellite Install/Satellite, select an
appropriate satellite and then press [red] button to scan
channels.
Note: If don't scan channels, please contact the local
satellite antenna supply.
5 Basic Operations
5.1 Changing channels
You can change the channels in several ways.
Press the [, ] buttons in the full screen.
Enter the channel number directly with number
buttons.
Go to the TV List or Organizing Channel and
select a channel.
Note:
Press the [TV/RADIO] button to switch between TV
and radio channels.
Press the [RECALL] button to return to the previous
ten channels.
5.2 Volume/Mute/Audio
To adjust the audio volume, press the [, ] or [V+, V-]
buttons.
To mute the audio temporarily, press the [MUTE] button.
5.3 Setting audio options
Audio options are available only when the programme
supports multiple audio languages.
Press the [AUDIO] button to change the audio language
and direction.
Each time you press the [, ] buttons, the value
changes.
Note: The mute function remains set while you change
channels.
5.4 Display Resolution
Press the [V.Format] button to set the resolution of the
screen.
Networking
17
Each time you press this button, the value changes.
480<-> 576<-> 720<-> 1080i<->1080p<-> Auto
Note: When you connect with A/V or SCART, the TV has
output that only you change to resolution the TV
supports.
5.5 Info bar
The info bar is display informations about the channel of
the time whenever you change channels. Press the
[INFO] button while it hide. Press the [EXIT] button to
hide.
Note: It not displayed when not channels.
: This icon highlight, the channel has Teletext.
: This icon highlight, the channel has EPG.
: This icon highlight, the channel has multilingual in
audio.
: This icon highlight, the channel has subtitle.
: This icon highlight, the channel is Scrambled.
: This icon highlight, the channel is HBBTV.
: This icon highlight, the channel is added favourite
channel.
: This icon highlight, the channel is HD.
5.6 Sleep timer
Press the [SLEEP] button to set the automatic turn off
time.
Each time you press this button, the value changes.
OFF - 120 - 90 - 60 - 30 - 20 - 10 minutes
5.7 TV/SAT
Press [TV/SAT] key can switch between TV mode and
STB mode
5.8 Pause
1. In playing mode, press [ PAUSE] button, the
picture will be paused, but the sound of the
channel will still continues.
2. Press [PLAY] button, the screens picture will skip
over to the current playing picture, and the sound
of the channel will corresponding playing.
5.9 Zoom
The [ZOOM] button allows you to magnify a certain area
on the images.
Each time you press this button, the enlarge value
changes.
x1, x4, x9, x16
Using[, ] & [
, ] buttons to move the image center
area you want to see. And press [EXIT] button to exit.
Networking
18
5.10 NVOD
Press [OPTION] button in full screen, it display NVOD
menu if it has NVOD. Or it will show "no option channel".
5.11 Teletext
Teletext is a free service broadcast which gives the latest
information on news, weather and many other topics.
You can use interactive services in teletext mode.
All teletext supporting channels have the TTX icon
display highlight on the info bar.
1. Press [TTX] button and select TTX.
2. Press [, ] button to select the language.
3. Press [ok] button.
4. Using[, ] & [, ]buttons to switch information.
5.12 Subtitle
All subtitle supporting channels have the subtitle icon
display highlight on the info bar.
1. Press [TTX] button and select subtitle.
2. Press [, ] button to select the language.
3. Press [ok] button.
Networking
19
5.13 Quick bar
Press [F1] button to display the menu. It show weather
message, time and state of NET and USB, and has
shortcut to enter to "weather" menu. It also has
message box and manage of USB memory.
Message box is show the system message, like notify of
the new software.
5.14 Manage of USB memory
1. Press [yellow] button to Add New Folder, Copy, Cut,
Paste, Rename and Delete functions
2. Press [blue] button to sort the files or folders by
Name, Size or Time.
5.15 Change Satellite
1. Press [SAT] button.
2. Press [, ] buttons to select Satellite.
3. Press [ok] button.
5.16 Change Favourites group
1. Press [FAV] button.
2. Press [, ] buttons to select one favourites
group.
3. Press [, ] buttons to select channel.
5.17 Recording
In full screen:
  • Page 1 1
  • Page 2 2
  • Page 3 3
  • Page 4 4
  • Page 5 5
  • Page 6 6
  • Page 7 7
  • Page 8 8
  • Page 9 9
  • Page 10 10
  • Page 11 11
  • Page 12 12
  • Page 13 13
  • Page 14 14
  • Page 15 15
  • Page 16 16
  • Page 17 17
  • Page 18 18
  • Page 19 19
  • Page 20 20
  • Page 21 21
  • Page 22 22
  • Page 23 23
  • Page 24 24
  • Page 25 25
  • Page 26 26
  • Page 27 27
  • Page 28 28
  • Page 29 29
  • Page 30 30
  • Page 31 31
  • Page 32 32
  • Page 33 33
  • Page 34 34
  • Page 35 35
  • Page 36 36
  • Page 37 37
  • Page 38 38
  • Page 39 39
  • Page 40 40
  • Page 41 41
  • Page 42 42
  • Page 43 43
  • Page 44 44
  • Page 45 45
  • Page 46 46
  • Page 47 47
  • Page 48 48
  • Page 49 49
  • Page 50 50
  • Page 51 51
  • Page 52 52
  • Page 53 53
  • Page 54 54
  • Page 55 55
  • Page 56 56
  • Page 57 57
  • Page 58 58
  • Page 59 59
  • Page 60 60
  • Page 61 61
  • Page 62 62
  • Page 63 63
  • Page 64 64
  • Page 65 65

Amiko Alien 2 User manual

Category
TV set-top boxes
Type
User manual

Ask a question and I''ll find the answer in the document

Finding information in a document is now easier with AI