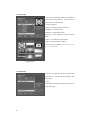
Discovery Telecom Mercury User manual
- Category
- Digital media players
- Type
- User manual

1
User’s Manual
Digital HD Satellite Receiver
Mercury

2
PREFACE
1- OVERVIEW
1. WHAT IS THIS PRODUCT FOR? 3
2. WHAT FEATURE DOES THIS PRODUCT OFFER? 3
3. FOR YOUR SAFETY 4
4. PLEASE CHECK THE FOLLOWING ACCERSSORIES ARE ENCLOSED 4
5. HOW TO USE THE REMOTE CONTROL KEY 5
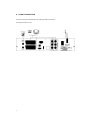
6. FRONT PANEL 6
7. REAR PANEL 6
8. CONNECTION DIAGRAM 7
2- OPERATING
1. Start Up 8
2. Installation 8
3. Edit Channel 13
4. User Setup 16
5. System Tools 20
6. Game 22
7. HDD (PVR) 23
8. PVR 25
9. Channel List 27
10. Program Guide 28
11. Audio change 28
12. Multi Pictures 29
13. Recall the Favorite channel 29
3- SPECIFICATION
4- TROUBLE SHOOTING

3
1- OVERVIEW
1. WHAT IS THIS PRODUCT FOR?
This manual describes how to setup and operate Your STB.
Only qualified personnel should handle any problems beyond this manual.
This product is designed for using Digital Satellite and allows you to enjoy a lot of broadcasting whenever you want
to watch it anytime. By simply pressing the button of the remote control unit, the vivid picture and life –like sound of
digital broadcasting that your TV portrays through this product, allows you to watch whatever channel you wish of the
digital broadcasting.
Through this manual you will notice that the operation is easy to use.
This manual will help you get the most from this product and guide you through Installation, channel selection and
many other functions.
In case you experience any difficulties to use this product, please consult the relevant section of this manual.
From now on, enjoy digital broadcasting with digital satellite receiver!!!
2. WHAT FEATURE DOES THIS PRODUCT OFFER?
< General Features >
▪ Full Compliant of MPEG Digital & DVB broadcasting
▪ Standard Definition / High Definition contents ( MPEG2 and support MPEG4 AVC/H.264)
▪ High Definition Video output : HDMI and Component(YPbPr)
▪ Audio Decoding : ISO/IEC 13818-3(MPEG-2 audio/MUSICAM), Dolby AC-3
▪ USB PVR ready ( File System(FAT16/FAT32/NTFS) , Format function, Recording, Playback, EPG Time record,
Time shifted recording)
▪ USB 2.0 Interface - Firmware Update , Media Play, PVR Recording
▪ Media Supporting : JPG( JEPG decoding accelerator), BMP, MP3 , OGG , WMA
▪ Video output resolution : 576i, 576p , 720p, 1080i
▪ User selectable output resolution
▪ Integrated USB2.0 (Host), Support to USB Storage (HDD, Memory Stick)
▪ 10days EPG (Electronic Program Guide)
▪ 950-2150MHz Input Frequency (IF Loop Throughout)
▪ Variable Input Symbol Rate (1-45Msps)
▪ Multi Language OSD
▪ Automatic PAL/NTSC Conversion
▪ Fast Channel Change & Scan
▪ 5,000 Channel TV & Radio Program
▪ Flexible reception of SCPC & MCPC from C/Ku-Band Satellites
▪ Timer Function (Automatic Turn On/Off by Setting Function)
▪ 8 Bit Colors GUI(Graphic User Interface)
▪ PIG (Picture In Graphic), Zoom function

4
▪ 8 Favorite Group List
▪ Powerful Channel Editing Function
Sorting: Alphabetic, FTA/Scramble, Parental Lock and with default option
Move, Delete, Favorite Edit
Parental Lock, Channel Rename, Channel Skip
▪ Manual PID/Satellite & TP/Network Scan
▪ Blind Scan
▪ Multi Satellite Scan – Simultaneous Scan with various Satellites
▪ DiSEqC 1.0, 1.1, 1.2 & USALS Compatible
▪ Comparable of Setting the Frequency for SMATV System
▪ Software Upgrade via USB Storage or RS232C (Receiver to Receiver, PC to Receiver)
▪ 1 TV SCART (Video, TV RGB out, Audio L/R),1 VCR SCART(Video, Audio L/R) , HDMI , Composite Video/Audio ,
Componenet Video , S/PDIF(Optical) , Ethernet support
3. FOR YOUR SAFETY
▪ Do not open the cover. It may cause malfunction or electric shock.
▪ When you do not use the product for a long time, please pull the power cord out from the outlet.
Also do not use a damaged power cord that may cause fire or electric shock.
▪ Do not use install the product in a humid area.
▪ Do not cover the product or place anything heavy on the product, Keep clear space around the product for
sufficient ventilation.
▪ Avoid using spray or liquid materials around the product. Don’t make other materials come into the inside the
product.
▪ Do not connect to modify cables when the product is plugged in.
▪ Socket-outlet shall be installed near the equipment and shall be easily accessible.
▪ Apparatus shall not be exposed to dripping or splashing and that no objects filled with liquids, such as vases
shall be placed on the apparatus.
4. PLEASE CHECK THE FOLLOWING ACCRSSORIES ARE ENCLOSED
▪ User manual 1 set
▪ Remote Control Unit 1 Set
▪ Batteries (AAA Type) 2EA
▪ A/V Cable (SCART to RCA), HDMI cable
Note !
If any of the accessories listed above are missing, Please contact the sales outlet where this product was initially
purchased.

5
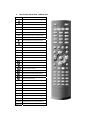
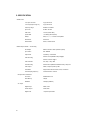
5. HOW TO USE THE REMOTE CONTROL KEY
key Function
\
Turns the equipment on/off
Sounds Off/On
PAUSE Holds the picture or release the pause
INFO Shows detail channel information
AUDIO Selects audio mode, Select audio language
LAST Returns to previous program
MENU Enters main menu screen. Or exits menu screen
EXIT Moves to upper menu
Execute page down function in the menu
Execute page up function in the menu
FIND Find Channel
EPG Shows program information
FAV Enter favorite program or Exit from Favorite Program
SAT Enter programmed satellite list
SIG Shows signal / quality level
TIME Shows current Time , setting Time
Fast rewind recorded file while playing
Fast forward recorded file while playing
Plays recorded pvr file
Stop recording or playing
Slow rewind recorded file while playing
Slow forward recorded file while playing
Pause recorded file while playing
Starts a direct recording
HDD Enter Hard Disk (Record) menu
PVRi Information about PVR
ZOOM Zoom Screen
SLEEP Sleep timer
TTX Teletext Fucntcion
SubT Subtitile Function
V.MODE Current video out resolution and change
OK Shows Channel list. Confirms selection
TV/RADIO Toggles between TV and Radio operation
Change the value of a selected line, volume up/down

6
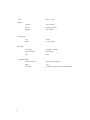
6. FRONT PANEL
No Name Fuction
1 CH DOWN To move down in menus, To change channels
2 POWER To Put Power in and out of standby
3 CH UP To move up in menus, To change channels
4 DISPLAY Display Segment LED
5 IR IR Receiver
6 USB Connection USB Port ( switch Front/Rear )
7 SMART CARD Smart Card Slot
7. REAR PANEL
No Name Function
1 IF Input / Output IF INPUT From LNB to receiver / IF Loop-through output to 2nd receiver
2 Scart VCR Scart / TV Scart (Video, RGB Signal output.)
3 S/PDIF For Digital Audio Output
4 HDMI HDMI Digital Video/Audio Output
5 USB Connection USB Port ( switch Front/Rear )
6 RS232 Serial port used for software upgrade
7 VIDEO / AUDIO Composite Video Output / Left-Right Audio Output
8 COMPONENT VIDEO Component Video Output ( Y , Pb, Pr )
9 POWER Power switch

7
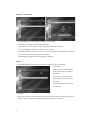
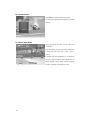
8. CONNECTION DIAGRAM
Connect the cable from the satellite dish to the LNB Input socket on the receiver.
The SCART connect the TV set.

8
2 - OPERATING
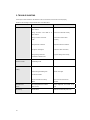
1. Start Up
Please follow the brief procedure below and watch the satellite programs.
Select the User Setup and confirm Language
Select the Installation and antenna setup
Adjust LNB configuration per each satellite
Execute scanning to find program
Exit from installation after all programs are searched.
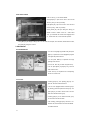
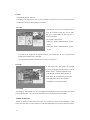
Language
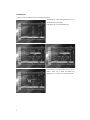
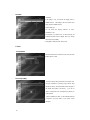
When the receiver is turned on for the first time, main menu is appeared as below photo.
You can find desired menu by using◀ ▶ ▲ ▼ key and select desired menu by press [OK] key.
Select the user setup and press [OK] or ▶ to enter Language menu as below photo and can select the desired
language by using ◀ ▶ or [OK] key to confirm it.
* This Receiver supports 11 languages.
English, French, German, Italian, Spanish, Portuguese, Russian, Turkish, Polish, Arabic and Persian.
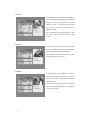
2. Installation
Press the [OK] or ▶ key to enter Installation menu as below photo. Press the [OK] key on Antenna setup menu and
it is appeared on screen as below second photo.
2.1 Antenna Connection ( This can be adopted by Two Tuner Model)
You can fix “Antenna Connection Type” through ◀ ▶ Keys.

9
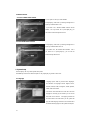
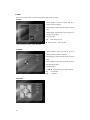
2.2 Satellite List
When you enter to Satellite List menu, there will display the screen.
• Press [Red] key to enter Edit Satellite where you can
edit Satellite name and longitude
• Press [Green key to enter Add Satellite menu
• Press [Blue] key, you will be asked “Are you sure to
delete?”. Select “yes” to delete the Satellite that
highlight focus on. Select “No” to cancel the operation

10
2.3 Antenna Setup
In this section you could know how to operate Antenna Setup.
2.3.1 Tuner
Press ◀ ▶ keys to fix Tuner LNB1 or LNB2.
2.3.2 Satellite
Press ◀ ▶ keys to fix Satellite or [OK] key to select Satellite list.
2.3.3 LNB Frequency
Select LNB type using ◀ ▶ keys and ▲▼ keys. And confirm it by [OK] key.
Option is 5150 / 5750 / 5950 / 9750 / 10000 / 10050 / 10450 / 10600 / 10700 / 10750 / 11250 / 11300 / 5150-5750 /
5750-5150 / Universal (9750-10600)
2.3.4 Transponder
Select a specific transponder by using ◀ ▶ keys or [OK] key and confirm it by [OK] key.
2.3.5 DiSEqC 1.0 or 1.1
Select a specific setting for DiSEqC 1.0 or 1.1 by using ◀ ▶ keys or [OK] key and confirm it by [OK] key.
Option is Disable / LNB1 / LNB2 / LNB3 / LNB4 at DiSEqC 1.0.
Option is Disable / LBN1 to LNB16 at DiSEqC 1.1.
2.3.6 22Khz
In case you are using a Dual LNB or two antennas connected to a 22KHz tone switch box, make 22KHz tone switch
“ON” or “OFF” to select a LNB or an antenna.
2.3.7 Polarity
Select Polarity
2.3.8 Motor DiSEqC
It is used to set the DiSEqC 1.2 motor & USALS
If you have no positioner equipment, select “Disable”.

11
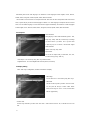
1) DiSEqC 1.2 – Motor Setting
If you select “DiSEqC1.2”, “Local Longitude / Local Latitude” is not available.
• Press◀ ▶ key or [OK] key to change satellite or transponder.
• Position No.& Save: You can press ◀ ▶ key or number key to select or input Position NO.
• Go to X: Press [OK] key to open a list. You can go to X or go to reference.
• After select “Satellite” and “Position No & Save”, you can move the highlight to “West/Save/East” line and press
◀ ▶ key to move the dish and press [OK] to save the position.
• Move the highlight to “Recalculation” and press [OK] key to recalculate.
2) USALS
Set the satellite’s longitude and local longitude / local latitude, USALS can move dish automatically.
• Local Longitude
Please input Local Longitude by numeric
keys and adjust E.W by using ◀▶ keys
• Local Latitude
Please input Local Longitude by numeric
keys and adjust S.N. by using ◀▶ keys
• Motor Setting
Switching the satellite can move the dish
to the right place
• Limit Setup
When you set “limit setup” to “West Limit/ East Limit”, you can move the dish to west or east by pressing◀ ▶ key
manually. When you are moving to the target place, please press [OK] key to save the point.

12
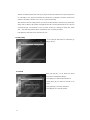
2.4 Single Satellite Search
Scan all the listed transponders in a selected
satellite.
In “Satellite” item, press◀ ▶ key to select satellite,
which you to scan. Otherwise, press [OK] key can
open the “satellite list” for you to select directly.
• Scan Option
Press◀ ▶ key to select scans all channels or just
scans free channels.
• Scan Channel
Press ◀ ▶ key to select scans TV + Radio Channels, or just TV channels or just Radio channels.
• Network Scan
Press ◀ ▶ key to select whether network search or not.
• Scan Mode
Press ◀ ▶ key to select scans “Normal Scan” or “Blind Scan”
• Scan Start
Press [OK] to start search
2.5 Multi Satellite Search
In “Satellite” item, press [OK] key to see the
selected satellite. The system will use DiSEqC1.0 /
DiSEqC1.2 / USALS function to search satellite and
scan channels. It will scan all the satellite
displaying in the bottom box.

13
2.4 TP List & Search
• Press ◀ ▶ key, you can switch satellite.
• Press [Red] key to open edit TP menu. User can edit
TP info by using ◀ ▶ key manually.
• Press [Green] key, open new TP menu. User can add a
new TP by using ◀ ▶ key manually.
• Press [Yellow] key will open dialog box asking you
whether confirm to delete current TP. When select
“Yes”, you will delete the channel which highlight focus
on. When select “No”, it will cancel the operation.
• Press [Blue] key will display a dialogue box. You can select “Scan Option, Scan Channel, Network Search” items,
and press [OK] to begin to TP Scan.
3. Edit Channel
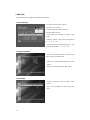
3.1 TV Channel List
• You can move highlight by press▲▼ key and press
[OK] key to preview the current highlighted program
in the right side preview window.
• You can press ▲▼ key to implement the Page
Up/Page Down function.
• You can use ◀ ▶ key to switch “Program Group”.
• You can press [Menu] or [Exit] keys to go back to
“Edit Channel” menu.
• Press color key can implement the corresponding
function in “Channel List”.
3.1.1 Favorite
• Pressing [FAV] key, then pressing [OK] key can
open the “Favorite” window like above
• You can move highlight between 8 favorite groups
by pressing [Channel Up/Channel Down] key and
press [OK] key to make a favorite mark in the left
side of the selected Favorite group.
• Pressing [OK] key on the marked Favorite group
can cancel the exist favorite mark.
• After marking, pressing [Exit] key can back to “TV
Channel List”,there will show a favorite mark beside
the marked channel.

14
3.1.2 Lock
• Press [Red] key can enter lock mode and press ▲▼ key
to move the highlight and press [OK] key, it will display a
dialogue to ask you to input password. The default
password is “0000”. If you input the correct password
you can see a “lock mark” in the right side of the
highlighted channel.
• After save and exit menu, STB will request you to input
the password while you want to watch the locked
channel.
3.1.3 Skip
• Press [Green] key can enter skip mode and press▲▼
key to move the highlight and press [OK] to make a “skip
mark” in the right side of the highlighted channel.
• After save and exit menu, the channel will be skip while
user change channel in the full screen.
3.1.4 Move
• Press [Yellow] key, then press▲▼ key to move the
highlight and press [OK] key to make a mark. There will
show a “moving mark” in the right side of the selected
channel like above
• You can move the selected channel to the position that
you want to place by press▲▼ key And press [OK] key
to confirm your decision.

15
3.1.5 Edit
• Press [Blue] key will open “Edit” menu.
• Press [Exit] can exit “Edit Channel” menu. If you do modification in “Edit Channel” menu, the system will show up a
message box to inquire you whether saving or not when exit.
3.1.5.1 Sort
• Press [Red] key can open the “Sort” window like above.
There are four kinds of sorting ways. You can press
▲▼ key to move highlight and press [OK] key to
confirm your selection
• The five kinds of sorting way are:
1. Name (A-Z): Sorting in Alphabetical Order, ignore “$”
symbol.
2. Name (Z-A): Sorting in Alphabetical Order, ignore “$”
symbol.
3. FTA: Sort channel through free and scramble sequence. Free channel will in the front of channel list and
scramble channel will at the rear of channel list
4. Lock: Accumulated all locked channels and list in the last of TV Channel List.
3.1.5.2 Edit
In “Edit Channel” menu, press [Green], then press▲▼
key to move the highlight and press [OK] key to open the
“Rename” window. It shows the window like above:
• Press [Red] key can switch whether capital or not.
• Press [Green] key can delete the char on the cursor.
• Press [Yellow] key can save the modification.
• Press [Blue] key can cancel the operation.
3.1.5.3 Delete
Press [Blue] key, then press ▲▼ key to move the highlight and press [OK] key to make a delete mark in the right side
of the highlighted channel. After save and exit “Edit Channel” menu, the marked channel will be deleted.
3.2 Radio Channel List
Basically, the operation of “Radio Channel List” is same as “TV Channel List”, but there is one point different: In “Radio
Channel List” mode, there is no video information, so it will always display Radio’s logo in the right side preview window.

16
3.3 Delete Channel
3.3.1 One satellite delete channel
• You can press ◀ ▶ key to select satellite.
• Press [Ok] key, it will show up a warning message box to
inquire you whether delete or not.
• If you select “Yes”, selected satellite channels will be
deleted. And if you select “No” or press [Exit] key, you
can exit the function directly without save.
3.3.2 All satellite delete channel
• Press [Ok] key, it will show up a warning message box to
inquire you whether delete all or not.
• If you select “Yes”, all channels will be deleted. And if
you select “No” or press [Exit] key, you can exit the
function directly without save.
4. System Setup
Press the [OK] or ▶ key to enter System Setup menu.
Press▲▼ key to select menu items and press ◀ key or [Exit] key to go back to main menu.
4.1 Language
• Language: press ◀ ▶ key to select menu languages,
the selections of languages include: English, French,
German, Russian, Arabic, Portuguese, Turkish, Spanish,
Polish, Italian and Persian.
• First Audio: Some channels have more than one audio
language for choosing; by this function you can set the
first audio for this channel. If the playing channel has
the same audio as the “First Audio” you set, system will
play this audio language as default. If the channel hasn’t
the suited audio language, then the system will compare

17
automatically with second audio language. The selections of audio languages include: English, French, German,
Russian, Arabic, Portuguese, Turkish, Spanish, Polish, Italian and Persian.
• Second Audio: If the channel has no correspond audio with “First Audio” but have corresponded audio with “Second
Audio”, system will play the second audio language as default. If no audio language corresponds with the “Second
Audio”, then the default language of current channel will be played automatically. The selections of audio languages
include: English, French, German, Russian, Arabic, Portuguese, Turkish, Spanish, Polish, Italian and Persian.
4.2 TV System
• Video Resolution
Press [OK] key to select Video Resolution (options : 576i,
576p, 720p, 1080i.). After that, it will show up a message
“you want to Save”. If you select “No” or you don’t want
to press any key for 15 second, it will be back original
Video Resolution.
Options : 576i, 576p, 720p, 1080i.
• Aspect Mode
You can set TV aspect mode (4:3 Letter Box, 16:9, Auto,
4:3 Pan & Scan) by using ◀ ▶ key
• Video Output : You can set it by using ◀ ▶ key CVBS and RGB,
• Digital Audio Out : You can set Digital Audio Out mode ( BS out, LPCM Out)
4.3 Display Setting
Press ◀ ▶ keys to fix Brightness, Contrast and Saturation of Display.
4.4 Local Time Setting
• GMT Usage
You can select “On” or “Off” mode by using ◀ ▶ keys.
• GMT Offset
This item is valid only when you select “TDT Auto” mode.
You can press ◀ ▶ keys to switch “GMT” Offset”
value, and the range is “-12:00 ~ +12:00”, increase each
half hour progressively.
• Summer Time
This item only valid when you select “TDT Auto” mode. When “Summer Time” is “On”, it will add one hour to the
time.

18
• “Date” and “Time”
These items are valid only when the setting of “GMT Usage” is “Off”. You can press◀ ▶ keys to moving highlight
and use number keys to input directly.
• If the current channel provides the correct time information, you will see the current time while you enter “Time”
menu. If the channel doesn’t provide time information, you have to input the date and time information manually.
• Press [Exit] key to draw back from “Time” menu.
4.4 Timer Setting
• You can press▲▼ key to select a timer, then press
[enter] key to open timer menu.
• Current time information will display on the first column;
if the current time is incorrect, please modify the time
information in “Time” item.
• Timer Mode: There are several modes for Timer to
setting, include Off, Once, Daily
• Recording :
• Wakeup Channel: press [OK] key to enter channel list
and select channel that you want to setting.
• Wakeup Date: use number keys to input your wakeup date.
• On Time: use number keys to input your wakeup time. Once the time’s up, no matter what the system is in standby
mode or in playing mode, the system will automatically switch to the channel you want and start to play.
• Duration: After you set a time for “Duration” item, once the time’s up, the system will automatically switch to standby
mode. If you want not work this function, set the duration is 00:00.
• Move the highlight to “Save” button and press [OK] key to save timer. Select “Cancel” or press [Exit] key to cancel
the operation.
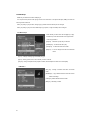
4.5 Parental Lock
• After selecting parental lock and entering the correct
password, the screen as shown in the middle appears.
The default password is “0000”.
• Menu Lock determining that when users wish to enter “Edit
Channel/Installation/Tools” menu, whether have to input
Password or not. If the setting of “Menu Lock” is “Yes”
which means user have to key in password, set “No”
means unlock.

19
• Channel Lock determining that when users wish to play the lock channels, whether have to input the password or
not. If the setting is “Yes”, play the channels with lock mark will show up a dialogue on the screen and ask for the
password. If the setting of “Channel Lock” is “No”, the Lock function will invalid.
• New Password is used for revising password; you can input the new password in this item by using number keys
directly. After you filled in 4 digit numbers, the highlight will auto skip to Confirm Password and ask you to input the
new password again. If the password is correct, the screen will show up a message of “Saving Data, Please
Wait…”. After finish saving and draw back to “System Setup” menu, the revising is complete.
• Press [Exit] key to draw back from the “Parental Lock” menu.
4.6 OSD Setting
You can adjust the OSD timeout and Transparency by
using ◀ ▶ keys.
4.7 Favorite
When press [OK] key, you can rename the favorite
group’s name. It will display the dialogue.
• Press [Red] key can switch whether capital or not.
• Press [Green] key can delete the character on the
cursor.
• Press [Yellow] key can save the modification.
• Press [Blue] key can cancel the operation.

20
4.8 Others
• LNB Power
If the setting is “On”, the receiver will supply power to
satellite antenna. If the setting is “Off”, the receiver won’t
supply power to satellite antenna.
• Channel Play type
You can select the “playing channels” as “Free”,
Scrambled” or “All”.
For Example: If you select “Free”, in full screen play, all
scrambled channels will be skipped when you change
channels by using ▲▼ key.
• Press [Exit] to draw back from “Other” menu.
5. Tools
5.1 Information
Show the information of model name, boot, main, dB code
and back ground of STB.
5.2 Factory Setting
Once the Factory setting is selected and chooses “Yes”
and type password by pressing 4-digit numeric keys
followed by OK key, whole parameters will be changed to
the default value written in the factory. If you do not
want to continue this mode, press [EXIT] key before you
enter password.
Common password is “0000”. In case selected password
is forgotten, call yours dealer to get factory master
password.
Page is loading ...
Page is loading ...
Page is loading ...
Page is loading ...
Page is loading ...
Page is loading ...
Page is loading ...
Page is loading ...
Page is loading ...
Page is loading ...
Page is loading ...
Page is loading ...
-
 1
1
-
 2
2
-
 3
3
-
 4
4
-
 5
5
-
 6
6
-
 7
7
-
 8
8
-
 9
9
-
 10
10
-
 11
11
-
 12
12
-
 13
13
-
 14
14
-
 15
15
-
 16
16
-
 17
17
-
 18
18
-
 19
19
-
 20
20
-
 21
21
-
 22
22
-
 23
23
-
 24
24
-
 25
25
-
 26
26
-
 27
27
-
 28
28
-
 29
29
-
 30
30
-
 31
31
-
 32
32


Discovery Telecom Mercury User manual
- Category
- Digital media players
- Type
- User manual
Ask a question and I''ll find the answer in the document
Finding information in a document is now easier with AI
Other documents
-
SAB 3606 User manual
-
 Solomend HD PVR 800 User manual
-
 Golden Media HD receiver User manual
-
Blade BM5000S User manual
-
 EXPANSYS PANSAT 4500 User manual
-
 Manhattan Computer Products ST 250 User manual
-
Manhattan ST100 User manual
-
Vantage Hearth HD 8000S Owner's manual
-
Hyundai HSS-760A User manual
-
 HD DVB-S2 User manual


