Page is loading ...

y
1
BCE625-SS/W/BL/R/IV
60 cm Twin cavity
electric slot-in cooker

User Manual for your Baumatic
BCE625-SS/W/BL/R/IV
60 cm Twin cavity electric slot-in
cooker with ceramic top
NOTE: This User Instruction Manual contains important
information, including safety & installation points, which will
enable you to get the most out of your appliance. Please keep it
in a safe place so that it is easily available for future reference; for
you or any person not familiar with the operation of the appliance.
JW 07/12/12
2

3
Contents
Environmental note 4
Important safety information 5 – 9
Specifications 9 – 12
Dimensions 9
Product specifications 9
Standard accessories 10
Electrical details 10
Control panel 11
Oven timer 12
Setting and using the oven programmer/timer 12 - 14
Selecting manual operation mode 12
Setting the time of day 13
Before first use 13
Setting the minute minder function 14
Setting the duration function (main oven only) 14 - 15
Setting the start/end time function (main oven only) 16 - 17
Changing the cooking time 17
Adjusting the audible signal 17
Adjusting the display brightness 18
Selecting an oven cooking function and temperature 18 - 21
Using the main oven 18
Using the top oven and grill 19
Using the enamelled baking tray and handle 19
Temperature indicator lights 20
Cooking guidelines 20
Warnings 20 - 21
Using the hob top 21 - 23
Before first use 21
Using the hob top zones 21
Residual heat indicator 22
Hob guidelines 22 - 23
Cleaning and maintenance 23 - 26
Cleaning the ceramic hob top 24
After each use 24
Cleaning table 25
Replacing the oven bulb 25
Removing the oven door for cleaning 26
Installation 27 - 32
Positioning 27 - 29
Safety chain anchors 29
Securing the safety chains 30
Electrical connection 31
Connecting the main supply cable 31 - 32
My appliance isn’t working correctly 32 - 34
Baumatic consumables 35
Contact details 39

Environmental note
4
o The packaging materials that Baumatic uses are environmentally
friendly and can be recycled.
all packaging material with due regard for the
environment.
o Please discard

5
Important safety information
Your safety is of the utmost importance to Baumatic.
Please make sure that you read this instruction booklet
before attempting to install or use the appliance. If you
are unsure of any of the information contained in this
ooklet, please contact the Baumatic Advice Line.
estic household use and for
ambient temperature of the
scolouration at
nd that this
t of Baumatic Ltd.
Guarantee. The foregoing does not
affect your statutory rights.
atic service
d service agents.
arning and safety instructions
ill
become hot during use and retain heat after operation.
b
General Information
o This appliance is designed for dom
the cooking of domestic foodstuffs.
o IMPORTANT: The adjacent furniture and all materials used in
the installation must be able to withstand a minimum
temperature of 85°C above the
room it is located in, whilst in use.
o Certain types of vinyl or laminate kitchen furniture are
particularly prone to heat damage or di
temperatures below the guidelines given above.
o IMPORTANT: Baumatic Ltd. DO NOT recomme
appliance is installed on any type of marine vessel.
o The use of this appliance for any other purpose or in any other
environment without the express agreemen
will invalidate any warranty or liability claim.
o Your new appliance is guaranteed against electrical or
mechanical defects, subject to certain exclusions that are noted
in Baumatic’s Conditions Of
o Repairs may only be carried out by Baum
engineers or their authorise
W
o This appliance complies with all current European safety
legislation. Baumatic do wish to emphasise that this compliance
does not remove the fact that the appliance surfaces w

6
hild Safety
any time. During and after use, all
surfaces will become hot.
se ensure that they are kept under close supervision
at all times.
eneral Safety
C
o Baumatic strongly recommend that babies and young children
are prevented from being near to the appliance and not allowed
to touch the appliance at
o If it is necessary for younger family members to be in the
kitchen, plea
G
Make sure that you understand the controls before using the
appliance.
Check that all of the controls on the appliance are turned off
after use.
when opening the oven door, this will allow
eat to disperse.
Always stand back
h
Take care when removing items from the oven, as the contents
may be hot.
Always keep the oven doors closed when the oven is not in use.
Always follow the basic principles of food handling and hygiene;
this will prevent the possibility of bacterial growth.
Always keep ventilation slots clear of obstructions.
Keep fingers away from the hinge areas when closing the door,
otherwise you may trap them.
Oven gloves should be used when placing food in the oven cavity
and when removing it. Care should be taken to avoid direct
contact with any of the elements in the appliance.
T LEAVE THE APPLIANCE UNATTENDED WHILST I
N
USE.
y should be allowed to sit or stand on any
part of the cooker.
o DO NO
o Do not place heavy objects on the oven door or lean on the
oven door when it is open, as this can cause damage to the oven
door hinges. Nobod

7
o Do not store chemicals, food stuffs, pressurised containers in or
o Do not place fla
mmable or plastic items on or near the hob
o Do not leave heated oil or fat unatte
nded, as this is a fire risk.
you should also not use a lid.
grill trivet should never be covered with aluminium foil.
coffee, milk, saltwater, lemon, tomato
juice or any liquid with high sugar content to remain in contact
o Do not use the appliance to
heat the room it is located in or to
hob burners or oven door.
o Do not attempt to lift or move cooking appliances by using the
oven door or handle, as this may cause damage to the appliance
or result in injury to the person lifting the appliance.
on the cooker or in cabinets immediately above or next to the
cooker.
o Do not heat up unopened food containers, as pressure can build
up which may cause the container to burst.
burners, these types of materials should also not be placed in
the oven or the compartment below the oven.
You should not fill a deep fat frying pan more than one third full
of fat or oil;
o Do not allow fat or oil to build up in the oven trays, grill pan or
oven base.
o Do not place pans or baking trays directly on the base of the
oven cavity, or line it with aluminium foil.
o Do not grill food containing fat without using the grill trivet. The
o Do not place hot enamel parts in water, leave them to cool first.
o Do not allow vinegar,
with the enamel parts of the appliance. Spillages should be
wiped up immediately.
o Do not allow electrical fittings or cables to come into contact
with areas on the appliance that get hot.
dry clothing. No clothing should be placed over or near to the
o Do not install the appliance next to curtains or soft furnishings.

8
Cleaning
ried out on a regular basis.
IMPORTANT: Care must be taken when cleaning between
r glasses, and inside the inner frame as some of
the edg
lified person, strictly in accordance
with the manufacturer’s instructions. Please see
o Baumatic Ltd. declines any responsibility for injury or
take care to avoid injury and ensure that the room is
adequately ventilated. If the appliance is going to be used for
qualified installer if you are in any doubt
about the amount of ventilation that you will require.
eclaration of conformity
Th s:
3/23/EEC regarding “low voltage”
regarding “materials in contact with food”.
ed
d requires the appliance to be installed in
ntly in force. This appliance
must be used by a trained person for domestic purposes only.
o Cleaning of the oven should be car
o Great care should be taken whilst using this appliance and when
following the cleaning procedure.
o IMPORTANT: The appliance must be disconnected from the
mains before following the cleaning procedure.
o
the doo
es maybe sharp due to the manufacturing process.
This appliance must be correctly installed by a
suitably qua
Installation
the specific section of this booklet that refers to
installation.
damage, to person or property, as a result of improper
use or installation of this appliance.
o Heat, steam and moisture will be created during use of the
appliance,
prolonged periods of time, then additional ventilation may be
required.
o Please consult with your
D
is appliance complies with the following European Directive
-7
-89/336/EEC regarding “electromagnetic disturbances”
-89/109/EEC
o The above directives comply with 93/68/EEC regarding CE
marking.
o The manufacturer declares that the oven is built using certifi
materials an
accordance with the standards curre

9
pecificatioS ns
Product ensions:
dim
80 mm)
res
movable doors
o Adjustable feet
Height: 900 - 920 mm
Width: 600 mm
Depth: 600 mm
Product specifications:
o 4 zone ceramic hob:
o 2 x 1.20 kW radiant zone (diameter 145 mm)
o 2 x 1.80 kW radiant zone (diameter 1
o 4 Individual residual heat indicators
o Main (bottom cavity) fan oven
2 Functions o
o Main oven gross / net capacity: 70 / 58 litres
o Secondary (top cavity) conventional oven and Grill
4 Functions o
o Secondary oven gross / net capacity: 35 / 27 lit
o LED full programmer
o Double-glazed re

10
Standard accessories:
lled baking tray with handle
o 1 x Trivet
lectrical details
Supply Connection: used
3mm contact gap)
:
ven Light Bulb: E14 15 W/300°C screw type pygmy
l numbers can be found on the inner cavity
f the oven or grill door.
odel Number ……………………………….
erial Number ……………………………….
ate of Purchase ……………………………….
o 2 x Shelves
o 2 x Ename
E
Rated Voltage: 220 - 240 Vac 50 Hz
45A (double pole switched f
outlet with
Max Rated Inputs: 10.00 kW
Mains Supply Lead 3 core x 6 mm² (not supplied)
O
For future reference please record the following information which can
be found on the rating plate and the date of purchase which can be
found on your sales invoice. The main rating plate for your oven can
be located at the back of the cooker. A smaller rating plate which
quotes the serial and mode
o
M
S
D

1111
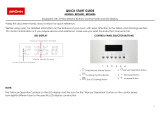
ontrol Panel C
Control panel
you will select the defrost
function.
Thermostat control knob (top oven & grill)
ect the oven
function or grill in the top oven.
nobs (hob)
e
temperature of each individual heating zone.
Thermostat control knob (main oven)
control the
temperature in the main oven.
Use this control knob to o
o If you position the dial on the first icon
clockwise,
Use this control knob to selo
Thermostat control k
Use these control knobs to select tho

12
ven timer
tton
ion button
bol
10) Oven in use symbol
etting and using the oven programmer/timer
O
1) Minute minder bu
2) Duration button
3) End cook button
4) Manual operat
5) Minus button
6) Plus button
7) Auto function symbol
8) Minute minder symbol
9) Manual operation sym
S
Selecting manual operation mode
After your appliance is connected to your mains supply for the first
time, the numbers on the timer display will flash. Before you can select
a cooking function or set a temperature, you must set the appliance
to manual operation mode.
tion button
(4) on the control panel.
in
o To select manual operation mode,
press the manual opera

S
13
your oven for manual operation, you should also set the
e of day.
he time will fix in the
efore first use
and turn
the thermostat dial to its maximum temperature setting.
ou should not burn off both ovens
simultaneously.
It is perfectly normal for a smell to be produced during this process.
re that any windows in the room are left open
during this process.
o remain in the room whilst the burning
off process is taking place.
ld leave each oven on maximum setting for 30 – 40
minutes.
either a sponge or soft cloth. No abrasive
cleaners should be used.
ither a sponge or soft cloth. No abrasive cleaners should be
used.
n the stainless steel surfaces of this
appliance (BCE625SS only).
etting the time of day
After setting
tim
o After pressing the manual operation button (4), use the minus
button (5) and plus button (6) to adjust the time that appears in
the display. After getting the display to the correct time, release the
minus and plus buttons. After a few seconds t
display and you will be able to use your oven.
B
o To remove any residue from the oven that may have been left from
the manufacturing process, you should select the conventional oven
function (top cavity) and fan oven function (main cavity)
o IMPORTANT: Y
o
o You should make su
o It is advisable for you not t
o You shou
o After both cavities have cooled, they should then be cleaned with
warm soapy water, using
o Outer parts of the oven should be cleaned with warm soapy water,
using e
o We would recommend that an appropriate stainless steel cleaner
and polish is regularly used o

S
14
nction and an alarm will sound when
hat peri
countdown for, by using the minus (5) and plus (6)
he minute minder symbol (8)
shorten or
he
oven function selector and
thermostat control knob to 0.
etting the duration function (main oven only)
ll no longer continue to
eat, once the countdown period has elapsed.
knob to select the fan oven function
and temperature required.
o The manual operation symbol (4) will appear on the display.
etting the minute minder function
You are able to set the minute minder at any time, regardless of
whether an oven function has been selected. You can set a period of
time using the minute minder fu
t od of time has elapsed.
o Press the minute minder button (1), the display will show a
value of 00:00. Set the period of time that you wish the minute
minder to
buttons.
o Once the display has got to your desired countdown time, let go
of the minus and plus buttons. T
will appear on the timer display.
o Once a countdown time has been set, it is possible to
lengthen the time by using the minus or plus buttons.
o An alarm will sound when the countdown time has elapsed. T
alarm can be silenced by pressing the minute minder button.
Important: The oven(s) will continue to heat once the alarm
has been silenced. If you have finished cooking, then you
should turn the appropriate
S
This function will allow you to set a countdown time similar to the
minute minder function. However the oven wi
h
o Use the main oven control

15
ssible to set the duration of the cooking time that
you require.
buttons. The oven in use symbol (10) will appear on the display.
d the auto function symbol (7) will appear on the
timer display.
shorten or
lengthen the time by using the minus or plus buttons.
ountdown time
at any point by pressing the duration button (2).
nction symbol (7) will disappear. The alarm
n button (4), the oven in use symbol (10)
selector knob to 0, then the appliance will
tion or start/end time function you will
anual
o It is then po
o Press the duration button (2) and the display will show a value
of 00:00. Set the period of time that you wish the duration
function to countdown for, by using the minus (5) and plus (6)
o Once the display has got to your desired countdown time, let go
of the minus and plus buttons. The countdown will start
immediately an
o Once a countdown time has been set, it is possible to
o During the countdown time the display will return to showing the
current time of day. You can view the remaining c
o An alarm will sound when the countdown time has elapsed and
the oven will switch off. The manual operation symbol (9) will
flash and the auto fu
can be silenced by pressing any button, or it will automatically
turn off after 7 minutes.
o You will need to return the oven to manual operation mode, once
the duration function has been used. To do this you should press
the manual operatio
will disappear from the display and the manual operation symbol
will appear instead.
Important: If you do not turn the thermostat control knob
and oven function
continue to operate as soon as you press the manual
operation button.
NOTE: If you press the manual operation button anytime
during the dura
cancel the function memory and your oven will be in m
operation mode.

16
This function will allow you to set a time in the future that the oven
Use the main oven control knob to select the mode of cooking that
g the
minus (5) and plus (6) buttons. The oven in use symbol (10) and
After a
few seconds the display will show the current time of day with the
oint by pressing the
end cook button (3). You can check the length of cooking time at
ok for the length of time that you selected. It will
automatically switch itself on, once it reaches the time of day that it
al
operation symbol (9) will flash and the auto function symbol (7)
will disappear. The alarm can be silenced by pressing any button.
Setting the start and end time function (main oven only)
switches on at and a time that the oven will switch off at.
o
you require.
o The manual operation symbol (9) will appear on the display.
o Press the end cook button (3) and the display will show a value of
00:00. Set the time of day you wish cooking to end at, by usin
the auto function symbol (7) will appear on the timer display.
o Immediately press the duration button (2) and the timer display
will show the default cooking time of 2:15. Set the length of
cooking time required, using the minus and plus buttons.
auto function symbol (7) and the oven in use symbol (10).
o You can check the end of cooking time at any p
any point by pressing the duration button (2).
o The oven will calculate what time it needs to switch on at, so that
your food will co
has calculated.
o When the time of day reaches the end of cooking time that you set,
the oven will switch off and an alarm will sound. The manu

17
ime function has been used. To do this you
should press the manual operation button, the auto function symbol
nt: If you do not turn the thermostat control knob and
ven function selector knob to 0, then the appliance will
f you press the manual operation button anytime during
the duration or start/end time function you will cancel the
oven will be in manual operation
ode.
The end of cooking time can be changed by
The cooking time can be changed by pressing the
duration button and using the plus and minus
buttons.
g the audible signal
To adjust the level of the audible signal, make sure that the timer is
level that is set.
When the required level of audible signal is reached, release the
minus button and it will be set.
o You will need to return the oven to manual operation mode, once
the start and end t
will disappear from the display and the manual operation symbol
will appear instead.
Importa
o
continue to operate as soon as you press the manual operation
button.
NOTE: I
function memory and your
m
Changing
the cooking time
o
pressing the end cook button and using the plus
and minus buttons.
o
Adjustin
o The audible signal has three different settings, low, medium and
high.
o
in manual mode. Then press and hold the minus button and you will
hear the current
o Press the minus button again and the audible signal will adjust to
the next level.
o

Selecting a cooking function and temperature
After your appliance is connected to your mains supply for the
irst time, the numbers on the timer f display will flash. Before
function you should set the time of day
how to do this).
and set
the oven to a temperature, then the
fan oven setting is selected.
r
the room temperature, the quantity
ked simultaneously on different
shelves, preventing the transmission of smells and tastes
from one dish onto another.
you select a cooking
(see pages 12-13 for
Using the main oven
o The oven temperature control should
be turned clockwise and used to select
the particular mode of cooking that
you require. If you turn the dial
clockwise and select the first symbol,
this will start the defrost function. If
you continue turning the dial
18
18
e two cooking functions available on your appliance:
DEFROST MODE: The fan runs without heat to reduce the
defrosting time of frozen foods. The time required to defrost
the food will depend on
There a
and type of food. Always check food packaging for the
defrosting instructions.
FAN OVEN: This method of cooking uses the circular
element while the heat is distributed by the fan. This results
in a faster and more economical cooking process. The fan
oven allows food to be coo

19
should be turned
.
the lower
ents.
This function is suitable for roasting and baking on one shelf
lower element to direct heat upward to the food. This function is
uitable for slow-cooking recipes or for warming up meals.
owning or keeping
cooked dishes warm.
of cooking utilises the inner and outer
parts of the top element, which directs heat downwards onto the
ons of sausages, bacon, steaks, fish etc.
r
i
o
T: When fitting the handle
y, hook
he handle over the edge of the tray
secure it.
Using the top oven
o The control knob
ire
o You should continue turning the control
knob clockwise to select
element, top element and grill function.
These functions are static therefore the
clockwise and used to select the
conventional oven function and
temperature that you requ
temperature cannot be adjusted.
CONVENTIONAL OVEN: This method of cooking provides
traditional cooking, with heat from the top and lower elem
only.
LOWER ELEMENT ONLY: This method of cooking uses the
s
UPPER ELEMENT ONLY: This method of cooking uses the outer
part of the top element to direct heat downwards onto the food.
This function is suitable for gentle cooking, br
FULL GRILL: This method
food. This function is suitable for grilling medium or large
porti
We recommend that you p
putting food into the grill cav
IMPORTANT: The grill do
function.
eheat the grill for five minutes before
ty.
r must be closed when using the grill
IMPORTAN
to the enamelled baking tra
t
and through the wire rack at a
central point, along the tray edge.
Lower the handle fully down to

20
hese lights will come on to indicate that the heating elements are in
thermostat control knob
en reached. It will cycle on and off throughout the cooking time.
uld not place food inside the cavity, until the correct
Please refer to the information given on food packaging for
al preference.
You should pre-heat the oven and not place food inside of it until
ven; however you should extend the cooking time
given on the food packaging by approximately ten minutes.
ccessories are removed
from the oven.
Place cooking trays in the centre of the oven and leave gaps
en the door as little as possible to view the dishes.
or
heat items wrapped in aluminium foil under the grill. The high
never line the base of your oven with aluminium foil.
Temperature indicator lights
T
operation. The relevant light, displayed above the control knobs, will
switch off when the temperature set on the
has be
You sho
cooking temperature has been reached.
Cooking guidelines
o
guidance on cooking temperatures and times. Once familiar with
the performance of your appliance, temperatures and times can be
varied to suit person
o Make sure that frozen foods are thoroughly thawed before cooking,
unless the instructions on the food packaging advise that you can
“cook from frozen”.
o
the oven is properly heated. You can choose not to pre-heat when
using the fan o
o Before cooking, check that any unused a
o
between the trays to allow air to circulate.
o Try to op
o The oven light will remain on during cooking.
Warnings
o Do not use aluminium foil to cover the enamelled baking tray
reflectivity of the foil could potentially damage the grill element.
o You should
o During cooking, never place pans or cookware directly onto the
bottom of the oven. They should always be placed on the shelves
provided.
/