ROBINHOOD 9 Function Built-In Oven Installation & Operating Manual

Category
Ovens
Type
Installation & Operating Manual

ROBINHOOD 9 Function Built-In Oven combines traditional convection with forced air ventilation for faster cooking. Choose from 9 functions and set your desired temperature with the thermostat control knob. The digital timer lets you keep track of your cooking time, and the auto function symbol alerts you when your food is ready.

ROBINHOOD 9 Function Built-In Oven combines traditional convection with forced air ventilation for faster cooking. Choose from 9 functions and set your desired temperature with the thermostat control knob. The digital timer lets you keep track of your cooking time, and the auto function symbol alerts you when your food is ready.

Description: Robinhood 60cm Built-in Oven 9 Function with Digital Timer
Model Numbers: OBD609K65SS
Issue 3
Warning and safety information
This appliance is not intended for use by persons (including children) with reduced physical, sensory or mental capabilities, or lack of
experience and knowledge, unless they have been given supervision or instruction concerning use of the appliance by a person
responsible for their safety. Young children should be supervised to ensure that they do not play with the appliance. In certain
circumstances electrical appliances may be a safety hazard. Do not leave this oven unattended or unsupervised whilst children or
infirmed are present.
WARNING Accessible parts will become hot when in use. Young children should be kept away. During use the oven becomes hot.
Care should be taken to avoid touching heating elements inside the oven. Do not touch any components during this time, as they may
be hot and can cause burns. Use heat resistant cooking gloves where possible when moving food and cooking utensils in and out of
the oven.
This appliance is supplied with a 10 amp power cable and plug. If the power supply cable is damaged, it must be replaced by the
manufacturer or its service agent or similarly qualified person to avoid a hazard (wires minimum areas of 1.5mm²).
The oven is not intended to be operated by means of an external timer or separate remote-control system.
Do not modify this appliance.
Do not use harsh abrasive cleaners or sharp metal scrapers to clean the oven glass doors since they can scratch the surface, which
may result in shattering of the glass. Clean the glass door using warm damp cloth and dry it with a soft cloth.
Cleaning may only be commenced on the appliance once it has cooled down (best slightly warm). The appliance should be
disconnected from the power outlet or turned off at your isolation switch before commencing any cleaning process. Do not use a
steam jet or any other high pressure cleaning equipment to clean the appliance. Follow oven cleaner directions if these are being
used. WARNING: Ensure the appliance is switched off before replacing the lamp to avoid the possibility of electric shock. If you use
your oven for an extended period of time, condensation may form. Dry it using a soft dry cloth.
Do not place heavy objects in or on these appliances, use for storage or let children play/swing from the door. These appliances are
designed for cooking food only. This appliance is designed for domestic household use only and for the cooking of domestic food
products. Use as a commercial appliance will void the warranty. It should not to be used in a marine environment or outdoors.
Ensure that the kitchen is well ventilated or mechanical ventilation is in use while cooking with this appliance.
Do not store or use flammable materials or aerosols near the oven. Items made from aluminium, plastic or plastic film should also be
kept away from the appliance, as they may fuse to the surface. Never line the oven bottom with aluminium foil, as the consequent
accumulation of heat could compromise the cooking and even damage the enamel.
Important: the power supply to the appliance must be turned off before any adjustments or maintenance work.
The appliance must be installed and put in operation by an authorised technician under the conditions provided by the manufacturer
in this manual. The manufacturer cannot be held responsible for any damage that might occur due to faulty installation.
To ensure the proper working order of the built-in appliance, the kitchen unit must be of a suitable size. The unit panels next to the
cooker must be heat resistant. In the case of veneered wood units, glues must be resistant to a temperature of 100
above ambient
temperature. Do not allow electrical fittings or cables to be in contact with hot areas of the appliance.
This oven is to be installed in accordance with the local, national building, electrical and plumbing codes. In accordance with safety
standards, once the appliance has been mounted, there must be no possible contact with electrical parts. Any protective parts must
be secured so that they can only be removed with the use of tools.
This oven must not be installed behind a decorative door in order to avoid overheating.
The installation of this oven is to be carried out by using only a qualified electrician and must be earthed.
The electrical connection must be accessible after installation. The appliance must be electrically isolated before any maintenance
can be performed. Electrical connection must be made as per local wiring rules and regulations. Do not disconnect the appliance with
wet hands or bare feet, and do not disconnect the power cord with extreme force. If the electricity supply is restricted, means of an all-
pole disconnection must be accessible and incorporated in the fixed wiring in accordance with the wiring rules.
Where this appliance is installed in a caravan, it shall NOT be used as a space heater.
2
Installing the built in oven
Important: the power supply to the appliance must be turned off before any adjustments or maintenance work.
Installation of Built-in Oven
To ensure the proper working order of the built-in appliance, the kitchen unit must be of a suitable size.
In accordance with safety standards, once the appliance
has been mounted, there must be no possible contact with
electrical parts. Any protective parts must be secured so
that they can only be removed with the use of tools.
This oven must not be installed behind a decorative door
in order to avoid overheating.
Positioning the appliance
Ensure that the aperture that you will be fitting the oven
into, is of the size given in the diagram.
Ensure that the rear panel of the furniture
housing unit has been removed.
Cooling fan
A tangential cooling fan is fitted inside of this
appliance, to make the internal temperature
of the oven stable and the external surface
temperature lower. After the oven has been
used the cooling fan will run on for a period
of time, until the oven is sufficiently cooled.
Fastening the oven
Insert the appliance into the
compartment; open the oven
door and fasten the oven to
the cabinet using the four
screws “A”, remembering to
place the special spacers
provided between the hole
and the screw itself.
3
Installing the built in oven - continued
Electric connection
This oven must be connected to a 220-240V 50Hz power supply. It is earthed via the power cable and plug.
Before carrying out the connection to the power supply, the voltage rating of the appliance (stamped on the appliance
identification plate) must be checked for correspondence to the available mains supply voltage, and the mains electric
wiring should be suitable for the oven’s power rating (also indicated on the appliance identification plate);
The switched outlet must be connected to a suitable earth wiring, in conformity to current safety regulations.
This appliance must be connected to the building wiring via a suitable junction box. It should not be located above the
appliance and no more than 1.25m away from it. The power supply cord must not touch against any hot surfaces and
must be placed so that its temperature does not exceed 75
at any point along its length.
After having installed the appliance, the switched outlet must always be in an accessible position. If the electrical supply
(outlet and plug) is restricted, means of all-pole disconnection (circuit breaker) must be accessible and incorporated in the
fixed wiring in accordance with the wiring rules.
NOTE: For connections to the mains power supply, never use adapters, reductions or multiple power points as these may
overheat and catch fire.
The mains terminal block is located on the back of the oven and the terminals are accessible by opening the terminal
block cover. Note: The terminal cover should not be opened when the mains power is still connected to the appliance and
never by an unauthorized person.
The electrical safety of this appliance can only be guaranteed if the oven is correctly and efficiently earthed. The
manufacturer declines all responsibility for damage resulting from an installation which has not been earthed correctly.
4
Instruction on use
Control panel features
This oven combines in a single appliance the advantages of traditional convection ovens with those of modern forced air
ventilation ovens.
Oven programmer/timer display
1. Digital timer
2. Oven Function control knob
3. Thermostat control knob
4. Oven In Use symbol
5. Minute Minder symbol
6. Auto Function symbol
7. Decimal point
8. Mode button
9. Minus button
10. Plus button
Setting the current time
When the power is connected to the power supply, the oven is in standby mode and the display will flash. Before any
functions can be run on the oven, the current time must be set. Take care the Thermostat control knob and Oven
Function control knob are both off.
First press the Mode button (8) for 3 seconds until the Oven In Use symbol (4) turns on and the display Decimal point (7)
will flash for 5 seconds. The oven is now in Operating mode. While the decimal point is flashing, adjust the current time
using the Plus and Minus buttons. The time will be set once the decimal point (7) stops flashing (5 seconds after the last
button is pressed). Reset the oven to standby mode by pressing the Mode button for 3 seconds (display will flash current
time and the Oven in use symbol will turn off).
Setting a cooking function and temperature
This appliance comes with 9 functions. To choose a function, rotate the Oven Function control knob (2) to the correct
position. Next choose a cooking temperature by adjusting the Thermostat control knob (3). Note: Do not rotate this knob
anticlockwise between 0 and 250ºC. To start cooking, the appliance must now be taken out of standby mode. Press the
Mode button and hold for 3 seconds. After 3 seconds the Oven In Use symbol will turn on and the oven will start (the oven
is in Operating mode).
To stop the oven, rotate the two control knobs to the top position (off) and press the Mode button for 3 seconds to send
the oven back into standby mode.
When using the oven for the first time, run the oven for 30 minutes without food with windows open to burn off any oil
inside the appliance used during the manufacturing process.
Note: You should not place food inside the oven until the correct temperature has been reached.
5
Instructions on use - continued
Oven Functions
Defrost:
This function turns on the rear fan without any heating elements on. The time required to defrost the food depends on
the room temperature.
Lower element with fan (Pizza function):
This function turns on the lower heating element and the rear fan for food that needs to cook more from the base.
Conventional cooking (Bake):
This function turns on the upper and lower heating elements for conventional cooking.
Fan Assist (Fan Bake):
This function turns on the upper & lower heating elements as well as the rear fan to help circulate the heat more
evenly.
Grill:
This function turns on the grill element for a more powerful grill function.
Maxi-Grill:
This function uses the grill element and the upper element for a faster grill operation.
Maxi-Grill with rear fan:
This function uses grill and top elements and the rear fa. It is used when the heat from the grill needs to be circulated.
Such as when quick browning is required.
Rear element with fan (Fan Forced):
This function turns on the rear fan and the rear heating element on. The fan helps circulate the heat throughout the
oven and allows food on different rack levels to be cooked at the same time.
Light only:
This function turns on the internal light .
6
Accessories:
Your oven will come supplied with the following items:
Chrome side rack x 2.
Baking tray x 1.
Wire rack x 2.
The numbers 1-5 indicate the different shelf positions that you can use.
Wire Shelves & Tray
The 2 wire shelves come with a built-in safety feature to help minimise them being accidentally pulled fully out. This
comes in the way of a “step”, positioned part-way in from the rear of the accessory. To fit them into the oven, push the
wire shelf part way into the oven until the step “catches”, then angle the part over the step & fully insert. To remove,
repeat the operation in reverse.
The tray comes with a removable wire handle. Hook the handle over the front edge of the tray and adjust the handle to
the horizontal position. To remove, angle the handle back up while the tray is supported.
Instructions on use - continued
Minute Minder
When the oven is running a cooking function or just in Operating mode (the Oven In Use symbol is on), the Minute Minder
function can be used. This is an alarm that can be set, but does not effect the operation of the oven in any way.
Press the Mode button twice until the Minute Minder symbol (5) starts to flash. While it is flashing, use the Minus button (9)
and Plus button (10) to adjust the length of time. This will be set 5 seconds after the last button is pressed and the display will
revert back to the current time (this can be checked or even adjusted by pressing the Mode button twice again). To cancel the
Minute Minder, reset the length of time to 0. Once the Minute Minder time runs out, an alarm will sound and the Minute Minder
symbol will flash. Turn off by pressing any button.
Timer
The Timer function is used to stop the oven cooking functions after a certain time. Put oven into Operating mode and adjust
the cooking functions and temperature. Prepare the food and place in the oven when temperature is reached. Press the Mode
button 3 times until the Oven in use symbol (4) and Auto Function symbol (6) are flashing (the display shows the current timer
time 0.00). With the symbols flashing, adjust the timer time with the Plus and Minus buttons. The Time will set 5 seconds after
the last button is pressed and the display will revert to the current time (the Oven in use symbol and Auto Function symbol will
stay on). The remaining time can be checked by pressing the Mode button 3 times, and then adjusted (if needed) using the
Plus and Minus buttons at any time.
Once the time has elapsed, an alarm will sound , the oven function will stop running and the Oven in use symbol and Auto
Function symbol will flash. Press any button to stop the alarm (oven reverts to Operating mode), turn off oven functions, turn
thermostat to 0 and reset to standby mode. Remove food from oven.
Timer End
The Timer End function allows you to set up the time when the cooking function will end. Put oven into Operating mode and
adjust the cooking functions and temperature. Prepare the food and place in the oven when temperature is reached. Press the
Mode button 4 times until the Oven in use symbol (4) and Auto Function symbol (6) are flashing (the display shows the current
time). With the symbols flashing, adjust the end time with the Plus and Minus buttons. The end time will set 5 seconds after
the last button is pressed and the display will revert to the current time (the Oven in use symbol and Auto Function symbol will
stay on). The remaining time can be checked by pressing the Mode button 4 times, and then adjusted (if needed) using the
Plus and Minus buttons at any time.
When the end time has been reached, an alarm will sound , the oven function will stop running and the Oven in use symbol
and Auto Function symbol will flash. Press any button to stop the alarm (oven reverts to Operating mode), turn off oven
functions, turn thermostat to 0 and reset to standby mode. Remove food from oven.
Automatic Cooking
The Automatic Cooking function allows you to set up a fixed length Timer which ends at a pre-set time (for example to set up a
1 hour cooking time that ends in 2 hours time). Note: do not leave raw meats in the oven for extended lengths of time before
cooking.
First set a Timer for the cooking length of time (see Timer section above). At the end of setting this, press the Mode button
once before the symbols stop flashing (within 5 seconds of the last button pressed). Set up the Timer End function, and let the
function set. The Oven will stay in standby mode until the correct time is reached, then start operating for the pre-set length of
time and end at the pre-set Timer End time.
When the end time has been reached, an alarm will sound , the oven function will stop running and the Oven in use symbol
and Auto Function symbol will flash. Press any button to stop the alarm (oven reverts to Operating mode), turn off oven
functions, turn thermostat to 0 and reset to standby mode. Remove food from oven. Like all of the Timer functions, the timer
can be cancelled by resetting time values to 0 or changing the oven to standby mode.
7
Instructions on use - continued
Cooking guidelines
Please refer to the information given on food packaging for guidance on cooking temperatures and times. Once familiar
with the performance of your appliance, temperatures and times can be varied to suit personal preference.
If you are using the fan oven function, then you should follow the information given on the food packaging for this
particular mode of cooking.
Make sure that frozen foods are thoroughly thawed before cooking, unless the instructions on the food packaging
advise that you can “cook from frozen”.
You should pre-heat the oven and not place food inside of it until the oven operating light has gone off. You can choose
not to pre-heat when using the fan oven mode; however you should extend the cooking time given on the food
packaging by approximately ten minutes.
Before cooking, check that any accessories that are not required are removed from the oven.
Place cooking trays in the centre of the oven and leave gaps between the trays to allow air to circulate.
Try to open the door as little as possible to view the dishes.
The oven light will remain on during cooking.
Replacing the light bulb
Turn off the supply of power to the oven by turning off the circuit breaker connecting it to the mains, or by removing the
plug if it is accessible;
Unscrew the glass cover attached to the lamp holder;
Unscrew the lamp and replace it with another high-temperature lamp (300) with the following characteristics:
Voltage: AC220V-240V
Wattage: 25W
Socket: E 14
Temperature rating: 300
Remount the glass cover and reconnect the appliance to the power supply.
WARNING:
Ensure that the appliance is switched off before
replacing the lamp to avoid the possibility of electric shock.
Disassembling/assembling the oven door
To make it easier to clean the inside of your oven, the oven door can be removed, by proceeding as follows (fig. 1-2):
Open the door completely and lift the 2 levers “B” (fig.1);
Now, shutting the door slightly, you can lift it out by pulling out the hooks “A” as shown in figure 2.
•To remove the inner glass, place the door handle down onto a clean, flat surface (like a towel on a table). Pull the glass
towards the top of the door, and then rotate (from the top) out. Once clean, replace glass in the door.
To reassemble the door:
With the door in a vertical position, insert the two hooks “A into the slots;
Ensure that seat “D” is hooked perfectly onto the edge of the slot (move the oven door backwards and forward
slightly);
Keep the oven door open fully, unhook the 2 levers “B” downwards and then shut the door again.
8
Maintenance and cleaning
Maintenance
How to keep your oven in good condition
Important: Before cleaning your oven, or performing maintenance, disconnect it from the power supply.
To extend the life of your oven, it must be cleaned frequently, keeping in mind that:
Do not use steam equipment to clean the appliance
The enamelled or stainless steel parts should be washed with lukewarm water without using any abrasive powders
or corrosive substances which could ruin them; Stainless steel could get stained. If these Stains are difficult to
remove, use special products available to rinse thoroughly any dry.
The inside of the oven should preferably be cleaned immediately after use, when it is still warm, with hot water and
soap; the soap should be rinsed away and the interior dried thoroughly. Avoid using abrasive detergents (for
example cleaning powders) and abrasive sponges for dishes or acids (such as lime scale-remover, etc…) as
these could damage the enamel. If the grease spots and dirt are particularly tough to remove, use a special product
for oven cleaning, following the instructions provided on the packet.
If you use your oven for an extended period of time, condensation may form. Dry it using a soft cloth.
There is a rubber seal surrounding the oven opening which guarantees its perfect functioning. Check the condition of
this seal on a regular basis. If necessary, clean it and avoid using abrasive products or objects to do so. Should it
become damaged, please contact Customer Service. We recommend you avoid using the oven until it has been
repaired.
Never line the oven bottom with aluminium foil, as the consequent accumulation of heat could compromise the
cooking and even damage the enamel.
Clean the glass door using non-abrasive products or sponges and dry it with a soft cloth.
Do not use harsh abrasive cleaners or sharp metal scrapers to clean the oven door glass since they can
scratch the surface, which may result in shattering of the glass.
To remove the side shelves, first remove all shelves and trays. Take hold of the bottom of the side shelf and pull away
from the holding pin. Rotate to a horizontal position and pull from the oven side. To replace, follow the same steps
In reverse. Always remove when cleaning.
9
Important information
The appliance may be built-in and connected to the power supply only by a qualified technician.
Never use the appliance as a room heater.
Never use the glass door as a working surface. Sharp objects may damage the glass
surface.
In case any other appliances are plugged in the electric mains close to the oven, prevent contact
of the electrical cable with the hot surface areas.
Never keep any flammable or temperature sensitive objects, like cleaning agents, sprays, detergents, etc.,
below or near the appliance.
In case of any malfunction, disconnect the appliance from the power supply and call customer service.
Do not use high-pressure steam cleaner or hot steam to clean the appliance.
The appliance is manufactured in compliance with the relevant safety standards.
Troubleshooting
The oven isn’t coming on.
Check that the oven is in manual operation mode.
Check that you have selected a cooking function and a cooking temperature.
There appears to be no power to the oven and grill.
Check that the appliance has been connected to the electrical mains supply correctly.
Check that the mains fuses are in working order.
Check that the operating instructions for setting the time of day and putting the appliance into manual operation mode
have been followed.
The grill function works but the main oven does not.
Check that you have selected the correct cooking function.
The grill and top oven element is not working, or cuts out for long periods of time during use.
Allow the oven to cool for approximately 2 hours. Once cool, check whether the appliance is again working properly.
My food is not cooking properly
Ensure that you are selecting the correct temperature and the correct cooking function for the food that you are cooking.
It may be appropriate to adjust your cooking temperature by plus or minus 10
, to achieve the best cooking results.
My food is not cooking evenly
Check that the oven has been installed correctly and is level.
Check that the correct temperatures and shelf positions are being used.
The oven light is not working
Refer to previous page and follow the “Replacing the oven bulb” section.
I am getting condensation in my oven
Steam and condensation is a natural by product of cooking any food with high water content, such as frozen food,
chicken etc.
You may get condensation in the oven cavity and forming between the oven door glasses. This is not necessarily a sign
that the oven is not working correctly.
Do not leave food in the oven to cool after it has been cooked and the oven has been switched off.
Use a covered container, where practical, when cooking to reduce the amount of condensation that forms.
Technical information
Oven size 65 litres
Width 595mm
Depth 575mm
Height 595mm
Voltage 220-240 / 50hz
Wattage 2300W
Light Specifications
Oven light
25W / 300
10
Warranty Certificate (New Zealand)
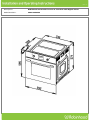
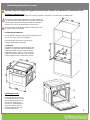
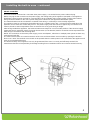
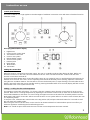
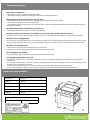
Pre-Installation
Terms and Conditions
The following conditions apply in respect of the warranty given in this certificate:
1. Monaco Corporation Limited (“Monaco”) warrants the following Robinhood products against manufacturing defects and
faulty materials, under normal use and subject to the exclusions in this certificate, for a period of:
Rangehood, Ovens, Cooktops, Dishwashers - 24 months from date of original purchase for domestic use.
Uniduct 12 months from date of original purchase for domestic use.
Ironing centre 12 months from date of original purchase for domestic use.
Sinks sets5 years on stainless steel sink including draining bench from date of original purchase for domestic use, 6
months on all stainless steel accessories, including wire rack, colander and tray from date of original purchase for
domestic use.
Laundry Tub - 5 years on stainless bowl, 24 months on Tap, Cabinet and other components from the date of original
purchase for domestic use.
“Original purchase”, when used in this certificate, means purchase by the customer directly from Monaco or one of its
approved suppliers.
2. This warranty is limited to the repair or replacement, at our option, within the warranty period of any component part
which we at our discretion determine to contain faulty materials or a manufacturing defect in breach of this warranty.
This warranty is subject to terms and conditions set out in this certificate.
3. The warranty only applies within New Zealand.
4. The customer must produce the original invoice or other purchase documentation as proof of the original purchase
date.
Warranty exclusions
1. The warranty does not apply where, in Monaco’s opinion:
The defect is caused by misuse, wear and tear, dirt, fire or accidental damage.
The product has been repaired or serviced by an unauthorised person.
The product was not installed in accordance with our instructions.
The product was purchased overseas or was not designed for use in New Zealand.
The product was not used, cleaned or cared for in accordance with our instructions.
The product was used outdoors.
2. In addition, this warranty does not extend to damage or defects which in our opinion, directly or indirectly arise from or
are due to:
Exposing the product to acidic or corrosive materials or chemicals such as dyes, solvents, denture cleaner or acetone;
Using inappropriate household cleaning products such as abrasive cream or powder cleansers, furniture polish, bleach,
mentholated spirits, drain cleaners, sugar soap, metal pads and strongly alkaline or acidic cleaners;
Heat damage, including from washing the product at high temperatures;
Impact or mishandling the product, including the impact caused by objects scraped along, thrown or dropped on the
product surface or excessive weight being placed on the product;
Structural or support changes in or affecting the building or the application where the product has been installed;
Failure to clean or maintain the product as recommended; or
any other causes specified in the product information as being excluded from this warranty.
3. Variations with the colour or gloss within the product or any ageing or fading of colour, shine or gloss level over time
are not covered by this warranty. The warranty does not cover visual imperfections or blemishes in the surface and
edges of the product that were not brought to your supplier’s attention at the time you inspected the product.
4. Costs incurred on installation or removal of a product, or any reinstallation of a product, or any associated costs, are
not covered by this warranty.
5. Monaco will not be liable for consequential or indirect loss or damage whatsoever and however arising out of or in
connection with the supply, performance or removal of the product, including (but not limited to) loss of profit, loss of
revenue, loss of contract, loss of goodwill or increased cost of workings, even if due to the negligence of Monaco or
any of its approved suppliers, employees or agents.
6. Charcoal filters and light bulbs are not covered by this warranty
7. This warranty and the statements contained in this certificate or other documents given to you do not exclude, restrict or
modify the application of any term implied into this warranty by statute, provided that (to the extent any statutory
provision permits Monaco to limit its liability for a breach of an implied condition or warranty) Monaco’s liability for such
breach is limited to the payment of the cost of replacing the product, repairing the product or acquiring an equivalent
product.
8. Subject to clause 5, our obligations under this warranty are limited to those set out in this certificate, and this warranty
is expressly instead of all other warranties, express or implied, including any implied warranty of merchantability or
fitness for a particular purpose and notwithstanding any course of dealing between the parties or custom and usage in
trade to the contrary.
Terms and conditions are subject to change.
New Zealand
Monaco Corporation Ltd
Telephone: (09) 415 6000
Facsimile: (09) 415 7400
Email: customercare@monacocorp.co.nz
www.robinhood.co.nz
Warranty Certificate (Australia)
Australia
Shriro Australia Pty Ltd
ABN 28 002 386 129
Telephone: 1800 648 556
Facsimile: 1800 628 577
Email: customercare@shriro.com.au
www.robinhood.com.au
Terms and Conditions
If you are a consumer under the Australian Consumer Law, our goods come with guarantees that cannot be excluded under the Australian Consumer
Law. You are entitled to a replacement or refund for a major failure and for compensation for any other reasonably foreseeable loss or damage. You are
also entitled to have the goods repaired or replaced if the goods fail to be of acceptable quality and the failure does not amount to a major failure
1. Shriro Australia Pty Limited (“Shriro”) also warrants the following Robinhood products against manufacturing defects and faulty materials, under normal
use and subject to the exclusions in this certificate, for a period of:
Rangehood, Ovens, Cooktops, Dishwashers - 24 months from date of original purchase for domestic use.
Uniduct 12 months from date of original purchase for domestic use.
Ironing centre 12 months from date of original purchase for domestic use.
Sinks sets5 years on stainless steel sink including draining bench from date of original purchase for domestic use, 6 months on all stainless steel
accessories, including wire rack, colander and tray from date of original purchase for domestic use.
Laundry Tub - 5 years on stainless bowl, 24 months on Tap, Cabinet and other components from the date of original purchase for domestic use.
“Original purchase”, when used in this certificate, means purchase by the customer directly from Shriro or one of its approved suppliers.
2. This warranty is limited to the repair or replacement, at our option, within the warranty period of any component part which we at our discretion
determine to contain faulty materials or a manufacturing defect in breach of this warranty. This warranty is subject to terms and conditions set out in this
certificate.
3. The warranty only applies within Australia.
4. For warranty service outside of capital city metropolitan area or 30 km from nearest authorised service agent you will be liable for reasonable travelling
expenses and the cost of transport of the product or parts to and from the service agent
5. To make a claim under this warranty, you must produce the original invoice or other purchase documentation as proof of the original purchase date.
You must send your claim to Shriro Australia Pty Limited, 104 Vanessa Street, Kingsgrove NSW 2208 within 7 days of any alleged defect or failure of the
product first becoming apparent, you are responsible for the expense of making a claim under this warranty.
This warranty is given by:
Shriro Australia Pty Ltd
ABN 28 002 386 129
Telephone: 1800 648 556
Facsimile: 1800 628 577
Email: customerca[email protected].au
www.robinhood.com.au
Attention Customer Services Manager
Warranty exclusions
1. The warranty does not apply where, in Shriro’s opinion:
The defect is caused by misuse, wear and tear, dirt, fire or accidental damage.
The product has been repaired or serviced by an unauthorised person.
The product was not installed in accordance with our instructions.
The product was purchased overseas or was not designed for use in Australia.
The product was not used, cleaned or cared for in accordance with our instructions.
The product was used outdoors.
2. All Robinhood Rangehoods are suitable for indoor use only and not suitable over BBQs or charcoal cookers designed for outdoor use.
3. In addition, this warranty does not extend to damage or defects which in our opinion, directly or indirectly arise from or are due to: exposing the product
to acidic or corrosive materials or chemicals such as dyes, solvents, denture cleaner or acetone; using inappropriate household cleaning products such
as abrasive cream or powder cleansers, furniture polish, bleach, mentholated spirits, drain cleaners, sugar soap, metal pads and strongly alkaline or
acidic cleaners; heat damage, including from washing the product at high temperatures;
impact or mishandling the product, including the impact caused by objects scraped along, thrown or dropped on the product surface or excessive weight
being placed on the product; structural or support changes in or affecting the building or the application where the product has been installed; failure to
clean or maintain the product as recommended; or any other causes specified in the product information as being excluded from this warranty.
4. Variations with the colour or gloss within the product or any ageing or fading of colour, shine or gloss level over time are not covered by this warranty.
The warranty does not cover visual imperfections or blemishes in the surface and edges of the product that were not brought to your supplier’s attention
at the time you inspected the product.
5. We will not be responsible under this warranty for, nor pay the costs of, removing the existing product, or reinstalling the new product, or any
associated costs or damages.
6. Charcoal filters and light bulbs are not covered by this warranty
The benefits given by this warranty are in addition to other rights and remedies of consumers under any law in relation to the goods which cannot be
excluded.
This warranty certificate is not intended to create a contract between Shriro Australia Pty Limited and the purchaser.
  • Page 1 1
  • Page 2 2
  • Page 3 3
  • Page 4 4
  • Page 5 5
  • Page 6 6
  • Page 7 7
  • Page 8 8
  • Page 9 9
  • Page 10 10
  • Page 11 11
  • Page 12 12

ROBINHOOD 9 Function Built-In Oven Installation & Operating Manual

Category
Ovens
Type
Installation & Operating Manual

ROBINHOOD 9 Function Built-In Oven combines traditional convection with forced air ventilation for faster cooking. Choose from 9 functions and set your desired temperature with the thermostat control knob. The digital timer lets you keep track of your cooking time, and the auto function symbol alerts you when your food is ready.

Ask a question and I''ll find the answer in the document

Finding information in a document is now easier with AI