Page is loading ...

IMPORTANT:
• ALLINSTALLATIONWORKSHOULDBEDONEBYACCREDITEDPROFESSIONAL.
• SHUTOFFPOWERSUPPLYATFUSEORCIRCUITBREAKER!
• USEONLYTHESPECIFIEDBULBS.DONOTEXCEEDTHEMAXIMUMWATTAGE!
PREPARING FOR INSTALLATION
Removeallofthecontentsfromthecarton.Seetheimportantnotesabove.Shut
offthepoweratthecircuitbreakerandcompletelyremovetheoldxturefromthe
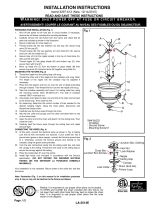
ceiling,includingtheoldmountingstrap.Fromthepartsbagremovethemounting
strapassembly.Oneendofnipple(F)shouldbeattachedtomountingstrap(A)with
hexnuts(C,D)inplace.Theotherendshouldhavecanopyloop(H)attached.
Matchthethreadedholesofmountingstrap(A)tothespacingoftheholesonthe
junctionbox.Attachmountingstrap(A)tothejunctionboxusingmountingscrews(B)
andascrewdriver.Tightensecurely.Unscrewcanopyloopcollar(I)fromcanopyloop
(H).Passcanopy(G)overthemountedcanopylooptotesttheheight.Approximately
halfofthecanopyloop’sexteriorthreadsshouldbeexposed,andthecanopyloop
collarshouldtsnuglyontothecanopyloop.Removecanopy(G)andadjustthe
heightofnipple(F)andcanopyloop(H)untilthedesiredheightisreached.
ASSEMBLING THE FIXTURE
Fixturebody(M)isonthexture’swires.Makesurethattoploop(L)isthreaded
tightlytoxturebody(M).Bymeasuring,determinethecorrectnumberofchain
linksneededforproperhangingheight.Ifnecessary,useapairofplierstoopenand
removeanyexcesschain.Attachoneofchainconnectors(K)toeachendofchain
(J).Usetheotherchainconnector(K)toattachchain(J)totoploop(L)andclosethe
chainconnector.Hooktheendofrod(N)ontotoploop(L).Pullthewiresthroughtop
loop(L).Feedthexture’swiresupthroughthechain(everythreelinksorso),pulling
thewiresuntiltaut.Slidecanopyloopcollar(H)andcanopy(G)ontothechain/wires.
Usethefreechainconnector(K)toattachchain(J)tocanopyloop(H).
CONNECTING THE WIRES
Haveanassistantsupportthexture’sweightwhilecompletingthewiring.Cutaway
excesswire.Threadthexture’swiresthroughcanopyloopandnipple.Attachthe
xture’swirestothepowersupplywiresfromthejunctionbox.Connectblack(hot)
tosmooth/black/transparent(L);white(neutral)toribbed/white/transparent(N);and
ground(green)tobarecopper/green/transparentwithgreeninterior.Twisttheendsof
thewirepairstogether,andthentwistonawireconnector.Makesurealltwistsare
inthesamedirection.Ifthereisnogroundwire(greenorcopper)comingfromthe
junctionbox,locategroundscrew(E)onthemountingbracket/mountingstrapand
wrapthexture’sgroundwirearoundthegreengroundscrew(E).Useascrewdriver
tosecuregroundscrew(E)ontothemountingbracket/mountingstrap.Tuckallwires
neatlyintothejunctionbox.
CLEANING TIPS
Treat the xture gently! Regular cleaning will reduce the need for deep cleaning. For regular cleaning, turn off the light and wipe down the
xture with a clean lint-free cotton or microber cloth. Never spray cleaner directly onto the xture. For deep cleaning, turn off the light
and remove the glass prior to cleaning. Hand wash glass with warm water and mild detergent. Dry with a lint-free or microber cloth.
AssemblyInstructions:1405-M1L (Travers)
For Customer Service, contact the
place of purchase.
FINISHING THE INSTALLATION
Raisecanopy(G)totheceilingandslidecanopyloopcollar(I)upbeneaththecanopy.Tightlythreadcanopyloopcollar(I)ontocanopy
loop(H)tosecurecanopy(G)inplace.
Carefullyslidespider(P)oversocket(N)beforeslidingglassshade(R)oversocket(N).Securetheglassinplacewithsocketcover(Q).
Repeatuntilallglassshadesarehung.Installlightbulb(O)inaccordancewiththexture’sspecications.
Yourinstallationiscomplete.Turnonthepowerandtestthexture.
Smooth / Black /
Transparent (L)
Black (Hot)
Ribbed / White /
Transparent (N)
Bare Copper / Transparent with
Green Interior / Green
White (Neutral)
Green
(Ground)
Q
P
O
R
I
H
K
G
B
A
F
E
D
C
L
J
N
K
M
/


