Page is loading ...

Assembly Instructions: 1567-5 (Riverton)
IMPORTANT:
• ALL INSTALLATION WORK SHOULD BE DONE BY ACCREDITED PROFESSIONAL.
• SHUT OFF POWER SUPPLY AT FUSE OR CIRCUIT BREAKER!
• USE ONLY THE SPECIFIED BULBS. DO NOT EXCEED THE MAXIMUM WATTAGE!
PREPARING FOR INSTALLATION
Remove all of the contents from the carton. See the important notes
above. Shut off the power at the circuit breaker and completely remove
theoldxturefromtheceiling,includingtheoldmountingstrap.
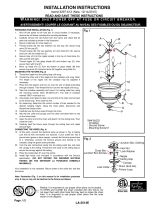
Fromthepartsbagremovethemountingstrapassembly.Oneendof
nipple(F)shouldbeattachedtomountingstrap(A)withwasher(C)
andhexnut(D)inplace.Theotherendshouldhavecanopyloop(H)
attached.Attachmountingstrap(A)tothejunctionboxusingmounting
screws(B)andascrewdriver.Tightensecurely.Unscrewcanopyloop
collar (I) from canopy loop (H). Pass canopy (G) over the mounted
canopylooptotesttheheight.Approximatelyhalfofthecanopy
loop’sexteriorthreadsshouldbeexposed,andthecanopyloopcollar
shouldtsnuglyontothecanopyloop.Removecanopy(G)andadjust
theheightofnipple(F)andcanopyloop(H)untilthedesiredheightis
reached.
ASSEMBLING THE FIXTURE
Takethexture’sbodyoutofthebox.Arms(VandU)ofthextureare
closedinthepackaging.Feedthexture’swiresthroughtopofrod(O)
andpullthexture’swiresuntiltaut.Threadrod(O)topost(Q)until
tight.Threadnial(Z)ontonipple(Y).Feedthexture’swiresthrough
toploop(L)andtightentoploop(L)torod(O).Gentlyspreadthearms
untiltheyareevenlyspaced.Bymeasuring,determinethecorrect
numberofchainlinksneededforproperhangingheight.Ifnecessary,
useapairofplierstoopenandremoveanyexcesschain.Attachchain
connectors(K)toeachendofchain(J)beforeattachingoneendof
the chain connector/chain to top loop (L). Close the chain connector.
Connect the other chain connector (K) to canopy loop (H). Feed the
xture’swiresupthroughtoploop(L)thenthroughchain(J)(everythree
links or so). Pull the wires until taut. Slide canopy loop collar (I) and
canopy (G) onto the chain/wire.
CONNECTING THE WIRES
Haveanassistantsupportthexture’sweightwhilecompletingthe
wiring.Cutawayexcesswire.Threadthexture’swiresthroughcanopy
loopandnipple.Attachthexture’swirestothepowersupplywires
fromthejunctionbox.Connectblacktosmooth/black/transparent
(L)wire;whitetoribbed/white/transparent(N)wire;groundtoground
(greenorcopper).Twisttheendsofthewirepairstogether,andthen
twist on a wire connector. Make sure all twists are in the same direction.
Ifthereisnogroundwire(greenorcopper)fromthejunctionbox,locate
groundscrew(E)onmountingstrap(A)andwrapthexturegroundwire
aroundthegreengroundscrew(E).Useascrewdrivertosecureground
screw(E)ontothemountingbracket/mountingstrap.Tuckallwires.
CLEANING TIPS
Treat the xture gently! Regular cleaning will reduce the need for deep cleaning. For regular cleaning, turn off the light and wipe down the
xture with a clean lint-free cotton or microber cloth. Never spray cleaner directly onto the xture.
For Customer Service, contact
the place of purchase.
FINISHING THE INSTALLATION
Pushcanopy(G)uptotheceilingandslidecanopyloopcollar(I)upbeneaththecanopy.Tightlythreadcanopyloopcollar(I)onto
canopy loop (H) to secure canopy (G) in place.
Slideglassshades(S)oversockets(T)andsecureinplacewithsocketrings(R).Install
lightbulbs(notprovided)inaccordancewiththexture’sspecications.Donotexceedthemaximumrecommendedwattage.
Yourinstallationisnowcomplete.Turnonthepowerandtestthexture.
G
K
R
P
S
T
Y
Z
Q
U
L
O
M
N
X
V
J
D
C
A
I
B
E
H
F
JUNCTION
BOX
/