Page is loading ...

Version 1.2 ©Copyright 2016, Ambient LLC. All Rights Reserved. Page 1
Ambient Weather RC-1800WSTH Indoor / Outdoor Radio
Controlled Wall Clock with Temperature & Humidity User
Manual
Table of Contents
1 Introduction ..................................................................................................................................... 2
2 Quick Start Guide ............................................................................................................................ 2
3 Overview ......................................................................................................................................... 2
4 Important Notes............................................................................................................................... 2
5 Installation ....................................................................................................................................... 3
6 Controls ........................................................................................................................................... 3
7 Battery Installation and Initial Operation ........................................................................................ 4
8 Mechanical Deviation Adjustment .................................................................................................. 5
9 Setting the Time Manually .............................................................................................................. 5
10 Forced Radio Resynchronization ................................................................................................ 5
11 Temperature and Humidity Sensors............................................................................................ 6
12 Maintenance ............................................................................................................................... 6
13 Specifications ............................................................................................................................. 6
14 Glossary of Terms ....................................................................................................................... 7
15 Troubleshooting Guide ............................................................................................................... 7
16 Liability Disclaimer .................................................................................................................... 8
17 Warranty Information ................................................................................................................. 9
18 Disposal ...................................................................................................................................... 9

Version 1.2 ©Copyright 2016, Ambient LLC. All Rights Reserved. Page 2
1 Introduction
Thank you for your purchase of the Ambient Weather Radio Controlled Analog Wall Clock. The
following user guide provides step by step instructions for operation and troubleshooting. To
download the latest manual and additional troubleshooting tips, please visit:
http://ambientweather.wikispaces.com/rc1800wsth
2 Quick Start Guide
1. Remove locking pin before use (Figure 2).
2. Set Time Zone and Daylight Savings Time switch (Section 7).
3. Insert the battery. The hour minute and second hand will automatically adjust to 12:00:00.
4. Hang the clock on the wall.
5. Wait 24-48 hours for the correct time to set.
6. Wait 4 hours for the humidity sensor to acclimate.
3 Overview
The radio controlled wall clock (RCC) updates time and date automatically using a radio receiver
from the atomic time transmitted from Fort Collins, CO, USA (WWVB).
This signal is shortwave, and travels thousands of miles by bouncing off of the ionosphere. The signal
is best received at night when there is no solar interference.
The radio controlled clock never requires setting, and automatically adjusts to daylight savings time
(DST). This feature can be overridden for locations that do not observe DST (example, Arizona).
Features include:
Hour, minute and second hands
Automatic daylight savings time update and leap year observation
Four time zone settings (Pacific, Mountain, Central, Eastern)
Thermometer and Hygrometer
Long battery life
The radio controlled reception is attempted every two hours, and generally is successful at night. Just
one successful synchronization per day is sufficient to accurately set the clock to the second.
4 Important Notes
Before using this product, please read the following :
1. Read these instructions – All operating instructions should be read before the unit is operated.
2. Clean only with soft damp cloth.
3. Do not use near any heat sources such as radiators, heat registers, stoves, or other device
(including amplifiers) that produce heat.
4. Do not attempt to dismantle, open or repair this product yourself. If a fault occurs, seek
advice from Ambient Weather support only.
5. The product must not be exposed to substantial mechanical strain or strong vibrations.

Version 1.2 ©Copyright 2016, Ambient LLC. All Rights Reserved. Page 3
6. Do not leave packaging materials unattended. It may become a dangerous plaything for
children.
7. Handle the product with care. It can be damaged by dropping and vibration.
Battery Safety Instructions
1. If the battery electrolyte in the cells should get on your skin, thoroughly wash with soap and
water. If in the eyes, rinse thoroughly with cool water. Immediately seek medical attention.
2. Leaking or damaged batteries might cause acid burns when in contact with skin, therefore use
suitable protective gloves to handle corrupted batteries.
3. Correct polarity must be observed while inserting the batteries.
4. Batteries should be removed from the device if not used for a long period of time to avoid
damage through leaking.
5. Keep batteries out of reach of children. Batteries can be swallowed and represent a choking
hazard.
6. Batteries must not be dismantled, short-circuited or thrown into fire.
5 Installation
1. The clock includes a suspension eye for hanging on a wall.
2. To ensure proper radio reception, the clock should not be placed near electronic devices or on
a metal wall (metal blocks radio signals).
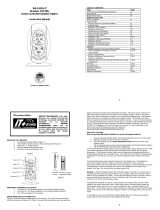
6 Controls
The following controls are on the back of the clock face. Remove the cover by rotating counter
clockwise, as shown in Figure 1.
Figure 1

Version 1.2 ©Copyright 2016, Ambient LLC. All Rights Reserved. Page 4
#
Description
#
Description
1
Locking pin (remove before using)
5
Reception Button (Resynchronization
with Atomic Clock) Same as #2.
2
Reception Button (Resynchronization
with Atomic Clock) Same as #5.
6
Time Zone (P=Pacific, M=Mountain,
C=Central, E=Eastern)
3
AA Battery Compartment
7
Daylight Savings Time Observation
(OFF for Arizona)
4
Manual Clock Set. Same as #8.
8
Manual Clock Set. Same as #4.
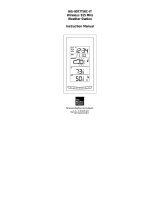
Figure 2
7 Battery Installation and Initial Operation
1. Reference Figure 2. Enter the Time Zone and Daylight Savings Time (DST) as outlined in
Table 1.
#
Cities
Time
Zone
Hours from
GMT
Daylight Savings Time (DST)
1
Pacific Time
P
-8
ON
2
Mountain Time
M
-7
ON
3
Arizona Time
M
-7
OFF
4
Central Time
C
-6
ON
5
Eastern Time
E
-5
ON
Table 1

Version 1.2 ©Copyright 2016, Ambient LLC. All Rights Reserved. Page 5
2. On the back of the housing, insert one AA battery, observing the correct polarity. The
correct polarity is indicated in the battery compartment.
Replace the cover by rotating clockwise, as shown in Figure 1.
3. The second hand will run and stop at the 12:00 o’clock position, followed by the minute hand
and hour hand aligning to the 12:00 o’clock position. This confirms the clock hands are
operating properly.
4. The clock attempts to synchronize with the atomic clock for 10 minutes. If it synchronizes,
the clock sets properly. If it does not receive the signal from the atomic clock (very likely
during the daytime), the clock will begin running from the 12:00 position until the time
synchronization is successful.
The clock will attempt synchronization at the following times: 2:16:00, 4:16:00, 14:16:00,
and 16:16:00. During synchronization, the second hand may stop until the time is correct.
8 Mechanical Deviation Adjustment
During normal operation, the second hand will resynchronize at 9:30 for two minutes to account for
mechanical deviation. The resynchronization occurs for two minutes, and makes the proper second
hand adjustment.
During normal operation, the minute hand will resynchronize from 11:51 to 11:54. If the minute hand
deviates within two minutes, it will automatically adjust. If the minute deviates more than two minutes,
the clock hands will attempt resynchronization.
9 Setting the Time Manually
If reception is not available, the clock date and time can be set manually.
To set manually, press and hold the M. SET button (Figure 2) for three seconds, and the clock second
hand will stop and enter the manual mode.
Next, press and hold the M. SET button again until the time is set to the current time.
The clock will begin updating again after the M. SET button has not been pressed for 6 seconds.
The clock will attempt synchronization at the following times: 2:16:00, 4:16:00, 14:16:00, and
16:16:00.
10 Forced Radio Resynchronization
To force resynchronization from the atomic clock, press and hold the REC button for 3 seconds. The
second hand will stop.
The clock attempts to synchronize with the atomic clock for 10 minutes. If it synchronizes, the clock
sets properly. If it does not receive the signal from the atomic clock (very likely during the daytime),
the clock will begin running until the time synchronization is successful.
The clock will attempt synchronization at the following times: 2:16:00, 4:16:00, 14:16:00, and
16:16:00.

Version 1.2 ©Copyright 2016, Ambient LLC. All Rights Reserved. Page 6
11 Temperature and Humidity Sensors
The clock includes a temperature and humidity sensor, as shown in Figure 3.
Temperature and humidity are greatly influenced by direct sun and radiant heat from the wall it is
attached to.
We recommend mounting the clock in a protected, shaded area to insure accurate temperature and
humidity.
Figure 3
12 Maintenance
The device is maintenance-free, but should be cleaned occasionally. Only use a slightly dampened and
soft cloth to clean the housing. Do not use abrasives or solvents.
13 Specifications
Operating Voltage
1.5 Vdc
Battery
1 x AA
Battery Life
About 1 year (high quality batteries)
Radio controlled time protocol
WWVB (USA)
Dimensions
Approximately 18”
Measurement
Range
Accuracy
Resolution
Temperature
-10 to 130 °F
± 1.8 °F (± 1 °C)
1 °F
Humidity
0 to 100%
± 6% (10 to 40%)
± 5% (40 to 75%)
± 7% (75 to 85%)
± 8% (0 to 10 and 85 to
100%)
1 %

Version 1.2 ©Copyright 2016, Ambient LLC. All Rights Reserved. Page 7
14 Glossary of Terms
Term
Definition
DST
Daylight saving time (DST) or summer time is the
practice of advancing clocks during the lighter months so
that evenings have more daylight and mornings have
less. Typically clocks are adjusted forward one hour near
the start of spring and are adjusted backward in the
autumn.
Hygrometer
A hygrometer is a device that measures relative humidity.
Relative humidity is a term used to describe the amount
or percentage of water vapor that exists in air.
RCC
A radio-controlled clock is a clock that is synchronized
by a time code bit stream transmitted by a radio
transmitter connected to a time standard such as an
atomic clock.
WWVB
WWVB is a NIST time signal radio station near Fort
Collins, Colorado. WWVB is the station that
radio-controlled clocks in most of North America use to
synchronize themselves. The 70 kW ERP signal
transmitted from WWVB is a continuous 60 kHz carrier
wave, the frequency of which is derived from a set of
atomic clocks located at the transmitter site, yielding a
frequency uncertainty of less than 1 part in one trillion.
15 Troubleshooting Guide
If your question is not answered here, you can contact us as follows:
1. Email Support: support@ambientweather.com
2. Technical Support: 480-346-3380 (M-F 8am to 3pm Arizona Time)

Version 1.2 ©Copyright 2016, Ambient LLC. All Rights Reserved. Page 8
Problem
Solution
Radio controlled clock does not update or
time is wrong.
Hang the clock on a wall. Laying the clock flat
on a surface will result in poor reception.
Be patient. Wait at least one week before
contacting Ambient Weather. The RCC is a
shortwave signal originating near Fort Collins,
Colorado, and travels thousands of miles by
bouncing off the ionosphere. The signal is better
at night due to solar interference during the
daytime. The farther you are from Colorado, the
weaker the signal. Urban environments can also
affect the signal strength.
Locate the Clock at night near a window or
outer wall, and away from other radiating
sources, like wireless routers or TVs. This will
insure the best reception possible.
Replace the batteries in the clock if
required. Low batteries are often the cause for
weak reception.
Check your Time Zone Setting. Make sure
your time zone is set properly in the clock
settings.
Avoid closed in areas. Closed in areas such as
basements are not recommended.
The clock is off by increments of an hour.
Check your Time Zone and DST
Settings. Make sure your time zone and DST
switches are set properly.
The clock does not respond to commands.
Remove and replace the battery.
16 Liability Disclaimer
Reading the “User manual” is highly recommended. The manufacturer and supplier cannot accept any
responsibility for any incorrect readings and any consequences that occur should an inaccurate reading
take place.
This product is not to be used for medical purposes or public information.
The specifications of this product may change without prior notice.
This product is not a toy. Keep out of the reach of children.
No part of this manual may be reproduced without written authorization of the manufacturer.
Ambient, LLC WILL NOT ASSUME LIABILITY FOR INCIDENTAL, CONSEQUENTIAL,
PUNITIVE, OR OTHER SIMILAR DAMAGES ASSOCIATED WITH THE OPERATION OR
MALFUNCTION OF THIS PRODUCT.
This product complies with the applicable national and USA and European regulations. All rights

Version 1.2 ©Copyright 2016, Ambient LLC. All Rights Reserved. Page 9
reserved and patent pending.
17 Warranty Information
Ambient, LLC provides a 1-year limited warranty on this product against manufacturing defects in
materials and workmanship.
This limited warranty begins on the original purchase date, and is valid only on products purchased
and used in the United States, only to the original purchaser of this product, and only from an
authorized dealer. To receive warranty service, the purchaser must contact Ambient, LLC for
troubleshooting and service.
Warranty service can only be performed by an Ambient, LLC authorized service representative. The
original receipt must be provided upon request as proof of purchase to Ambient, LLC.
Ambient, LLC will replace this product with new or reconditioned parts or products, if found to be
defective during the limited warranty period specified above.
Replacement parts and products assume the remaining original warranty, or ninety (90) days,
whichever is longer.
The owner must pay any shipping charges incurred in getting your Ambient, LLC product to a
Ambient, LLC for replacement or repair. Ambient, LLC will pay reasonable return shipping charges to
the owner of the product.
Your Ambient, LLC warranty covers all defects in material and workmanship with the following
specified exceptions: (1) damage caused by accident, unreasonable use or neglect (including the lack
of reasonable and necessary maintenance); (2) damage resulting from failure to follow instructions
contained in your owner’s manual; (3) damage resulting from the performance of repairs or alterations
by someone other than an authorized Ambient, LLC authorized service center; (4) units used for other
than in the manner described in this manual.
18 Disposal
Please help in the preservation of the environment and return used batteries to an authorized depot.
The electrical and electronic wastes contain hazardous substances. Disposal of electronic waste in
wild country and/or in unauthorized grounds strongly damages the environment.
/