Page is loading ...

USER GUIDE
EK-Quantum
Impulse 120mm FAN

Please note the installation of the product is intended to be undertaken
by an adequately trained and experienced person. You are installing the
product at your own risk. If you are not properly trained or experienced or
feel unsure about the installation procedure, please refrain from installing
the product yourself and contact our tech support for assistance. We
disclaim our liability for any damages to the product as well as incidental,
consequential, or indirect damages incurred due to improper or
inappropriate installation.
Before you start using this product, please follow these basic guidelines:
Carefully read the manual before beginning with the installation
process.


- 4 -
BOX CONTENTS
EK-Quantum Impulse 120mm FAN
Extension cable (1 pc) FAN Self tapping screw (4 pcs)
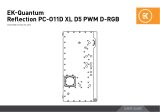
TECHNICAL SPECIFICATIONS AND DIMENSIONS
119.5 mm
105 mm
105 mm
119.5 mm
29 mm
26 mm
Technical Specification:
- Max Air Flow: 57.5CFM = 97.8m3/h
- Static Pressure: 1.94mm-H2O
- Noise Level: 24.3dBA (max. RPM)
- Led Count:
• Frame front side - 12 LED
• Frame back side - 12 LED
• Impeller - 6 LED

- 5 -
STEP 1
EK provides the four (4) self-tapping screws with each Fan. Use
the Phillips head screwdriver to tighten the screws (in a clockwise
direction). Don’t use excessive force while tightening the screws.
EK recommends using the EK-Loop Torque Screwdriver - 0.6Nm:
https://www.ekwb.com/shop/ek-loop-torque-screwdriver-0-6nm
EK-QUANTUM SURFACE RADIATOR
In the case of using the EK-Quantum Surface radiators, it is
recommended to select the M4 x 30 Screws (enclosed with the
radiator) to secure the fans.
The number of enclosed screws depends on the radiator model.
Use the Phillips Head Screwdriver to tighten the screws in a
clockwise direction.
Don’t use excessive force while tightening the screws.
INSTALLING THE FAN DIRECTLY
INSTALLING THE FAN ON THE RADIATOR
M4 x 30 PHILLIPS
HEAD SCREW
EK-QUANTUM
IMPULSE 120mm
FAN
STEP 1
STEP 1
SELF-TAPPING
SCREW
EK-QUANTUM
SURFACE RADIATOR
IMPULSE FAN

- 6 -
BASIC INFORMATION’S
CONNECTING THE FANS
FAN
CONNECTOR
FEMALE
CONNECTOR
D-RGB
CONNECTOR
FEMALE
CONNECTOR
MALE
CONNECTOR

- 7 -
STEP 1
Connect the female connector from the extension cable to the
male connector from the fan.
Make sure to turn the Female connector correctly.
FEMALE
CONNECTOR
MALE CONNECTOR
STEP 1

- 8 -
STEP 1
*In case of using multiple fan-s, connect fan-s in series with the
“daisy-chain”.
Make sure to turn the female connector correctly.
FEMALE
CONNECTOR
MALE CONNECTOR
STEP 1
STEP 2
After connecting the extension cable with the fan, connect the
4-pin fan connector from the extension cable directly to the CPU
fan header on the motherboard.
Always use the CPU fan header. On the majority of
motherboards, these headers usually offer the best
PWM regulation.
STEP 2
FAN CONNECTOR

- 9 -
STEP 3
Plug the 3-pin D-RGB connector from the extension cable into the
D-RGB header on the motherboard.
Please ensure that the arrow indicated on the connector is
plugged into the +5V line as indicated on your motherboard.
If you put LED Diode to the 12V RGB HEADER you can
damage the LEDs.
D-RGB HEADER
RGB HEADER
STEP 3

In case you need assistance or wish to order spare parts or a new
mounting mechanism, please contact:
https://www.ekwb.com/customer-support/
EKWB d.o.o.
Pod lipami 18
1218 Komenda
Slovenia - EU
SUPPORT AND SERVICE
EKWaterBlocks
@EKWaterBlocks
ekwaterblocks
ekwaterblocks
EKWBofficial
SOCIAL MEDIA
/