Page is loading ...

OPERATING INSTRUCTIONS
Connecting a SICK Bar Code Scanner or
Image Code Reader to Profibus DP
CMF 400-1x01
Fieldbus Gateway

Operating Instructions
CMF 400-1x01 for Profibus DP
2 © SICK AG · Division Auto Ident · Germany · All rights reserved 8 010 462/0000/2005-07-15
Production status of the CMF 400-1x01
Copyright
Copyright © 2005
SICK AG Waldkirch
Auto Ident, Reute Plant
Nimburger Strasse 11
79276 Reute
Germany
Trademarks
Windows 95
TM
/98
TM
, Windows NT
TM
, Windows 2000
TM
, Windows XP
TM
and Internet-
Explorer
TM
are registered trademarks or trademarks of the Microsoft Corporation in the USA
and other countries.
Latest Manual Version
For the latest version of this manual (PDF), see www.sick.com.
Device type Designation Revision index
CMF 400-1001 Field bus gateway for Profibus DP 0000
CMF 400-1101 Field bus gateway for Profibus DP 0000
CMF 400-1201 Field bus gateway for Profibus DP 0000

Operating Instructions
CMF 400-1x01 for Profibus DP
Contents
8 010 462/0000/2005-07-15 © SICK AG · Division Auto Ident · Germany · All rights reserved 3
Abbreviations used
LED Light Emitting Diode
LSB Least Significant Byte
MSB Most Significant Byte
PLC Progammable Logic Controller
PUO Profibus User Organisation
Profibus DP Profibus Decentralized Peripherals
The Bar Code Scanners and the Image Code Readers are simply referred to as “bar code
scanner“ in the document.
Contents
1 Product Description.......................................................................................................... 4
1.1 Features............................................................................................................. 4
1.2 Scope of delivery............................................................................................... 4
1.3 Prerequisites for Installation and Commissioning.......................................... 4
1.4 Basic Functions................................................................................................. 5
2 Installation ......................................................................................................................... 7
2.1 Installation Location in the Connection Module ............................................. 7
2.2 Front Panel Set ................................................................................................. 8
3 Electrical Installation...................................................................................................... 10
3.1 Electrical Connections ....................................................................................10
4 Commissioning ............................................................................................................... 12
4.1 Prerequisites ...................................................................................................12
4.2 Configuration: Preparatory Steps................................................................... 12
4.3 Configuring the Bar Code Scanner and Gateway Using CLV Setup.............12
4.4 Configuring the Gateway with ComPro ..........................................................16
5 Communication via Profibus DP .................................................................................. 17
5.1 Data Exchange ................................................................................................17
5.2 Standard CMF Format, Byte Handshake, Digital I/O....................................17
5.3 Standard CMF Format, No Byte Handshake, Digital I/O..............................22
5.4 BMV Compatible, Without Digital I/O ...........................................................22
5.5 The DigitalInput and DigitalOutput Bytes ......................................................23
6 Troubleshooting .............................................................................................................. 25
6.1 System LED: "SYS" (V3) ..................................................................................25
6.2 Profibus DP: LED "COM" (V2) ......................................................................... 25
6.3 Bar Code Scanner LED: "SER" (V1)................................................................25
7 Technical Data ................................................................................................................ 27
7.1 Data Sheet: Fieldbus Gateway CMF 400 for Profibus DP............................ 27
7.2 Accessories ..................................................................................................... 28
8 Appendix ..........................................................................................................................29
8.1 Example of control of the CMF 400 in Mode #1 with a Simatic S7-300 .... 29
8.2 EC Declaration of Conformity .........................................................................30

Chapter 1 Operating Instructions
CMF 400-1x01 for Profibus DP
4 © SICK AG · Division Auto Ident · Germany · All rights reserved 8 010 462/0000/2005-07-15
Product Description
1 Product Description
1.1 Features
• Field bus gateway as a plug-in module for connecting one SICK bar code scanner
CLV 42x to 45x, CLV 480, CLV 490, CLX 490 or one Image Code Reader ICR 84x/85x to
Profibus DP.
• Can be used in the CDM 420 and CDM 490 connection modules (basic devices).
• Connection to the motherboard via the SMD connector.
• On the front panel for connection to Profibus DP:
– 9-pin Sub D socket (CMF 400-1001/-1101) or
– two 2-pin M12 connectors (CMF 400-1201), B-coded.
• Electrically isolated Profibus DP interface (max baud rate: 12 Mbit/s).
• Additional 2 digital inputs and outputs on the gateway.
• 3 LEDs for displaying statuses and malfunctions.
• 18 to 30 V DC power supply via the connection module.
• Configuration via the user interface of the connected bar code scanner.
• Certified by the Profibus User Organization (PUO).
1.2 Scope of Delivery
• CMF 400-1x01 field bus gateway for Profibus DP
• Front panel set for the connection module with one Sub D socket or two M12 connectors
for the bus connection
• Installation set
• "Manuals & Software" CD (no. 2 019 112)
Note The latest versions of all the current publications/programs on the CD can also be
downloaded from www.sick.com.
Further Product Information:
¾ See www.sick.de/cmf
EC Declaration of Conformity:
¾ On request
1.3 Prerequisites for Installation and Commissioning
• CDM 420 or CDM 490 connection module with operating instructions.
• Bar code scanner with CMF 400-compatible firmware and operating instructions
(see section 7.1 “Data Sheet: Fieldbus Gateway CMF 400 for Profibus DP”, page 27).
• GSD file "SICK07DE.GSD" for CMF 400-1x01 (on the "Manuals & Software" CD).
• PC with "CLV Setup" user software from version 4.2 for configuring the CMF 400 (also on
the CD).
• 3-core RS 232 data cable (null modem cable) for connecting the PC to the CDM
connection module
• If ComPro configuration tool is used: additionally the parameterization cable
no. 2 030 490 (see also Chapter 4.4 “Configuring the Gateway with ComPro”, Page 16)

Operating Instructions Chapter 1
CMF 400-1x01 for Profibus DP
Product Description
8 010 462/0000/2005-07-15 © SICK AG · Division Auto Ident · Germany · All rights reserved 5
1.4 Basic Functions
1.4.1 Operating Principle
The CMF 400-1x01 field bus gateway is used for connecting a SICK bar code scanner to
Profibus DP. The gateway enables user data to be transferred transparently between the
bar code scanner and a field bus master (PLC). In the field bus, the gateway always acts as
the slave. Data is exchanged cyclically with the field bus master. The bar code scanner can
be connected to the gateway via its host interface (RS 232 variant) or the terminal interface
(RS 232).
Instead of a bar code scanner, a different device with an RS 232 interface and STX/ETX
frame can also be connected to Profibus DP via the gateway. This enables hand scanners,
for example, to be easily integrated in Profibus DP networks
(see also section 4.4 “Configuring the Gateway with ComPro”, page 16).
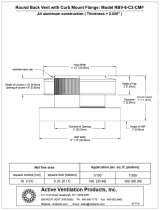
Fig. 1-1: Block diagram of the field bus gateway for Profibus DP in the connection module
Fig. 1-2: Structure of the field bus gateway for Profibus DP
CMC
400
Bar code scanner
Image Code Reader
PC
Host
Term
Profibus DP
CDM 420/490
Profibus DP
CMF 400-1x01
RS 232
I/O
Aux
HSS
AUX
OFF
Terminals
Configuration
Diagnosis
LEDs:
Configuration switch:
SMD connector
for motherboard
5-pin terminal strip (I/O)
V 1 (SER)
V 2 (COM)
V 3 (SYS)
Connector for supply cable
to front panel
"OFF" position
"AUX" position
"HSS" position
Molex socket
(for use with ComPro)

Chapter 1 Operating Instructions
CMF 400-1x01 for Profibus DP
6 © SICK AG · Division Auto Ident · Germany · All rights reserved 8 010 462/0000/2005-07-15
Product Description
1.4.2 Configuration Switch and Displays
Configuration switch:
Note Use the "OFF" (or "HST") position to configure or diagnose the connected bar code scanner
via the AUX connector in the connection module.
LEDs:
Function Default
Switching the RS 232 gateway interface to different sources:
HSS: Host interface of the bar code scanner
AUX: Terminal interface of the bar code scanner
OFF: Complete disconnection from the bar code scanner
HSS
Tab. 1-1: Function of the gateway configuration switch
LED Function Color Status Description
V1 SD Green On Communication with bar code scanner OK
Off No communication with bar code scanner for 200 ms
XOFF Yellow On Gateway has sent XOFF. LED extinguishes when XON is sent.
Off Initial state (OK)
Regular flashing Gateway receive buffer or transmit buffer has overflowed.
Terminate flashing by releasing receive and/or transmit buffer.
V2 ERR Red Off Not used
STA Green On Data exchange with the Profibus DP master
Off No token
V3 RUN Green On Communication active
Irregular flashing Parameterization error
Regular flashing Ready to communicate
Off No communication
RDY Yellow On Gateway ready
Cyclic flashing Bootstrap loader active
Irregular flashing Hardware or system error
Both off Hardware defect or no power supply
Tab. 1-2: Function of the LEDs on the gateway

Operating Instructions Chapter 2
CMF 400-1x01 for Profibus DP
Installation
8 010 462/0000/2005-07-15 © SICK AG · Division Auto Ident · Germany · All rights reserved 7
2 Installation
2.1 Installation Location in the Connection Module
Risk of damage to the gateway due to electrostatic charge.
Do not touch the gateway without equipotential bonding because electrostatic discharge
from your body may damage electronic components.
¾ Before removing the module from the ESD pouch, carry out equipotential bonding
between the body and shield of the connection module.
¾ Handle the module on the sides only.
¾ When carrying out installation work, you are advised to wear a grounding wrist band.
2.1.1 Installing the Gateway in the Connection Module
1. Loosen the screws in the cover of the connection module and remove the cover.
2. Disconnect the connection module from the power supply.
To do so, set switch S 1 (power) to the "OFF" position.
3. Align the gateway in such a way that the red connector points towards the front of the
connection module. Insert the module to the left of the motherboard (Fig. 2-1). The SMD
connector must rest on the mating connector of the motherboard.
4. Secure the module using the two threaded pins provided in the installation kit.
5. Connect the gateway shield (PE, terminal 1 on the 5-pin terminal strip) to the shield (ter-
minal 6, 7, or 8) on the motherboard using the cable supplied.
6. Unscrew the old metal front panel and remove the shield connector.
Fig. 2-1: Slot for the field bus gateway for Profibus DP in the connection module
Slot
motherboard

Chapter 2 Operating Instructions
CMF 400-1x01 for Profibus DP
8 © SICK AG · Division Auto Ident · Germany · All rights reserved 8 010 462/0000/2005-07-15
Installation
2.2 Front Panel Set
Fig. 2-2: Front panel of the CMF 400-1001: 9-pin D Sub socket (IP 20) for Profibus DP
Connector for connecting
the panel to the shield
Cable of the D Sub
socket with connector
Fig. 2-3: Front panel of the CMF 400-1101: 9-pin D Sub socket (IP 65) for Profibus DP
Cable for connecting the
panel to the shield
Cable of the D Sub
socket with connector
Fig. 2-4: Front panel of the CMF 400-1201: M12 connectors (IP 65) for Profibus DP
Connector for connecting
the panel to the shield
Cables of the M12 con-
nectors with connector
Code tappet
Socket (OUT)
Plug (IN)
M12 connectors
B-coded

Operating Instructions Chapter 2
CMF 400-1x01 for Profibus DP
Installation
8 010 462/0000/2005-07-15 © SICK AG · Division Auto Ident · Germany · All rights reserved 9
2.2.1 Installing the new Front Panel
CMF 400-1001 (Front Panel with 9-pin D Sub Socket, IP 20):
1. Connect the shield connector to the new front panel (Fig. 2-2).
2. Screw the new front panel into place. The shield must be located at the bottom of the
connection module.
3. Connect the D Sub socket connection cable (on the backside of the front panel) to the
red gateway connector. Be sure that the code tappet rest correctly on the gateway
connector.
4. Continue with step 7.
CMF 400-1101 (Front Panel with 9-pin D Sub Socket, IP 65):
1. Screw the new front panel (Fig. 2-3) into place. The shield must be located at the bottom
of the connection module.
2. Loosen the old shield cable on the motherboard and connect insteadly the shield cable
of the new front panel.
3. Connect the D Sub socket connection cable (on the backside of the front panel) to the
red gateway connector. Be sure that the code tappet rest correctly on the gateway
connector.
4. To remain the enclosure rating IP 65, only connect the Profibus via the connector
no. 6 029 030.
5. Continue with step 7.
CMF 400-1201 (Front Panel with two M12 Connectors, B-coded, IP 65):
1. Connect the shield connector to the new front panel (Fig. 2-4).
2. Screw the new front panel into place. The shield must be located at the bottom of the
connection module.
3. Connect the bunched cables of the M12 connectors (on the backside of the front panel)
to the red gateway connector. Be sure that the code tappet rest correctly on the gateway
connector.
4. Continue with step 7.
All CMF 400-1x01:
7. Switch on the power supply for the connection module with switch S 1.
8. Replace and secure the cover.

Chapter 3 Operating Instructions
CMF 400-1x01 for Profibus DP
10 © SICK AG · Division Auto Ident · Germany · All rights reserved 8 010 462/0000/2005-07-15
Electrical Installation
3 Electrical Installation
3.1 Electrical Connections
Note Diagrams showing you how to connect the CMF 400 for Profibus DP are also available in the
"CLV Connect" PC program. The software is available on the "Manuals & Software" CD. The
software can also be downloaded from the SICK home page (www.sick.com) in the Internet.
It can be called up using a standard HTML browser (e. g. Internet Explorer
TM
).
3.1.1 Pin Assignment for the 5-Pin Terminal Strip (Gateway)
3.1.2 CMF 400-1001/-1101: Pin Assignment of the 9-Pin D Sub Socket
(Profibus DP) on the Front Panel
Floating RS 485 interface in accordance with EN 50 170.
3.1.3 CMF 400-1201: Pin Assignment of the 5-pin M12 Connectors (Profibus DP) on
the Front Panel
Floating RS 485 interface in accordance with EN 50 170.
Pin Signal Function
1 PE Shield (connection to connection module)
2 IN 1 Digital input (U
in
= DC 0 to 30 V)
3 IN 2 Digital input (U
in
= DC 0 to 30 V)
4 OUT 1 Digital output (U
out
= DC 0 to V
s
, max. 30 V)
5 OUT 2 Digital output (U
out
= DC 0 to V
s
, max. 30 V)
Tab. 3-1: Pin assignment for the 5-pin terminal strip (gateway)
Pin Signal Function
3 RxD/TxD-P Receive/transmit data P
4 CNFR-P Control signal for repeater
5 DGND Data reference potential (ISO GND)
6 VP Power supply (ISO +5 V)
8 RxD/TxD-N Receive/transmit data N
Tab. 3-2: Pin assignment of the 9-pin D Sub socket (Profibus DP)
Pin Signal Function
1 +5 V DC Power supply (ISO +5 V)
2 A (N) Receive/transmit data N
3 GND Data reference potential (ISO GND)
4 B (P) Receive/transmit data P
5 Shield Shield
Tab. 3-3: Pin assignment of the 5-pin M12 socket for Profibus DP (OUT)
15
69

Operating Instructions Chapter 3
CMF 400-1x01 for Profibus DP
Electrical Installation
8 010 462/0000/2005-07-15 © SICK AG · Division Auto Ident · Germany · All rights reserved 11
3.1.4 Conditions for Profibus DP
A maximum of 32 devices can be connected to each other in a Profibus DP bus segment. A
maximum of 126 devices can be connected when several bus segments are connected via
a repeater. The maximum length of a bus segment depends on the data transmission rate
used (Table 3-5).
Recommendation Only use cables suitable for Profibus (preferably type A).
The cable lengths are maximum values recommended by the PUO. In new installations, the
cable lengths for each bus segment should be less than the maximum values specified
above. A repeater can be used to separate two bus segments from each other, which
enables the permitted lengths to be increased easily.
Note Use resistors to terminate the backbone of the network at both ends.
Drop lines do not require a bus terminator.
3.1.5 Pin Assignment for the 9-Pin D Sub Plug “Aux“ in the Connection Module
Pin Signal Function
1n. c.
−
2A (N) Receive/transmit data N
3n. c.
−
4 B (P) Receive/transmit data P
5 Shield Shield
Tab. 3-4: Pin assignment of the 5-pin M12 plug for Profibus DP (IN)
Cable length of segment Data transmission rate
Max. 100 m (328 ft) 12 Mbit/s (without repeater)
Max. 200 m (656.2 ft) 1.5 Mbit/s
Max. 400 m (1,312 ft) 500 kbit/s
Max. 1,000 m (3,280.8 ft) 187.5 kbit/s
Max. 1,200 m (3,936.7 ft) 93.75 kbit/s
Tab. 3-5: Data transmission rate as a function of the cable length of a bus segment
Pin Signal Function
2RxD Receiver
3 TxD Transmitter
5GND Signal ground
Tab. 3-6: Pin assignment for the 9-pin D Sub plug “Aux“ (RS 232)
5
1
9
6

Chapter 4 Operating Instructions
CMF 400-1x01 for Profibus DP
12 © SICK AG · Division Auto Ident · Germany · All rights reserved 8 010 462/0000/2005-07-15
Commissioning
4 Commissioning
4.1 Prerequisites
To integrate the field bus gateway in Profibus DP, the gateway must be registered with the
field bus master. SICK provides a device master file (GSD) for this purpose. This file must
be transferred to the device database of the master and contains all the required device-
specific gateway properties. The current version of the GSD file is available on the "Manuals
& Software" CD.
The GSD file can also be downloaded from the SICK home page (www.sick.de/cmf).
4.2 Configuration: Preparatory Steps
Note When configuring the gateway using the "CLV Setup" configuration software (PC
connected to the terminal interface of the bar code scanner), ensure that the gateway
configuration switch is not in the "Aux" position because the bar code scanner is then
connected to the gateway and PC at the same time.
1. Set the gateway configuration switch to "HSS".
2. Connect the bar code scanner to the connection module.
3. Switch on the power supply for the connection module (switch S 1 to ON).
4. Connect the PC to the terminal interface of the bar code scanner.
To do so, connect the 3-core RS 232 data cable (null modem cable) to the internal
9-pin "Aux" connector on the connection module.
5. Switch on the PC and install the "CLV Setup" configuration software on the
"Manuals & Software" CD if you have not already done this.
6. Start the "CLV Setup" software.
When it successfully establishes communication with the bar code scanner, CLV Setup
copies the current scanner parameter set and displays the values on the tabs.
7. Configure the bar code scanner and field bus gateway as described below.
4.3 Configuring the Bar Code Scanner and Gateway Using CLV
Setup
Note The bar code scanner firmware must support the gateway
(see section 7.1 “Data Sheet: Fieldbus Gateway CMF 400 for Profibus DP”, page 27).
The sections below explain how to configure the gateway using bar code scanner CLV 42x.
If you are using a different type, the bar code scanner-specific tabs in CLV Setup are
identical or similar.
4.3.1 Overview
• Configure the host interface of the bar code scanner.
• Configure the Profibus DP network address of the bar code scanner.
• Configure the field bus gateway.
• Download the new parameter set to the bar code scanner.
• Restart the bar code scanner and gateway.

Operating Instructions Chapter 4
CMF 400-1x01 for Profibus DP
Commissioning
8 010 462/0000/2005-07-15 © SICK AG · Division Auto Ident · Germany · All rights reserved 13
4.3.2 Configuring the Host Interface of the Bar Code Scanner
Note Once the configuration parameters have been downloaded to the bar code scanner, the
gateway automatically recognizes the settings using an AutoDetect function after it has
been restarted.
All the network nodes must use the same communication parameters (apart from the
network address).
¾ Choose the H
OST INTERFACE tab.
¾ Set the following values on the tab:
• Target of the result data string: Asynchronous host interface
• Baud rate: 9 600, 19 200, 38 400, or 57 600 kBd
• Stop bits: 1
• Data/parity bits: 8 bit/no parity or 8 bit/odd parity
• Hardware: RS 232
• Interface protocol type: No handshake or ACK/NAK
• Standard start symbol: Transmit: STX, receive: ETX
• Standard stop symbol: Transmit: STX, receive: ETX
• XON/XOFF: Active/not active
The values in bold are the default gateway settings.
XON/XOFF:
When the XON/XOFF protocol is active, the gateway can interrupt the data flow from the bar
code scanner by sending the control character "XOFF" to the bar code scanner. If the bar
code scanner then receives the control character "XON", it resumes data transmission.
The gateway sends XOFF when five of the six buffers are full and a 6th telegram is received
from the bar code scanner. As soon as at least two buffers are free, the gateway sends XON
to the bar code scanner. The bar code scanner only processes the control characters "XON"
and "XOFF" at its host interface. The gateway processes a maximum telegram length of 512
bytes (without STX/ETX frame).
Fig. 4-1: CLV Setup: "Host Interface" tab

Chapter 4 Operating Instructions
CMF 400-1x01 for Profibus DP
14 © SICK AG · Division Auto Ident · Germany · All rights reserved 8 010 462/0000/2005-07-15
Commissioning
4.3.3 Configuring the Profibus DP Network Address of the Bar Code Scanner
¾ Choose the D
EVICE CONFIGURATION tab.
¾ In the D
EVICE NO. field, assign a unique device address. The node address must be unique
in the Profibus DP network (range 1 to 99).
Note If a CMC 400 cloning module is also used in the connection module, the device address is
set using the two rotary coding switches on the CMC 400.
4.3.4 Configuring the Field Bus Gateway
¾ Choose the F
IELD BUS GATEWAY tab.
Fig. 4-2: CLV Setup: "Device Configuration" tab
Fig. 4-3: CLV Setup: "Field Bus Gateway" tab

Operating Instructions Chapter 4
CMF 400-1x01 for Profibus DP
Commissioning
8 010 462/0000/2005-07-15 © SICK AG · Division Auto Ident · Germany · All rights reserved 15
¾ Depending on the planned gateway data connection to the bar code scanner, choose the
list entry P
ROFIBUS DP in the HOST GATEWAY or AUX GATEWAY field.
¾ Click P
ROFIBUS DP PARAMETERS.
The P
ROFIBUS DP PARAMETERS dialog box is displayed.
¾ Choose the required gateway transmission method in the O
PERATING MODE sector.
For a more detailed description of the individual transmission methods, see Chapter 5
“Communication via Profibus DP” , page 17.
4.3.5 Downloading the Parameter Set and Restarting the System
1. Download the new parameter set to the bar code scanner.
To do so, choose the icon in the toolbar.
The P
ARAMETER DOWNLOAD dialog box is displayed.
2. Confirm the dialog box by choosing the Permanent storage option.
3. Save the modified parameter set as a new configuration file in CLV Setup.
4. To restart the bar code scanner and gateway, briefly disconnect the connection module
from the power supply (e.g. switch S1 to "OFF" and back again).
The new settings are activated.
4.3.6 Further Activities
1. If the bar code scanner communicates with the gateway via its terminal interface, set
the gateway configuration switch to "Aux".
2. Connect the connection module to Profibus DP (D Sub socket or M12 connectors on the
front panel).
3. Import the GSD file to the field bus master and, if necessary, configure.
4. Test the installation.
Fig. 4-4: CLV Setup: "Profibus DP Parameters" dialog box

Chapter 4 Operating Instructions
CMF 400-1x01 for Profibus DP
16 © SICK AG · Division Auto Ident · Germany · All rights reserved 8 010 462/0000/2005-07-15
Commissioning
4.4 Configuring the Gateway with ComPro
Instead of a bar code scanner, a different device with an RS 232 interface and STX/ETX
frame can also be connected to Profibus DP via the gateway. Since CLV Setup cannot be
used to configure the (external) device, a special configuration tool called ComPro is
required. For configuring, the parameterization cable no. 2 030 490 is additionally required
to the 3-core RS 232 data cable (null modem cable), see Table 7-2, Page 28.
In the following cases, configuration must be carried out with ComPro in order to integrate
a device in Profibus DP via the gateway in the connection module:
• The SICK bar code scanner firmware does not allow you to configure the gateway.
• A SICK hand scanner is operated on the connection module.
• An external device with an RS 232 interface and STX/ETX frame is operated on the
connection module.
Note If the field bus gateway has already been configured using ComPro, it cannot be
reconfigured using CLV Setup via the connected bar code scanner.
In this case, the gateway always uses the settings made with ComPro.
¾ To configure the gateway using CLV Setup again, you first have to reset the internal
gateway database using ComPro.
Pin Assignment for the 3-Pin Molex Socket (Gateway)
¾ Connect the PC to the 3-pin Molex socket on the gateway.
To do so, connect the 3-core RS 232 data cable (null modem cable) to the PC. Connect
the free D Sub socket of the RS 232 data cable to the D Sub plug of the parameterization
cable no. 2 030 490 (1:1 connection). Connect the parameterization cable to the Molex
socket.
Pin Signal Function
1GND Signal ground
2 TxD Transmitter
3RxD Receiver
Tab. 4-1: Pin assignment for the 3-pin Molex socket of the gateway (RS 232)

Operating Instructions Chapter 5
CMF 400-1x01 for Profibus DP
Communication via Profibus DP
8 010 462/0000/2005-07-15 © SICK AG · Division Auto Ident · Germany · All rights reserved 17
5 Communication via Profibus DP
5.1 Data Exchange
The gateway enables data to be exchanged between the connected bar code scanner and
a bus master. At the RS 232 interface, the telegrams are provided with a frame by means
of the control characters "STX" and "ETX". The frame is not transmitted on the field bus.
The field bus must ensure that the input and output data is transmitted to and from the bus
cyclically and consistently. The lengths of the input and output data from the field bus can
be defined separately from each other. The permissible value range in each case is 8 to 240
bytes. With Profibus DP, the data lengths are defined in the field bus master (PLC) and
confirmed by the Check Config telegram issued by the Profibus DP master.
The Profibus DP gateway is a modular slave. To achieve the required lengths of the input
and output data, the modules defined in the GSD file may have to be combined
appropriately. The gateway ensures data consistency across all modules. When word
modules are used, you must take into account potential problems arising with the INTEL/
Motorola format (LSB/MSB or MSB/LSB) for the field bus master!
The gateway itself does not carry out swapping when word modules are used. This means
that the input data from the gateway to the bus always appears on the bus as described in
the following chapters, and the output data from the bus to the gateway must be sent by the
field bus master in this same format!
The communication procedure between the gateway for Profibus DP and the bus master is
defined with 5 control bytes. The three transmission methods available are described
below. You can decide which method to use when carrying out configuration with CLV Setup
(see Section 4.3.4 “Configuring the Field Bus Gateway”, page 14).
5.2 Standard CMF Format, Byte Handshake, Digital I/O
This transmission method can be easily handled in the field bus master (PLC).
Two structures comprising a header and the actual user data are created for the cyclical
input and output data of the field bus. In the header, a handshake uses counters to control
transmission of the user data.
The fields in the tables above are relevant for the rest of this section and will be described
in more detail in the next chapter:
• The DigitalInput and DigitalOutput bytes are described in Chapter 5.5, page 23.
• The InTelegramCountBack and InTelegramCount counters control user data
transmission from the gateway to the field bus master, whereby the gateway is the active
Digital
Output
InTelegram
CountBack
OutTelegram
Count
OutTelegram
LenRest
OutTelegram
8 bits 8 bits 8 bits 16 bits
(INTEL format:
LSB/MSB)
N
out
= 3 to 235 bytes of user data
Tab. 5-1: Output data (receive telegram from the gateway)
Digital
Input
InTelegram
Count
OutTelegram
CountBack
InTelegram
LenRest
InTelegram
8 bits 8 bits 8 bits 16 bits
(INTEL format:
LSB/MSB)
N
in
= 3 to 235 bytes of user data
Tab. 5-2: Input data (send telegram from the gateway)

Chapter 5 Operating Instructions
CMF 400-1x01 for Profibus DP
18 © SICK AG · Division Auto Ident · Germany · All rights reserved 8 010 462/0000/2005-07-15
Communication via Profibus DP
node (client) that must activate user data transmission by incrementing
InTelegramCount. Both counters must have the same status beforehand. The field bus
master is the passive node (server).
• The OutTelegramCount and OutTelegramCountBack counters control user data
transmission from the field bus master to the gateway, whereby the field bus master is
the active node (client) that must activate user data transmission by incrementing
OutTelegramCount. Both counters must have the same status beforehand. The gateway
is the passive node (server).
• OutTelegramLenRest specifies the data length currently remaining to be transmitted
from the field bus master to the gateway.
• InTelegramLenRest specifies the data length currently remaining to be transmitted from
the gateway to the field bus master.
• In OutTelegram, the field bus master enters the user data (left justified) to be transmitted
to the gateway.
The length of this field is N
Out
= parameterized output data length minus 5.
• In InTelegram, the gateway enters the user data (left justified) to be transmitted to the
field bus master.
The length of this field is N
In
= parameterized input data length minus 5.
5.2.1 Direction of Data: Bar Code Scanner to Field Bus Master
Note The following section describes the procedure for transmitting data from the bar code
scanner to the field bus master. Data is transmitted from the field bus master to the bar
code scanner following a similar procedure.
Transmitting incoming telegrams:
Incoming telegrams are telegrams that the gateway receives from the bar code scanner at
the RS 232 interface and then forwards to the field bus master via the input buffers. A
distinction is drawn here between two different types of telegram:
• Telegrams that can be transmitted within a single incoming field bus telegram (user data
fits in the InTelegram element).
• Telegrams that have to be divided into successive blocks due to their length (user data
does not fit in the InTelegram element).
Initialization:
During reset or power-up, that is, before the first incoming telegram is transmitted, the
gateway sets the InTelegramCount, OutTelegramCountBack, and InTelegramLenRest to
zero. Accordingly, the field bus master must set its InTelegramCountBack,
OutTelegramCount, and OutTelegramLenRest to zero.
See also "Resynchronization".
Resynchronization:
If the gateway registers a field bus error (interruption in communication, incorrect counter
statuses), it terminates data transmission in the affected data direction(s). The gateway
then requests the field bus master to resynchronize transmission. To do so, the gateway
sets the corresponding counters (InTelegramCount and/or OutTelegramCountBack) to zero.
The field bus master then has to set its corresponding counters (InTelegramCountBack
and/or OutTelegramCount) to zero too. The initialization status (see "Initialization") is now
restored and the active node (client) can repeat or start data transmission.

Operating Instructions Chapter 5
CMF 400-1x01 for Profibus DP
Communication via Profibus DP
8 010 462/0000/2005-07-15 © SICK AG · Division Auto Ident · Germany · All rights reserved 19
Counter overflow:
When incremented to 255, the InTelegramCount counter is assigned the value "1"
(0
→ 1 → 2 → to → 254 → 255 → 1 → 2 → to). The value "0" only appears during
initialization or if an error occurs (see "Resynchronization").
Transmitting unblocked individual telegrams:
As soon as an incoming telegram that is to be transmitted to the field bus master is
available, the gateway checks whether the previous data transmission has been completed
(InTelegramCountBack is identical to InTelegramCount). The incoming telegram is then
entered in the InTelegram field (left justified). The bytes in the InTelegram field that are not
required are set to zero. The length of the incoming telegram is then entered in the
InTelegramLenRest field. Finally, the InTelegramCount counter is incremented as described
in "Counter overflow“.
The field bus master is always activated when the InTelegramCount field is incremented,
that is, when the value is different to the InTelegramCountBack counter value. The field bus
master monitors whether InTelegramLenRest is less than or equal to N
In
(parameterized
incoming data length minus 5) and then copies the InTelegramLenRest bytes in the
InTelegram field to a different buffer.
The field bus master then sets its InTelegramCountBack counter to the current
InTelegramCount value. This signals to the gateway that the field bus master is ready to
transmit data again.
If the field bus master requires some time to evaluate and process the bar code scanner
data, it can delay acknowledging the InTelegramCountBack counter accordingly.
Transmitting blocked telegrams:
If the length (N
In
) of the InTelegram field is not sufficient for transmitting an incoming
telegram, the incoming telegram is divided into several blocks. These blocks are
transmitted in succession. The same fields are used as for the individual telegram.
With the first block, the first part of the incoming telegram is entered in InTelegram. The
entire length of the incoming telegram is entered in InTelegramLenRest. The field bus
master responds once InTelegramCount has been incremented. It recognizes from the
telegram length (InTelegramLenRest) entered, which is greater than the InTelegram field,
that a blocked data transmission is running here. It transmits the entire InTelegram field to
a buffer and then sets InTelegramCountBack to the current value at InTelegramCount.
The gateway now recognizes that the field bus master has processed the first part of the
incoming telegram. The next part of the incoming telegram is then entered in the
InTelegram field. InTelegramLenRest is assigned a value reduced by the length of the
InTelegram = N
In
field. Finally, InTelegramCount is incremented again.
The reincremented InTelegramCount value reactivates the field bus master, which checks
InTelegramLenRest again. If this value is now less than or equal to N
In
, the remaining
telegram is copied to the buffer and telegram transmission is complete. If the value is
greater than N
In
, the entire telegram is copied to the buffer and the field bus master waits
for the next block.

Chapter 5 Operating Instructions
CMF 400-1x01 for Profibus DP
20 © SICK AG · Division Auto Ident · Germany · All rights reserved 8 010 462/0000/2005-07-15
Communication via Profibus DP
Example:
The incoming telegram (user data) from the bar code scanner is "123456789".
The field bus master responds to the bar code scanner with "OK" (in this example only; "OK"
is not a meaningful telegram for the bar code scanner!).
The input and output data length of the field bus is in each case 10 bytes, which means that
N
In
and N
Out
both comprise 5 bytes.
The counters are equalized, that is, the previous data transmissions are complete in both
directions.
The data bytes are specified in the order in which they appear on the field bus. The length
of the incoming telegram (9 bytes), for example, is specified in the InTelegramLenRest field
as 09h 00h (INTEL format: LSB/MSB!):
1. No new data
2. Incoming telegram, first block (block not yet processed by field bus master)
3. Incoming telegram, first block (block processed by field bus master)
Digital
Output
InTelegram
CountBack
OutTelegram
Count
OutTelegram
LenRest
OutTelegram
00h 34h 18h 04h 00h E N D E 00h
Tab. 5-3: Output data (receive telegram from the gateway)
Digital
Input
InTelegram
Count
OutTelegram
CountBack
InTelegram
LenRest
InTelegram
00h 34h 18h 03h 00h - - - 00h 00h
Tab. 5-4: Input data (send telegram from the gateway)
Digital
Output
InTelegram
CountBack
OutTelegram
Count
OutTelegram
LenRest
OutTelegram
00h 34h 18h 04h 00h E N D E 00h
Tab. 5-5: Output data (receive telegram from the gateway)
Digital
Input
InTelegram
Count
OutTelegram
CountBack
InTelegram
LenRest
InTelegram
00h 35h 18h 09h 00h 1 2 3 4 5
Tab. 5-6: Input data (send telegram from the gateway)
Digital
Output
InTelegram
CountBack
OutTelegram
Count
OutTelegram
LenRest
OutTelegram
00h 35h 18h 04h 00h E N D E 00h
Tab. 5-7: Output data (receive telegram from the gateway)
Digital
Input
InTelegram
Count
OutTelegram
CountBack
InTelegram
LenRest
InTelegram
00h 35h 18h 09h 00h 1 2 3 4 5
Tab. 5-8: Input data (send telegram from the gateway)
/