Page is loading ...

MiniPortrait Camera
Model 206
User Manual

i
Radio and television interference
FCC Notice (U.S.A. only) This equipment has been tested and found to comply with the
limits for a Class B digital device, pursuant to Part 15 of the
FCC Rules. These limits are designed to provide reasonable
protection against harmful interference when the equipment is
operated in a residential environment.
This equipment generates, uses, and can radiate radio
frequency energy and, if not installed and used in accordance
with the instruction manual, may cause harmful interference
to radio communications.
However, there is no guarantee that interference will not occur
in a particular installation. If this equipment does cause
harmful interference to radio or television reception, which can
be determined by turning the equipment on and off, the user is
encouraged to try to correct the interference by one or more of
the following measures:
• Reorienting or relocating the receiving antenna of the radio
or television set
• Increasing the separation between this equipment and the
radio or television receiver
• Connecting this equipment to an outlet on a circuit different
from that to which the receiver is connected
• Consulting the dealer for help
Note: Changes or modifications not expressly approved by
the party responsible for compliance could void the user's
authority to operate this equipment.
EMI Notice (Canada) This Digital Apparatus does not exceed the Class B limits for
radio noise emissions from digital apparatus set out in the
Radio Interference Regulations of the Canadian Department
of Communications.
EMC Notice (Germany) Polaroid garantiert, daß dieses Gerat die nachstehend
aufgeführten Internationalen Standards erfülit:
•• die Vorschriften für RF-Störungen laut EN55022 Klasse B -
•• die Anforderungen für Funkschutz laut EN50082-1,
IEC 801-2, IEC 801-3, IEC 801-4.

ii
Table of contents
Certifications i
1 Setting up
Using this guide 1-1
Unpacking the camera 1-2
The camera 1-3
Setting up the work area 1-4
Setting up the camera 1-5
Setting the Timer 1-6
Technical Assistance 1-6
2 Loading film
Inserting fresh film 2-2
Removing spent film 2-4
Cleaning the rollers 2-5
Cleaning the film exit door 2-6
3 Taking a picture
Preparing the camera 3-2
Taking the photo 3-4

iii
4 LED display functions
Making display selections 4-2
5 Troubleshooting
Correcting common errors 5-1
Polaroid Warranty and Service
MiniPortrait 206 Camera warranty S-1
MiniPortrait 206 Camera service S-1
Polaroid Offices and Service Centers S-2

1-1
1 Setting up
The Polaroid MiniPortrait 206 Camera lets you take instant
photos, quickly and easily, for use with ID systems. You can
use the camera to take ID photos for use on passports,
identification cards, credit cards, and many other small
formats.
Using this guide
This guide describes all the features of the Polaroid
MiniPortrait 206 Camera. It takes you from unpacking the box
to setting up the camera, through troubleshooting problems
you may have with photos.
This guide is written for the person who will be setting up and
running the camera. You do not need prior knowledge of
Polaroid cameras in order to use this new portrait camera.

1-2
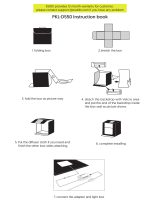
Unpacking the camera
The following figures illustrate the standard parts you will find
in the camera box, in addition to this manual. If you are
missing anything, contact your dealer or Polaroid Customer
Support at (800) 343-5000 immediately.
a MiniPortrait 206 Camera (a)
b an AC adapter
depending on the configuration ordered, you may receive
the wall-mounted unit for 110V (b) or, for all other
voltages, the table-top unit (c)
a
b
c

1-3
The camera
The following illustrates the parts of the camera.
a LED Display h Aiming button
b Timer i Face Brightener button
c On button j Flash
d Shutter button k Lenses
e Camera back l Aiming lights
f AC adapter socket m Aperture selector switch
g Aiming light selector

1-4
Setting up the work area
You need the following items when setting up your work area:
• the camera
• a wastebasket
• a non-reflective cloth backdrop for ID photos
• a white backdrop for passport photos
• a chair, 17 to 18 inches (45cm) high
To set up the work area for the MiniPortrait Camera:
1 Use a work area that measures 8 X 10 feet (2.4 X 3m).
2 Make sure an electrical outlet is accessible to the camera.
Avoid placing the camera where it may be exposed to
extreme temperatures, for example, near a door or
window.
3 Use a wastebasket for discarding tabs and film waste.
4 Place the backdrop behind where the subject will be
seated. Passport regulations require a white background.
For ID pictures hang a piece of non-reflective cloth as a
backdrop.
5 Place a chair against the backdrop.

1-5
Setting up the camera
Setting up the camera is simple; just follow these steps and
you'll have your MiniPortrait 206 Camera set up and ready to
take photos in no time.
Note: The following instructions refer to callouts in the
illustrations in the section, The camera, earlier in this chapter.
Preparing the camera To set up the camera:
1 Power up the camera by plugging the small end of the AC
power cord into the socket on the back of the camera (f).
Plug the other end of the cord into a grounded AC outlet.
After a brief warm-up period, the following will be illumin-
ated in the LED display:
A green Ready light, and a green Exposure light. For
detailed instructions on adjusting the exposure, see
Chapter 4, LED display functions.
2 Adjust the aperture selector switch (m) on the front of the
camera for the recommended f-stop. To adjust the
aperture switch, move the switch to the desired setting.
Film Speed Aperture
ASA 80 f11-1/2
ASA 100 f11-1/2
ASA 125 f16
ASA 3000 f64
Note: Use these settings at 75
o
F (24
o
C) and above. At
colder temperatures, you may have to adjust the settings.
Refer to the film instructions for details.
3 Set the aiming light selector (g) to the passport (PP) or ID
setting.
4 Set the timer (b). To do this, refer to Setting the Timer on
page 1-6.

1-6
Setting the Timer
Before setting the timer, first remove the insulation strip (a)
which protects the timer’s battery during shipment.
• To set minutes (larger numbers), press the MIN button.
Each time you press it, the next higher number will appear;
after the first press, “01” (1 minute) is indicated; second
press, “02” is shown, etc.
• To set seconds (smaller numbers), press the SEC button.
With each press, the next higher number will appear. It
will read “01” for one second; or “10” for ten seconds.
• To start the timer, press the START button.
• To clear the numbers, press the MIN button and the SEC
button at the same time.
Replacement battery: The timer uses one #LR4 battery.
They can be purchased wherever watch, calculator, or hearing
aid batteries are sold.
Technical Assistance
For technical assistance, call toll-free within the U.S.A.:
1-800-343-5000, Monday through Friday, 8 a.m. to 8 p.m.
(Eastern Time). Or, write to the Polaroid Resource Center,
201 Burlington Road, Bedford, MA 01730. In Canada, call
toll- free: 1-800-268-6970. Outside North America, please
contact the office nearest you.
0 0
00
Polaroid
M S
MIN
SEC
START
CLEAR
a

2-1
2 Loading film
Loading film into the camera is quick and simple. After you
have loaded film a few times, you will not need to refer to
these instructions.
This chapter explains how to:
•• Insert a fresh film pack
•• Remove the spent film pack
•• Clean the processing rollers

2-2
Inserting fresh film
To insert a fresh film pack:
1 Insert a fresh film pack into the camera back with the
black paper tab facing you.
2 Check below the black tab to make sure you see a
number of white tabs. One white tab is used for each film
exposure.

2-3
3 Close the camera back and rotate its latching cover,
making sure the black paper tab is outside the camera
back.
4 Pull the black paper tab out of the camera back, keeping
the tab perpendicular to the camera at all times. The best
method is to place the camera on a flat surface, grip the
camera with your left hand and pull the tab with your right
hand. This ensures that the film in the camera remains
aligned.

2-4
Removing spent film
To remove the spent film pack:
1 Open the film compartment and swing open the hinged
camera back door to access the spent film pack.
2 Remove the empty film pack by grasping it at the tab end,
pulling it up and lifting it out (see the first illustration on
page 2-2).

2-5
Cleaning the rollers
Clean the rollers each time you replace a film pack. To clean
the rollers:
1 Open the door of the camera back.
2 Remove the rollers by placing your thumbs at the ends of
the roller assembly and rotating it upward.
3 While the rollers are out of the camera back, wipe them
gently with a clean, lint-free cloth moistened with water.
Caution: Use water only; other cleaning solutions may
permanently damage the rollers.
4 Replace the rollers by placing the assembly against the
film exit door and rotating it downward.

2-6
Cleaning the film exit door
Check the film exit door and remove any pieces of paper or
dried film developer.

3-1
3 Taking a picture
Taking pictures with the Polaroid MiniPortrait 206 Camera is
simple. It requires only a few steps to produce high quality
passport or ID photos.
This chapter describes the steps you should take each time
you take a photo. The first few times you use the MiniPortrait
206 Camera, follow these instructions closely. After you are
familiar with the steps, you will be able to take photos on your
own. This chapter tells you how to:
• Prepare the camera to take photos
• Take the photo and process the exposed film

3-2
Preparing the camera
To prepare the camera to take passport or ID photos:
1 Plug the AC power cord into the back of the camera and
into a wall outlet. The camera will power up.
Both the green Ready light and the green Exposure light
will illuminate. See the example in Chapter 4, LED
display functions.
Note: If the camera is unused for approximately ten
minutes, it will automatically shut off to conserve power.
Press the On button to reactivate the camera.
2 If necessary, load film into the camera. Refer to Chapter
2, Loading film, for detailed instructions.
3 Place your subject in a chair against the backdrop. For
best results, position the subject as close to the backdrop
as possible. Remember, passport photos require a white
background. For questions regarding passport specifica-
tions and techniques, call toll-free: 1-800-343-5000.
Note: For passport photos, move the aiming light selector
to “PP”; for ID photos, set the selector to “ID”. Refer to the
section The camera, in Chapter 1, for the location of the
aiming light selector.

3-3
4 Press the Aiming button and aim the lights at your
subject. The lights blink for 15 seconds while you aim the
camera.
Note: The aiming lights must be blinking in order for you
to take a picture.
5 Position the camera so that the lights converge on your
subject's chin.

3-4
6 If your subject has a dark complexion, press the face
brightener (Boost) button. Refer to The camera, in
Chapter, 1 for location of the button. A green Boost light
will illuminate in the LED display. The face brightener
function turns off and its light goes out after you take the
picture. To turn the face brightener function off before
you take the picture, press the button again.
When you turn the Face Brightener function on, the
camera increases the flash output by 0.3 to 0.5
photographic stops.
Taking the photo
To take a photo:
1 Press the Shutter button.
After you press the button, the green Pull Film light
illuminates in the LED display; if the camera is set to take
another picture on this sheet of film, the Ready light will
come on. If it reads Ready, take another picture.
Note: You can take the two pictures at the same time,
giving you two of the same pose, or you can take one
picture after another, giving you two different poses. To
set the number of photos to be taken at once, refer to
Chapter 4, LED display functions.
/