Page is loading ...

FlexLine
Reverse osmosis system
MANUAL
WLROC.EN
E-8881186
ÁWLROC.EN=È
WL-ROC-25/40/80/140

Page 2
Certain computer programs contained in this product [or device] were developed by HygroMatik
GmbH ("the Work(s)").
Copyright © HygroMatik GmbH [27.10.2022]
WL-ROC-25, WL-ROC-40, WL-ROC-80, WL-ROC-140 EN
All Rights reserved.
Current version of this manual to be found on: www.hygromatik.com
HygroMatik GmbH grants the legal user of this product [or device] the right to use the Work(s)
solely within the scope of the legitimate operation of the product [or device]. No other right is
granted under this licence. In particular and without prejudice to the generality of the foregoing,
the Work(s) may not be used, sold, licensed, transferred, copied or reproduced in whole or in part
or in any manner or form other than as expressly granted here without the prior written consent of
HygroMatik GmbH.
Information in this manual is subject to change or alteration without prior notice.
Risk of electrical shock!
Hazardous electrical voltage!
All electrical work to be performed by certified expert staff (electricians or expert personnel with
equivalent training) only.

Page 3
1. Introduction ....................................................................................................................... 6
1.1 Typographic Distinctions ...................................................................................................6
1.2 Documentation .................................................................................................................. 6
1.3 Symbols in Use ................................................................................................................. 6
1.3.1 General Symbols ............................................................................................................ 6
1.4 Intended Use ..................................................................................................................... 7
1.5 Unit sizes ........................................................................................................................... 7
2. Safety Instructions ............................................................................................................ 8
2.1 Guidelines for Safe Operation ........................................................................................... 8
2.1.1 Scope ............................................................................................................................. 8
2.1.2 Unit control ..................................................................................................................... 8
2.1.3 Unit operation ................................................................................................................. 8
2.1.4 Mounting, dismantling, maintenance and repair of the unit ............................................ 9
2.1.5 Electrical ......................................................................................................................... 9
3. Transport ............................................................................................................................ 10
3.1 Overview ........................................................................................................................... 10
3.2 Interim Storage .................................................................................................................. 10
3.3 Check for complete and correct delivery of goods ............................................................ 10
3.4 Scope of delivery ............................................................................................................... 10
4. Function and structure ..................................................................................................... 11
4.1 Mode of operation ............................................................................................................. 11
4.2 Influencing factors ............................................................................................................. 11
4.3 Operating conditions of the unit ......................................................................................... 12
4.4 Operating sequence .......................................................................................................... 12
4.5 Mechanical construction ....................................................................................................13
5. Installation arrangement ................................................................................................... 14
5.1 Flowchart .......................................................................................................................... 15
6. Mechanical installation .....................................................................................................18
6.1 Environment Parameters to be met and Mounting Recommendations ............................. 18
6.2 Installation steps ................................................................................................................ 19
6.2.1 Feed water connection ................................................................................................... 19
6.2.2 Permeate line connection ............................................................................................... 19
6.2.3 Connection of the expansion vessel ............................................................................... 19
6.2.4 Connection of the concentrate line ................................................................................. 20
6.2.5 Inserting the prefilter cartridge(s) ................................................................................... 20
6.2.6 Inserting the membrane(s) ............................................................................................. 20
7. Water connection .............................................................................................................. 23
8. Electrical connection ........................................................................................................ 25
8.1 Procedure for electrical installation ................................................................................... 25
8.2 Electrical installation check list .......................................................................................... 25
8.3 Inputs and outputs of the main board ................................................................................ 26
9. Initial start-up and flushing of the membrane(s) ............................................................ 27
9.1 System start-up after initial commissioning ....................................................................... 28

Page 4
9.2 Adjusting the metering pump ............................................................................................. 29
10. Maintenance ..................................................................................................................... 30
10.1 General ............................................................................................................................ 30
10.2 Safety instructions for maintenance ................................................................................ 30
10.3 Change prefilter ............................................................................................................... 31
10.4 Membrane exchange ....................................................................................................... 31
10.5 Maintenance scheme ...................................................................................................... 32
10.5.1 Daily check ................................................................................................................... 32
10.5.2 Weekly check ............................................................................................................... 32
10.5.3 Maintenance every two months .................................................................................... 32
10.5.4 Maintenance by qualified staff ...................................................................................... 33
11. Decomissioning ............................................................................................................... 34
11.1 Dismantling ...................................................................................................................... 34
11.2 Disposal after dismantling .............................................................................................. 34
12. Control .............................................................................................................................. 35
12.1 The control panel ............................................................................................................. 35
12.2 Access to the main menu: ............................................................................................... 35
12.3 Operating states .............................................................................................................. 36
12.3.1 Alarm messages ........................................................................................................... 37
12.4 Menu navigation .............................................................................................................. 38
12.5 Setting options at operator level ...................................................................................... 39
12.6 Menu Structure ................................................................................................................ 40
12.7 Setting options at service level ........................................................................................ 42
12.7.1 Conductivity sensors ...................................................................................................42
12.7.2 Calibration of the probe zero point ............................................................................... 43
12.7.3 Calibration of the probe slope ...................................................................................... 43
12.7.4 Permeate set point calibration ...................................................................................... 44
12.7.5 RAW/MIX set point calibration ...................................................................................... 45
12.7.6 Lower level switch LSLOW ........................................................................................... 46
12.7.7 Upper level switch LSHIGH .......................................................................................... 46
12.7.8 Calibration low pressure switch PSLOW ...................................................................... 47
12.7.9 Calibration high pressure monitor (only WL-ROL/ WL-ROC140) PSHIGH .................. 49
12.7.10 Upstream softening system INFIL .............................................................................. 49
12.7.11 Module flushing .......................................................................................................... 50
12.7.12 Configuration of the alarm - output relay .................................................................... 51
12.7.13 Operating and service hour counter ........................................................................... 52
12.7.14 Function test relay outputs ......................................................................................... 53
12.7.15 Function test alarm output relay ................................................................................. 53
12.7.16 Select language .......................................................................................................... 53
12.7.17 Change password ...................................................................................................... 54
12.7.18 Reset password .......................................................................................................... 54
12.7.19 Setting the maintenance interval ................................................................................ 54
12.7.20 Dosing pump antiscalant INPASC .............................................................................. 55

Page 5
12.7.21 Stand-by-Input INSB .................................................................................................. 55
12.7.22 Set start delay ............................................................................................................ 56
12.8 Wiring diagram ............................................................................................................... 57
13. Error description ............................................................................................................. 59
14. Declaration of Conformity .............................................................................................. 61
15. Spare parts ....................................................................................................................... 63
16. Commissioning report / maintenance documentation ................................................ 66
17. Technical specifications ................................................................................................. 70
18. Dosing Antiscalant .......................................................................................................... 71

Page 6
1. Introduction
Dear Customer,
Thank you for choosing a HygroMatik
reverse osmosis unit. HygroMatik reverse
osmoses units are state of the art.
In order to operate your HygroMatik reverse
osmosis unit safely, properly and efficiently,
please read these operating instructions.
Only use the HygroMatik R.O. unit in faultless
condition and for its intended use, being
aware of safety and hazards, and observing
all instructions in this manual.
If you have additional questions, please con-
tact your expert dealer.
For all technical questions or spare parts
orders, please be prepared to provide unit
type and serial number (see name plate on
the unit).
1.1 Typographic Distinctions
•preceded by a bullet: general speci-
fications
» preceded by an arrow: Procedures
for servicing or maintenance which
should or must be performed in the
indicated order
Installation step which must be
checked off.
italics Terms used with graphics or
drawings
1.2 Documentation
Retention
Please retain these operating instructions in
a secure, always accessible location. If the
product is resold, turn the documentation
over to the new operator. If the documenta-
tion is lost, please contact HygroMatik.
Versions in Other Languages
These operating instructions are available in
several languages. If interested, please con-
tact HygroMatik or your HygroMatik dealer.
1.3 Symbols in Use
Specific Symbols related to Safety
Instructions
According to ANSI Z535.6 the following sig-
nal words are used within this document:
DANGER indicates a hazardous situation
which, if not avoided, will result in death or
serious injury.
WARNING indicates a hazardous situation
which, if not avoided, could result in death or
serious injury.
CAUTION indicates a hazardous situation
which, if not avoided, could result in minor or
moderate injury.
NOTICE is used to address practices not
related to physical injury.
1.3.1 General Symbols
This symbol is used whenever a situation
requires special attention beyond the scope
of safety instructions.

Page 7
1.4 Intended Use
HygroMatik reverse osmosis unit used to pro-
duce fully demineralized water. It may only be
used in accordance with its intended pur-
pose.
• Intended use also includes compliance
with the assembly, disassembly and
reassembly, commissioning, operating
and maintenance conditions and dis-
posal measures prescribed by us.
• Only qualified and authorized person-
nel may work on and with the system.
Persons who carry out transport or
work on and with the system must have
read the relevant parts of the operating
instructions and in particular the chap-
ter "Safety instructions". In addition, the
personnel must be informed by the
operator of any hazards that may exist.
Leave a copy of the operating manual
at the place of use of the unit.
• The installation of additional equipment
is only permitted with the written
approval of the manufacturer.
Use of the system
• The system is intended for operation
(with use of feed water in the drinking
water sector) of humidification systems.
• The limit and guide values of the Ger-
man Drinking Water Ordinance must be
taken into account.
• Frost protection and protection against
excessive moisture must be ensured
• The permitted surrounding temperature
is between 5° C and 40° C
• The use of a system separator accord-
ing to DIN 1988, part 4 is obligatory.
• Avoid water temperatures above 20°C
to prevent possible germ growth.
• Due to their construction, HygroMatik
reverse osmosis systems are not
intended for outdoor installation.
1.5 Unit sizes
The following reverse osmosis units belong
to the WL-ROC (Reverse-Osmosis-Compact)
series:
WL-ROC-25: max. permeate production rate
of 25 l/h
WL-ROC-40: max.
permeate production rate
of
40 l/h
WL-ROC-80: max.
permeate production rate
of
80 l/h
WL-ROC-140: max.
permeate production rate
of
140 l/h
The following reverse osmosis plants belong
to the WL-ROL (Reverse-Osmosis-Large)
series
WL-ROL-160: max.
permeate production rate
of
160 l/h
WL-ROL-320: max.
permeate production rate
of
320 l/h
WL-ROL-460: max.
permeate production rate
of
460 l/h
WL-ROL-600: max.
permeate production rate
of
600 l/h
WL-ROL-1000: max.
permeate production rate
of
1000 l/h
WL-ROL-1200: max.
permeate production rate
of
1200 l/h

Page 8
2. Safety Instructions
These safety instructions are required by law.
They promote workplace safety and accident
prevention.
2.1 Guidelines for Safe Opera-
tion
2.1.1 Scope
Comply with the accident prevention regula-
tion „DGUV Regulation 3“ to prevent injury to
yourself and others. Beyond that, national
regulations apply without restrictions. This
way you can protect yourself and others from
harm.
2.1.2 Unit control
Do not perform any work which compromises
the safety of the unit. Obey all safety instruc-
tions and warnings present on the unit.
In case of a malfunction or electrical power
disruption, switch off the unit immediately and
prevent a restart. Repair malfunctions
promptly.
Restricted use.
IEC 60335-1 stipulates as follows:
This device may be used by children of eight
years of age and above as well as by persons
with reduced physical, sensory or mental ca-
pabilities or lack of experience and knowledge
so long as they are supervised or have been
instructed regarding the safe use of the de-
vice and understand the hazards that may re-
sult from it. Cleaning and maintenance of the
unit must not be undertaken by children with-
out supervision.
The installation room must be adequately
ventilated and be equipped with a floor drain.
A water stop mechanism (e.g. leakage detec-
tor) can be used as an alternative.
2.1.3 Unit operation
Danger of scalding!
Hot surfaces can cause injuries. Protect
yourself with suitable protective equipment.
Water leaks possible due to defective con-
nections or malfunctions.
• Before starting work, the water supply
to the reverse osmosis system (RO
system) must be shut off.
• The system may be under pressure.
Release pressure before starting work.
• The reverse osmosis (RO) systems
continuously produce permeate (prod-
uct water) and concentrate (waste
water). Connections and water-carrying
components must be checked regularly
for correct functionality.
Risk of material damage!
• The unit may be damaged if switched
on repeatedly following a malfunction
without prior repair. Rectify defects
immediately!
• Regularly check that all safety and
monito-ring devices are functioning
normally. Do not remove or disable
safety devices.
It is essential to leave the RO system con-
nected to the power supply permanently.
Only then the automatic rinsing can be car-
ried out (protection against germs).
WARNING
!
NOTICE
NOTICE
NOTICE
NOTICE

Page 9
Switch device ON/OFF
The system can be switched on/off in differ-
ent ways:
» Interrupt the power supply (pull the
plug) or
» operate the main fuse switch (only
WL-ROL units) or
» press the ESC key (for about 2 sec-
onds).
2.1.4 Mounting, dismantling, mainte-
nance and repair of the unit
The HygroMatik reverse osmosis units are
IP20 protected. Make sure that the unit is not
object to dripping water in the mounting loca-
tion.
Do not install HygroMatik reverse osmosis
systems above electrical equipment such as
fuse boxes, electrical appliances, etc. In the
event of a leakage, leaking water can dam-
age the underlying electrical systems.
• Use genuine spare parts only
• After any repair work, have qualified
personnel check the safe operation of
the unit
• Attaching or installing of additional
components is permitted only with the
written consent of the manufacturer
2.1.5 Electrical
Risk of electrical shock!
Hazardous electrical voltage!
Any work on the electrical system to be per-
formed by certified expert staff (electricians
or expert personnel with comparable training)
only.
During maintenance or installation work, the
device must be disconnected from the power
supply and secured against being switched
on again. The absence of voltage must be
ensured by a measurement.
After electrical installation or repair work, test
all safety mechanisms (such as grounding
resistance).
Use only original fuses with the appropriate
amperage rating.
Regularly check the unit‘s electrical equip-
ment. Promptly repair any damage such as
loose connections or burned wiring.
Responsibility for intrinsically safe installation
of the HygroMatik reverse osmosis unit is
incumbent on the installing specialist com-
pany.
NOTICE
NOTICE
NOTICE
WARNING
!
NOTICE

Page 10
3. Transport
3.1 Overview
Proceed carefully when transporting the
reverse osmosis unit in order to prevent dam-
age due to stress or careless loading and
unloading.
Protect the device from moisture during
transport; the storage and shipping tempera-
ture is 5° to 40°C.
3.2 Interim Storage
Store the unit in a dry place and protect from
frost and strong sunlight.
3.3 Check for complete and cor-
rect delivery of goods
Upon receipt of the unit, confirm that:
•model and serial number on the
name plate match those specified in
the order and delivery documents
•the equipment is complete and all
parts are in perfect condition
In case of damage from shipment and/or
missing parts, immediately notify the carrier
or supplier in writing.
Time limits for filing freight claims with ship-
ping companies are*:
* Time limits for some services subject to change.
3.4 Scope of delivery
WL-ROC
• reverse osmosis unit incl. control
• 2 membranes (WL-ROC-25: only 1
membrane)
• 1 prefilter (WL-ROC-140: 2 prefilters)
• manual
• connection material: permeate hose
(5m), concentrate hose (1.5m), screw-
in connector (3/4" to 15mm JG)
WL-ROL
• Reverse osmosis unit incl. control
• 4 membranes (WL-ROL-160 and 320:
only 2 membranes)
• 2 prefilters (5/10 µm)
• manual
• connection material: 2 screw-in
connectors 3/4" to 15mm JG (only WL-
ROL160 - 600)
• Antiscalant canister (for device versi-
ons with integrated antiscalant pump)
Options:
• Retrofit antiscalant WL-ROC-140
• Retrofit kit blending WL-ROC-140
•
Retrofit kit blending
WL-ROC-25/-40/-80
•UV-lamp
• expansion vessel
The scope of delivery does not include pipe
clamps for fastening or stabilising the con-
nection material to the specific wall or ceiling.
Shipping company After receipt of
goods
Carriers no later than 4 days
Parcel service immediately
Please note
Please note

Page 11
4. Function and structure
4.1 Mode of operation
General principle of reverse osmosis
Osmosis is a natural process, it is understood
as the one-sided diffusion of a liquid (here the
feed water) through a semi-permeable mem-
brane. A semi-permeable membrane is only
permeable for certain substances..
As the liquid moves through a semi-permea-
ble membrane, the pressure on the side with
the lower concentration decreases and at the
same time the pressure of the more concen-
trated solution increases until a balance is
reached, stopping the water flow. Pressure
difference between the two liquids is called
"osmotic pressure".
Reverse osmosis, on the other hand, is a
technical process in which the natural pro-
cess is reversed. It involves applying a pres-
sure higher than the osmotic pressure to the
concentrated liquid so that the water flows in
the opposite direction through the semi-per-
meable membrane and thus separates the
salts solved in the water.
Using this principle, water can be demineral-
ized for drinking water as well as for process
and industrial applications.
4.2 Influencing factors
The performance of the reverse osmosis
membrane depends strongly on the following
parameters:
Water inlet pressure at the membrane:
By lowering the working pressure, a reduc-
tion in permeate production can be achieved.
By increasing the working pressure, an
increase in permeate production is also
achieved.
The pump pressure can be changed by turn-
ing the screw on the pump (see chapter 8.4).
Be careful not to exceed the maximum pump
pressure!
Salt content of the feed water:
The higher the salt content, the faster the
membrane wear.
Temperature of the feed water:
The WL-ROC unit is set up for a feed water
temperature of 15°C. Any difference from this
temperature will affect the production quan-
tity and the quality of the permeate.
The following table shows the variation of the
permeate production quantity by 3% per dif-
fering 1°C.
The colder the feed water, the lower the per-
meate production and the better/lower the
conductivity.
The warmer the feed water, the higher the
production quantity, but the lower the perme-
ate quality.
Temperature 15 °C + 1 + 2 + 3 + 4 + 5 + 6 + 7 + 8
Correction factor 1 1,03 1,06 1,09 1,12 1,15 1,18 1,21 1,25
Temperature 15 °C- 1- 2- 3- 4- 5- 6- 7- 8
Correction factor 1 0,96 0,92 0,88 0,84 0,8 0,77 0,74 0,7

Page 12
4.3 Operating conditions of the
unit
The WL-ROC system can be fed with water
from the normal water supply if the water has
a maximum hardness up to 20°dH.
In order to avoid a reduction of the operating
capacity, the water to be treated must comply
with certain parameters:
turbidity < 1 NTU
Iron < 0,15 ppm
Manganese < 0,05 ppm
Aluminium < 0,05 ppm
SDI (Silt Density Index) < 3
Water temperature 5 to 25 °C
Free chlorine < 0.25 ppm
Hardness < 20 °dH(30 °F)
Oil and fat < 0.1 mg/l
COD < 10 mg/l
TOC < 3 mg/l
TDS < 1000μS/cm
SiO2 < 15 ppm
SO4 < 75 ppm
In some cases the reverse osmosis unit can-
not be fed with water from the normal water
supply because some elements contained in
the water (free chlorine, iron, suspended sol-
ids, hardness minerals) would disturb the
osmotic process and damage the mem-
branes, sometimes irreversibly.
In these cases a pre-treatment is necessary,
e.g: De-ironing, de-chlorination, softening
with resins or chemical softening (dosing
pump with anti-fogging agent), depending on
the characteristics of the water to be treated.
4.4 Operating sequence
The feed water (raw water) is pumped
through the pre-filter, which guarantees the
de-chlorination and a final filter capacity of 5
µm. This ensures the necessary clarity of the
water at the membrane inlet. The feed water
pressure must be at least 2 to 5 bar during
normal operation to ensure a correct supply
pressure at the pump inlet.
The water then flows through the water inlet
solenoid valve SV1 and is then directed by
the pressure pump at high pressure to the
membrane(s).
The pressure switch PSHIGH provides a sig-
nal when the pressure exceeds 10 bar at the
membrane inlet (WL-ROC140 only).
Pure water (permeate) passes through the
membrane; the salts solved in the water are
retained by the membrane and drained off
(concentrate).
The permeate now flows via the pure water
line (scope of delivery) to the expansion ves-
sel or the permeate collecting tank.
The quality of the permeate leaving the sys-
tem is controlled by the conductivity sensor
(ECPROBout).
The production process stops automatically
when the water outlet pressure has reached
4 bar at the pressure switch PSMAX. The
pressure in the following circuit is kept con-
stant by the expansion vessel.
If the pressure in the following circuit at the
pressure switch PSMIN falls below 2 bar
(when the expansion vesel is empty), the unit
starts permeate production again.
If the inlet pressure falls below 0.8 bar, the
pressure switch PSLOW gives the corre-
sponding alarm and interrupts operation.
The reverse osmosis (R.O.) units of the WL -
ROC series should not operate without an
expansion vessel or permeate collecting
tank.
NOTICE

Page 13
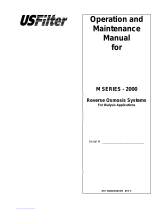
4.5 Mechanical construction
WL-ROC-140
2
4
12
11
10
9
14
15
17
16
5
1
Ø 10
Ø 8
7
8
13
6
3
21
WL-ROC- 25 to -80
Humidifier
1 Prefilter/ CB-EC activated carbon filter* 8 Pressure gauge (permeate) / PI 15 T-piece connection expansion vessel
2 Pressure gauge (feed water) / PI 9 Membrane pressure pipe 16 Expansion vessel
3 Water inlet solenoid valve 10 Pressure switch / PS MIN 17 Manual control valve / RV
4 Pressure switch PS HIGH 11 Pressure switch / PS MAX 18 Flush valve (solenoid valve)
5 control 12 Flow limiter concentrate 19 Pressure switch / PS LOW
6 Rotary vane pump 150 l/h 13 Concentrate pipe 20 Prefilter sediment / CPP*
7 Engine 14 Permeate pipe 21 Conductivity sensor
2
4
11
10
9
14
5
1
Ø 10
Ø 10
7
8
13
6
319
18
20
21
* activated carbon filter
• WL-ROC-25 - 80: 5μ
• WL-ROC-140: 10μ
** sediment filter
• only WL-ROC-140
The devices of the Hygro-
Matik WL-ROC series are
designed for wall moun-
ting.

Page 14
5. Installation arrangement
The following illustration shows an example of
the installation arrangement of the reverse
osmosis system, a pressure expansion vessel
and existing consumers heatersteam humidi-
fier or adiabatic humidifier.
A: consumer
B:
max. 15 metres (25 metres with fixed piping) total pipe
length between the UO-system and the last consumer.
C: concentrate P: permeate
1: BA" ¾" system separator
2: WL-ROC-XX incl. connection material
3: Waste water connection set
4:
Permeate quality blending kit (incl. needle valve and
conductivity sensor, only for electrode steam humidifier)
5: Expansion vessel
6:
UV disinfection with transformer, screw-in connectors
7: Connection set for another unit
8: Stainless steel pressure gauge 0-6 bar with fitting
and stopcock for expansion vessel (only for 100-500l)
10: shut-off by free-flow valve or stopcock.
11: Connection set expansion vessel
12: Screw-in connector 3/4"
WL-ROC unit with standing expansion vessel (80 - 500 Liter)
WL-ROC unit with wall-mounted expansion vessel (18/40 Liter)

Page 15
5.1
Flowchart
1
4
CVFR
5μ
LOW MIN MAX
FR
CV
CV CV
BV
2
3
SV
F Prefilter
CV Non-return valve
PS Pressure switch
BV Manual ball valve
C.P. Control
FR Flow limiter
SV Solenoid valve
PI Pressure gauge
EV Expansion vessel
RV Manual control valve
EC Conductivity sensor
1 Feed water
2Permeat
3 Concentrate
4 Blending kit

Page 16
12
3
4
4BV
CV
CV
CV FR
FR
5μ
LOW MIN MAX
SV
F Prefilter
CV Non-return valve
PS Pressure switch
BV Manual ball valve
C.P. Control
FR Flow limiter
SV Solenoid valve
PI Pressure gauge
EV Expansion vessel
RV Manual control valve
EC Conductivity sensor
1 Feed water
2Permeat
3Concentrate
4 Blending kit

Page 17
1
2
3
4
4BV
CV
CV
CVCV FRFR
LOW HIGH MIN MAX
CPP
10μ
SV
SV
F Prefilter
CV Non-return valve
PS Pressure switch
BV Manual ball valve
C.P. Control
FR Flow limiter
SV Solenoid valve
PI Pressure gauge
EV Expansion vessel
RV Manual control valve
EC Conductivity sensor
1 Feed water
2Permeat
3Concentrate
4 Blending kit

Page 18
6. Mechanical installation
Risk of foot injuries!
Prevent unit from dropping during installation!
Helping hand of a second person is advisa-
ble.
Risk of electrical shock!
Hazardous electrical voltage.
During installation, the unit must be discon-
nected from power supply and secured
against being switched on again. The
absence of voltage must be ensured by a
measurement.
6.1 Environment Parameters to
be met and Mounting Recom-
mendations
When selecting the installation site for the
reverse osmosis unit, take the following into
account:
• The minimum clearances indicated in
the fitting measures section must be
observed in order to ensure adequate
unit ventilation and allow for unob-
structed access in case of maintenance
• Protection class IP20
• By design, HygroMatik reverse osmo-
sis units are not qualified for outdoor
installation (electronical components
and water-bearing parts may be dam-
aged)
• Ambient temperature must lie between
+5 and +40 °C (+41 and +104 °F) in
order to protect the unit electronics
against damage; frost may damage
the solenoid valve and pump, as well
as make hoses burst.
• Avoid environments with excessive
humidity, as it could have negative
effects on the electronics.
• Installation in closed rooms requires
aeration and, if necessary temperature
conditioning in order to meet the envi-
ronmental conditions.
• Make use of existing water connections
for supply and draining.
• Mount the unit on a stable, preferably
solid wall with the required load-bear-
ing capacity required (s. unit technical
specifications). If such a wall is not at
hand, the unit may be attached to a
stand bracket firmly anchored to the
floor.
• For correct operation it is necessary
that the unit is mounted vertically and
horizontally perpendicular.
• The optimal feed water pressure of the
reverse osmosis (RO) units is in the
range of 2 bar to 5 bar. If these values
are not reached, the installation of a
pressure reducer or a booster pump is
necessary.
• The on-site waste water connection
must be a free outflow according to DIN
EN 1717.
• The installation room must be well ven-
tilated and equipped with a floor drain.
Alternatively, a water stop device (e.g.
leakage detector) can be used.
• Install the reverse osmosis unit as
close as possible to the consumer /
humidifier. The maximum distance is 15
metres.
WARNING
!
WARNING
!

Page 19
6.2 Installation steps
6.2.1 Feed water connection
» Connect the feed water inlet to the
system. The diameter of the raw
water pipe must be at least equal to
the diameter of the connection
piece.
» Observe the information in the tech-
nical data.
» Connect a shut-off valve upstream
of the system.
6.2.2 Permeate line connection
» A short piece of hose is installed at
the outlet port of the permeate in the
factory. Remove this and replace it
with the white hose Ø10 mm
(included in the scope of delivery).
Never use the RO unit with the permeate line
closed!
6.2.3 Connection of the expansion
vessel
» Mount the holder* of the expansion
tank on a stable wall.
» Seal the thread of the holder* (e.g.
with Teflon tape).
» Mount the expansion tank on the
holder*.
» Install the adapter* under the holder.
» Connect the following fitting to the
Ø10 ball valve with a piece of white
hose (diameter 10 mm).
» With the rest of the hose, connect
the ball valve to the T-piece.
The expansion tank should be installed 3 - 5
m close to the R.O. unit.
Do not connect the permeate line to the
expansion vessel until all other commission-
ing steps (especially flushing the mem-
branes) have been completed.
* Included in the delivery of the optionally available
expansion vessel.

Page 20
6.2.4 Connection of the concentrate
line
» Connect the free connection of the
flow limiter (with integrated back-
flow preventer) with the black hose
(Ø see technical data) with slope to
a free flow.
Ensure a free outlet and discharge according
to DIN EN 1717. Pay attention to the mini-
mum requirement for the free flow distance
(between the drain hose and the siphon) of
26 mm to prevent microbial contamination.
The colour of the supplied hoses indicates
their use:
White: for permeate Black: for concentrate
(PE hose connection: "John Guest" plug connection)
6.2.5 Inserting the prefilter car-
tridge(s)
Before installing the filter set in the preffilter
container, it must be ensured that the feed
water line is closed and thus no pressure is
applied.
» Remove the filter container(s) using
the screw driver supplied.
» Then install the new filter insert as
shown.
» Refit the filter container(s) and
screw tight.
If there are two prefilters (WL-ROC-140),
insert the green activated carbon filter first.
Prefilter and membrane position
Fig.WL-ROC-25
6.2.6 Inserting the membrane(s)
Before installing the membranes in the mem-
brane container, it must be ensured that
• the feed water line is closed and thus
no pressure is applied.
• the unit is out of power.
WL-ROC-25/-40/-80:
» Unscrew the cap of the membrane
container and install the membrane.
» Pay attention to the installation
direction (black lip seal downwards).
» Make sure that the membrane is
correctly inserted.
» Tighten the closure of the mem-
brane container.
/