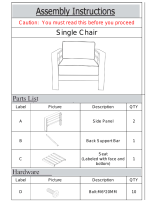
Noble House 303472 is a stylish and comfortable chair designed for both indoor and outdoor use. With its sturdy construction and easy-to-assemble design, this chair is perfect for relaxing in your living room, patio, or backyard.
Some of the key features of the Noble House 303472 include:
- Durable construction: The chair is made from high-quality materials that are resistant to fading, moisture, and UV rays. This makes it ideal for use in all types of weather conditions.
- Comfortable design: The chair has a contoured seat and back that provide excellent support and comfort. The seat cushion and back cushion are also filled with high-density foam for added comfort.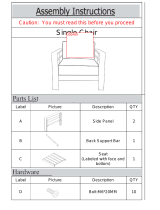


-
 1
1
-
 2
2
-
 3
3
-
 4
4
-
 5
5
-
 6
6
-
 7
7
-
 8
8
-
 9
9


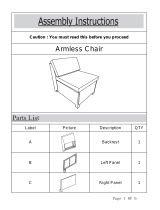
Noble House 303472 is a stylish and comfortable chair designed for both indoor and outdoor use. With its sturdy construction and easy-to-assemble design, this chair is perfect for relaxing in your living room, patio, or backyard.
Some of the key features of the Noble House 303472 include:
- Durable construction: The chair is made from high-quality materials that are resistant to fading, moisture, and UV rays. This makes it ideal for use in all types of weather conditions.
- Comfortable design: The chair has a contoured seat and back that provide excellent support and comfort. The seat cushion and back cushion are also filled with high-density foam for added comfort.
Ask a question and I''ll find the answer in the document
Finding information in a document is now easier with AI
Related papers
-
Noble House 11852 User manual
-
 Noble House 82653 Operating instructions
-
Noble House 9495 Operating instructions
-
 Noble House 306487 Operating instructions
-
 Noble House 300489 Operating instructions
-
 Noble House 11448 Operating instructions
-
 Noble House 8115 Operating instructions
-
 Noble House 301053 Operating instructions
-
 Noble House 39723 Installation guide
-
 Noble House 53081 Operating instructions


Other documents
-
Patio Festival PF19120-B Operating instructions
-
 Baxton Studio 28862-5274-HD Operating instructions
-
 LOKATSE AC18803G User guide
-
 LOKATSE AC18804D Operating instructions
-
Angel Sar AA000155 Installation guide
-
Elegant Home Fashions HDTCHR1001 Operating instructions
-
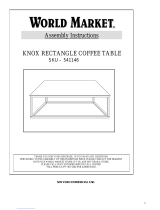 World Market KNOX RECTANGLE COFFEE TABLE Assembly Instructions
-
 Flash Furniture BZ100NVY Operating instructions
-
 New Classic FURNITURE Tamarack Installation guide
-
Kmart 42953388 User manual


