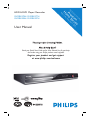
Philips DVDR3595H/05 User manual
- Category
- DVD players
- Type
- User manual
This manual is also suitable for

HDD & DVD Player / Recorder
DVDR3575H / DVDR3577H
DVDR3595H / DVDR3597H
Premium
Home Service
This product comes with
Refer to the inside page for details.
Read your Quick Start Guide and/or User Manual rst for quick tips
that make using your Philips product more enjoyable.
Register your product and get support
at www.philips.com/welcome
User Manual

English
2
Dear valued customer,
T
hank you for buying a Philips DVD Recorder.
Your product comes with the Philips ‘Premium Home Service’ warranty.
Should you require any assistance in operating your set, Philips offers you professional support via:
Philips Support Center website
www.philips.com/support
or
Philips Consumer Care Helpline *
where our trained representatives will guide you, step-by-step, to solve any issues you have.
If we are unable to provide a solution, Philips will be pleased to pick-up your DVD Recorder from your home; and provide
a service replacement set, within 7 days. That’s the Philips ‘Premium Home Service’ commitment to you. This service comes
free-of-charge (except for Consumer Care Helpline) and applies to all Philips DVD Recorders during the Philips warranty
period.
For more information, please contact a representative via the Philips Consumer Care Helpline.
* Refer to the back page of this manual for the Philips Customer Care phone number in your country.
Please have with you the model number, serial number and purchase date of your product when contacting Philips Customer Care..
United Kingdom, Ireland
Premium Home Service

English
3
VIDEO Plus+® is a registered trademark of
Gemstar Development Corporation. The
VIDEO Plus+® system is manufactured
under license from Gemstar Development
Corporation.
Manufactured under license from Dolby
Laboratories. “Dolby”, “Pro-Logic” and the
double-D symbol are trademarks of Dolby
Laboratories.
DivX Ultra Certi ed products: “DivX,
DivX Ultra Certi ed, and associated
logos are trademarks of DivX, Inc. and
are used under license.
Important notes for users in U.K.
Mains plug
This apparatus is tted with an approved 13
Amp plug. To change a fuse in this type of plug
proceed as follows:
1 Remove fuse cover and fuse.
2 Fix new fuse which should be a BS1362
5 Amp, A.S.T.A. or BSI approved type.
3 Re t the fuse cover.
If the tted plug is not suitable for your socket
outlets, it should be cut off and an appropriate
plug tted in its place.
If the mains plug contains a fuse, this should
have a value of 5 Amp. If a plug without a fuse
is used, the fuse at the distribution board
should not be greater than 5 Amp.
Note: The severed plug must be disposed off to
avoid a possible shock hazard should it be
inserted into a 13 Amp socket elsewhere.
How to connect a plug
The wires in the mains lead are coloured with
the following code: blue = neutral (N),
brown = live (L).
As these colours may not correspond with the
colour markings identifying the terminals in your
plug, proceed as follows:
– Connect the blue wire to the terminal
marked N or coloured black.
– Connect the brown wire to the terminal
marked L or coloured red.
– Do not connect either wire to the earth
terminal in the plug, marked E (or e) or
coloured green (or green and yellow).
Before replacing the plug cover, make certain
that the cord grip is clamped over the sheath of
the lead - not simply over the two wires.
Copyright in the U.K.
Recording and playback of material may require
consent. See Copyright Act 1956 and The
Performer’s Protection Acts 1958 to 1972.
HDMI, and HDMI logo and High-De nition
Multimedia Interface are trademarks or
registered trademarks of HDMI licensing
LLC.

English
4
This product complies with the radio
interference requirements of the
European Community.
This product complies with the
requirements of the following
directives and guidelines:
2006/95/EC + 2004/108/EC
This product incorporates copyright protec-
tion technology that is protected by US
patents. Use of this copyright protection
technology must be authorised by Macrovi-
sion, and is intended for home and other
limited viewing uses only unless otherwise
authorised by Macrovision. Reverse
engineering or disassembly is prohibited.
U.S. Patent Number 4,631,603; 4,819,098;
4,907,093; 5,315,448; and 6,516,132
CAUTION
VISIBLE AND INVISIBLE LASER
RADIATION WHEN OPEN. AVOID
EXPOSURE TO BEAM
Disposal of your old product
Your product is designed and manufactured with high quality materials
and components, which can be recycled and reused.
When this crossed-out wheeled bin symbol is attached to a product it
means the product is covered by the European Directive 2002/96/EC.
Please inform yourself about the local separate collection system for
electrical and electronic products.
Please act according to your local rules and do not dispose of your old products with
your normal household waste. The correct disposal of your old product will help
prevent potential negative consequences for the environment and human health.

English
5
LASER
Type Semiconductor laser
InGaAlP (DVD)
AIGaAs (CD)
Wave length 658 nm (DVD)
90 nm (CD)
Output Power 30 mW (DVD+RW write)
1.0 mW (DVD read)
1.0 mW (CD read)
Beam divergence 84 degrees (DVD)
61 degrees (CD)
For Customer Use:
Read carefully the information located at
the bottom or rear of your DVD
Recorder and enter below the Serial No.
Retain this information for future
reference.
Model No. DVD/HDD RECORDER
DVDR3575H, DVDR3577H,
DVDR3595H, DVDR3597H
Serial No. _______________
CAUTION!
This unit does not contain any user-
serviceable parts. Please leave all
maintenance work to quali ed
personnel.

English
6
Table of Contents
General
Care and Safety Information .......................................................................................... 8
Setup precautions .................................................................................................................................................8
Cleaning discs ........................................................................................................................................................8
Hard Disk Drive (HDD) handling care...........................................................................................................8
Energy saving message ........................................................................................................................................8
Product Information ....................................................................................................... 9
In troduc tion ...........................................................................................................................................................9
Accessories supplied ...........................................................................................................................................9
Region codes ..........................................................................................................................................................9
Special features ............................................................................................................................................10~11
Product Overview
Remote Control ........................................................................................................ 12~14
Using the remote control ................................................................................................................................14
Main Unit ......................................................................................................................... 15
Connections & Setup
Step 1: Basic Recorder Connections ......................................................................16~18
Connecting the antenna cables ......................................................................................................................16
Connecting the video/audio cables ........................................................................................................17~18
Step 2: Optional Connections .................................................................................19~23
Connecting to a Cable Box or Satellite Receiver .....................................................................................19
Connecting to a VCR or other similar device ........................................................................................... 20
Connecting to a VCR and Cable Box/Satellite Receiver .........................................................................21
Connecting to an AV ampli er/receiver ..................................................................................................... 22
Connecting to a camcorder ............................................................................................................................23
Step 3: Installation and Set-up ............................................................................... 24~25
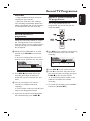
Watch TV
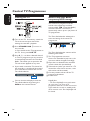
Control TV Programmes ....................................................................................... 26~28
Viewing live TV....................................................................................................................................................26
About Time Shift buffer - temporary HDD storage ....................................................................... 26~27
Pause live TV function ...................................................................................................................................... 28
Instant replay function ..................................................................................................................................... 28
FlexTime function .............................................................................................................................................. 28
Main Menu
Using the Home menu ............................................................................................ 29~30
About the Home menu .....................................................................................................................................29
Viewing media information ............................................................................................................................. 30
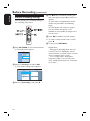
Recording
Before Recording ......................................................................................................31~34
Recording media .................................................................................................................................................31
Default recording settings ....................................................................................................................... 32~34
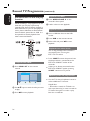
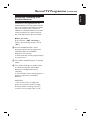
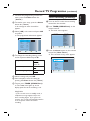
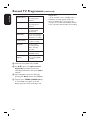
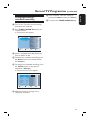
Record TV Programmes ......................................................................................... 35~41
Record current TV programme .....................................................................................................................35
Record a speci c section of TV programmes ...........................................................................................35
Simultaneous record and play function ........................................................................................................36
Automatic recording from Satellite Receiver .............................................................................................37
About timer recording ..................................................................................................................................... 38
Timer recording (VIDEO Plus+ system) .............................................................................................. 39~39
Timer recording (manually) .....................................................................................................................39~40
Changing/Deleting a scheduled recording ...................................................................................................41
Record from external devices ................................................................................ 42~44
Recording from an external device (Camcorder/VCR/DVD player) ...................................................42
Recording from a DV Camcorder .........................................................................................................43~44

English
7
Table of Contents
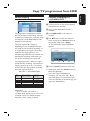
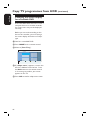
Copy TV programmes from HDD......................................................................... 45~46
About copying .................................................................................................................................................... 45
Copying recordings to recordable DVD..................................................................................................... 45
Changing the screen display for recordable DVD ................................................................................... 46
Copy Files
Copy les between HDD, USB and DVD ............................................................. 47~48
Copying les from HDD to USB or recordable DVD .............................................................................47
Copying les from USB to HDD or recordable DVD ............................................................................ 48
Copying les from CD/DVD to HDD or USB .......................................................................................... 48
Playback
Playback from HDD .................................................................................................49~51
Hard Disk navigation .........................................................................................................................................49
Basic operation ...................................................................................................................................................50
Delete/Lock/Protect a title in the HDD .....................................................................................................51
Repeat hard disk playback ................................................................................................................................51
Playback from USB device ............................................................................................ 52
Playback from Disc .................................................................................................. 53~55
Playable discs .......................................................................................................................................................53
Starting disc playback ................................................................................................................................ 53~55
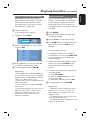
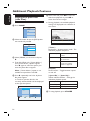
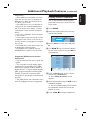
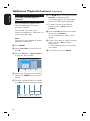
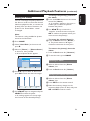
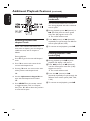
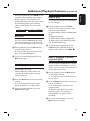
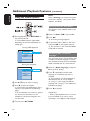
Additional Playback Features ................................................................................ 56~63
Edit Recordings
Edit Recordings - Hard Disk ................................................................................... 64~68
Changing the title name ................................................................................................................................... 64
Selecting the genre ............................................................................................................................................ 64
Video editing ................................................................................................................................................65~68
Edit Recordings - Recordable DVD ........................................................................69~74
About editing recordable DVDs ....................................................................................................................69
Changing the disc/title name ...........................................................................................................................70
Making the edited DVD±RW compatible ...................................................................................................70
Deleting all recordings/titles ...........................................................................................................................70
Finalising the DVD±R for playback ................................................................................................................71
Deleting a recording/title .................................................................................................................................71
Lock/Unlock the disc for playback ............................................................................................................... 72
Protecting the recorded titles (DVD±RW) ............................................................................................... 72
Video editing ................................................................................................................................................ 73~74
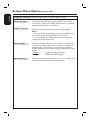
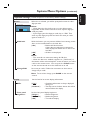
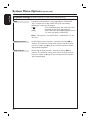
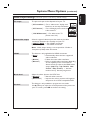
System Settings
System Menu Options ............................................................................................. 75~85
System menu navigation ...................................................................................................................................75
Language settings ................................................................................................................................................76
Playback settings ......................................................................................................................................... 77~78
Video Output settings .......................................................................................................................................79
Audio settings ..................................................................................................................................................... 80
Analogue Tuner settings ........................................................................................................................... 81~83
Set up settings ............................................................................................................................................ 84~85
Other
Other Information ..........................................................................................................86
Installing the latest software .......................................................................................................................... 86
Copyright notice ................................................................................................................................................ 86
Frequently Asked Questions ...................................................................................87~89
Troubleshooting ....................................................................................................... 90 ~95
Display panel symbols/messages ........................................................................... 96~97
Glossary..................................................................................................................... 98~99
Speci cations ................................................................................................................ 100

English
8
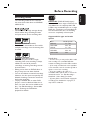
Cleaning discs
CAUTION!
Risk of damage to discs! Never use
solvents such as benzene, thinner,
cleaners available commercially, or anti-
static sprays intended for discs.
Wipe the disc with a micro bre cleaning
cloth from the centre to the edge in a
straight line movement.
Hard Disk Drive (HDD)
handling care
To avoid damage to the hard disk and
losing important data:
– Do not move the recorder or subject
it to vibration whilst in operation.
– Do not remove the AC power plug
from the mains socket without switching
the recorder to standby mode.
It is recommended to archive important
recording to a recordable DVD as
backup.
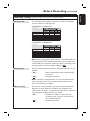
Energy saving message
In order to minimise the power
consumption in standby mode, we
recommend you to leave this unit with
Eco mode enable and turn off the front
panel display brightness. See Playback
settings - { Display } option and Setup
settings - { Eco mode } option.
Care and Safety Information
IMPORTANT NOTE!
DO NOT disconnect the recorder from
the power supply unless you are intending
not to use this product for a long period
of time. Power is needed to enable the
recorder to perform essential tasks like
timer recordings and automatically
updating the system date/time.
Setup precautions
Finding a suitable location
– Place this unit on a at, hard and
stable surface. Do not place the unit on a
carpet.
– Do not place this unit on top of other
equipment that might heat it up (e.g.,
receiver or ampli er).
– Do not put anything under this unit
(e.g., CDs, magazines).
– Install this unit near the AC outlet
where the AC power plug can be easily
reached.
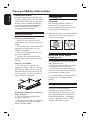
Space for ventilation
– Place this unit in a location with
adequate ventilation to prevent internal
heat build up. Allow at least 10 cm (4”)
clearance from the rear and the top of
this unit and 5cm (2”) from the left and
right to prevent overheating.
10cm )
10cm
5cm
5cm
Avoid high temperature, moisture,
water and dust
– This unit must not be exposed to
dripping or splashing.
– Do not place any object or items that
can damage this unit (e.g., liquid lled
objects, lighted candles).

English
9
Introduction
This DVD/Hard Disk Drive (HDD)
recorder changes the way you watch TV.
You have full control over the TV
programmes you watch, because the
Time Shift Buffer function stores all the
programmes that the recorder is tuned
to. You can ‘pause’ TV programmes with
Pause Live TV function, or repeat any
scene with the Instant Replay function.
Recording has never been easier with the
built-in Hard Disk Drive, you can record
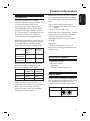
up to 180~300 hours of video in SEP
(Super Extended Play) recording mode.
Model Hard Disk
Drive
(HDD)
Maximum
recording
hours
DVDR3575H
DVDR3577H
160 GB 180
DVDR3595H
DVDR3597H
250 GB 300
On top of that, you can store the DivX
movies, music les and digital camera
photos in the HDD Media Jukebox.
DVDR3575H
DVDR3577H
DVDR3595H
DVDR3597H
DivX les 150 270
Photos 10,000 10,000
Music les 4,500 7,000
When you want to save or share a
recording, simply copy it to a recordable
DVD. You can also copy recordings
from your video camera or camcorder
through the i-Link connection.
Before you can start using this recorder,
you must complete the basic connection
and initial recorder set-up in three simple
steps.
Step 1: Basic recorder connections.
Step 2: Optional connections for other
devices.
Step 3: Installation and set-up.
Please take time to read this user manual
before using your recorder. It contains
important information and notes
regarding the operation of your DVD
recorder.
Helpful Hint:
– Refer to the type plate at the rear or
bottom of the product for identi cation and
supply ratings.
Accessories supplied
– Quick Start Guide
– RF antenna cable
– Scart cable
– Remote control and batteries
Region codes
DVD movies are usually not released at
the same time in all regions of the world,
thus all DVD players/recorders are
programmed to a speci c region code.
Countries DVD Region code
Europe
ALL
2
Product Information

English
10
Special features
Pause Live TV
Every TV programme is now under your
control, allowing you to take a break
without missing a moment. You can
pause any live TV programme by simply
pressing PAUSE LIVE TV button and
resume playback by pressing the PAUSE
LIVE TV button again. You can now
continue watching the remainder of the
programme or if you want to return to
the live TV programme again, just press
the LIVE TV button.
Instant Replay
You can repeat any scene of a live TV
programme by pressing the REPLAY ()
button, as often as you like. If you wish
to return to the live TV programme
again, just press the LIVE TV button.
To enjoy Instant Replay, you need to
turn your recorder on and watch your
favourite TV programmes via your
recorder.
FlexTime
You can be truly exible with your time
now with FlexTime. FlexTime allows you
to start watching a TV programme while
it is still being recorded, you do not need
to wait for the recording to nish before
starting to watch it. Alternatively, you
can also watch another earlier recorded
programme, play a DVD or DivX movie
or enjoy some music while the recorder
is recording the TV programme.
Product Information (continued)
Time Shift Buffer (TSB)
As soon as you turn on your recorder,
the TV channel it is tuned to will be
stored into the Time Shift Buffer. Think
of this as a temporary storage for TV
programmes allowing you great exibility.
It can contain up to 6 (six) hour of TV
programmes and will automatically ush
anything that is older. You can mark
portions of the Time Shift Buffer and
copy them to your recordings list for
later viewing or copying to recordable
DVD. The recorder needs to be turned
on for the Time Shift Buffer to be active.
When the recorder is turned off, the
Time Shift Buffer is automatically cleared.
VIDEO Plus+
This is a simple programming system for
recorders. To use it, enter the
programming number associated with
your television programme. You can nd
this number in your favourite listings
magazine.
SAT Recording
This function enables you to record a
programme from your Satellite Receiver
or any other device. Make sure that the
device is connected to the
EXT2-TO VCR/SAT socket of this
recorder, and the timer setting has been
done on the connected device.

English
11
Follow TV
With this function you can align the
sequence of the channels on your TV
(analogue only) with those on your
recorder. This enhances the ef ciency of
the system for recordings. Make sure
you have connected the TV to the
EXT1 TO TV socket of this recorder.
* The Follow TV feature may not work
properly on every TV.
i.LINK
i.LINK, also known as ‘FireWire’ or ‘IEEE
1394’, is a digital connection for
connecting your camcorder to enable
you to make high quality copies of your
camcorder videos. The connector can be
found behind the front ap door.
Product Information (continued)

English
12
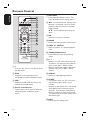
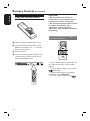
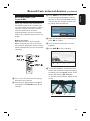
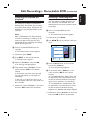
Remote Control
a 2
– Turns on this unit or turns off to normal
standby mode.
b CAM
– Switches to the camcorder that is
connected to the DV IN CAM2 socket.
c USB
– Switches to USB mode and shows the
content of the USB device.
d Colour coded buttons
– These buttons can be used to select the
coloured options available in some
menus.
e OPTIONS
– Enters/exits the Options menu. This
menu provides various setting options.
f : Cursor buttons for moving to the
left/right. In recorder’s Live TV mode,
replay or skip the scene by a speci ed
length of time.
: Cursor buttons for moving up/
down.
g OK
– Con rms an entry or selection.
h HOME
– Enters/exits the recorder’s Home menu.
i PREV í/ NEXTë
– Skips to previous or next title/chapter/
track.
j TIMER (VIDEO Plus+)
– Enters/Exits the timer programming
mode.
k P +-
– While in Live TV mode, select the next
or previous TV channel or the external
input source (EXT1, EXT2, CAM1).
– While in camcorder mode, select other
external input source (EXT1, EXT2,
CAM1).
l AUDIO
– Selects an audio language/channel.
m SCART
(only effective when your TV is connected
with the Scart cable to EXT1 of your
recorder)
– Switches to the device that is connected
to the EXT2 Scart connector of your
recorder. If no device is connected to
EXT2, it switches to TV preset instead.
To switch back to recorder mode, press
this button again.
n EDIT
– Enters/exits the editing menu.
SUBTITLE
INFO SELECT EDIT SCART
AUDIO
PAUSE LIVE TV
1
2
3
4
5
6
7
8
9
10
11
12
13
14

English
13
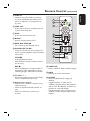
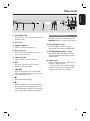
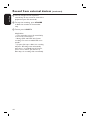
Remote Control (continued)
o
LIVE TV
– Switches to live TV mode. It activates
the Time Shift Buffer that allows you to
pause or replay the TV programme at
any time.
p HDD LIST
– Shows the list of your recordings stored
in the internal hard disk.
q DISC
– Shows the content of the disc.
r BACK
– Returns to the previous menu.
s REW m / FFW M
– Fast reverse or fast forward search.
t PAUSE LIVE TV u
– Pauses or resumes a live TV programme.
– Starts or pauses playback of any recorded
title or disc.
STOP x
– Stops playback/recording.
– Hold down this button to open or close
the disc tray.
REC z
– Starts recording the currently viewed TV
programme. Press repeatedly to set the
recording length in 30-minute increments.
u TV VOL +-
– Adjusts the volume of the TV (for Philips
TVs or compatible brands only).
v Alphanumeric keypad
– Used to enter numbers or letters (using
SMS style entry).
– Selects a chapter/track/title number to
play.
– Selects the recorder’s preset tuner
channel.
w SUBTITLE
– Selects a DVD or DivX subtitle language.
x INFO
– Displays on-screen information.
y SELECT
– Selects multiple les for copying or
deleting.
– Toggles between ‘T’ (title) and ‘C’
(chapter) selection during disc playback,
then use the í / ë keys to select the
previous or next title/chapter.
– Toggles between upper and lower case
characters while using the alphanumeric
keypad.
SUBTITLE
INFO SELECT EDIT SCART
AUDIO
PAUSE LIVE TV
16
17
23
24
25
18
19
20
21
15
22

English
14
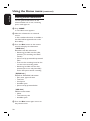
Remote Control (continued)
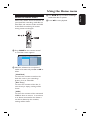
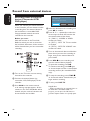
Using the remote control
A Open the battery compartment cover.
B Insert two batteries type R03 or AAA.
Match the indications (+-) inside the
battery compartment.
C Close the cover.
D Point the remote control directly at the
remote sensor on the front panel and
select the desired function.
SUBTITLE
INFO SELECT EDIT SCART
AUDIO
PAUSE LIVE TV
CAUTION!
– Remove batteries if they are
exhausted or if the remote control
is not to be used for a long time.
– Do not mix batteries (old and new
or carbon and alkaline, etc.).
– Batteries contain chemical
substances, they should be disposed
of properly.
Using the alphanumeric keypad to
enter the characters
SUBTITLE
INFO SELECT EDIT SCART
AUDIO
PAUSE LIVE TV
– Press a number button repeatedly until
the required character or the number
appears.
– To enter special symbols, press button
repeatedly.
– To select upper/lower case (capital/
small) letters, press SELECT.
– To enter a space, press button

English
15
Main Unit
a STANDBY-ON
– Turns on this unit or turns off to normal
standby mode.
b Disc tray
c OPEN CLOSE ç
– Opens or closes the disc tray.
d Display panel
– Shows information about the current
status of the recorder.
e HDD ACTIVE
– Lights up when access hard disk.
f u
– Pauses or resumes a live TV show.
– Starts or pauses playback.
. >
– Skips to the previous or next chapter/
track. Hold down the button to make a
reverse/forward search.
x
– Stops playback/recording.
g
z
– Starts recording the currently viewed TV
programme. Press repeatedly to set the
recording length in 30-minute increments.
– Lights up while recording is in progress.
Sockets behind the ap
Flip down the door as indicated by the
OPEN label at the right hand corner.
h DV IN-CAM2 socket
– Input for digital camcorders (also
referred to as FireWire or IEEE1394).
i VIDEO-AUDIO-CAM1 socket
– Composite video and audio inputs for
camcorder/DVD player/VCR or other
similar device.
j USB socket
– Input for USB ash drive, USB memory
reader or digital camera.
* Not all brands and models of digital
cameras are supported, except those
compliant with the PTP standard.

English
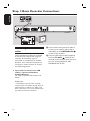
16
ANTENNA-IN
TV-OUT
TO TV
EXT1
TO VCR/SAT
EXT2
MAINS
HDMI
OUT
CVBS OUT
S-VIDEO OUT
VIDEO OUT
COAXIAL
DIGITAL OUT
AUDIO OUT
AUDIO
RL
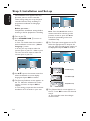
Step 1: Basic Recorder Connections
Connecting the antenna
cables
These connections enable you to watch
and record TV programmes using this
recorder. If the antenna signal is
connected via a Cable Box or Satellite
Receiver, ensure that these devices are
turned on in order to watch or record
the cable programmes.
If you want to connect to a VCR
and/or a separate Cable Box/
Satellite Receiver,
see ‘Step 2: Optional Connections’ for
details.
Helpful Hint:
– Depending on how you have currently
connected your TV channel (directly from an
off-air antenna or cable box or VCR), you’ll
have to disconnect some of the cables before
you make the antenna connection.
A Connect the existing Antenna cable (it
can be from the off-air wall socket or
Cable Box) to the ANTENNA-IN
socket on the recorder.
B Connect a RF antenna cable (supplied)
from the TV-OUT socket on the
recorder to the antenna input socket on
your TV (usually labelled as ANT,
ANTENNA IN, RF IN).

English
17
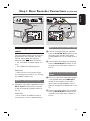
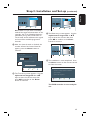
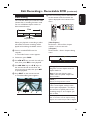
Step 1: Basic Recorder Connections (continued)
Connecting the video/audio
cables
This connection enables you to view the
playback from this recorder. You only
need to choose one of the options
below to make your video connection.
– For a standard TV, follow option 1, 2
or 3.
– For a HDMI TV, follow option 4.
Helpful Hint:
– Audio connection is only required if you
are connecting this recorder to your TV using
the S-VIDEO or CVBS socket.
Option 1: Using the Scart socket
Connect a scart cable (supplied) from the
EXT1-TO TV socket on the recorder
to the corresponding SCART socket on
the TV.
Helpful Hint:
– Use the EXT2- TO VCR/SAT socket for
connecting the recorder to additional device.
Option 2: Using the S-Video socket
A Connect a S-video cable (not supplied)
from the S-VIDEO OUT socket on the
recorder to the S-Video input socket
(usually labelled as Y/C or S-VHS) on the
TV.
B Connect the audio cables (not supplied)
from the AUDIO OUT sockets on the
recorder to the audio input sockets on
the TV.
Option 3: Using the Video (CVBS)
socket
A Connect a composite video cable (yellow
- not supplied) from the CVBS OUT
socket on the recorder to the video
input socket (usually labelled as A/V In,
Video In, Composite or Baseband) on the
TV.
B Connect the audio cables (not supplied)
from the AUDIO OUT sockets on the
recorder to the audio input sockets on
the TV.
ANTENNA-IN
TV-OUT
TO TV
EXT1
TO VCR/SAT
EXT2
HDMI
OUT
AUDIO
O
AUD
I
L
TV
Option 1
TO VCR/SAT
X
T2
HDMI
OUT
CVBS OUT
S-VIDEO OUT
VIDEO OUT
COAXIAL
DIGITAL OUT
AUDIO OUT
AUDIO
RL
TV
Option 2
Option 3
OR

English
18
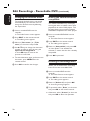
Step 1: Basic Recorder Connections (continued)
Option 4: Connecting to a HDMI-
compatible TV
HDMI (High De nition Multimedia
Interface) is a digital interface that allows
pure digital video/audio transmission
without the loss of image quality.
Connect a HDMI cable (not supplied)
from the HDMI OUT on the main unit
to the HDMI IN on a HDMI-compatible
device (e.g., HDMI TV, HDCP compliant
DVI TV).
Helpful Hints:
– Some HDMI TVs/monitors from different
manufacturers may adhere to different
standards resulting in unreliable signal
transfers.
– The HDMI connector is only compatible
with HDMI compliant devices and DVI-TVs.
– The teletext information will not be
accessible in the recorder’s live TV mode.
Note:
To enable HDMI connection, you must
set the recorder’s video output correctly.
A Make an addition video connection from
this recorder to your TV using Scart,
S-Video or Video (CVBS).
B Turn on your TV to the correct viewing
channel for the above video connection.
C When you have completed the
installation and set-up, change the video
output setting of this recorder as
follows:.
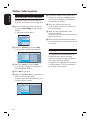
1) Press OPTIONS.
2) Move to { Settings } > { Video
output } > { Active video output }
> { HDMI output }, then press OK
to con rm.
D Switch your TV to the correct viewing
channel for the HDMI connection (refer
to your TVs user manual).
Option 4
ANTENNA-IN
TV-OUT
TO TV
EXT1
TO VCR/SAT
EXT2
M
A
HDMI
OUT
CVBS OUT
S-VIDEO OUT
VIDEO OUT
COAXIAL
DIGITAL OUT
AUDIO OUT
AUDIO
RL
TV

English
19
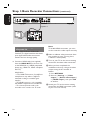
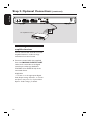
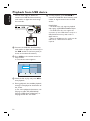
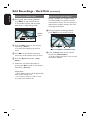
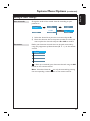
Connecting to a Cable Box or
Satellite Receiver
Option 1
If your Cable Box/Satellite Receiver
has only an antenna output socket
(RF OUT or TO TV),
see ‘Basic Recorder Connections -
Connecting the antenna cables’ for
details.
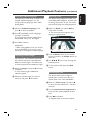
Option 2 (as shown on the above illustration)
If your Cable Box/Satellite Receiver
has a Scart output socket
A Keep the existing antenna connection
from the Cable Box/Satellite Receiver to
your TV.
B Connect a scart cable (supplied) from the
EXT1-TO TV socket on the recorder
to the corresponding SCART socket on
the TV.
C Connect another scart cable (not
supplied) from the EXT2-TO VCR/
SAT socket on the recorder to the Scart
socket (usually labelled as TV OUT or
TO VCR) on the Cable Box/ Satellite
Receiver.
ANTENNA-IN
TV-OUT
TO TV
EXT1
TO VCR/SAT
EXT2
MAINS
HDMI
OUT
CVBS OUT
S-VIDEO OUT
VIDEO OUT
COAXIAL
DIGITAL OUT
AUDIO OUT
AUDIO
RL
TV
B
C
Step 2: Optional Connections
Cable Box /
Satellite Receiver

English
20
ANTENNA-IN
TV-OUT
TO TV
EXT1
TO VCR/SAT
EXT2
MAINS
HDMI
OUT
CVBS OUT
S-VIDEO OUT
VIDEO OUT
COAXIAL
DIGITAL OUT
AUDIO OUT
AUDIO
RL
TV
VHF/UHF
RF IN
VHF/UHF
RF OUT
SCART OUT
SCART IN
B
C
D
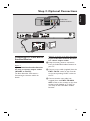
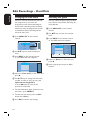
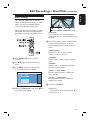
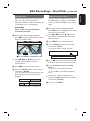
Step 2: Optional Connections (continued)
VCR (example only)
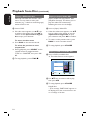
Connecting to a VCR or
other similar device
This connection enables you to record
from video tape to hard disk and allows
the VCR to be used for playback on the
TV if the recorder is turned off.
Note:
Your new recorder can replace the VCR
for all your recording needs. Just unplug
all the connections to your VCR.
A Connect the existing Antenna cable (it
can be from the off-air wall socket or
Cable Box) to the ANTENNA-IN
socket on the recorder.
B Connect a RF antenna cable (supplied)
from the TV-OUT socket on the
recorder to the antenna input socket on
your TV (usually labelled as ANT,
ANTENNA IN, RF IN).
C Connect a scart cable (supplied) from the
EXT1-TO TV socket on the recorder
to the corresponding SCART socket on
the TV.
D Connect another scart cable (not
supplied) from the EXT2-TO VCR/
SAT socket on the recorder to the Scart
socket (usually labelled as TV OUT or
TO TV) on the VCR.
Helpful Hints:
– Most commercial video cassettes and
DVDs are copy-protected and therefore
cannot be recorded.
– Connect the recorder directly to the TV. If
there is a VCR or an additional device in
between, the picture quality may be poor.
Page is loading ...
Page is loading ...
Page is loading ...
Page is loading ...
Page is loading ...
Page is loading ...
Page is loading ...
Page is loading ...
Page is loading ...
Page is loading ...
Page is loading ...
Page is loading ...
Page is loading ...
Page is loading ...
Page is loading ...
Page is loading ...
Page is loading ...
Page is loading ...
Page is loading ...
Page is loading ...
Page is loading ...
Page is loading ...
Page is loading ...
Page is loading ...
Page is loading ...
Page is loading ...
Page is loading ...
Page is loading ...
Page is loading ...
Page is loading ...
Page is loading ...
Page is loading ...
Page is loading ...
Page is loading ...
Page is loading ...
Page is loading ...
Page is loading ...
Page is loading ...
Page is loading ...
Page is loading ...
Page is loading ...
Page is loading ...
Page is loading ...
Page is loading ...
Page is loading ...
Page is loading ...
Page is loading ...
Page is loading ...
Page is loading ...
Page is loading ...
Page is loading ...
Page is loading ...
Page is loading ...
Page is loading ...
Page is loading ...
Page is loading ...
Page is loading ...
Page is loading ...
Page is loading ...
Page is loading ...
Page is loading ...
Page is loading ...
Page is loading ...
Page is loading ...
Page is loading ...
Page is loading ...
Page is loading ...
Page is loading ...
Page is loading ...
Page is loading ...
Page is loading ...
Page is loading ...
Page is loading ...
Page is loading ...
Page is loading ...
Page is loading ...
Page is loading ...
Page is loading ...
Page is loading ...
Page is loading ...
Page is loading ...
Page is loading ...
Page is loading ...
Page is loading ...
-
 1
1
-
 2
2
-
 3
3
-
 4
4
-
 5
5
-
 6
6
-
 7
7
-
 8
8
-
 9
9
-
 10
10
-
 11
11
-
 12
12
-
 13
13
-
 14
14
-
 15
15
-
 16
16
-
 17
17
-
 18
18
-
 19
19
-
 20
20
-
 21
21
-
 22
22
-
 23
23
-
 24
24
-
 25
25
-
 26
26
-
 27
27
-
 28
28
-
 29
29
-
 30
30
-
 31
31
-
 32
32
-
 33
33
-
 34
34
-
 35
35
-
 36
36
-
 37
37
-
 38
38
-
 39
39
-
 40
40
-
 41
41
-
 42
42
-
 43
43
-
 44
44
-
 45
45
-
 46
46
-
 47
47
-
 48
48
-
 49
49
-
 50
50
-
 51
51
-
 52
52
-
 53
53
-
 54
54
-
 55
55
-
 56
56
-
 57
57
-
 58
58
-
 59
59
-
 60
60
-
 61
61
-
 62
62
-
 63
63
-
 64
64
-
 65
65
-
 66
66
-
 67
67
-
 68
68
-
 69
69
-
 70
70
-
 71
71
-
 72
72
-
 73
73
-
 74
74
-
 75
75
-
 76
76
-
 77
77
-
 78
78
-
 79
79
-
 80
80
-
 81
81
-
 82
82
-
 83
83
-
 84
84
-
 85
85
-
 86
86
-
 87
87
-
 88
88
-
 89
89
-
 90
90
-
 91
91
-
 92
92
-
 93
93
-
 94
94
-
 95
95
-
 96
96
-
 97
97
-
 98
98
-
 99
99
-
 100
100
-
 101
101
-
 102
102
-
 103
103
-
 104
104


Philips DVDR3595H/05 User manual
- Category
- DVD players
- Type
- User manual
- This manual is also suitable for
Ask a question and I''ll find the answer in the document
Finding information in a document is now easier with AI
Related papers
-
Philips DVDR3577H User manual
-
-
-
-
-
-
-
-
-
Other documents
-
Tascam AUDIO RECORDER Operating instructions
-
Currys Essentials C1DVDB12 Quick start guide
-
Goodmans GDVD3607HDMI Quick start guide
-
DK Digital DVP-198 Owner's manual
-
Logik L3HDVD19 User manual
-
Magnavox DVDR77 Owner's manual
-
Daewoo DG-M13E1D User manual
-
Tesco HDMI Upscaling DVD Player User guide
-
Pioneer PRV-9200 User manual
-
ARISTONA 645 User manual