Page is loading ...

3
3
IMPORTANT SAFETY INSTRUCTIONS
LIGHTED BULB IS HOT!
WARNING: To reduce the risk of FIRE or INJURY TO PERSON:
• Turn off and allow to cool before replacing bulb.
• Bulb gets HOT QUICKLY! Contact switch only when turning off.
• DO NOT remain in light if skin feels warm. (Light is intense,
may cause “sunburn”)
• DO NOT look directly at lighted bulb.
• Keep materials away from bulb that may burn.
• Use ONLY with wattage specified or lower.
• DO NOT touch bulb at any time, use a soft cloth. Oil from skin
may damage bulb.
• DO NOT operate fixture with missing or damaged glass.
1) Pass fixture wire from center stem through stem and thread
end of stem to top of center stem.
2) Pass fixture wire through remaining stems and screw stems
together.
NOTE: Thread locking compound must be applied to all
stem threads as noted with symbol (3) to prevent accidental
rotation of fixture during cleaning, relamping, etc.
3) Pass fixture wire through end of swivel on canopy. Carefully
pull wires up through canopy. Thread swivel onto end of last
stem.
NOTE Align swivel to ceiling slope if needed.
4) TURN OFF POWER.
IMPORTANT: Before you start, NEVER attempt any work
without shutting off the electricity until the work is done.
a) Go to the main fuse, or circuit breaker, box in your
home. Place the main power switch in the “OFF”
position.
b) Unscrew the fuse(s), or switch “OFF” the circuit breaker
switch(s), that control the power to the fixture or room that
you are working on.
c) Place the wall switch in the “OFF” position. If the fixture
to be replaced has a switch or pull chain, place those in
the “OFF” position.
5) Find the appropriate threaded holes on mounting strap.
Assemble mounting screws into threaded holes.
6) Attach mounting strap to outlet box. (Screws not provided).
Mounting strap can be adjusted to suit position of fixture.
7) Make wire connections (connectors not provided.) Reference
chart below for correct connections and wire accordingly.
8) Push fixture to ceiling, carefully passing mounting screws
through holes in canopy.
9) Thread knurl knobs onto ends of mounting scrwes. Tighten
knurl knobs to secure fixture to ceiling.
10) Pass hole in bracket on outer shade over socket.
11) Fit glass inside outer shade. Pass hole in top of glass over
socket.
12) Thread socket ring onto socket. (DO NOT over tighten.)
13) Insert recommended bulb. CAUTION: DO NOT touch bulb
with bare hands. If this happens, clean bulb with denatured
alcohol and a lint free cloth.
14) Fit glass sleever over bulb. Carefully thread glass sleeve
onto socket. (DO NOT over tighten.)
Connect Black or
Red Supply Wire to:
Connect
White Supply Wire to:
Black White
*Parallel cord (round & smooth) *Parallel cord (square & ridged)
Clear, Brown, Gold or Black
without tracer
Clear, Brown, Gold or Black
with tracer
Insulated wire (other than green)
with copper conductor
Insulated wire (other than green)
with silver conductor
*Note: When parallel wires (SPT I & SPT II)
are used. The neutral wire is square shaped
or ridged and the other wire will be round in
shape or smooth (see illus.)
Neutral Wire
Date Issued: 1/1/16 IS-42384-CB
INSTRUCTIONS
For Assembling and Installing Fixtures in Canada
Pour L’assemblage et L’installation Au Canada
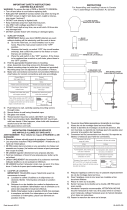
MOUNTING STRAP
PATTE DE FIXATION
CANOPY
CACHE
STEM
TIGE
KNURL KNOB
BOUTON MOLETÉ
SWIVEL
ROTULE
SEE OTHER SIDE FOR CANADIAN FRENCH TRANS-
LATIONS.
VOIR L’AUTRE CÔTÉ POUR LES CANADIENS TRA-
DUCTIONS EN FRANÇAIS.
We’re here to help 866-558-5706
Hrs: M-F 9am to 5pm EST
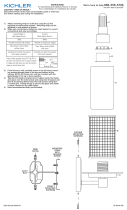
GLASS
VERRE
SOCKET RING
ANNEAU DE DOUILLE
BULB
L’AMPOULE
GLASS SLEEVE
MANCHON DE
VERRE
OUTER SHADE
L’ABAT-JOUR
EXTERIOR
CENTER STEM
TIGE CENTRALE

IMPORTANTES CONSIGNES DE SÉCURITÉ
UNE AMPOULE ALLUMÉE EST BRÛLANTE !
AVERTISSEMENT: Pour réduire les risques D’INCENDIE ou DE
BLESSURE:
• Éteindre et laisser refroidir avant de remplacer l’ampoule.
• Les ampoules chauffent TRÈS RAPIDEMENT ! N’éteindre qu’à
l’aide de l’interrupteur.
• NE PAS rester dans la lumière si une sensation de chaleur est
ressentie sur la peau. (La lumière est intense et peut provoquer
des coups de soleil).
• NE JAMAIS regarder directement une ampoule allumée.
• Tenir les matériaux à l’écart d’une ampoule pour éviter qu’ils
ne brûlent.
• Utiliser UNIQUEMENT des ampoules à la puissance nominale
indiquée (watts) ou à une puissance inférieure.
• NE JAMAIS toucher l’ampoule à main nue, se servir d’un tissu
doux. L’huile de la peau peut endommager l’ampoule.
1) Passer les fils du luminaire de la tige centrale à travers la
tige et visser l’extrémité de la tige vers le haut de la tige centrale.
2) Acheminer le fil du luminaire par les tiges et visser les tiges
ensemble. REMARQUE : appliquer le frein filet sur tous les
filets de la tige indiqués par le symbole (3) pour empêcher
la rotation accidentelle du luminaire pendant le nettoyage,
remplacement de lampe, etc.
3) Passer les fils du luminaire à travers l’extrémité du pivot sur
le cache. Retirer soigneusement les fils à travers le cache.
Visser le pivot sur l’extrémité de la dernière tige.
REMARQUE: Aligner le pivot à l’inclinaison du plafond si
nécessaire.
4) COUPER LE COURANT.
IMPORTANT: TOUJOURS couper l’électricité avant de
commencer le travail.
a) Localiser le coffret à fusibles ou le disjoncteur du
domicile. Mettre l’interrupteur principal en position
d’Arrêt.
b) Dévisser le ou les fusibles (ou mettre le disjoncteur sur
Arrêt) qui contrôlent l’alimentation vers le luminaire ou la
pièce dans laquelle le travail est effectué.
c) Mettre l’interrupteur mural en position d’Arrêt. Si le luminaire
à remplacer est doté d’un interrupteur ou d’une chaîne
connectée à l‘interrupteur, placer ces éléments en
position d’Arrêt.
5) Trouver les trous filetés appropriés sur la barrette de montage.
Vissez les vis de montage dans les trous filetés.
6) Visser la barrette de montage à la boite de jonction. (Vis non
fournies). La barrette de montage peut etre ajustée pour
convenir à la position de l’applique.
7) Connecter les fils (connecteurs non fournis). Se reporter au
tableau ci-dessous pour faire les connexions.
8) Pousser le luminaire vers le plafond en passant soigneusement
les vis de montage par les trous dans le cache.
9) Fixer le luminaire au plafond à l’aide des boutons moletés.
10) Passer le trou dans le support de l’abat-jour externe sur la
douille.
11) Placer le verre dans l’abat-jour externe. Passer le trou dans
le haut du verre sur la douille.
12) Serrer l’anneau de la douille sur la douille. (NE PAS serrer
avec excès).
13) Introduire l’ampoule recommandée. ATTENTION: NE PAS
toucher l’ampoule à main nue. Si la peau entre en contact
avec l’ampoule, nettoyer l’ampoule avec de l’alcool dénaturé
et un tissu non pelucheux.
14) Monter le manchon de verre sur l’ampoule. Visser avec
précaution le manchon de verre sur la douille. (Ne serrez
pas.)
Date Issued: 1/1/16 IS-42384-CB
Connecter le fil noir ou
rouge de la boite
Connecter le fil blanc de la boîte
A Noir A Blanc
*Au cordon parallèle (rond et lisse)
*Au cordon parallele (à angles droits el strié)
Au bransparent, doré, marron, ou
noir sans fil distinctif
Au transparent, doré, marron, ou
noir avec un til distinctif
Fil isolé (sauf fil vert) avec
conducteur en cuivre
Fil isolé (sauf fil vert) avec
conducteur en argent
*Remarque: Avec emploi d’un fil paralléle
(SPT I et SPT II). Le fil neutre est á angles
droits ou strié et l’autre fil doit étre rond ou
lisse (Voir le schéma).
Fil Neutre
SEE OTHER SIDE FOR ENGLISH TRANSLATIONS.
VOIR L’AUTRE CÔTÉ DES TRADUCTIONS EN ANGLAIS.
We’re here to help 866-558-5706
Hrs: M-F 9am to 5pm EST
3
3
INSTRUCTIONS
For Assembling and Installing Fixtures in Canada
Pour L’assemblage et L’installation Au Canada
MOUNTING STRAP
PATTE DE FIXATION
CANOPY
CACHE
STEM
TIGE
KNURL KNOB
BOUTON MOLETÉ
SWIVEL
ROTULE
GLASS
VERRE
SOCKET RING
ANNEAU DE DOUILLE
BULB
L’AMPOULE
GLASS SLEEVE
MANCHON DE
VERRE
OUTER SHADE
L’ABAT-JOUR
EXTERIOR
CENTER STEM
TIGE CENTRALE
/


