Page is loading ...

Fire damper
FKRS-EU
Installation and operating manual
Read the instructions prior to performing any task!
according to Declaration of Performance
DoP/FKRS-EU/DE/005
GB/en

A00000092709, 1, GB/en
Translation of the original
© 2023
TROX GmbH
Heinrich-Trox-Platz
47504 Neukirchen-Vluyn, Germany
Germany
Phone: +49 2845 2020
Fax: +49 (0) 2845 202-265
E-mail: [email protected]
Internet: http://www.troxtechnik.com
05/2023
Fire damper FKRS-EU2

General information
About this manual
This operating and installation manual enables oper-
ating or service personnel to correctly install the TROX
product described below and to use it safely and effi-
ciently.
This operating and installation manual is intended for
use by fitting and installation companies, in-house tech-
nicians, technical staff, instructed persons, and qualified
electricians or air conditioning technicians.
It is essential that these individuals read and fully under-
stand this manual before starting any work. The basic
prerequisite for safe working is to comply with the safety
notes and all instructions in this manual.
The local regulations for health and safety at work and
general safety regulations also apply.
This manual must be given to the system owner when
handing over the system. The system owner must
include the manual with the system documentation. The
manual must be kept in a place that is accessible at all
times.
Illustrations in this manual are mainly for information
and may differ from the actual design.
Copyright
This document, including all illustrations, is protected
by copyright and pertains only to the corresponding
product.
Any use without our consent may be an infringement
of copyright, and the violator will be held liable for any
damage.
This applies in particular to:
Publishing content
Copying content
Translating content
Microcopying content
Saving content to electronic systems and editing it
TROX Technical Support
To ensure that your request is processed as quickly as
possible, please keep the following information ready:
Product name
TROX order number
Delivery date
Brief description of defect or issue
Online www.trox.de
Phone +49 2845 202-0
Limitation of liability
The information in this manual has been compiled with
reference to the applicable standards and guidelines,
the state of the art, and our expertise and experience of
many years.
The manufacturer does not accept any liability for dam-
ages resulting from:
Non-compliance with this manual
Incorrect use
Operation or handling by untrained individuals
Unauthorised modifications
Technical changes
Use of non-approved replacement parts
The actual scope of delivery may differ from the infor-
mation in this manual for bespoke constructions, addi-
tional order options or as a result of recent technical
changes.
The obligations agreed in the order, the general terms
and conditions, the manufacturer's terms of delivery,
and the legal regulations in effect at the time the con-
tract is signed shall apply.
We reserve the right to make technical changes.
Warranty claims
The provisions of the respective general delivery terms
apply to warranty claims. For purchase orders placed
with TROX GmbH, these are the regulations in section
"Vl. Warranty claims" of the Delivery Terms of TROX
GmbH, see www.trox.de/en/ .
General information
Fire damper FKRS-EU 3

Safety notes
Symbols are used in this manual to alert readers to
areas of potential hazard. Signal words express the
degree of the hazard.
Comply with all safety instructions and proceed carefully
to avoid accidents, injuries and damage to property.
DANGER!
Imminently hazardous situation which, if not avoided,
will result in death or serious injury.
WARNING!
Potentially hazardous situation which, if not avoided,
may result in death or serious injury.
CAUTION!
Potentially hazardous situation which, if not avoided,
may result in minor or moderate injury.
NOTICE!
Potentially hazardous situation which, if not avoided,
may result in property damage.
ENVIRONMENT!
Environmental pollution hazard.
Tips and recommendations
Useful tips and recommendations as well as informa-
tion for efficient and fault-free operation.
Safety notes as part of instructions
Safety notes may refer to individual instructions. In
this case, safety notes will be included in the instruc-
tions and hence facilitate following the instructions. The
above listed signal words will be used.
Example:
1. Loosen the screw.
2.
CAUTION!
Danger of finger entrapment when closing
the lid.
Be careful when closing the lid.
3. Tighten the screw.
Specific safety notes
The following symbols are used in safety notes to alert
you to specific hazards:
Warning signs Type of danger
Warning – danger zone.
General information
Fire damper FKRS-EU4

1 Safety ................................................................ 8
1.1 General safety notes ................................. 8
1.2 Correct use ................................................ 8
1.3 Qualified staff ............................................. 9
2 Technical data ................................................ 10
2.1 General data ............................................ 10
2.2 FKRS-EU with fusible link ....................... 12
2.3 FKRS-EU with spring return actuator ...... 13
2.4 FKRS-EU with spring return actuator and
duct smoke detector ................................ 16
2.5 FKRS-EU with fusible link and cover grille
on both sides as an upstream shutter for
the air transfer unit .................................. 17
2.6 FKRS-EU with spring return actuator and
duct smoke detector used as an air
transfer damper ....................................... 18
3 Supply package, transport and storage ...... 19
4 Parts and function ......................................... 20
4.1 Function in a ventilation system .............. 20
4.2 FKRS-EU with fusible link ....................... 20
4.3 FKRS-EU with spring return actuator ...... 20
4.4 FKRS-EU with spring return actuator and
duct smoke detector ................................ 21
4.5 FKRS-EU with fusible link and cover grille
on both sides as an upstream shutter for
the air transfer unit .................................. 22
4.6 FKRS-EU with spring return actuator and
duct smoke detector used as an air
transfer damper ....................................... 22
5 Installation ...................................................... 24
5.1 Overview of installation situations ........... 24
5.2 Safety notes regarding installation .......... 28
5.3 General installation information ............... 28
5.4 Installation kits ......................................... 43
5.4.1 Overview of installation block and instal-
lation kits .............................................. 43
5.4.2 Installation block ER ............................. 44
5.4.3 Installation kit TQ2 ................................ 45
5.4.4 Installation kit WA2 ............................... 46
5.4.5 Installation kit WE 2 .............................. 47
5.4.6 Installation kit GL2 ................................ 48
5.5 Solid walls ............................................... 51
5.5.1 General information .............................. 51
5.5.2 Mortar-based installation ...................... 53
5.5.3 Mortar-based installation – multiple
installation into one installation opening
............................................................... 57
5.5.4 Mortar-based installation into a solid
wall, with partial mortaring .................... 60
5.5.5 Mortar-based installation into a solid wall
underneath a flexible ceiling joint ......... 62
5.5.6 Dry mortarless installation in solid wall
with installation block ER ...................... 63
5.5.7 Dry mortarless installation into a solid
wall, with installation kit TQ2 ................ 64
5.5.8 Dry mortarless installation on the face of
a solid wall, with installation kit WA2 .... 66
5.5.9 Dry mortarless installation remote from
solid walls with installation kit WE2 (wall
connection) ........................................... 68
5.5.10 Dry mortarless installation remote from
solid walls with installation kit WE2
(wall penetration) ................................ 74
5.5.11 Installation remote from solid walls with
mineral wool ........................................ 79
5.5.12 Dry mortarless installation with fire batt
............................................................ 81
5.5.13 Dry mortarless installation with fire batt
in solid wall - multiple occupancy of an
installation opening ............................. 84
5.6 Lightweight partition walls ....................... 87
5.6.1 General information .............................. 87
5.6.2 Mortar-based installation ...................... 93
5.6.3 Mortar-based installation – multiple
installation into one installation opening
............................................................ 100
5.6.4 Dry mortarless installation into a light-
weight partition wall, without installation
kit ........................................................ 103
5.6.5 Dry mortarless installation into a light-
weight partition wall, with installation kit
TQ2 .................................................... 104
5.6.6 Dry mortarless installation remote from
lightweight partition walls with installa-
tion kit WE2 (wall bushing) ................. 109
5.6.7 Installation remote from lightweight parti-
tion and compartment walls with mineral
wool .................................................... 114
5.6.8 Dry mortarless installation in lightweight
partition wall with installation kit GL2
during wall construction ...................... 116
5.6.9 Dry mortarless installation with flexible
ceiling joint and installation kit GL2 ..... 117
5.6.10 Dry mortarless installation with fire batt
.......................................................... 126
5.6.11 Dry mortarless installation with fire batt
in lightweight partition wall - Multiple
occupancy of an installation opening 132
5.7 Lightweight partition walls with timber sup-
port structure or half-timbered construc-
tions ....................................................... 135
5.7.1 General information ............................ 135
5.7.2 Mortar-based installation .................... 138
5.7.3 Dry mortarless installation with installa-
tion kit TQ2 ......................................... 145
5.7.4 Installation remote from lightweight parti-
tion walls with mineral wool ................ 147
5.7.5 Dry mortarless installation with fire batt
............................................................ 151
Table of contents
Fire damper FKRS-EU 5

5.7.6 Dry mortarless installation with fire batt -
multiple occupancy of an installation
opening ............................................... 159
5.8 Solid wood walls .................................... 164
5.8.1 General information ............................ 164
5.8.2 Mortar-based installation .................... 165
5.8.3 Dry mortarless installation into a solid
wood wall or CLT wall, with installation
kit TQ2 ................................................ 167
5.8.4 Installation remote from solid wood or
cross laminated timber walls with min-
eral wool ............................................. 168
5.8.5 Dry mortarless installation with fire batt
............................................................ 170
5.9 Shaft walls with metal support structure 172
5.9.1 General information ............................ 172
5.9.2 Mortar-based installation .................... 176
5.9.3 Dry mortarless installation into a shaft
wall with metal support structure, with
installation kit TQ2 .............................. 181
5.9.4 Dry mortarless installation into a shaft
wall with metal support structure, with
installation kit WA2 ............................. 183
5.9.5 Dry mortarless installation with fire batt
............................................................ 184
5.10 Shaft walls without metal support struc-
ture ...................................................... 185
5.10.1 General information .......................... 185
5.10.2 Mortar-based installation .................. 186
5.10.3 Dry mortarless installation into a shaft
wall without metal support structure,
with installation kit TQ2 ..................... 187
5.10.4 Dry mortarless installation into a shaft
wall without metal support structure,
with installation kit WA2 .................... 188
5.11 Solid ceiling slabs ................................ 189
5.11.1 General information .......................... 189
5.11.2 Mortar-based installation .................. 191
5.11.3 Mortar-based installation – multiple
installation into one installation opening
........................................................... 196
5.11.4 Mortar-based installation into a con-
crete base ......................................... 199
5.11.5 Mortar-based installation into a con-
crete base – multiple installation
opening into one installation opening
........................................................... 202
5.11.6 Mortar-based installation in hollow con-
crete block ceiling ............................. 205
5.11.7 Mortar-based installation in hollow core
ceiling ................................................ 206
5.11.8 Mortar-based installation in ribbed
ceiling ................................................ 207
5.11.9 Mortar-based installation in composite
ceiling ................................................ 208
5.11.10 Mortar-based installation in combina-
tion with wooden beam ceiling ........ 209
5.11.11 Mortar-based installation in combina-
tion with solid wood ceiling .............. 210
5.11.12 Mortar-based installation in combina-
tion with a lightweight ceiling (Cadolto
system) ........................................... 211
5.11.13 Mortar-based installation in combina-
tion with lightweight ceiling (ADK
Modulraum system) ........................ 212
5.11.14 Dry mortarless installation in light-
weight ceilings (ADK Modulraum
system) with installation kit TQ2 ..... 214
5.11.15 Dry mortarless installation in combina-
tion with lightweight ceiling (ADK
Modulraum system), with concrete
base and installation kit TQ2 .......... 215
5.11.16 Dry mortarless installation in solid
ceiling slab with installation block ER
......................................................... 217
5.11.17 Dry mortarless installation remote
from solid ceiling slabs, with installa-
tion kit WE2 ..................................... 219
5.11.18 Dry mortarless installation with fire
batt .................................................. 225
5.12 Solid wood ceilings .............................. 227
5.12.1 Mortar-based installation into a solid
wood ceiling, suspended or upright .. 227
5.12.2 Dry mortarless installation with installa-
tion kit TQ2 into solid wood ceiling,
upright and suspended ..................... 228
5.13 Wooden beam ceilings ........................ 229
5.13.1 Mortar-based installation into wooden
beam ceilings ................................... 229
5.13.2 Dry mortarless installation in wooden
beam ceiling with installation kit TQ2
.......................................................... 231
5.13.3 Mortar-based installation into historical
wooden beam ceilings ...................... 233
5.14 Fixing the fire damper .......................... 235
5.14.1 General information .......................... 235
5.14.2 Fixing in conjunction with fire batt/fire
protection block bulkhead ................. 235
5.14.3 Fire damper remote from walls and
ceilings ............................................. 239
6 Accessories ................................................. 240
7 Electrical connection .................................. 241
7.1 General safety notes ............................. 241
7.2 Limit switches (fire dampers with fusible
link) ........................................................ 241
7.3 Spring return actuator ............................ 241
7.4 Spring return actuator and duct smoke
detector RM-O-3-D ................................ 241
8 Functional test ............................................. 242
8.1 General Information ............................... 242
Table of contents
Fire damper FKRS-EU6

8.2 Functional test with automatic control unit
................................................................ 242
8.3 Fire damper with fusible link .................. 243
8.4 Fire damper with spring return actuator 244
9 Commissioning ............................................ 246
10 Maintenance ................................................. 247
10.1 General information ............................. 247
10.2 Replacing the fusible link ..................... 248
10.3 Inspection, maintenance and repair
measures ............................................. 249
11 Decommissioning, removal and disposal . 251
11.1 Final decommissioning ........................ 251
11.2 Removal ............................................... 251
11.3 Scrap ................................................... 251
12 Nomenclature ............................................... 253
13 Change history ............................................ 258
14 Index.............................................................. 261
Table of contents
Fire damper FKRS-EU 7

1 Safety
1.1 General safety notes
Sharp edges, sharp corners and thin sheet metal
parts
CAUTION!
Danger of injury from sharp edges, sharp cor-
ners and thin sheet metal parts!
Sharp edges, sharp corners and thin sheet metal
parts may cause cuts or grazes.
– Be careful when carrying out any work.
– Wear protective gloves, safety shoes and a hard
hat.
Electrical voltage
DANGER!
Danger of electric shock! Do not touch any live com-
ponents! Electrical equipment carries a dangerous
electrical voltage.
– Only skilled qualified electricians are allowed to
work on the electrical system.
– Switch off the power supply before working on
any electrical equipment.
1.2 Correct use
The fire damper is used as an automatic shut-off
device to prevent fire and smoke from spreading
through ducting.
The fire damper is suitable for supply and extract air
in HVAC systems.
The use of the fire damper in potentially explosive
atmospheres is permitted with the corresponding
special accessories and a CE conformity state-
ment according to ATEX directive 2014/34/EU. Fire
dampers for use in areas with potentially explosive
atmospheres are marked for the zones for which
they have been approved.
The fire dampers may only be operated in com-
pliance with these installation instructions and the
technical data in these installation and operating
instructions.
Modifying the fire damper or using spare parts that
have not been approved by TROX is not permitted.
Additional provision for use in Germany:
Do not use it in extract air systems in commercial
kitchens.
For use as an air transfer damper see general type
approval Z-6.50-2516.
Use with a combined penetration seal requires indi-
vidual type-approval.
Use with firestop blocks requires individual type-
approval.
Crossflow fasteners may require a building inspec-
torate licence. This must be checked and applied for
by the client.
Flame-resistant, non dripping building materials
(elastomer foams) must at least comply with fire
rating class C - s2, d0 according to the German
MVV TB (2019/1) guideline. The applicable local
building regulations have to be observed.
Incorrect use
WARNING!
Danger due to incorrect use!
Incorrect use of the fire damper can lead to dan-
gerous situations.
Never use the fire damper:
– without specially approved attachments in areas
with potentially explosive atmospheres
– as a smoke control damper
– outdoors without adequate protection against the
effects of weather
– in atmospheres where chemical reactions,
whether planned or unplanned, may cause
damage to the fire damper or lead to corrosion
Safety
Correct use
Fire damper FKRS-EU8

1.3 Qualified staff
WARNING!
Danger of injury due to insufficiently qualified
individuals!
Incorrect use may cause considerable injury or
damage to property.
– Only specialist personnel must carry out work.
Personnel:
Skilled qualified electrician
Trained personnel
Skilled qualified electrician
Skilled qualified electricians are individuals who have
sufficient professional or technical training, knowledge
and actual experience to enable them to work on elec-
trical systems, understand any potential hazards related
to the work under consideration, and recognise and
avoid any risks involved.
Trained personnel
Trained personnel are individuals who have sufficient
professional or technical training, knowledge and actual
experience to enable them to carry out their assigned
duties, understand any potential hazards related to the
work under consideration, and recognise and avoid any
risks involved.
Safety
Qualified staff
Fire damper FKRS-EU 9

2 Technical data
2.1 General data
Nominal sizes 100 – 315 mm
Casing length L 400 mm
Volume flow rate range Up to 770 l/s or 2770 m³/h
Differential pressure range Up to 1500 Pa
Temperature range 1, 3, 4 -20 °C – 50 °C
Release temperature 472 °C or 95 °C (for warm air ventilation systems)
Upstream velocity 2, 4 ≤ 8 m/s with fusible link,
≤ 10 m/s with spring return actuator
Closed damper blade air leakage EN 1751, Class 3
Casing air leakage EN 1751, Class C
EC conformity EU Construction Products Regulation no. 305/2011
EN 15650 – Ventilation for buildings - Fire dampers
EN 13501-3 – Classification – Part 3: Fire resisting
ducts and fire dampers
EN 1366-2 – Fire resistance tests for installations: Fire
dampers 5
EN 1751 Ventilation for buildings – Air terminal devices
Declaration of Performance DoP/FKRS-EU/DE/005
1) Temperatures may differ for units with attachments. Details for other applications are available on request.
2) Data applies to uniform upstream and downstream conditions for the fire dampers.
3) Non-condensing operation or without moisture entry via the fresh air intake.
4) For explosion-proof constructions of the FK-EU see the corresponding operating manual.
5) Leakage rate of the fire damper system tested at 300 Pa and 500 Pa negative pressure.
Technical data
General data
Fire damper FKRS-EU10

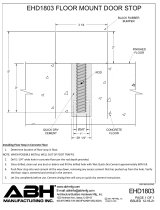
Product sticker
Fig. 1: Product sticker (example)
1 CE mark
2 Manufacturer's address
3 Number of the European standard and year of its
publication
4 Notified body
5 The last two digits of the year in which the CE
marking was affixed
6 Year of manufacture
7 No. of the declaration of performance
8 Website from which the DoP can be downloaded
9 Regulated characteristics; the fire resistance
class depends on the application and may vary
Ä
Chapter 5.1 ‘Overview of installation situations’
on page 24
10 Type
11 Order number
Technical data
General data
Fire damper FKRS-EU 11

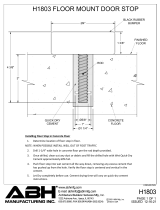
2.2 FKRS-EU with fusible link
Dimensions and weight
Fig. 2: FKRS-EU with fusible link
Y Keep clear to provide access for operation
A Installation side
B Operating side
Limit switch
Connecting cable length / cross section 1 m / 3 × 0.34 mm²
Protection level IP 66
Type of contact 1 changeover contact, gold-plated
Maximum switching current 0.5 A
Maximum switching voltage 30 V DC, 250 V AC
Contact resistance approx. 30 mΩ
Weight [kg]
Nominal size [mm]
ÆDN [mm]
100
99
125
124
150
149
160
159
180
179
200
199
224
223
250
249
280
279
315
314
FKRS-EU with fusible link 1.3 1.6 1.8 2.0 2.3 2.5 2.7 3.3 3.8 4.4
... and installation block ER 5.7 8.6 7.6 7.3 11.0 9.8 13.5 12.1 16.0 15.0
... and installation kit TQ2 5.4 6.1 7.0 7.9 8.8 9.7 10.6 12.0 13.7 15.8
... and installation kit WA2 4.4 5.2 6.1 6.6 7.4 8.2 9.0 10.2 11.7 13.6
... and installation kit WE2 4.4 5.2 6.1 6.6 7.4 8.2 9.0 10.2 11.7 13.6
... and installation kit GL2 4.4 5.2 6.1 6.6 7.4 8.2 9.0 10.2 11.7 13.6
Technical data
FKRS-EU with fusible link
Fire damper FKRS-EU12

2.3 FKRS-EU with spring return actuator
Dimensions and weight
Fig. 3: FKRS-EU with Belimo spring return actuator
Y Keep clear to provide access for operation
A Installation side
B Operating side
Weight of FKRS-EU with fusible link + approx. 1 kg, see table
Ä
12 .
Spring return actuator BFL...
Construction 230-T TR 24-T-ST TR
Supply voltage 230 V AC, 50/60 Hz 24 V AC/DC, 50/60 Hz
Functional range 198 – 264 V AC 19.2 – 28.8 V AC
21.6 – 28.8 V DC
Power rating Spring winding mecha-
nism / hold position
3.5 W / 1.1 W 2.5 W / 0.8 W
Rating 6.5 VA 4 VA
Run time Actuator / spring return < 60 s / < 20 s
Limit switch Type of contact 2 changeover contacts
Switching voltage 5 – 120 V DC / 5 – 250 V AC
Switching current 1 mA – 3 (0.5 inductive) A
Contact resistance < 1 Ω (when new)
IEC protection class / IP protection II / IP 54
Storage temperature / ambient temperature -40 to 55 °C / -30 to 55 °C ¹
Ambient humidity ≤ 95% rh, no condensation
Connecting cable Actuator / limit switch 1 m, 2 × 0.75 mm² / 1 m, 6 × 0.75 mm² (free of halo-
gens)
¹ Up to 75 °C the safe position will definitely be reached.
Technical data
FKRS-EU with spring return actuator
Fire damper FKRS-EU 13

Dimensions and weight
Fig. 4: FKRS-EU with Siemens spring return actuator
Y Keep clear to provide access for operation
A Installation side
B Operating side
Weight of FKRS-EU with fusible link + approx. 1 kg, see table
Ä
12 .
Spring return actuator GRA...
Construction 326.1E 126.1E
Supply voltage 230 V AC, 50/60 Hz 24 V AC, 50/60 Hz /
24 – 48 V DC
Functional range 198 – 264 V AC 19.2 – 28.8 V AC
19.2 – 57.6 V DC
Power rating Spring-winding mechanism 7 VA / 4.5 W 5 VA / 3.5 W
Hold position 3.5 W 2 W
Run time Actuator / spring return 90 s / 15 s
Limit switch Type of contact 2 changeover contact
Switching voltage 24 – 230 V AC / 12 – 30 V DC
Switching current AC: 6 A (inductive 2 A) / DC: 2 A
IEC protection class / IP protection II / IP 42 or IP 54* III / IP 42 or IP 54*
Storage temperature / ambient temperature -20 to 50 °C / -20 to 50 °C
Ambient humidity < 95% rh, no condensation
Connecting cable Actuator / limit switch 0.9 m, 2 × 0.75 mm² / 0.9 m, 6 × 0.75 mm² (free of
halogens)
*Connecting cable at the bottom
Technical data
FKRS-EU with spring return actuator
Fire damper FKRS-EU14

FKRS-EU with Schischek explosion-proof spring
return actuator
The FKRS-EU can also be supplied with Schischek
explosion-proof spring return actuator on request:
ExMax-15-BF-TR
RedMax-15-BF-TR
For further information, see "Supplementary oper-
ating manual for explosion-proof fire dampers Type
FKRS-EU".
Technical data
FKRS-EU with spring return actuator
Fire damper FKRS-EU 15

2.4 FKRS-EU with spring return actuator and duct smoke detector
Dimensions and weight
Fig. 5: FKRS-EU with Belimo spring return actuator and duct smoke detector, drawn in a square air duct (on-site)
Y Keep clear to provide access for operation
A Installation side
B Operating side
Fig. 6: FKRS-EU with Belimo spring return actuator and duct smoke detector, drawn in a round air duct (on-site)
Y Keep clear to provide access for operation
A Installation side
B Operating side
Technical data for spring return actuator, see table
Ä
on page 13
The duct smoke detector type RM-O-3-D is to be arranged in a square air duct on the top or alternatively in
a round air duct in a T-piece on the top. For technical details of the duct smoke detector see the RM-O-3-D
operating and installation manual.
Technical data
FKRS-EU with spring return actuator and duct smo...
Fire damper FKRS-EU16

2.5 FKRS-EU with fusible link and cover grille on both sides as an upstream
shutter for the air transfer unit
Dimensions and weight
Fig. 7: FKRS-EU with fusible link and cover grille on both sides as an upstream shutter for the air transfer unit
Y Keep clear to provide access for operation
A Installation side
B Operating side
Note: Air transfer units may require a building inspectorate licence. This must be checked and applied for by the
client.
For installation in Germany please note:
If a fire damper with only a mechanical shut-off element is to be used as an air transfer unit, the local building
regulations apply. Such air transfer units are usually only used for pressure differential systems.
Technical data
FKRS-EU with fusible link and cover grille on bo...
Fire damper FKRS-EU 17

2.6 FKRS-EU with spring return actuator and duct smoke detector used as an air
transfer damper
Dimensions and weight
Fig. 8: FKRS-EU with spring return actuator and duct smoke detector used as an air transfer damper
Y Keep clear to provide access for operation
A Installation side
B Operating side
Weight of FKRS-EU with fusible link + approx. 2.5 kg, see table
Ä
12 .
Technical data for spring return actuator, see table
Ä
on page 13
The duct smoke detector type RM-O-3-D is to be placed on top of a console (scope of supply). For technical
details of the duct smoke detector see the RM-O-3-D operating and installation manual.
Note: For more information on the installation and use of the fire damper as an air transfer damper in Germany see
general type approval Z-6.50-2516.
Technical data
FKRS-EU with spring return actuator and duct smo...
Fire damper FKRS-EU18

3 Supply package, transport
and storage
Scope of delivery
If attachments and accessories are supplied from the
factory with the fire dampers, they are already taken into
account in the order code.
Depending on the installation situation, supplementary
materials for assembly and fixing may be needed to
ensure proper installation, e.g. mortar, screws, mineral
wool, etc.
Such materials are not usually included in the supply
package (unless stated otherwise).
The selection of additional attachments or accessories
as well as the identification and provision of materials
for assembly and fixing is the responsibility of those
involved in the building project and must be done taking
into account the required classification.
Delivery check
Check delivered items immediately after arrival for
transport damage and completeness. In case of any
damage or an incomplete shipment, contact the ship-
ping company and your supplier immediately.
Fire damper
– Attachments/accessories, if any
Operating manual (one per delivery)
Colour hues on the damper blade
The blades of fire dampers are treated with a
greenish impregnating agent. Resulting colour hues
on the damper blade are due to technical reasons
and do not constitute a defect of any kind.
Transport on site
If possible, take the product in its transport packaging
up to the installation location.
Storage
For temporary storage please note:
Remove any plastic wrapping.
Protect the product from dust and contamination.
Store the product in a dry place and remote from
direct sunlight.
Do not expose the unit to the effects of weather (not
even in its packaging).
Do not store the product below -40 °C or above 50
°C.
Packaging
Properly dispose of packaging material.
Supply package, transport and storage
Fire damper FKRS-EU 19

4 Parts and function
4.1 Function in a ventilation system
Fire dampers are used as safety related components in
ventilation systems. The fire damper is used as a shut-
off device to prevent fire and smoke from spreading
through ducting. During normal operation the damper
blade is open to enable air passage through the ventila-
tion system.
If the temperature increases in the event of a fire, the
damper blade closes. Closure is triggered at 72 °C
( 95 °C in warm air ventilation systems). If the damper
blade closes due to a temperature increase (i.e. in the
event of a fire), it must not be reopened.
4.2 FKRS-EU with fusible link
Fig. 9: FKRS-EU with fusible link
1.1 Casing
1.2 Damper blade with sealing ring
1.4 Travel stop for CLOSED position
1.5 Inspection access (12 mm)
1.6 Handle/damper blade position indicator
1.8 Lip seal
10.14 Thermal release device with fusible link
Functional description
In fire dampers with a fusible link, damper closure is
triggered by the fusible link. If the temperature inside
the fire damper rises to 72 °C or 95 °C, the fusible
link triggers a coil spring mechanism. The coil spring
mechanism then causes the fire damper to close.
As an option, the fire damper can be either supplied or
subsequently fitted with one or two limit switches. The
limit switches can signal the damper blade position to
the central BMS or fire alarm system. One limit switch
each is required for damper blade positions OPEN and
CLOSED.
4.3 FKRS-EU with spring return
actuator
Fig. 10: FKRS-EU with spring return actuator
1.1 Casing
1.2 Damper blade with sealing ring
1.4 Travel stop for CLOSED position
1.5 Inspection access (12 mm)
1.8 Lip seal
10.1 Spring return actuator
10.13 Thermoelectric release mechanism with temper-
ature sensor
Functional description
The spring return actuator enables the motorised
opening and closing of the damper blade; it can be
activated by the central BMS. Motorised fire dampers
can be used to shut off ducts on a regular basis. As long
as power is supplied to the actuator, the damper blade
remains open. The spring return actuator closes the fire
damper when one of the following events occur:
Temperature in the fire damper > 72 °C or > 95 °C
Ambient temperature outside the release mecha-
nism > 72 °C
The power supply is interrupted (power off to close)
As standard, the spring return actuator is equipped with
limit switches that can be used to indicate the damper
blade position.
Parts and function
FKRS-EU with spring return actuator
Fire damper FKRS-EU20
/