Page is loading ...

Croydex, Central Way, Andover,
Hampshire, SP10 5AW, UK
+44 (0) 1264 365881
+44 (0) 1264 356437
info@croydex.co.uk
www.croydex.com
TS 047 R02
1.
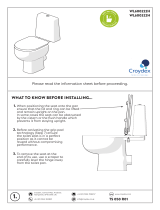
Please read the information sheet before proceeding.
WL600622H
WHAT TO KNOW BEFORE INSTALLING...
When positioning the seat onto the pan
ensure that the lid and ring can be lifted
and remain upright on the pan.
In some cases the seat can be obstructed
by the cistern or the flush handle which
prevents it from staying upright.
Before activating the grip pad
technology (Step 7) ensure
the toilet seat is in a perfect
position as it cannot be
reused without compromising
performance.
1.
2.
To remove the seat at the
end of its use, use a scraper to
carefully lever the hinge away
from the toilet pan.
3.

Croydex, Central Way, Andover,
Hampshire, SP10 5AW, UK
+44 (0) 1264 365881
+44 (0) 1264 356437
info@croydex.co.uk
www.croydex.com
TS 047 R02
2.
ICON LIBRARY
For reference only Parts may vary.
(Optional)
Warning! Please
take special care.
SAFETY AND CARE
PLEASE READ ALL OF THE INFORMATION CAREFULLY AND REFER BACK WHEN YOU
SEE THE NUMBERED ICONS THROUGHOUT INSTRUCTIONS.
To retain the best quality finish, clean product with a soft cloth and a mild soap
solution.
1
2
3
4Take care when cleaning the toilet pan with chemical cleaners. Avoid contact of the
chemical cleaners with the toilet seat or hinges. Immediately rinse o any splashes
to avoid damage or discolouration to the surface of the toilet seat and hinge parts.
Spray cleaning liquids onto the cloth and not directly onto the product.
Do not use abrasive or chemical cleaners as they may damage the surface of the
toilet seat or hinges.
FLEXI FIX TOILET SEAT
A x2 B
C
x2
x2
Dx2
E
Fx2

Croydex, Central Way, Andover,
Hampshire, SP10 5AW, UK
+44 (0) 1264 365881
+44 (0) 1264 356437
info@croydex.co.uk
www.croydex.com
TS 047 R02
3.
1. 2.
3.
- Remove the old seat from the pan and
clean the surface around the fixing holes.
- Ensure the surfaces around the fixing holes
are completely dry before beginning the
installation.
BEFORE YOU BEGIN
In its sealed packaging place the seat over
your pan to ensure you are happy with size
and shape of the toilet seat.
PREPARATION
PLACEMENT
To ensure you do not lose any components
down the toilet you may want to place cling
film over the bowl of the toilet.
HELPFUL ADVICE
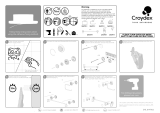
Attach the Grip Pad component to
the hinges on the seat.
Choose
the most
appropriate
slot to suit the
length of the
toilet pan.
Take the covers o the hinges.

Croydex, Central Way, Andover,
Hampshire, SP10 5AW, UK
+44 (0) 1264 365881
+44 (0) 1264 356437
info@croydex.co.uk
www.croydex.com
TS 047 R02
4.
5.4. Remove the protective film to
reveal the grip pad and place
bolts into the hinge base.
6. 7.
Lightly screw the bolt into place using the
nut provided. Do not collapse the supports
on the hinge base yet.
Complete a final check to ensure that you
are happy with the position of the seat.
Then apply pressure to
the hinges to collapse
the supports allowing
the grip pad to bond to
the toilet pan. Hold for
at least 20 seconds.
Carefully place the seat on the pan
ensuring the Grip Pad does not stick to the
pan surface at this stage of installation.

Croydex, Central Way, Andover,
Hampshire, SP10 5AW, UK
+44 (0) 1264 365881
+44 (0) 1264 356437
info@croydex.co.uk
www.croydex.com
TS 047 R02
5.
9.8. Fully tighten the bolt. Insert cover and slide into place.
AB
CD
/