Page is loading ...


Model/ Serial Number Page 1
Introduction Page 1
Overview Page 2
Warranty Information Page 2
Standard Equipment Page 3-4
Optional Accessories Page 4-5
Preparation & Set Up Page 6-11
Battery Charging Page 9-10
Basic Maintenance Page 10
Strap Bar Installation Page 11
Lectro-Truck Operation Page11-16
Balancing a Load Page 12
Standing a Load Upright Page 12
Smooth, Flat Surfaces Page 12
Climbing Stairs Page 13-14
Descending Stairs Page 14-15
Portable Dock Leveler Page 15
Powered Tailgate Page 15-16
Rough or Soft Surfaces Page 16
Other Obstacles Page 17-19
Curbs Page 17
Thresholds Page 17
Deep Steps Page 17
Turning on a Landing Page 17
Pitched Steps Page 18
Bulkheads Page 18
Low Doorways Page 18
Moving Up/ Down Inclines Page 18
General Troubleshooting Page 19
Accessories Page 20-24
Tripod Page 20-21
All-Terrain Wheels Page 21
Caster Attachments Page 22
Lectro-Stack Page 22
Balance Box Page 23
Hook Box Page 24
Toe Plate Adapter Page 25
Wheel Brakes Page 25
Parts Breakdown Page 26-30
Drive Screw (1200-1500 lb.) Page 26
Drive Screw (600 lb.) Page 27
Outer Frame Page 28
Battery Box (Steel) Page 28
Motor Box Page 28
Battery Pack (Aluminum) Page 29
Strap Bar Page 29
Inner Frame Page 29
Tripod (Steel) Page 30
Hook Box Page 30
All-Terrain Wheels Page 30
General Service Page 31-35
Adjustment—Electric Brake Page 31
Drive Nut Replacement Page 31
Disassembly of Drive Screw Page 32
Assembly of Drive Screw Page 32
Wiring Diagram (Lg. Alum.) Page 33
Wiring Diagram (Sm. Alum.) Page 34
Wiring Diagram (Steel) Page 35
Parts List Page 36-42
Outer Frame Page 36
Inner Frame Page 36
Wheel Brakes Page 36
Drive Screw Page 37
Battery Pack (Aluminum) Page 37
Battery Box (Steel) Page 38
Motor Package Page 38
Manual Brake Page 39
Electric Brake Page 39
Miscellaneous Wiring Page 39
Decals Page 39
Hook Bar/ Hook Box Page 40
Tripods Page 40
Strap Bars Page 40
Concave Attachment Page 41
Caster Attachment Page 41
Balance Box Page 41
Load Adjuster Kit Page 41
All-Terrain Wheels Page 42
Miscellaneous Items Page 42
Table of Contents
Lectro-Truck Owner's Manual

The serial number of your Lectro-Truck is on a nameplate attached to the flat cross brace on the inner
frame. This is located about half way down the back of the unit.
Page 1 Model and Serial Number
Serial Number Model Number Date
Upon receipt of your Lectro-Truck please place the date, model and serial number in th e boxes
provided. If you ever call our office to order parts or have any service questions we will ask you for this
information to make sure the correct information for your particular unit is given.
The purpose of safety symbols throughout this manual is to a ttract your attention to possible dangers.
The symbols, and the explanations with them, deserve your careful attention and understanding. Safety
warnings do not by themselves eliminate any danger; the instructions or warnings they give are not
substitutes for proper accident prevention measures.
SYMBOL WHAT IT MEANS
NOTE
SAFETY WARNING: Failure to obey a safety warning may result
in injury to yourself or others.
NOTE: Advises you of information vital to the operation or
maintenance of your equipment.
Introduction
Congratulations on your recent purchase of the Lectro-Truck. The “Original” Lectro-Truck was the first
of its type in personal stair-climbing material handling equipment. You will soon experience the efficiency
and ease of operation that has evolved from over 30 years of proven knowledge. Depending on which
unit you purchased, it is capable of moving loads from 600 pounds (270 Kg) to 1,500 pounds (680 Kg)
with increased safety and reduced operator effort. The Lectro-Truck has been engineered and
constructed to provide years of reliable, labor saving operations with minimum maintenance.
Learning to operate y our Lectro-Truck is a simple process and pri marily a m atter of familiarizing
yourself with the operations as outlined in thes e instructions. Your confidence will be built through
practice going up and down stairs; or loading and unloading your truck or trailer. BE PATIENT. Read
this manual thoroughly and understand it completely before attempting to operate your
Lectro-Truck. Take your time until you are familiar with the proper procedures.
DO NOT practice with an empty Lectro-Truck. You must practice your moves with a
minimum light load of 150 pounds (68 Kg) to learn the techniques of the
Lectro-Truck’s operation. Practicin g and having a f ull un derstanding of how the
Lectro-Truck works is very important prior to attempting to move heavier loads.
A video (VHS) training tape can be obtained by contacting our office. This tape is an
excellent aid in learning how to operate, maintain, and service your Lectro-Truck.
Lectro-Truck Owner's Manual

The Lectro-Truck operates using the basic principles of leverage and balance. B y mastering the
techniques outlined in this manual, a single operator is capable of handling and moving heavy loads that
previously required two or more persons.
Your Lectro-Truck is a battery powered, motor-driven machine, with a specially designed inner and outer
frame. The key to Le ctro-Truck’s operation is finding the leverage and balance point and using the
proper sequence when moving your load. If the “Load-Down/Wheels Up” switch is energized, your load
will move downward toward the wheels. Conversely, if the “Load-Up/Wheels Down” switch is energized,
the load is moved upward toward the operator. By alternating the load down and load up sequence, the
operator will soon find the ease with which Lectro-Truck can overcom e vertical barriers such as stairs
and curbs.
LECTRO-TRUCK DOES THE HEAVY WORK WHILE
THE OPERATOR CONTROLS THE MOVE.
All Lectro-Truck models are backed by a one-year warranty, including all parts and workmanship. The
motor has a two-year warranty, to be free from defect under normal usage. Additional warranty details
apply. All warranties go into effect on the date your Lectro-Truck is purchased.
The warranty card must be completed and returned to
Innovative Moving Systems, Inc. in order
for the warranty to be valid.
Your Lectro-Truck has a 12-volt power system. Never hook up directly to any AC power
for charging or any other reason without a 12-volt battery charger or transformer between
the Lectro-Truck and the AC power source. Doing so will invalidate all warranties.
This warranty may or may not apply to used or demonstration models.
NOTE
Page 2 Overview of the Lectro-Truck
Warranty Information
Lectro-Truck Owner's Manual

Aluminum Models: (left to right) LTA6512,
LTA5512, LTA4512
Steel Models: (left to right)
1268E, 1260E
1. Protective switch guard *
2. All weather safety switches *
3. Enclosed, grommetted wiring system *
4. Protective anti-crush foot pads *
5. Smooth operating thrust bearings *
6. ¾” Heavy duty, smooth roll drive nut
7. Load securing, adjustable strap bars *
8. Sealed 12 volt battery *
9. Heavy duty inner frame *
10. Heavy duty outer frame *
11. Circuit breaker w/ on-off switch *
12. User-friendly handles *
13. Heavy duty battery box protector
14. Automatic Electromagnetic brake *
15. Heavy duty 1½ HP planetary gear
reduction motor.
16. Wide tread, non-marring, 8” roller
bearing wheels*
17. Standard toe plate depth of 6” - and
widths of 24” or 30” *
18. Heavy duty leverage/ hook bar
19. Extension handles for extra leverage
20. User-friendly tripod
21. Portable battery pack
22. Protective felt padding *
23. Side handles for easy gripping
24. Aircraft hardened ¾” high efficiency
drive screw
25. On-Board Battery Charger*
* Available on all models
Page 3 Standard Equipment
Lectro-Truck Owner's Manual

Each Lectro-Truck comes with the following as standard equipment:
Lectro-Truck Models: 1260E & 1268E
Owners-Operating Manual Sealed non-spill battery
2 Load securing strap bars Hook bar/Leverage bar
Automatic Electromagnetic brake On-Board Battery Charger
LTA5512
Owners-Operating Manual Sealed non-spill battery
2 Load securing strap bars Porta ble battery carrying pack
Automatic Electromagnetic brake On-Board Battery Charger
LTA6512
Owners-Operating Manual Porta ble battery carrying pack
2 Load securing strap bars Hook bar/Leverage bar
Automatic Electromagnetic brake User Friendly, Built-In Tri-Pod
Sealed non-spill battery 10” Extension handle
On-Board Battery Charger
LTA4512
Owners-Operating Manual Sealed non-spill battery
1 Load securing strap bar Porta ble battery carrying pack
Automatic Electromagnetic brake 10” Extension handle
On-Board Battery Charger
Page 4 Standard Equipment (continued)
All-Terrain Wheel Attachment (Page 21)
Large 15” high x 6” wide pneumatic, all-terrain wheels enable the Lectro-Truck to easily move the
heaviest loads over lawns, sandy, soft, or rocky terrain. The ATW attachment quickly and easily snaps
on and off the back of the Lectro-Truck, converting it into a four-wheel, all-terrain dolly.
Tri-Pod (Pages 20-21)
The Tri-Pod Attachment quickly snaps on and off the back of the Lectro-Truck converting it to a
four-wheel dolly. The Tri-Pod is built into the Model LTA6512e Lectro-Truck. The Tri-Pod is able to be
attached to the 1268e and 1260e Lectro-Truck models. The Tri-Pod should only be used on flat, smooth
surfaces.
Hook Bar/Leverage Bar
The hook bar is stored in the outer frame of the Lectro-Truck on our steel models and outside the outer
frame on our aluminum models. It pro vides safe, secure lif ting or lo wering from vehicles and added
leverage when breaking back heavy loads.
On-Board Battery Charger
This fully automatic battery charger is built into the battery box/ pack on each of the Lectro-Truck’s five
models. All you have to do is plug it into the wall (110V outlet) to charge your Lectro-Truck.
Hook Box (Page 24)
The Steel Hook Box h as a collapsible hook and mounts in th e bed of your truck to assist in securing
loads. Safely lift loads on and off trucks by simply locking the Lectro-Truck’s leverage-hook bar into the
hook box.
Concave Attachment
Our concave shaped strap bar attachment provides a sn ug fit to safely secure and protect cylindrical
shaped loads such as barrels, water heaters, tanks, etc.
Optional Accessories
Lectro-Truck Owner's Manual

Balance Box Kit (Page 23)
The Balance Box Kit provides the Lectro-Truck operator with a way to raise low, heavy loads to a height
on the unit that is the center of balance. This allows for easier handling. Our Balance Box is made to
support loads weighing up to 1500 lbs.
Caster Attachment (Page 22)
This flat platform, with rotating caster wheels, attaches to the Lectro-Truck’s toe plate allowing easier
maneuvering of loads that are in a vertical position while in ti ght or narrow locations. The caster
attachment is available in Standard and Heavy-Duty models.
Load Adjuster Kit
This attachment allows the operator to adjust low, heavy weights (for a better balance point) for easier
handling; automatically, with no lifting involved.
Toe Plate Adapter (Page 25)
Toe plate adapters can be ordered to best support the load being moved. They are available in two
standard sizes, 12”x 24”, and 12”x 30”, but can also be made to order.
Lectro Truck Lubricant
An advanced, Teflon-based lubricant recommended for use on the Lectro-Truck’s drive screw and other
moving parts.
Rubber Mounted Strap Bar (Page 11)
Attaches and detaches with just a twist!
Replacement Straps
Nylon replacement straps available in 12’ or 19’ lengths.
Lectro-Truck Battery
12-volt replacement battery for all Lectro-Truck models.
Lectro-Stack (Page 22)
The vertical lif ting attachment for the Lectro-Truck. It has a capacity of 750 pounds, and will lift up to
almost 5 feet.
Complete Portable Power Pack
The complete portable power pack includes a 12 -volt battery and an aluminum carrying case.
Replacement battery and Aluminum Power Pack battery cases are also a vailable separately. The
Power Pack is available for the LTA6512, LTA5512, and LTA4512 only.
Wheel Brakes (Page 25)
The wheel brakes allow the user to climb and descend steps, even if the steps are pitched, uneven, or
cracked.
Popular accessory part numbers
ATW-15 - All-Terrain Wheels CA27R - Battery Pack (LTA4512)
LT12 - Battery LA1 812 - Battery (LTA4512)
CE80 - Tripod TPA30 - Toe Plate Adapter
CC90SP - Concave Attachment OM96 - Owner’s Manual
CC50-A - Hook Box LT Lube - Lectro-Truck Lubricant
CH6 - Battery Charger CC91 - Caster Attachment
BB21 - Balance Box Kit LA21 - Load Adjuster Kit
CD27-R - Battery Pack (LTA6512 & LTA5512)
Page 5 Optional Accessories (continued)
Lectro-Truck Owner's Manual

Once you have determined whether everything that you ordered was shipped, taken care of any
damage that may have occurred, completed and sent in your warranty card, you are ready to set up
your Lectro-Truck and get it ready for use.
If you have ordered an LTA4512, LT A5512, or LTA6512, your unit will come with a portable battery
pack. The battery should be connected inside the pack. The battery pack is either installed on the unit
already or packed separately. When the battery pack is slid onto the unit attach the plug from the pack
to the plug on the frame this will give you power to the Lectro-Truck.
Using Diagram #1 (page 7), install the side handles on the 1260E, 1268E, LTA6512 or the LTA5512.
The LTA4512 does not require side handles. I f you have ordered an LTA6512 or L TA4512, using
Diagram #2 (page 8), install the retractable plungers found in your portable battery pack.
On the 1260E and 1268E models, the battery should be inside the battery box. It will be held in place by
a battery hold down clip or bracket. This prevents the battery from falling out, or moving up and touching
the battery box lid, shorting out the unit. If it is not already mounted in place, you will need to place the
battery in the battery box and attach the battery hold down clip (which is bolted in the battery box,) to
secure the battery.
Power Switch/ Circuit Breaker
The power switch is also the circuit breaker. On the 1268E and 1260E models it is located on the right
side of the ba ttery box (when standing behind the unit.) T he power switch/circuit breaker is a black
square with a red button and a small black lever. On the LTA6512, LTA5512, and LTA4512 the power
switch/circuit breaker is f ound on the battery pack. When the black lever is pu shed in th ere is po wer
supplied to the unit. When the black lever is extended out there will be no power to the unit.
Upon receipt of your equipment, carefully remove the protective plastic and cardboard wrap from your
stair climber. As well, remove any accessories or other items you may have received from all the boxes
to insure that you have your complete order. If you have not received all the items you ordered, check
your packing slip to see if the item(s) you have not received are on backorder. If your packing slip does
not indicate that these items are on ba ckorder, contact our office. If they are on backorder, it means
these items were not available at the time of shipping and will be shipped to you at a la ter date. You
should also check if the standard items that come with each unit have been shipped with the unit(s). A
list of the standard items that come with each model can be found on pages 3 and 4 in this manual.
If you are reading this you have already found the owner-operators manual. Inside this manual, you will
also find a warranty card. In the battery box/ pack, you will find two side handles. If you ordered an
Aluminum model, you may also find retractable plungers in the battery box/ pack. If your battery is not in
the battery box, it was packed separately.
Look everything over after unpacking. If you notice any damage to th e items received, that was not
visible prior to unpack ing, you will need to notify the shipping company immediately and file a damage
claim with them. They may want to inspect the items that are damaged prior to paying any claims. In the
event they can’t get right out to inspect the damage, we recommend taking pictures of the damage,
especially if you need to use the equipment before they inspect it. If you have problems getting a claim
paid, contact us and we will see if we can assist you.
At this time take a few moments to fill in and complete your warranty card. Once it is completed
mail it to our office. It is very important that we have this warranty card on file for any future
warranty claims.
Page 6 Preparation
Set Up
Lectro-Truck Owner's Manual

NOTE Be sure to attach the positive or red cable first. Then attach the black or negative cable.
Use a 7/16” wrench to tighten them down.
After you have attached the cables, press the small black lever in on the power switch/circuit breaker, to
set the breaker and engage power to the unit. T he power switch/circuit breaker is designed to protect
the motor, drive nut, and wiring against damage from an overload of weight on the unit. O verloading
can be caused by operating the Lectro-Truck with too heavy of weight; or if there are an y shorts in the
wiring system. If the unit should become overloaded the power switch/circuit breaker will trip. In the
event that this should happen, let the wiring cool down, and then press the black lever in to reset the
breaker. When the power switch/circuit breaker is tripped, you will have absolutely no power to the unit.
NOTE Never operate or engage the power switch/circuit breaker with the battery box lid open.
Connecting the Battery
When you connect the battery be sure the red button on the power switch/circuit breaker is pressed in
(this disengages the power to the unit,) and proceed with attaching the battery cables to the battery.
While standing behind the unit and with both hands firmly on the frame handles (not the side handles),
use the thumb on your left hand and press straight down on the “wheels up/load down” switch to see if
the wheels raise up. Next, using the thumb on your right hand, press straight down on the “wheels down/
load up” switch to lower the wheels back to the ground. You will only need to raise and lower the wheels
a couple of inches to determine if the “wheels up/load down” and “wheels down/load up” functions are
working.
If nothing happens when you press either switch, be sure to check if:
a. You have the power switch/circuit breaker engaged, (page 8).
b. The battery cables are hooked up properly and are tight.
c. You are pressing the operating switches straight down with sufficient effort to engage them.
d. The battery is fully charged.
NOTE
Pages 9-10 in this manual have the proper procedures on how to charge your battery.
All Lectro-Truck models are checked and tested to ensure they are operating properly
before leaving the factory. However, strange things happen during shipping - no matter
what precautions we may take. If your Lectro-Truck still does not operate after trying all
the above, contact our office at 1-800-619-0625, and ask for service.
Installation of Portable Side Handles (Steel Models, LTA5512, & LTA6512)
3/8” bolt
Lock Washer
Flat Washer
Handle
Lectro-Truck
cross section
Diagram #1
Page 7 Set Up (continued)
Lectro-Truck Owner's Manual

Installation of Retractable Plungers (Aluminum Models)
The Retractable Plungers are no t attached
prior to shipping to protect against damage.
These plungers must be installed prior to
operating your unit.
The plunger latches can be found inside the
battery pack of your unit.
LTA6512 - Y ou will have three plungers.
The two with the n uts on them are for the
extension handle, and the plunger without
the nut is to be installed in the leverage/ hook
bar.
LTA5512 - You may have one plunger
latch, if your unit is equipped with the lever-
age/ hook bar.
LTA4512 - You will have two plungers,
which are both for the extension handle.
Diagram #2
Your Lectro-Truck should be properly lubricated prior to operation
Lay the Lectro-Truck down, with the toe plate facing up, over some paper on the floor. Using a Teflon-
based lubricant, (not WD-40), lubricate the top 12 inches of the drive screw, wiping off any excess. Run
the inner frame all the way out and back in a co uple of times to d istribute the lubricant over the drive
screw and through the drive nut.
NOTE
Never use grease on the drive screw. It will pick up dust, grit and small particles,
distributing them in th e drive nu t where they collect and retard the operation of the
bearings and your unit. While WD-40 is excellent for a number of uses, do not use
WD-40 on the drive screw. WD-40 evaporates too quickly, leaving you no lubrication
on the drive screw.
In the lubrication process, when your inner frame is extended all the way out, you will notice four rollers -
two at the top of the inner frame and two at the bottom of the outer frame. Spray the rollers with the
same Teflon-based lubricant you used on the drive screw. Be sure to get the lubricant between the roller
and the axle. The roller channels on the inner and the outer frame should also be sprayed with the
Teflon-based lubricant. You will expose both of these channels by extending the inner frame out. After
lubricating the channels run your inner frame in and stand your Lectro-Truck upright.
NOTE
Although some lubricating is done at the plant, we recommend you do a com plete
lubrication of your Lectro-Truck upon receipt and prior to using it. Lubrication must be
done on a regular basis to insure the proper operation of your Lectro-Truck. If you use
the Lectro-Truck on a daily or regular basis, it should be lubricated once a month.
.
Installing your Retractable Plungers: When installing the Plunger in the Leverage/Hook Bar put a couple drops of thread
locker (Red Loctite™ etc.) onto the threads of the Plunger (the one without the nut). Then thread the Plunger in until the threads
are about 1/8” away from the Lectro Truck side and let stand for 15-20 min. for thread locker to set. You then should be able to pull
the spring loaded head of the Plunger to release the pin from the “catch” hole in Lectro Truck side. When installing Retractable
Plunger latches for the extension handle, pull the plunger head out so the pin is retracted inside of the thread shaft. Then thread
the Plunger in until it touches the extension handle. At this point back out the plunger by turning counterclockwise about one turn
to give the extension room to slide. Then tighten the ¾” Nut to hold Plunger in place.
Page 8 Set Up (continued)
Lectro-Truck Owner's Manual

Page 9 Proper Battery Charging Procedures
Your Lectro-Truck comes with a sealed, gel-type, lead-acid battery. It does not have a ‘memory’; and
therefore it does not need to be completely discharged prior to charging. The battery’s gel will become
crystallized if left uncharged for a long period of time. Once the liquid is crystallized it will not return to
its liquid form, which results in your battery having less power to operate your Lectro Truck. If you find
that your battery isn’t holding a charge very long, or isn’t putting out e nough power to op erate your
Lectro-Truck properly, you should have it loa d tested. If the load test shows anything under 12 volts,
you need a new battery.
Charging of your battery can be accomplished in the following ways:
a. The best way that we recommend to charge your Lectro-Truck is by using our On-Board, 3
amp charger (included). Pull the plug out of the Battery Box/ Pack and plug it into a 110
Volt outlet.
b. You may also purchase a charging plug and adapt it to your own battery charger, provided
that your charger can charge at 6 amps or less, and has an automatic shut-off.
c. Using a 6 amp charger (or less), open the battery box lid and place the positive clip from
your battery charger on the positive terminal of the battery. Place the negative clip of the
battery charger on the negative terminal of the battery.
NOTE
When charging any Lectro-Truck the black lever o n the power switch/circuit breaker,
(page 8), must be pushed in.
Caution: Charging plug is to be hooked up to DC power source only!
To attach the adapter plug onto your battery charger, remove the alligator clips that are on the charger.
Unscrew the two screws holding the plug closed and wire your positive and negative wires from your
charger right into this plug. Place the positive terminal wire from your charger on the spade going to the
larger receptacle opening and the negative wire from your charger to the smaller receptacle opening and
screw the plug back together. You will find the charging plug opening on your battery box on m odels
1260E & 1268E. To plug in the charging plug, push it onto the receptacle and twist it to the right to lock it
in place. To remove the charging plug, twist the plug to the left and pull.
For the LTA6512, LTA5512, and the LTA4512 it is recommended that you remove the battery pack from
the unit before charging. If our battery charger has been ordered, the battery charger will be located
inside the battery pack. To charge the LTA6512, LTA5512, and the LTA4512 using your own charger,
you will need to use a special adapter ordered from us. Place the term inals of your charger on the
charging adapter plug. When you attach this plug to your charger the positive goes to the red and
negative goes to black.
If you are going to charge your battery by attaching directly to the battery’s positive and
negative terminals of the battery with clips, be sure to secure battery lid open so it will
not fall down on the clips. This m ay arc out the positive and negative terminals. Also
remember to close the lid after charging before you operate the unit. Failure to close
the lid prior to operation may cause the lid to be sheared off.
Lectro-Truck Owner's Manual

Proper charging of your battery is very important.
If your battery isn’t working properly, your Lectro-Truck will not be working to it’s fullest potential, either.
The battery supplied with your Lectro-Truck is made up of cells that can be damaged if it isn’t charged
properly. If the proper charging procedures aren’t followed the once liquid cells inside the battery can
become crystallized and your battery will be damaged. Crystallization will occur if you: leave the battery
uncharged for a length of time, over charge your battery, charge it too fast, or charge it with too many
amps. It is very important to follow the proper charging procedures to get the maximum amount of power
from your battery.
When Charging Your Battery ALWAYS:
• Use a 6-amp charger or less.
• Use a fully automatic charger that shuts off when the battery is fully charged.
• Have your battery charged at all times.
When Charging Your Battery DO NOT use the following procedures or you may damage your battery:
• Do Not use more than a 6-amp charger.
• Do Not use a battery charger with a timer on it.
• Do Not use a Standard Automotive charger.
• Do Not leave your battery uncharged for long periods of time.
• Do Not put a quick charge to your battery.
By following these procedures and using the proper battery charger, your Lectro-Truck’s battery will
provide the proper power you need, and will last a lot longer.
Page 10 Proper Battery Charging Procedures
Basic Maintenance
Here are some general maintenance tips for your Lectro-Truck:
1. Keep your battery on the charger at all times. This applies to units that are able to be connected
to a fully-automatic, 6 Amp charger. The battery that is provided is a sealed, gel-type, lead acid battery.
The battery has no “memory,” so it can be charged at any time without damaging the cells inside.
2. Lubricate your drive screw often. Normal usage calls for the drive screw to be lubricated with a
Teflon-based spray lubricant about once per month. Do NOT use grease or WD-40 on the drive
screw. The proper procedure for the lubrication of the drive screw, and the rollers that ride between the
inner and outer frames, can be found on page 10.
3. Check your strap bar bumpers for wear. The strap bar bum pers will wear down the more you
move and adjust your strap bars. These bumpers should be checked, adjusted, and changed as
needed. You can read on how to adjust the strap bar bumpers on page 14.
4. Check your footpads for excessive wear. The footpads are the two rubber pieces at the bottom of
the inner frame. These pads protect the steps that you are climbing from being damaged. T he more
you use of the Lectro-Truck on concrete or brick steps, the more that these pads will wear.
Lectro-Truck Owner's Manual

To place the strap bar attachment on the Lectro-Truck, stand in front of the machine with the strap bar in
your hands. Holding the front of the strap bar diagonally, put the strap bar “ears” inside the Inner Frame,
and turn the strap bar until it is parallel to the toe plate. The strap bar should turn on with just enough
resistance to hold it in place on the Inner Frame. Your strap bar can be moved to any position on the
frame by turning the strap bar at a 45-degree angle until it disengages. Remove it completely from the
frame, reposition it, and turn it back onto the Inner Frame.
Placement of your strap bars on the unit depends on the load. On loads 3’ or taller, two strap bars
should always be used; one near the top of the load, and the other near the bottom of the load. The top
strap secures the load to the unit and the bottom strap prevents the load from sliding off of the toe plate.
On low standing loads you will only need to use one strap bar. To use the concave strap bar, position it
so that it is used as the top strap bar. Another strap bar should be used lower on the load so that it does
not slide off the toe plate.
To Adjust the Tension of the Strap Bar:
a. Remove the strap bar from the Lectro-Truck.
b. Lay the strap bar on a flat surface with the “ears” of the strap bar up.
c. Using a 7/16” wrench, loosen the nut on the rubber bumper.
• If the strap bar is too tight: Turn the bumper clockwise to decrease tension.
• If the strap bar is too loose: Turn the bumper counterclockwise to increase tension.
d. Tighten the nut on the rubber bumper.
e. Test the tension of the strap bar on the Lectro-Truck.
NOTE Keep the bottom strap bar (or concave attachment) about 2” above the motor box.
The strap is secured and tightened by the cam and toggle on the strap bar or concave attachment.
When the cam lever is pointing at you it is open and you can thread the strap through until your load is
secured. To lock the load, move the cam to the right, (Figure 3). Further tightening is achieved by
closing the toggle, after the cam is locked (Figure 4).
Cam Lever
Lock
Cam
Figure 3 Toggle
Close
Figure 4
Page 11 Installation of Strap Bars and Concave Attachment
General Lectro-Truck Information
If properly used, the Lectro-Truck will move loads safely and easily. There should never be a need to
physically lift your Lectro-Truck. The Lectro-Truck is designed to do the work for you. We have
thousands of Lectro-Truck operators that know how to properly use the Lectro-Truck, and swear by it for
everyday use.
After reading the operating procedures, you find yourself working harder when using the Lectro-Truck -
or it is no different than using a regular hand truck - something is being done incorrectly. The object of
the Lectro-Truck is to make it easier on the user. If this is not the case, review this manual, review our
training video, and if you still need help, call our office at 1-800-619-0625.
Lectro-Truck Owner's Manual

Page 12 General Lectro-Truck Information (continued)
ALWAYS REFER TO THESE GENERAL SAFETY RULES:
1. When in doubt as to whether or not you are able to handle a load by
yourself, always have someone else help.
2. Be sure that no one is in front of or below the Lectro-Truck during operation.
The operator(s) should be safely behind or above the load at all times.
3. Never practice climbing the steps with the Lectro-Truck without a load. If
you are practicing, start with a light load (300-500 lbs.), then progress to
heavier loads.
4. Be sure the load is securely strapped to the Lectro-Truck before attempting
to operate.
1. Place the toe plate of the Lectro-Truck securely under load, and properly strap the load into place.
2. Raise the wheels of the Lectro-Truck approximately 4-6” off the floor by pressing the “wheels up/ load
down” button.
3. Place your foot on the axle tube, grab onto the top of the Lectro-Truck, and pull back toward you.
Once the load is tipped back, you will find that - by raising or lowering the wheels - you will be able to
find a point where the load balances itself on the Lectro-Truck. This point is called the “balance point.”
Never raise the wheels of the Lectro-Truck over 6” to break back the load. Once the
load has been broken back, and is resting at angle on the toe plate and wheels, you can
run the wheels higher or lower to get your balance point. Raising the wheels too high
for break back may cause bodily harm.
Balancing a Load (“Breaking Back”)
NOTE The Models 1268E, 1260E, LTA6512E and are equipped with a “Hook Bar.” (Optional
on the LTA5512E.) In the event that you still are not able to break back your load by
raising the wheels only, fold the Hook Bar down, step up on it, and use your body weight
to help break back the load.
Standing a Load Upright
With a “standard” hand truck, standing a heavy load upright can be a tough move. Once you begin to
push your load forward, the weight of the load takes over and literally pulls you until the load is upright.
This type of procedure, with a standard hand truck, can lead to damage of your customer’s flooring, or
even product damage.
Standing a load upright is very simple with the Lectro-Truck:
Moving Over Smooth, Flat Surfaces
Break back load as described in "Balancing a Load." With the load resting at it’s balance point, grasp the
handles and pull back just enough to keep the toe plate off the floor. You should now be able to
comfortably move the load. If you are moving the load for a long distance, consider using a tripod
(Page 20.)
If there is too much weight for you to support at this point, you can adjust the load up or down by using
the buttons at the top of the machine. Every move and every load will be slightly different. Practice with
various loads until you are comfortable with moving loads over smooth, flat surfaces.
1. Bring the Lectro-Truck, with the load strapped in place, back to it’s balance point.
2. With the toe plate on the floor, step onto the axle tube (or hook bar) and lean the load forward.
3. Using your body weight as a counterbalance, gently ease the load forward until it is firmly on the floor.
4. Lower the wheels of the Lectro-Truck back to the ground and remove the straps from your load.
Lectro-Truck Owner's Manual

Page 13
Stair Climbing
Prior to climbing any staircase, be sure the steps are able to support the weight of the
Lectro-Truck and load before attempting to climb the stairs.
1. Pull the Lectro-Truck, with your load attached, to the base of the steps.
(Figure 5)
Figure 5
2. Push your load slightly forward, keeping the toe plate on the ground.
(You should lean your load just far enough for the wheels to clear the
front of the first step.) Push the load down/ wheels up button, so that the
wheels come to rest on the second step (figure 6.) Run the wheels up
until they are against the back of the second step.
Figure 6
3. Exert enough pressure downward and back toward you on the top of
the Lectro-Truck, so that the angle of the Lectro-Truck allows the inner
frame to clear the front edge of the bottom step. Push the load up/
wheels down button, and you will bring the load up to the first step.
(Figure 7)
Figure 7
NOTE You want to try to place the load about ¼ of the way in from the front of the step. This
helps you maintain proper balance.
NOTE
Many other users have found that it eases the operation if you use your forearm across
the top of the Lectro-Truck to add adequate force to push down and back as described
in #3 above. Example: Use your right forearm on the Lectro-Truck when pushing the
left button; and use your left forearm across the unit when pushing the right button.
Lectro-Truck Owner's Manual

Page 14
Stair Climbing (continued)
Figure 8
4. Repeat steps 2 and 3 until you have reached the top of the steps that
you are climbing.
Allow NO ONE under the load while climbing or descending steps.
Descending Stairs
1. At the top of the steps, recline your load back, and extend your load
down two steps. The load should come to rest about ¼ of the way back
from the front of the step. (Figure 9)
Figure 9
2. With the load firmly placed on the second step down, lean your
machine forward slightly (Figure 10), and push the wheels down/ load up
button, so your wheels move to the first step down.
Figure 10
NOTE You should only have to lean the Lectro-Truck far enough forward to make the wheels
clear the front of the step when brining your wheels down.
NOTE Recline the Lectro-Truck back far enough to miss the front of the steps you are moving
the load past.
Lectro-Truck Owner's Manual

Page 15
Descending Stairs (continued)
Figure 11
3. Repeat steps 1 and 2 until you are down to the bottom of the steps.
Your Lectro-Truck can be used as a portable dock leveler, as illustrated in
Figure 12. Loads can be easily moved from a dock, up or down, to a truck
or trailer, as the situation requires. The Lectro-Truck is equally as effective
in moving a load from ground to dock and dock to ground. Figure 12
NOTE
If you are moving a load from ground to dock (or vice versa)
use caution that the dock level, and the weight of the load
being moved, does not exceed the ability of the Lectro-Truck
user.
Portable Dock Leveler
Loading Onto a Truck or Trailer
If the Lectro-Truck model is able to reach the deck of the truck or trailer that you are loading to, the
Lectro-Truck can be a very resourceful tool in helping you load heavy, bulky objects.
1. While the load is at it’s balance point, pull the load to the rear of the truck or trailer, and stand the load
upright.
2. Climb into the rear of the truck or onto the trailer, and push the wheels up/ load down button. This will
bring the wheels up to the level of the deck. (Figure 13)
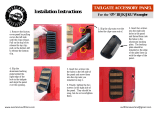
3. Fold the hook bar down from the back of the Lectro-Truck (all models excluding LTA4512.) Lock the
hook bar into the hook box. (Figure 14)
Figure 13
Figure 14
Hook Bar
Hook Box
Lectro-Truck Owner's Manual

Page 16
Loading Onto a Truck or Trailer (continued)
No one should stand under, or in the direct path of a load while it is being loaded or
unloaded from a truck or trailer.
4. Push the wheels down/ load up button, and start the load on it’s way up to the back of the truck.
(Figure 15). Continue lifting the load until it is all the way up. (Figure 16)
5. Disengage the hook bar from the hook box, and pull your load back. You are now in the back of the
truck, or on your trailer.
Figure 16
Figure 15
Unloading from a Truck or Trailer
Unloading is the reverse of loading.
1. Raise the wheels of the Lectro-Truck about 4”-6” off truck bed and break the load back to a balance
point.
2. Move the Lectro-Truck and the load to the back edge of the truck or tailgate.
3. With the load resting at it’s balance point, release and drop the hook bar from the Lectro-Truck.
4. Slide the hook bar into the hook box, and secure the Lectro-Truck in place.
5. Gently lean the Lectro-Truck forward until it is fully supported by the hook bar.
6. Push the load down/ wheels up” button and the load will travel to the ground.
7. When the load is on the ground, slide the hook bar out of the hook box. Fold the hook bar back in
place.
8. Tip the load slightly forward and lower the wheels to about 6” from the ground by pushing the “load
up/ wheels down” button. Once the wheels are down to the appropriate height, you are ready to move
your load.
To move loads over rough surfaces such as gravel, cracked black top, concrete - or any uneven
surfaces such as lawns, sand, or snow we recommend using an All-Terrain Wheel Attachment (Page
21), instead of a tri-pod. The tripod’s hard, swivel wheels can jam on small, hard items or sink into soft
surfaces. Tri-pods should only be used on flat, smooth surfaces.
Moving Over Rough, Irregular, and Soft Surfaces
Unloading the Lectro-Truck from a Tall Truck or Dock
If the framework of the Lectro-Truck will not allow you to reach the bed of your truck (or to the height of
the dock), construct a simple platform that will cut the distance to travel almost in half. For instance, if
your dock is 48” tall, construct a platform that is 12-24” tall, and move the load in two steps: 1 - Ground
to platform; 2 - Platform to dock.
Lectro-Truck Owner's Manual

Page 17
Overcoming Curbs and Other Obstacles
Curbs
Curbs are easy to step over. Back up to any curb that you must climb, and raise the wheels to the top of
the curb. Raise the wheels high enough and move them back over the curb to allow room for the load.
Raise the load just as you would to climb the last stair in a flight of stairs. To descend a curb, reverse the
procedure by extending the load out over the curb and pivoting the load upright on the toe plate. Lower
the wheels down, and move on.
Thresholds
Thresholds are handled in a similar fashion as curbs. If you are pushing the load forward, extend the
load over the threshold, pivot it upright and lower the wheels over the threshold. Extend the wheels up
and over the threshold first if you are pulling the load backward toward the door.
The Lectro-Truck should always be pulled - never pushed - over broken concrete,
blacktop, or cracks in the sidewalk.
NOTE The All-Terrain Wheel attachment (Page 21) should be used for moving loads over
broken concrete, blacktop, or cracks in the sidewalk.
Deep Steps
The normal depth (run) of steps is about 9” to 10”. However some steps are deeper and/or the riser is
shorter than normal. This causes the unit to lay down on the steps when you are trying to climb or
descend them. This not only prevents the operator from being able to break back the load far enough to
get the inner frame off the step when climbing, but also may cause the unit and load to want to roll down
the steps.
A suggestion would be to take one or two 2 x 4’s (28” long) and place them against the back of each
step, this will shorten the depth and bring your unit and load up at a safer angle. Thus, it will allow the
user to break back the load easier and make stair climbing easier. If the step is exceptionally deep, you
may need two 2 x 4’s.
More advanced users may not need the 2 x 4’s in this situation. If you are more accustomed to how the
Lectro-Truck operates, place your wheels in the middle of the step, as opposed to all the way to the rear
of the step. This will create the correct angle which you need to balance the Lectro-Truck on the steps.
Miscellaneous Other Situations
Unless the load is extremely light, we do not recommend that the Lectro-Truck be used
to climb excessively steep steps.
Turning at the Bottom of Steps
When going down a set of steps, and you are forced you to make a 90 degree turn at the bottom, this
can be made easier by preplanning the descent. As you are going down the steps, descend the steps
closest to the side in the direction that you have to turn. This will enable you to have room at the bottom
to stand behind the unit while spinning it the 90 degrees to go through the doorway.
At the bottom of the steps, with your load on the floor, and your wheels still on the steps, place a knotted
rag under the center of the toe plate. Next, set the load up vertically, run the wheels down, stopping the
wheels just above the bottom step. Do not run the wheels to the floor. With wheels up off the floor, they
will help you to pivot the unit around to make it through the doorway.
Lectro-Truck Owner's Manual

Page 18
Miscellaneous Other Situations (continued)
Pitched Steps
Steps that slant forward, or “pitched steps,” may require the use of the Lectro-Truck Wheel Brake
attachment (Page 25.) These “boots” slip over the wheels, and pivot down so that you have a flat
placement of your wheels. The wheel brakes also work well when steps are excessively worn or
chipped.
Short Landings
If you are short of landing space at top a set of steps, you will need to create some added landing
space. Place a solid block on the step below the landing that is the same height as the step and wider
then the wheels on the Lectro-Truck. Next, place a thick sheet of plywood on top of the block and over
the landing. Nail or attach the plywood to the block. This will increase the area of your landing. When
you are coming up the steps, you will need to run the wheels up onto this makeshift landing. Finally,
break back your load, and bring it all the way up to the landing.
When in doubt as to whether or not you are able to handle a load by yourself, always
have someone else help.
Going Over Bulk Heads
Some basements may have an external entrance with an upraised concrete border around the top of the
steps. This concrete edging usually is 4 to 6 inches thick and is raised about 6”-12” off the ground. To go
over this with a Lectro-Truck you will need to create a landing for the Lectro-Truck. This landing should
be the height of the concrete that is around the bulk head door. When going down into a bulk head,
bring your load up onto the landing, swivel the load, and descend the steps into the basement. As well,
when ascending from a basement that has a bulk head entrance, this landing provides a level surface to
bring your wheels to.
NOTE When constructing any platform that the Lectro-Truck will be on top of, be sure that it is
constructed sturdily enough so it is able to support the weight of the unit and the load.
Moving Under Low Doorways with a Tall Load
Lowering your load to go under a low doorway can be accomplished by one of the following:
1. Place the load back on the tripod. (Page 20-21) If you are still too tall to go through, but only by a
couple inches, press the load down/ wheels up button to lower the load.
2. Placing load back on the All Terrain Wheel attachment. (Page 21) Lowering the load to a balanced,
horizontal position will allow the operator to take even the tallest loads under low doorways.
Handling a Load While Moving Up or Down an Incline
If you are faced with the situation of moving a load up or down an incline, the footpads (located on the
bottom of the inner frame) can be used as a braking device. In this situation, using the All-Terrain
Wheel Attachment is best. (Page 21) At the top of the incline, lay your load back onto the All-Terrain
Wheels. Push the “Load Down” button until the footpads are just off the floor. As you move down the
incline slowly, if the load starts moving faster than you would like, simply lift on the rear of the Lectro-
Truck, and allow the footpads to slow the load.
Lectro-Truck Owner's Manual
/