GE current IND620 Operating instructions

Type
Operating instructions

GE Current IND620 is an emergency lighting fixture designed to provide reliable illumination during power outages, adhering to NFPA 101 code requirements. It includes a self-diagnostic function that monitors and conducts regular tests to ensure the unit's proper functioning, including battery, charger, and lamp status checks. The fixture also enables manual testing to verify its readiness. With a minimum 90-minute emergency operation and a monthly self-testing feature, this emergency lighting fixture assures adherence to safety standards.

GE Current IND620 is an emergency lighting fixture designed to provide reliable illumination during power outages, adhering to NFPA 101 code requirements. It includes a self-diagnostic function that monitors and conducts regular tests to ensure the unit's proper functioning, including battery, charger, and lamp status checks. The fixture also enables manual testing to verify its readiness. With a minimum 90-minute emergency operation and a monthly self-testing feature, this emergency lighting fixture assures adherence to safety standards.

Instructions for LED Emergency Lighting Fixture
IMPORTANT
IMPORTANT SAFEGUARDS
READ AND FOLLOW ALL SAFETY INSTRUCTIONS
SAVE THESE INSTRUCTIONS
FLEXIBLE CONDUIT ONLY
INSTALLATION (J-BOX MOUNTING)
INSTALLATION (CONDUIT )
WARNING:
Let the battery charge up for at least 24 hours.Then normal operation of
this unit should take effect . During an electrical power failure, the LED
lamps will automatically come on for a minimum of 90 minutes. In
accordance with NFPA 101, the emergency lighting system will go into a
self-testing mode monthly for a minimum of 30 seconds and annually for
90 minutes. Refer to your local codes for any additional requirements that
may apply.
When using electrical equipment, basic safety precautions should always be followed including the following:
1. Do not use outdoors.
2. Equipment should be mounted in locations and at heights where it will not be subject to tampering by unauthorized personnel.
3. Do not mount near gas or electric heaters.
4. The use of accessory equipment not recommended by the manufacturer may cause an unsafe condition.
5. Do not use this equipment for anything other than its intended use.
6. Servicing of this equipment should be performed by qualified personnel.
7. Disconnect AC power before servicing.
1. Feed fixture leads through the back plate and connect to AC power supply (Fig A). For 120V use black and white wires and
for 277V, use red and white wires.
2. Attach back plate to J-Box and secure with screws.
3. Complete the battery connection. (Fig. B)
4. Align snaps and push housing directly onto the back plate (Fig. C). Apply continuous AC power and test the unit.
1. Secure back plate to wall surface . Route wires through hole in conduit flange and make conduit connection. For 120V,
use black and white wires and for 277V, use red and white wires.
2. Complete the battery connection (Fig. B).
3. Align snaps and push housing directly onto the back plate (Fig. C). Apply continuous AC power and test the unit.
Unused wires must be capped using enclosed wire nuts.
Fig.A (J-Box) Fig.B Fig.C
BATTERY CONNECTOR
PLUG IN
ÔÛÜ
ÐÑÉÛÎÛÜÿ
REMOTE CAPABLE
WIRING DIAGRAM
Note:
Unused input lead must
be properly insulated with
wire nut or other approved
method.
AC INPUT CONNECTOR
(MOUNTING PLATE)
AC INPUT CONNECTOR
(MOUNTING PLATE)
REGULAR
LAMP
READY
TEST BATTERY
RED
BLACK
WHITE
YELLOW(+)
BLUE(-)
WHITE
YELLOW(+)
BLUE(-)
LAMP
RED
BLACK
WHITE
277V
120V
0V
CHARGER
BOARD
LAMP
TO REMOTE
READY
TEST BATTERY
RED
BLACK
WHITE
YELLOW(+)
YELLOW(+)
YELLOW(+)
BLUE(-)
WHITE
YELLOW(+)
BLUE(-)
BLUE(-)
LAMP
RED
BLACK
WHITE
277V
120V
0V
WHITE
WHITE
CHARGER
BOARD
Note:
Use 18-22 AWG stranded
wire to connect remote lamp
heads.
Note:
To connect additional heads
in remote, this jumper cable
needs to be replaced by the
remote head cable located in
the accessory bag.
INSTRUCTIONS FOR SELF-DIAGNOSTIC TEST:
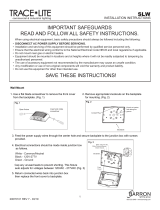
Once the unit is properly installed according to the installation instruction sheet and AC power supplied,
the dual color LED indicator will come ON and the self-diagnostic test function will automatically initiate.
The LED indicates the unit’s status. A STEADY GREEN LED indicates normal service; FLASHING
GREEN indicates the unit is testing; GREEN/RED FLASHING indicates the battery is charging; RED (in
different combinations) would indicate a service alert. Refer to the SERVICE INDICATION chart below for
more details. The LED would be OFF when the unit is in emergency mode.
SELF-DIAGNOSTIC SERVICE
The self-diagnostic function is factory preset and performs the following:
a. Monitoring of battery, battery charger, and lamps (both local and remote lamps when applicable )
b. Self-testing and a 30-second or longer discharge once every 30 days, after AC power has been
supplied for a minimum of 24 hrs.
c. Self-testing and a 30-minute or longer discharge once every 180 days, after AC power has been
supplied for a minimum of 24 hrs.
d. Self-testing and a 90-minute discharge once every 365 days, after AC power has been supplied for
a minimum of 24 hrs.
SERVICE INDICATION
MANUAL TESTING
WARNING:
The unit also provides for manual testing by pushing the test button in a specific pattern.
Action Reaction & LED Indication
Push test button Once (within 2 seconds) 30-second test: FLASHING Green
Push test button Twice (within 2 seconds) 30-minute test: Green FLASHING twice
Push test button Three times (within 2
seconds)
90-minute test: Green FLASHING three times
Push test button and hold for 3 seconds (In
test mode)
Cancels test. If self-test is cancelled it is recommended that a
manual test of the same duration be performed at a more
convenient time to ensure compliance
Push test button and hold for 6 seconds (In
test mode)
System reset
a) Make sure that power is OFF before making any electrical connections.
b) Unused wires must be capped using enclosed wire nuts.
LED Indicator Status
One flash red Replace electronics
Two flash red Replace battery
Four flash red
Replace lamp head board
Five flash red
Replace Remote lamp head or Remote lamp head disconnected
Steady red
Battery disconnected
Solid green
Trickle charge
Flashing green
In test
Red/Green flashing
Hi charge
  • Page 1 1
  • Page 2 2
  • Page 3 3

GE current IND620 Operating instructions

Type
Operating instructions

GE Current IND620 is an emergency lighting fixture designed to provide reliable illumination during power outages, adhering to NFPA 101 code requirements. It includes a self-diagnostic function that monitors and conducts regular tests to ensure the unit's proper functioning, including battery, charger, and lamp status checks. The fixture also enables manual testing to verify its readiness. With a minimum 90-minute emergency operation and a monthly self-testing feature, this emergency lighting fixture assures adherence to safety standards.

Ask a question and I''ll find the answer in the document

Finding information in a document is now easier with AI