Page is loading ...

A B CB
A
B
C
B
4 Background Support Installation
5ft. Width – Use A+C Rods (10'x5')
-7.5 ft Width – Use A+B+C Rods
-10 ft Width – Use A+B+B+C Rods (5'x10')
(Attach Clamps onto Crossbar before finalizing
Installation)
.
-
3. Cirrus™ and Umbrella Installation
Open Umbrella and insert Umbrella Rod through Cirrus™ Umbrella Hole
-Secure Cirrus™ and Umbrella onto stud on lightstand.
-Screw in bulb into Ceramic Socket on Cirrus™
-Repeat Step 1&2 for remaining Cirrus™.
-
2 Crossbars 3 Crossbars 4 Crossbars
5 Backdrop Muslin Installation
Using attached Muslin Clamps or Backdrop Holders, attach
each corner of Backdrop Muslin.
-Attach the remaining middle Muslin Clamps onto Backdrop
Muslins.
(Note: This step only needs to be done once. For removal,
muslin clamps stay on muslin for easy re-installation.)
(To purchase more Muslin Clamps or Backdrop Holders,please
contact us at 562-404-0493 or email service@lincostudio.com).
.
-
x 2
Softboxes
x 4
Light Stands
x 2
Backdrop Stands
x 1
Crossbar Set
x 5
Clamps
x 3
Backdrops
x 2
Backdrop Holders
x 4
Light Heads
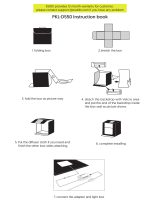
1: Cirrus™ and Pheno Square™ Reflector/Softbox Installation
x 4
Bulbs
Please call 562-404-0593 or email service@lincostudio.com
if you have any questions.
Our Business Hours are 08:00-16:30 PST Monday-Friday.
x 2
Umbrella Softboxs
2. Cirrus™ and Pheno Square™ Reflector/Softbox Installation
Secure attached Pheno Square™ and Cirrus™ onto Lightstand Stud.
-Screw in bulb into Ceramic Socket on Cirrus™
(Cirrus™ can ONLY accept Linco Inc.(R) LED and Fluorescent Bulbs.)
-Cover Pheno Square™ Reflector with diffuser for Softbox. (Optional)
-Repeat Step 1&2 for remaining Cirrus™.
-
LINCO INC. CIRRUS™ & PHENO SQUARE INSTRUCTIONS
(AM032)
/