Page is loading ...

80446339
Revision B
October 2012
Save These Instructions
Contact-Cooled Rotary Screw Air Compressor
Product Information
R37-160
110812.16.23
PRINT LANGUAGE
ENGLISH
SPANISH
FRENCH
PORTUGUESE

EN
80446339 Rev B EN-2
ABOUT THIS MANUAL . . . . . . . . . . . . . . . . . . . . . . . . . . . . . . . . . . . . . .3
SAFETY . . . . . . . . . . . . . . . . . . . . . . . . . . . . . . . . . . . . . . . . . . . . . . . . . . . .3
RECEIPT / HANDLING . . . . . . . . . . . . . . . . . . . . . . . . . . . . . . . . . . . . . . .3
Receipt . . . . . . . . . . . . . . . . . . . . . . . . . . . . . . . . . . . . . . . . . . . . . . . .3
Unpacking and Handling . . . . . . . . . . . . . . . . . . . . . . . . . . . . . . . . . .3
Long Term Storage . . . . . . . . . . . . . . . . . . . . . . . . . . . . . . . . . . . . . . .3
INSTALLATION . . . . . . . . . . . . . . . . . . . . . . . . . . . . . . . . . . . . . . . . . . . . .4
Location in Plant . . . . . . . . . . . . . . . . . . . . . . . . . . . . . . . . . . . . . . . .4
Discharge and Condensate Piping . . . . . . . . . . . . . . . . . . . . . . . . . . .4
Electrical . . . . . . . . . . . . . . . . . . . . . . . . . . . . . . . . . . . . . . . . . . . . . .5
Watercooled . . . . . . . . . . . . . . . . . . . . . . . . . . . . . . . . . . . . . . . . . . . .5
Cooling Water Piping . . . . . . . . . . . . . . . . . . . . . . . . . . . . . . . . . . . . . . . . . . 5
Venting the water system . . . . . . . . . . . . . . . . . . . . . . . . . . . . . . . . . . . . . . 5
Draining the water system . . . . . . . . . . . . . . . . . . . . . . . . . . . . . . . . . . . . . 6
Adjusting the aftercooler trim valve . . . . . . . . . . . . . . . . . . . . . . . . . . . . 6
Water quality recommendations . . . . . . . . . . . . . . . . . . . . . . . . . . . . . . . 6
Integrated Dryer . . . . . . . . . . . . . . . . . . . . . . . . . . . . . . . . . . . . . . . .6
Environmental Limits . . . . . . . . . . . . . . . . . . . . . . . . . . . . . . . . . . . . .6
GENERAL INFORMATION. . . . . . . . . . . . . . . . . . . . . . . . . . . . . . . . . . . .7
Integrated Dryer Operation . . . . . . . . . . . . . . . . . . . . . . . . . . . . . . . .7
OPERATING INSTRUCTIONS FOR VARIABLE SPEED
DRIVE VSD. . . . . . . . . . . . . . . . . . . . . . . . . . . . . . . . . . . . . . . . . . . . . . . .8
Basic Operation . . . . . . . . . . . . . . . . . . . . . . . . . . . . . . . . . . . . . . . . .8
Prior to starting . . . . . . . . . . . . . . . . . . . . . . . . . . . . . . . . . . . . . . . . . . . . . . . 8
Initial check sequence . . . . . . . . . . . . . . . . . . . . . . . . . . . . . . . . . . . . . . . . . 8
Start sequence . . . . . . . . . . . . . . . . . . . . . . . . . . . . . . . . . . . . . . . . . . . . . . . . 8
Stop sequence . . . . . . . . . . . . . . . . . . . . . . . . . . . . . . . . . . . . . . . . . . . . . . . . 8
Warm up mode. . . . . . . . . . . . . . . . . . . . . . . . . . . . . . . . . . . . . . . . . . . . . . . . 8
Blower control . . . . . . . . . . . . . . . . . . . . . . . . . . . . . . . . . . . . . . . . . . . . . . . . 8
Emergency stopping . . . . . . . . . . . . . . . . . . . . . . . . . . . . . . . . . . . . . . . . . . 8
Restarting after emergency stopping . . . . . . . . . . . . . . . . . . . . . . . . . . . 8
SG Controller Controls (VSD). . . . . . . . . . . . . . . . . . . . . . . . . . . . . . . .9
Display screen . . . . . . . . . . . . . . . . . . . . . . . . . . . . . . . . . . . . . . . . . . . . . . . . 9
Current status screen . . . . . . . . . . . . . . . . . . . . . . . . . . . . . . . . . . . . . . . . . 10
Main menu. . . . . . . . . . . . . . . . . . . . . . . . . . . . . . . . . . . . . . . . . . . . . . . . . . . 10
Operator setpoints . . . . . . . . . . . . . . . . . . . . . . . . . . . . . . . . . . . . . . . . . . . 11
Options. . . . . . . . . . . . . . . . . . . . . . . . . . . . . . . . . . . . . . . . . . . . . . . . . . . . . . 12
Sensor Calibration. . . . . . . . . . . . . . . . . . . . . . . . . . . . . . . . . . . . . . . . . . . . 13
Trip history . . . . . . . . . . . . . . . . . . . . . . . . . . . . . . . . . . . . . . . . . . . . . . . . . . 14
Clock functions. . . . . . . . . . . . . . . . . . . . . . . . . . . . . . . . . . . . . . . . . . . . . . . 14
Energy status messages . . . . . . . . . . . . . . . . . . . . . . . . . . . . . . . . . . . . . . 14
Warnings . . . . . . . . . . . . . . . . . . . . . . . . . . . . . . . . . . . . . . . . . . . . . . . . . . . . 14
Service warnings . . . . . . . . . . . . . . . . . . . . . . . . . . . . . . . . . . . . . . . . . . . . . 15
Initial check trips: . . . . . . . . . . . . . . . . . . . . . . . . . . . . . . . . . . . . . . . . . . . . 15
Trips. . . . . . . . . . . . . . . . . . . . . . . . . . . . . . . . . . . . . . . . . . . . . . . . . . . . . . . . . 15
OPERATING INSTRUCTIONS FOR FIXED SPEED FS. . . . . . . . . 16
SG Controller Controls (Fixed Speed) . . . . . . . . . . . . . . . . . . . . . . . 16
Display screen . . . . . . . . . . . . . . . . . . . . . . . . . . . . . . . . . . . . . . . . . . . . . . . 16
Current status. . . . . . . . . . . . . . . . . . . . . . . . . . . . . . . . . . . . . . . . . . . . . . . . 17
Main menu. . . . . . . . . . . . . . . . . . . . . . . . . . . . . . . . . . . . . . . . . . . . . . . . . . . 18
Operator setpoints . . . . . . . . . . . . . . . . . . . . . . . . . . . . . . . . . . . . . . . . . . . 18
Options. . . . . . . . . . . . . . . . . . . . . . . . . . . . . . . . . . . . . . . . . . . . . . . . . . . . . . 18
Sensor Calibration. . . . . . . . . . . . . . . . . . . . . . . . . . . . . . . . . . . . . . . . . . . . 19
Scheduled Start / Stop . . . . . . . . . . . . . . . . . . . . . . . . . . . . . . . . . . . . . . . . 19
Trip history . . . . . . . . . . . . . . . . . . . . . . . . . . . . . . . . . . . . . . . . . . . . . . . . . . 19
Prior to starting . . . . . . . . . . . . . . . . . . . . . . . . . . . . . . . . . . . . . . . . . . . . . . 20
Starting the compressor . . . . . . . . . . . . . . . . . . . . . . . . . . . . . . . . . . . . . . 21
Stopping the compressor . . . . . . . . . . . . . . . . . . . . . . . . . . . . . . . . . . . . . 21
Stopping the compressor in an emergency. . . . . . . . . . . . . . . . . . . . . 21
Re–starting after an emergency . . . . . . . . . . . . . . . . . . . . . . . . . . . . . . . 21
OPERATING INSTRUCTIONS XE SERIES CONTROLLER . . . . . 22
User Interface. . . . . . . . . . . . . . . . . . . . . . . . . . . . . . . . . . . . . . . . . 22
LED status icons. . . . . . . . . . . . . . . . . . . . . . . . . . . . . . . . . . . . . . . . . . . . . . 22
Command keys. . . . . . . . . . . . . . . . . . . . . . . . . . . . . . . . . . . . . . . . . . . . . . . 22
Navigation keys . . . . . . . . . . . . . . . . . . . . . . . . . . . . . . . . . . . . . . . . . . . . . . 22
Display layout. . . . . . . . . . . . . . . . . . . . . . . . . . . . . . . . . . . . . . . . . . . . . . . . 23
Folder navigation and icons. . . . . . . . . . . . . . . . . . . . . . . . . . . . . . . . . . . 23
Page navigation. . . . . . . . . . . . . . . . . . . . . . . . . . . . . . . . . . . . . . . . . . . . . . 23
Accessing parameters . . . . . . . . . . . . . . . . . . . . . . . . . . . . . . . . . . . . . . . . 23
Dashboard icons . . . . . . . . . . . . . . . . . . . . . . . . . . . . . . . . . . . . . . . . . . . . . 23
Folder Options (Fixed Speed) . . . . . . . . . . . . . . . . . . . . . . . . . . . . . 24
Home folder . . . . . . . . . . . . . . . . . . . . . . . . . . . . . . . . . . . . . . . . . . . . . . . . . 24
Operator settings folder. . . . . . . . . . . . . . . . . . . . . . . . . . . . . . . . . . . . . . 25
Events folder . . . . . . . . . . . . . . . . . . . . . . . . . . . . . . . . . . . . . . . . . . . . . . . . 26
Trip history . . . . . . . . . . . . . . . . . . . . . . . . . . . . . . . . . . . . . . . . . . . . . . . . . . 28
Maintenance folder . . . . . . . . . . . . . . . . . . . . . . . . . . . . . . . . . . . . . . . . . . 28
General settings folder . . . . . . . . . . . . . . . . . . . . . . . . . . . . . . . . . . . . . . . 29
Status folder. . . . . . . . . . . . . . . . . . . . . . . . . . . . . . . . . . . . . . . . . . . . . . . . . 31
Factory settings folder . . . . . . . . . . . . . . . . . . . . . . . . . . . . . . . . . . . . . . . 32
Folder Options (Variable Speed). . . . . . . . . . . . . . . . . . . . . . . . . . . 33
Home folder . . . . . . . . . . . . . . . . . . . . . . . . . . . . . . . . . . . . . . . . . . . . . . . . . 33
Operator settings folder. . . . . . . . . . . . . . . . . . . . . . . . . . . . . . . . . . . . . . 34
Events folder . . . . . . . . . . . . . . . . . . . . . . . . . . . . . . . . . . . . . . . . . . . . . . . . 36
Trip history . . . . . . . . . . . . . . . . . . . . . . . . . . . . . . . . . . . . . . . . . . . . . . . . . . 38
Maintenance folder . . . . . . . . . . . . . . . . . . . . . . . . . . . . . . . . . . . . . . . . . . 39
General settings folder . . . . . . . . . . . . . . . . . . . . . . . . . . . . . . . . . . . . . . . 39
Status folder. . . . . . . . . . . . . . . . . . . . . . . . . . . . . . . . . . . . . . . . . . . . . . . . . 41
Factory settings folder . . . . . . . . . . . . . . . . . . . . . . . . . . . . . . . . . . . . . . . 43
NOTICES AND DISCLAIMERS . . . . . . . . . . . . . . . . . . . . . . . . . . . . . . 47
WARRANTY . . . . . . . . . . . . . . . . . . . . . . . . . . . . . . . . . . . . . . . . . . . . . . 47
CONTENTS
110812.16.23

EN-3 80446339 Rev B
EN
SAFETY
Locate, read, understand and follow all Danger, Warning, Caution, and
Operating Instructions on the product and in all Manuals. Failure to
comply with safety precautions described in the manuals supplied with
the product, this manual or any of the labels and tags attached to the
product may result in death, serious injury or property damage.
Check that all labels, tags and data (name) plates are in place and legible.
It is your responsibility to make this information available to others.
If you have any questions about safety or procedures not included in
•
•
•
•
this manual, ask your supervisor or contact any Ingersoll Rand oce or
qualied Ingersoll Rand distributor.
RECEIPT / HANDLING
Receipt
Before signing the delivery receipt, inspect for damage and missing parts. If
damage or missing parts are apparent, make the appropriate notation on the
delivery receipt, then sign the receipt. Immediately contact the carrier for an
inspection.
All material shall be held in the receiving location for the carrier’s inspection.
Delivery receipts that have been signed without a notation of damage or
missing parts are considered to be delivered “clear.” Subsequent claims are
then considered to be concealed damage claims. Settle damage claims
directly with the transportation company.
If you discover damage after receiving the compressor (concealed damage),
the carrier shall be notied within 15 days of receipt and an inspection shall
be requested by telephone with conrmation in writing. On concealed
damage claims, the burden of establishing that the compressor was
damaged in transit reverts back to the claimant.
Read the compressor nameplate to verify it is the model ordered, and read
the motor nameplate to verify it is compatible with your electrical conditions.
Make sure electrical enclosures and components are appropriate for the
installation environment.
Unpacking and Handling
The compressor will normally be delivered with a polyethylene or other
cover. If a knife has to be used to remove this cover, ensure that the exterior
paintwork of the compressor is not damaged.
Incorporated within the base of the compressor are slots to enable a fork lift
truck to move the compressor. Ensure truck forks are fully engaged on both
sides. Alternatively a special lifting frame can be used to enable a crane or
hoist to move the compressor. Use only marked lifting points.
Once the packaging and pallet are discarded and the compressor is in its
nal position, remove the yellow painted transit brackets from the resilient
mounts and store for future use or discard.
For Variable Speed Drive (VSD)
(3) brackets at the separator tank
(1) bracket from the air end discharge elbow.
(1) bracket from the air end support.
For Fixed Speed (FS)
(3) brackets at the separator tank
(1) bracket from the air end support.
(1) bracket from the motor mounting bracket.
Long Term Storage
If the product will not be commissioned within six months of receipt, it
should be prepared for long term storage. Please contact Ingersoll Rand for
details.
•
•
•
•
•
•
ABOUT THIS MANUAL
The purpose of this manual is to provide site planning, installation and operation guidelines for the compressor.
For supporting documentation refer to Table 1.
Table 1: Product Manuals
PublicationPublicationPublicationPublication ProductProductProductProductProduct
Part/Document Number by RegionPart/Document Number by RegionPart/Document Number by RegionPart/Document Number by RegionPart/Document Number by RegionPart/Document Number by RegionPart/Document Number by Region
AmericasAmericasAmericas EMEA *
Product Safety Information ManualProduct Safety Information ManualProduct Safety Information ManualProduct Safety Information ManualProduct Safety Information ManualProduct Safety Information ManualProduct Safety Information ManualProduct Safety Information ManualProduct Safety Information ManualProduct Safety Information ManualProduct Safety Information ManualProduct Safety Information Manual AllAll 80446313 80446156 80446321
Product Maintenance ManualProduct Maintenance ManualProduct Maintenance ManualProduct Maintenance ManualProduct Maintenance ManualProduct Maintenance ManualProduct Maintenance Manual AllAll 80446354 80446248 80446362
Product Parts Information Manual
R55-75 kW
R37-45 kW
80446271
80448095
R132-160 kW Single-Stage2-160 kW Single-Stage2-160 kW Single-Stage 80446057
R90-160 kW Two-StageR90-160 kW Two-StageR90-160 kW Two-StageR90-160 kW Two-StageR90-160 kW Two-StageR90-160 kW Two-Stage 80446065
* Europe, Middle East and Africa
Product specication sheets and reference drawings are also available.
110812.16.23

EN
80446339 Rev B EN-4
INSTALLATION
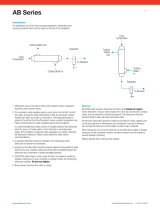
Location in Plant
Figure 1: Typical Air System
Key
Compressor
Air Receiver Dry Tank
Air Dryer
Compressed Air Filters
System Demand Points
Vent/Drain Trap
Isolation Valve
Air Receiver (“Wet Tank”)
The compressor can be installed on any level oor capable of supporting
it. A dry, well ventilated area where the atmosphere is as clean as possible
is recommended.
The area selected for the location of the compressor should be free of
dust, chemicals, metal lings, paint fumes and overspray.
Hard surfaces may reect noise with an apparent increase in the decibel level.
When sound transmission is important, a sheet of rubber or cork can be installed
beneath the compressor to reduce noise. Flexible piping may be required.
See the general arrangement drawing for minimum space requirements
for normal operation and maintenance.
Minimum space in front of the control panel door as required by national
or local codes shall be maintained.
Ambient temperatures higher than 46° C (115° F) shall be avoided, as well
as areas of high humidity.
NOTICE
A minimum of 1 m (3.3 ft) all around the compressor is recommended.
If headroom is restricted, then the exhaust should be ducted or
deected away from the compressor.
Screw type compressors should not be installed in air systems with
reciprocating compressors without means of isolation such as a common
receiver tank. It is recommended that both types of compressor be
piped to a common receiver tank using individual air lines.
The compressor is shipped with the shipping restraints in place.
Ensure that these are removed to allow free movement of the drive
assembly during operation. Each restraint is painted yellow.
Discharge and Condensate Piping
See Figure 1.
It is essential when installing a new compressor (1) to review the total air
system. This is to ensure a safe and eective total system.
One item which should be considered is liquid carryover. Installation of air
dryers (3) is always good practice since, when properly selected and installed,
they can reduce any liquid carryover to zero.
An air receiver tank (2) is recommended to ensure that the total system
volume is sucient.
1.
2.
3.
4.
5.
6.
7.
8.
•
•
•
•
•
•
Discharge piping should be at least as large as the discharge connection
of the compressor. All piping and ttings should be suitably rated for the
discharge pressure. Discharge piping should not exert any unresolved
moments or force on the compressor.
It is good practice to install line lters (4).
Include a vent or drain trap (6) to vent the discharge pipework downstream
from the minimum pressure check valve located on the separator tank and
upstream of the rst system isolation valve (7).
This compressor has an internal discharge check valve. An external check
valve is not required. An isolation valve (7) is required within 1 m (36 in) of the
compressor discharge.
NOTICE
There should be no plastic or PVC piping attached to this compressor
or used for any lines down stream with exception of condensate
removal lines.
NOTICE
The discharged air contains a very small percentage of compressor
coolant and care should be taken to ensure that downstream
equipment is compatible.
When two rotary compressors are operated in parallel, provide an isolation
vaIve (7) and drain trap (6) for each compressor before the common receiver.
Ensure the discharge piping is arranged to prevent water from being forced
into the non-operating compressor.
A wet tank (8) is recommended in cases where the air dryer is a regenerative
desiccant type to prevent short cycling the compressor during the purging
cycle when plant air demand is slow.
The built-in aftercooler reduces the discharge air temperature below the dew
point (for most ambient conditions). Therefore, considerable water vapor is
condensed. To remove this condensation, each compressor with a built-in
aftercooler is furnished with a combination condensate separator/trap.
A dripleg assembly and isolation valve should be mounted near the
compressor discharge. A drain line should be connected to the condensate
drain in the base.
NOTICE
The drain line shall slope downward from the base to work properly.
For ease of inspection of the automatic drain trap operation, the drain
piping should include an open funnel.
NOTICE
For low volume systems that may not include an air receiver tank (2),
compressor response time may need adjusting. Contact your local
Ingersoll Rand service provider.
NOTICE
Do not use the compressor to support the discharge pipe.
110812.16.23

EN-5 80446339 Rev B
EN
Electrical
A qualied electrician shall perform all electrical installations and service.
The compressor shall be properly grounded / earthed in compliance with all
applicable standards and regulations (local, state, country, federal, etc.).
Installation of this compressor shall be in compliance with all applicable
standards and regulations (local, state, country, federal, etc.).
The compressor shall have its own isolator situated adjacent to it. The fuse
protecting the circuit and the compressor shall be selected in accordance
with recognized code requirements on the basis of the data provided in the
specication sheet.
Feeder cables shall be sized to ensure that the circuit is balanced and not
overloaded by other electrical equipment. The length of wiring from a
suitable electrical feed point is critical as voltage drops may impair the
performance of the compressor.
NOTICE
For VSD, cable sizes may vary considerably so the line reactor is
equipped with copper bus connections. These connections can accept
bolts between 6 mm and 12 mm.
Feeder cable connections to incoming terminals L1-L2-L3 shall be tight and
clean.
The applied voltage shall be compatible with the compressor data plate
ratings.
The control circuit transformer has dierent voltage tappings. Ensure that
these are set for the specic applied voltage prior to starting.
Remove the blind plate to cut a hole for incoming power connection. If it
is necessary to make a hole in the control box in a dierent location, care
should be taken to not allow metal shavings to enter the starter and other
electrical components within the box. If another hole is used, the original
hole shall be blocked o.
The feeder cable shall be suitably glanded in to the starter box to maintain
proper ingress protection. Fixed speed starter boxes are rated for NEMA 4
/IP65, and variable speed drive starter boxes are rated for NEMA12/IP54.
For variable speed drive starter boxes, the feeder cable shall be glanded to
ensure that dirty air does not by-pass the lters.
On completion of electrical installation, check that the blower or fan motor
rotation is correct.
Variable speed drive compressors are designed for use, where the electricity
supply is separated from nearby residential and commercial areas. If the
compressor is to be used in a light industrial, residential or commercial
environment where the local supply network is shared, further radio
frequency (RF) screening measures may be required. Consult your local
distributor/supplier for details of the optional RF lter.
Variable speed drive compressors have an anti-condensation heater
and thermostat in the electrical box. This circuit can be connected to
an independent electrical supply of either 110 V or 230 V single phase,
dependent on the country of installation. The supply shall be suitably fused
and an independent isolator installed adjacent to the compressor. Verify that
the thermostat is adjusted to 29˚ C (85˚ F). This shall be done in accordance
with recognized codes. It is good practice, and sometimes mandatory,
to display suitable signs warning that the compressor has two separate
electrical supplies which both shall be isolated before any work is attempted.
For Variable speed drive compressors, the heater circuit can also be supplied
from the 110 V tapping of the control transformer and connected as shown
on the schematic wiring diagram furnished separately from this manual.
NOTICE
Main and fan motor insulation shall be tested by a qualied electrician
prior to initial start-up or following an extended shutdown period in
cold and damp conditions.
Watercooled
Cooling Water Piping
NOTICE
Water piping to and from the compressor package shall be at least
as large as the package connection size. Do not undersize the water
piping.
Isolation valves with side drains should be installed on both the inlet and
outlet lines. To maintain cooler cleanliness and reliability, it is important to
install a strainer of 2 mm mesh size on the inlet line. Strainers are available
from Ingersoll Rand.
For sea water applications (sea water option only) a zinc anode is not
recommended as it will deteriorate the copper oxide lm on the 70/30
copper-nickel alloy tubes in contact with sea water. To minimize galvanic
corrosion and provide the greatest corrosion protection to the coolers, it
is strongly recommended that a section of iron pipe (>300 mm length) be
connected as close as possible to the air compressor package water inlet
connection. The iron pipe will act as the sacricial anode for the copper-
nickel tubes and therefore shall be considered a regular maintenance and
replacement item. For this reason, the section of iron pipe should be installed
so that it can be easily replaced (e.g. with a union joint.).
The air compressor has a normally closed solenoid valve that is tted to
the water outlet side within the package. The valve is wired into the air
compressor control circuit and closes when the compressor stops.
Carefully inspect the water system before installing the air compressor
package. Ensure that the piping is free of scale and deposits that may
restrict water ow to the air compressor package. If water cleanliness is poor,
ltration installed on the water inlet pipe line is recommended.
Proper operation of the compressor requires that the cooling water ow
be provided at a maximum supply temperature of 46° C (115° F). See the
compressor engineering data sheets for cooling water ow rates.
Water temperature and pressure gauges should be installed in the water
piping for use in any fault nding of the water system. Water pressure should
ideally be between 3 and 5 bar (43.5 and 72.5 psi) but shall not be above 10
bar (145 psi).
Water cleanliness is also extremely important. Cleaning of coolers as a result
of fouling is a customer responsibility. Therefore, it is highly recommended
that proper water quality shall meet the requirements listed in WATER
QUALITY RECOMMENDATIONS later in this section.
Venting the water system
Air should be vented from the water side of the system to avoid poor
performance and water hammer. Since the air compressor uses dierent
type heat exchangers depending on your selection of “fresh water cooled”
or “harsh water cooled” system, the venting procedure is dierent. Be sure to
use the correct procedure below.
Fresh water coolers (brazed plate heat exchangers):
1. Disconnect the water stop valve in the water outlet line of the
compressor.
2. Open the inlet water valve(s) to allow the water to ow to the
compressor.
3. Allow all the air to escape from the system and observe water at the
water outlet port.
4. Connect the water stop valve.
Harsh water coolers (shell and tube heat exchangers):
1. Locate the water system vent cocks on top of the aftercooler and oil
cooler.
2. Open the water valve(s) allowing water to ow to the package.
3. Open the vent cocks and allow all air to escape from the system.
When water is observed at the vent cocks, close them.
110812.16.23

EN
80446339 Rev B EN-6
Draining the water system
Should it become necessary to completely drain the water system, use the
following procedures specic to the water cooled option you have.
Fresh water coolers (brazed plate heat exchangers):
1. Disconnect the inlet water line from the connection located at the
rear of the compressor.
2. Disconnect the water stop valve in the water outlet line of the
compressor.
3. Allow the system to completely drain.
Harsh water coolers (shell & tube heat exchangers):
1. Disconnect the inlet and discharge water lines from the
connections located at the rear of the compressor.
2. Locate the aftercooler and oil cooler. Remove the drain plugs
located at the bottom of the coolers.
3. Open the vent ports in the top of the aftercooler and oil cooler.
4. Allow the system to completely drain.
Adjusting the aftercooler trim valve
See the piping and instrumentation diagram provided separately from
this manual. The coolers are piped in a “parallel” water ow arrangement
with a manual trim valve controlling the ow through the aftercooler. The
aftercooler trim valve is factory set and should not need adjusting but if
disturbed use following procedure.
1. Close valve fully clockwise and then open two full turns.
2. With the compressor running loaded observe the package
discharge temperature on the controller display. It should be
approximately 8° C (15° F) above the water inlet temperature.
3. If the temperature is too high, open the valve ¼ turn and wait one
minute. If the temperature is too low, close the valve ¼ turn and
wait one minute. Repeat the incremental movements until the
desired temperature is reached.
4. Put a “Warning − Do Not Adjust” label on the valve or t a lock.
Water quality recommendations
Water quality is often overlooked when the cooling system of a watercooled
air compressor is examined. Water quality determines how eective the
heat transfer rate, as well as the ow rate, will remain during the life of the
compressor. It should be noted that the quality of water used in any cooling
system does not remain constant during the operation of the system.
Evaporation, corrosion, chemical and temperature changes, aeration, scale and
biological formations aect the water makeup. Most problems in a cooling
system rst appear as a reduction in the heat transfer rate, then in a reduced
ow rate or increased pressure drop, and nally with damage to the system.
Scale: Scale formation inhibits eective heat transfer, yet it does help
prevent corrosion. Therefore, a thin uniform coating of calcium carbonate
is acceptable on the inner surface. Perhaps the largest contributor to scale
formation is the precipitation of calcium carbonate out of the water. This is
dependent on temperature and pH level. The higher the pH value, the greater
the chance of scale formation. Scale can be controlled with water treatment.
Corrosion: In contrast to scale formation is the problem of corrosion.
Chlorides cause problems because of their size and conductivity. Low pH
levels promote corrosion, as well as high levels of dissolved oxygen.
Fouling: Biological and organic substances (slime) can also cause problems,
but in elevated temperature environments such as cooling processes they
are not a major concern. If they create problems with clogging, commercial
shock treatments are available.
To ensure good operation life and performance of the compressor cooling
system, the recommended acceptable ranges for dierent water constituents
are included below:
Integrated Dryer
Do not connect condensate drains common to other pressurized drain
lines in a closed circuit. Make sure the outow from the condensate drains
is unimpeded. Connect the condensate piping in such a way to ensure that
sound levels are kept to a minimum during drainage.
Ensure that all condensate is disposed of in a responsible manner, in
compliance with all applicable standards and regulations (local, state,
country, federal, etc.).
The ambient air around the dryer and compressor shall not contain solid
or gaseous contaminants. All compressed and condensed gases can
generate acids or chemical products which may damage the compressor or
components inside the dryer. Take particular care with sulphur, ammonia,
chlorine and installations in marine environments.
Environmental Limits
The standard compressor package is designed for the following conditions:
Indoors only
Area not considered to be a high dust area.
Ambient temperature range 2 to 46
o
C (35-115
o
F)
Ingersoll Rand oers the following options for xed speed compressors that
extend the environmental limits:
Outdoor modication
Low ambient option (-23 to 46
o
C / -15 to 115
o
F) at sea level
High ambient option (2 to 55
o
C / 35 to 131
o
F) at sea level)
High dust air lter
High dust package lter
•
•
•
•
•
•
•
•
Table 2: Acceptable Limits for Cooling Water Constituents
ACCEPTABLE MAXIMUM LIMITS
Substance Test Interval Fresh Water (Brazed Plate Heat
Exchanger
Dirty Water / Sea Water (Shell & Tube Heat
Exchanger)
Langelier Index (LI) Monthly 0 to 1 -0.5 to 2.5
Ammonia [NH3], ppm Monthly <1 <2
Ammonium [NH4-1], ppm Monthly <2 <5
Chlorides [Cl-], ppm Monthly <80 <1000
Copper [Cu], ppm Monthly <0.01 <0.5
Dissolved Oxygen (DO) [O2], ppm Weekly <0.1 <3
Iron + Manganese [Fe + Mn], ppm Monthly <0.3 <2
Nitrate [NO3-], ppm Monthly <100 <125
Oil & Grease, ppm Monthly <5 <5
Silicon Dioxide (silica) [SiO2], ppm Monthly <30 <100
Sulfates [SO4-2], ppm Monthly <70 <250
110812.16.23

EN-7 80446339 Rev B
EN
GENERAL INFORMATION
The compressor is an electric motor driven, contact cooled screw compressor,
complete with all necessary components piped, wired and baseplate
mounted. It is a totally self contained air compressor package.
The standard compressor is designed to operate in an ambient range of 2° C
to 46° C (35° F to 115° F). The standard maximum temperature of 46° C (115°
F) is applicable up to an elevation of 1000 m (3280 ft) above sea level. Above
this altitude, signicant reductions in ambient temperature are required if a
standard motor is to be used.
The compressor is managed by the onboard electronic controller. The
controller and drive system operate together to vary the speed of the
compressor to deliver compressed air at the target pressure.
For xed speed (FS) models, the capacity is automatically controlled via
‘ON-OFF LINE’. The compressor will operate to maintain a set discharge line
pressure and is provided with an auto restart system for use in plants where
air demand varies widely.
Panel instrumentation is provided to indicate the compressor operating
conditions and general status.
The air/coolant mixture discharges from the compressor into the separation
system. This system removes all but a few ppm of the coolant from the
discharge air. The coolant is returned to the cooling system and the air passes
to the aftercooler and out of the compressor through the moisture separator.
Air is pulled into the compressor by the cooling blower and through the
coolant cooler and aftercooler.
By cooling the discharge air, much of the water vapor naturally contained in
the air is condensed and is drained from the built-in moisture separator and
drain.
The coolant system consists of a sump, cooler, thermostatic valve and a
lter. When the compressor is operating, coolant is forced by air pressure
from the separator tank to the thermostatic element. The position of the
element (a direct result of coolant temperature) will determine whether the
coolant circulates through the cooler, bypasses the cooler, or mixes the two
paths together to maintain an optimum compressor discharge temperature.
This temperature is controlled to preclude the possibility of water vapor
condensing. By injecting coolant at a suciently high temperature, the
discharge air coolant mixture temperature will be kept above the dew point.
For variable speed drive models, the system is enhanced by a control logic
that varies the cooling blower speed dependent on the intake and discharge
temperatures and hence controls the injection temperature even closer while
saving blower motor energy.
The compressor is provided with a temperature sensor which will shut the
compressor down in case of excessive temperature. This setting is typically
109° C (228° F).
Eective coolant ltration is provided by the use of a screw on, heavy duty
coolant lter.
NOTICE
Standard air compressors are factory lled with compressor coolant.
It is recommended to perform a coolant analysis every 2000 hours or
3 months to monitor condition and determine when to change the
coolant. If an analysis is not performed, the recommended coolant
change interval is 8000 hours or two years, whichever comes rst.
For compressors supplied with optional food grade coolant, it is
recommended to perform a coolant analysis every 500 hours or every
month to monitor condition and determine when to change the
coolant. If an analysis is not performed, the recommended coolant
change intervals is 2000 hours or six months, when utilizing the food
grade lter supplied with the compressor. For compressors running
food grade coolant without the food grade lter, the change interval
should be 1000 hours or three months, whichever comes rst.
NOTICE
Fixed speed compressors should not be connected to variable speed
drives. Please contact your local Ingersoll Rand representative before
inverter duty conversion.
CAUTION
For xed speed models, the compressor may not reach its normal
operating temperature during periods of low demand. Sustained
operation at low demand can result in the buildup of condensate in
the coolant. If this situation occurs, the lubricating characteristics
of the coolant can be impaired, which may lead to damage of the
compressor.
The compressor should be allowed ample loading time.
Integrated Dryer Operation
In the default mode, the dryer is non-cycling. The stop button must be
pressed to shut o the dryer.
In the energy ecient mode, the dryer may run up to 6 minutes before
it shuts o automatically during the Start/Stop mode of the compressor
package. Note the dryer could be o for an extended period if the
compressor needs to come back on right away.
NOTICE
If ISO Class 4 dew point standards are critical to your application,
run the compressor in unload mode (xed speed) or idle mode
(variable speed) for one minute at startup to allow the dryer to reach
the required dew point before the compressor begins providing
compressed air.
110812.16.23

EN
80446339 Rev B EN-8
OPERATING INSTRUCTIONS FOR VARIABLE SPEED DRIVE (VSD)
Basic Operation
NOTICE
The language and compressors of measure displayed on the controller
will be preset before leaving the factory. If these are required to be
changed, contact your local Ingersoll Rand service provider.
Prior to starting
Check that the coolant level is at least visible in the center of the sight glass
and add coolant if necessary. Refer to the maintenance procedures for setting
the correct level.
Ensure that the discharge air isolation valve is open. Switch on the main
electrical isolation switch. The control panel will illuminate, indicating that
the line and control voltages are available.
The contrast of the SG controller display may be adjusted by turning the
small screw which is on the right hand side of the controller when accessed
through the starter cabinet door.
Initial check sequence
The controller will perform an initial check sequence if the compressor
receives initial power to the controller or has experienced an trip reset. While
the initial check sequence occurs, the controller will display a “Checking
Machine” message.
During the initial check sequence, the controller will check the control system
for proper operation. During this time, if any items are found inoperative, a
trip will occur and the compressor will not start.
After completion of the initial check sequence, the controller will then display
“READY TO START’. This process should be completed within 10 seconds.
Start sequence
The compressor will initially start by the operator pressing the local start
button or receiving a remote start command. The compressor will start
loaded and will ramp up the motor speed to its minimum speed. Once the
minimum speed has been achieved, the compressor will begin to control
pressure by using its speed regulation. When the system pressure reaches
the target pressure, the compressor will start to slow. If the system pressure
rises to the immediate stop pressure setpoint the compressor will stop. If
the system pressure rises to the auto stop setpoint and the compressor is at
minimum speed, the compressor will stop.
Stop sequence
The compressor can be stopped by a local or remote stop, a shutdown due
to a trip, or an emergency stop. All of the above conditions will cause the
compressor to stop immediately, except the local or remote stop. A local or
remote stop will open the blowdown valve and the compressor will run for
up to 10 seconds or until the pressure in the separator tank falls to 2.4 bar
(35 psi) before stopping. The compressor will stop if the system pressure
reaches the automatic stop or immediate stop pressure setpoints. However,
if the compressor stops for this reason, it will automatically restart when the
system pressure falls below the target pressure.
NOTICE
If the compressor has to be stopped in an emergency depress the
emergency stop button located underneath the instrument panel.
Warm up mode
A warm up cycle occurs when the compressor’s airend discharge temperature
doesn’t reach the required warm up temperature (82°C/180°F) for two
consecutive operational cycles. On a warm up cycle, instead of stopping,
the compressor will continue to run with the blowdown valve open.
blower will operate at minimum speed. The compressor will run like this
display the message “Warm Up Mode”. If the pressure falls during this time
period, the compressor will return to normal operation.
Blower control
The blower speed varies in some conditions to assist in controlling the
aftercooler approach temperature and the coolant injection temperature. The
blower motor has its own variable speed drive and will ramp up and down as
the compressor starts and stops.
Emergency stopping
If the compressor has to be stopped in an emergency press the emergency
stop button located underneath the instrument panel.
This will over-ride the normal unload/stop button and will immediately stop
the compressor.
Restarting after emergency stopping
malfunction, identify and correct the fault before attempting to restart.
compressor can be operated safely before restarting.
Refer to the PRIOR TO STARTING and START SEQUENCE instructions earlier in
this section before restarting the compressor.
NOTICE
of rotation of the dryer condenser fan. If the fan is not rotating in the
direction indicated by the rotation arrow decal, reverse two of the
wires at the main power supply or at the contactor in the package
starter box. Perform the proper stop sequence and lockout/tagout
the main electrical supply before making changes to the wiring.
110812.16.23

EN-9 80446339 Rev B
EN
SG Controller Controls (VSD)
Figure 2: Controller Interface
1. Emergency Stop
Pressing this switch stops the compressor immediately. The blowdown valve
will open to vent pressure in the separator tank to atmosphere. Note the
system downstream of the separator tank may still contain pressure. The
compressors can not be restarted until the switch is manually reset. Turn the
switch knob clockwise and press the reset button twice to reset.
On reset, the controller will display a message indicating that the compressor
is ready to start.
2. Start
Pressing this button will activate the start sequence.
3. Stop
Pressing this button will activate the stop sequence.
4. Not used
5. Not used
6. Arrows
The up and down buttons have multiple functions relating to the right half
of the display screen. When lists are presented, the buttons are used to move
up or down through the items on the list. The small arrow(s) displayed in the
upper right hand corner of the display screen indicate when you can move
up (designated by an arrow head pointing up) and/or down (designated by
an arrow head pointing down) through the list.
When the value of a specic compressor operating parameter is highlighted
on the display screen for the purpose of changing that value, the buttons are
used to change the value itself.
7. Display Buttons
The functions of the three buttons below the display screen are dened by
the words immediately above them in the bottom line of the screen. Each
function, such as MAIN MENU, STATUS, etc., is described in appropriate
sections in this manual.
Display screen
Figure 3: Display screen
The display screen is divided into three functional areas, as seen in the typical
CURRENT STATUS screen shown here.
The left side continuously shows the package discharge pressure in large
numbers with the line directly below showing the running condition of the
compressor.
The right side shows various items or lists such as the compressor’s CURRENT
STATUS readings, the MAIN MENU, the OPERATOR SETPOINTS list, etc. Any of
the lists can be moved up or down by pressing the arrow buttons to the right
of the screen. The small arrow(s) displayed in the upper right corner of the
screen indicate when you can move up and/or down through a list. The arrow
buttons are also used to change an individual item’s value. At certain times,
items and/or their values are “highlighted”. This means that they are displayed
as light characters on a dark background.
The bottom of the screen is divided into thirds with the words in each small
box showing the function of the button directly beneath it. The words will
change in these boxes depending on what actions are permitted at any
particular time. The action resulting from pressing each of these buttons is
indicated in the operator panel ow diagram later in this section. This can be
used as a quick reference of how to step the controller screen through any
desired function.
110812.16.23

EN
80446339 Rev B EN-10
Current status screen
The CURRENT STATUS screen is considered to be the “normal” display that the
controller shows.
The following items and their present values can be displayed on the right
side of the screen by pressing the up and down arrow buttons.
The controller automatically returns the display to this CURRENT STATUS
screen from other screens if no buttons are pressed within 30 seconds.
Use the UP and DOWN arrows to move between selections.
CURRENT STATUS items
% Energy Saving
% Capacity
Package kW
Package Discharge Temperature
Airend Discharge Temperature
Injected Coolant Temperature
Sump Pressure
Separator Pressure Drop
Coolant Filter Pressure Drop
Inlet Vacuum
Inlet Filter
Total Hours
Motor Speed
Remote Pressure (optional)
Time and Date
Program Name
Version of Drive Software
•
•
•
•
•
•
•
•
•
•
•
•
•
•
•
•
•
When the CURRENT STATUS screen is displayed, pressing the ENERGY STATUS
button will toggle the display to the ENERGY STATUS screen. Likewise, when
the ENERGY STATUS screen is displayed, pressing the STATUS button will
toggle the display to the CURRENT STATUS screen.
The ENERGY STATUS screen displays the following items.
ENERGY STATUS Items
Average Package kW-hr
Average % Capacity
Average Capacity
Energy Cost
Energy Savings
Lifetime Energy Savings
Main menu
Figure 4: Main Menu Screen
The MAIN MENU screen can be accessed from the CURRENT STATUS screen by
pressing the MAIN MENU button, identied by the words “MAIN MENU” in the
bottom line of the screen directly above the center button.
The MAIN MENU screen is the point from which various operator functions
can be accessed. Refer to the operator panel ow diagram.
Each of the functions can be chosen by using the up and down arrows to
highlight it on the screen.
The controller will go to the highlighted function if the SELECT button is
pressed or will return to the CURRENT STATUS screen if the STATUS button is
pressed.
The language and compressors of measure are preset prior to the compressor
leaving the factory. If you need to change these settings, contact any
Ingersoll Rand oce or qualied Ingersoll Rand distributor.
•
•
•
•
•
•
110812.16.23

EN-11 80446339 Rev B
EN
Figure 5: Operator Panel Flow Diagram
Operator setpoints
Figure 6: Operator Setpoint Screen
Setpoints are user-adjustable variables in the controller logic that can be set
using the OPERATOR SETPOINTS screen shown here.
The name and value of each of the setpoints listed can be seen on the screen
by moving the list up and down using the arrow buttons.
Setpoints associated with options are described in the OPTIONS sections.
110812.16.23

EN
80446339 Rev B EN-12
Table 3: Operator Setpoints
OPERATOR SETPOINTS DEFAULT MIN. MAX. STEP UNIT
Target pressure 100 65 145 1 PSI
Automatic stop pressure 110 Target +1 Target +10 1 PSI
Immediate stop pressure 120 Auto Auto +10 1 PSI
Blowdown mode O O On - -
% savings compared to Modulation - - - -
Energy Rate 0 0 9999.999 - -
Reset Avg. -- - - Reset Date -
Service menu 1 1 25535 1 -
A setpoint’s value can be changed by rst highlighting the item and its value
and pressing the SELECT button to highlight just the value. When the value
line is highlighted by itself, the value can be adjusted using the up and down
arrow buttons. The CANCEL and SET buttons appear at this time. Press the
SET button to enter the new value or press the CANCEL button to return the
value of the setpoint prior to using the arrows. The displayed value will ash
twice to indicate that it has been entered into the setpoint and the pair of
setpoint item and value display lines will again be highlighted together.
Operator setpoints can be exited by pressing the STATUS or MAIN MENU
buttons. If no buttons are pressed within 30 seconds, the display will return
to the CURRENT STATUS screen.
Target Pressure
The compressor will try to operate at this pressure setting. The target
pressure ranges and step sizes for each compressor of measure are listed in
the table below.
Table 4: Target Pressure Ranges and Step Sizes
Unit Min Max (1S / 2S) Step
PSI 65 145 1
BAR 4.4 10 0.1
kPa 440 1000 10
KGCM 4.5 10.2 0.1
Automatic Stop Pressure
The compressor will stop once the system pressure rises to this pressure
and the compressor is operating at the minimum speed. The range for this
setpoint will be the target pressure+1 to target pressure+10 psi.
Immediate Stop Pressure
The compressor will stop if the system pressure rises to this pressure. The
range for this setpoint will be the automatic stop pressure to automatic stop
pressure+10 psi.
Blowdown Mode
Two stage compressors will always blowdown when signalled to stop.
If this mode is selected to ON, the compressor will open the blowdown
valve anytime that it stops. This will vent pressure from the airend and
the separator tank. If this mode is selected to OFF, the blowdown valve
will remain closed when the compressor stops due to an automatic stop.
Blowdown mode is set on at all times for two stage models. Blowdown mode
will be shown as ”Not Installed” at the controller display.
% Savings Compared To
This setpoint is to determine what VSD’s percent of savings is compared to.
The modes of operation for comparing VSD to are modulation, online/oine,
and geometry. The percent savings value is displayed by the status message,
“% energy savings”.
Energy Rate
The energy cost and the energy savings items on the ENERGY STATUS screen
will use this value for their calculations. It is intended to be a monetary value
representing the user’s power cost per kilowatt hour.
Reset Averaging
When this setpoint is selected and the SET button is pressed, the items on
the ENERGY STATUS screen will be reset, and the date the reset occurred will
be displayed in this setpoint. This selects the beginning of the time period
over which the ENERGY STATUS information will be calculated. Note that the
“Lifetime Energy Savings” item will not be reset.
Service Menu
For use by Ingersoll Rand personnel only.
Options
Figure 7: Options Screen
Options are turned on or o and their associated values are set using the
OPTION screen shown here.
Some options are purchased, require additional compressor hardware and
shall rst be enabled by service personnel. The name and value of each of
the following options can be seen by moving the list up and down using the
arrow buttons.
An option item’s value can be changed the same way that OPERATOR
SETPOINTS values are changed.
110812.16.23

EN-13 80446339 Rev B
EN
Table 5: Option Item Values
OPTIONS Items SELECTION MIN. MAX. Step Unit Installed
Option
Required
Remote Pressure Sensor ON/OFF No
Sequencer ON/OFF No
Remote Start/Stop ON/OFF No
Power Out Restart ON/OFF Yes
Power Out Restart Time 10 600 1 SEC Yes
Scheduled Start Day day day 1 day Yes
Scheduled Start 00:00 23:59 1 time Yes
Scheduled Stop Day day day 1 day Yes
Scheduled Stop 00:00 23:59 1 time Yes
Modbus Protocol ON/OFF/ICU No
Modbus Address 1 247 1 No
Remote Pressure Sensor
If this setting is set to ON, the compressor will use a remote mounted
pressure sensor for controlling system pressure by comparing it to the Target
Pressure setting and the Auto Stop Pressure setting. The pressure measured
by this sensor is shown in the CURRENT STATUS display as the Remote
Pressure reading. The local sensor at the package discharge is still used for
Immediate Stop, for certain Trip conditions and for display on the left side of
the screen.
Sequencer
If this setting is set to ON, the compressor will be able to start and stop by
commands from a host device. When the controller receives a load command
from the host device, the compressor will start. When the controller receives
an unload command, the compressor will respond as though executing an
immediate stop.
Remote Start/Stop
If this setting is set to ON, the compressor can be started and stopped from a
remote device.
Power Out Restart
If this setting is set to ON, the compressor will automatically restart when
power is returned to the compressor if it was operating when power was
removed.
Power Out Restart Time
If the power out restart setting is set to ON, this is the number of seconds
from the time power is restored until the compressor starts. The power out
restart horn will sound during this time.
Scheduled Start Day
This option is the selection for the day that a scheduled start will take place.
The selections are Sunday, Monday, Tuesday, Wednesday, Thursday, Friday,
Saturday, Daily (Su- Sa), Weekdays (M - F), or Weekends. This option setpoint
will work with the scheduled start setpoint.
Scheduled Start
This option will cause the compressor to start on the scheduled start day
at the time stored in this setpoint. To disable this option, set the value of
scheduled start equal to the value of scheduled stop.
Scheduled Stop Day
This option is the selection for the day that a scheduled stop will take place.
The selections are Sunday, Monday, Tuesday, Wednesday, Thursday, Friday,
Saturday, Daily (Su - Sa), Weekdays (M - F), or Weekends. This option setpoint
will work with the scheduled stop setpoint.
Scheduled Stop
This option will cause the compressor to stop on the scheduled stop day
at the time stored in this setpoint. To disable this option, set the value of
scheduled stop equal to the value of scheduled start.
Sensor Calibration
Figure 8: Sensor Calibration Screen
Pressure sensor calibration is done through the SENSOR CALIBRATION screen.
Sensor calibration can only take place when the compressor is stopped.
Calibration needs to be done only after a sensor has been replaced or the
controller has been replaced.
Each of the sensors listed below can be chosen by using the up and down
arrow buttons to highlight it on the screen.
SENSOR CALIBRATION Items
Sensor 1VAPT (Inlet Vacuum)
Sensor 4APT (Package Discharge)
Sensor 3APT (Wet Side Sump)
Sensor 5CPT (Coolant Filter In)
Sensor 6CPT (Coolant Filter Out)
Sensor 2APT (Interstage) (On 2 stage compressors only)
Sensor 7APT (Aftercooler-dryer compressors only)
Select the highlighted sensor by pressing the SELECT button. Press the
CALIBRATE button to start the automatic calibration procedure, or press the
CANCEL button to not calibrate it and return to the sensor list.
The calibration screen can be exited by pressing either the STATUS or MAIN
MENU buttons. If no buttons are pressed within 30 seconds, the display will
return to the CURRENT STATUS screen.
•
•
•
•
•
•
•
110812.16.23

EN
80446339 Rev B EN-14
Trip history
Trip History displays each of the Trip messages for the last 15 trips
experienced by the compressor. It also gives access to displaying the
compressor operating conditions that existed at the time of each trip. The
rst one shown, “Trip History 1”, is the most recent Trip to occur. Note that
multiple, consecutive EMERGENCY STOP trips are not recorded as separate
trips. Only the rst one will be shown.
Figure 9: Trip History Screen
Each of the last 15 trip messages can be seen by moving the Trip History list
up and down using the arrow buttons. Pressing the SELECT button when
one of the trips is highlighted will display the list of compressor values that
existed at the time that particular trip occurred.
The name and value of each of the items can be seen by moving the list up
and down using the arrow buttons. Pressing the TRIP HIST. button will return
the display to the TRIP HISTORY screen.
Trip histories can be exited by pressing either the STATUS or MAIN MENU
buttons. If no buttons are pressed within 30 seconds, the display will return
to the CURRENT STATUS screen.
Clock functions
Figure 10: Clock Functions Screen
The date and time for the real time clock is set through the CLOCK
FUNCTIONS screen. Use the up and down arrows to highlight either TIME or
DATE. Select the highlighted setting by pressing SELECT.
If TIME is selected, rst the hours will be highlighted. Adjust the hours (00-23
hour clock) by using the up and down arrows. Once the correct time is in the
display, press SET to highlight the minutes. Adjust the minutes (00-59) and
then press SET to complete setting the time.
If DATE is selected, rst the month will be highlighted. Adjust the month by
using the up and down arrows and then press SET to highlight the date. Once
the correct date is displayed, press SET to highlight the year. Once the correct
year is displayed, press SET to complete setting the date.
Energy status messages
Figure 11: Energy Status Message Screen
The Energy Status display can be selected by pressing the ENERGY STATUS
button. The following items and their present values will be displayed on the
right side of the screen by pressing the up and down arrows.
AVERAGE PACKAGE kW HOURS - This displays the average package kW per
hour for the time period that was started by selecting the reset averaging
setpoint. This value includes the blower power usage.
AVERAGE % CAPACITY - Displays the compressor’s average percent capacity
for the time period that was started by selecting the reset averaging setpoint.
The value is determined by taking the average package kW per hour,
removing the blower power usage and then dividing that number by the
motor kW per hour for that size of compressor at 100% capacity.
AVERAGE CAPACITY - Displays the compressor’s average capacity in cfm
or m for the time period that was started by selecting the reset averaging
setpoint.
ENERGY COST - Displays the energy cost of the compressor for the time
period that was started by selecting the reset averaging setpoint. This is
calculated by multiplying the kW hours of the motor and the blower by the
energy rate.
ENERGY SAVINGS - Displays the energy savings of the compressor for
the time period that was started by selecting the reset averaging setpoint
as compared to a conventional compressor. This value is determined by
calculating how much a conventional compressor motor would cost to
operate at the same average capacity and then subtracting the motor energy
cost of the VSD compressor from it. It is assumed that the blower cost is the
same in both packages.
LIFETIME ENERGY SAVINGS - Displays the lifetime energy savings of the
compressor at the existing energy rate and at the average percent capacity as
compared to a conventional compressor.
Warnings
When a WARNING occurs, a large question mark will ash on the display
screen.
If multiple WARNINGS exist, the small up/down arrows will appear in the
upper right corner of the display screen. The multiple WARNINGS can be seen
by pressing the up and down arrow buttons. Pressing the STATUS button will
display the CURRENT STATUS screen with the WARNING button indicating
that a WARNING still exists.
A WARNING will not cause the compressor to shut down. The compressor
will continue to run in its normal operation and the WARNING will remain
displayed until reset.
A Warning needs to be reset by the operator by pressing the RESET button twice.
The possible Warning messages are as follows:
HIGH AIREND DISCHARGE TEMP - This will occur if the Airend Discharge
exceeds 105° C (221° F) and is not adjustable.
CHANGE COOLANT FILTER - This warning will occur if the high side pressure
is 1.4 bar (20 psig) greater than the low side pressure.
CHANGE INLET FILTER - This will occur if the Inlet Vacuum is greater than
0.05 bar (0.7 psig).
CHANGE SEPR ELEMENT - This will occur if the pressure dierential across
the separator is 1.0 bar (12 psig).
SENSOR FAILURE - This will occur if a sensor is recognized as missing or
broken.
HIGH DISCHARGE PRESS - Will occur if the compressor is under the control
of an external device, such as an ISC, and the discharge pressure is greater
than the immediate stop pressure.
AUXILIARY WARNING 1 or 2 - Will occur if the auxiliary warning input closes.
REMOTE PRESSURE SENSOR FAILURE (option) - This will occur if the
remote pressure sensor fails. If this happens, the controller will start using the
package discharge pressure sensor to measure system pressure.
CONDENSATE DRAIN ERROR - For compressors tted with the no loss drain
trap, this message occurs if the condensate drain error contacts close while
the compressor is running.
HIGH VSD AMBIENT TEMPERATURE - This warning will occur if the VSD
ambient temperature gets within 5% of the shutdown value.
HIGH SUMP PRESSURE - Occurs if the compressor is running, the
compressor is warm, the package discharge pressure is at least 4.5 bar
(65 psi), and the sump pressure is more than 1 bar (15 psi) above the target
pressure. The occurrence of this warning will cause the controller to evaluate
the need to lower the compressor’s speed.
110812.16.23

EN-15 80446339 Rev B
EN
Service warnings
SERVICE - Service warnings occur when the compressor has operated a
certain number of hours, based on the total hours. Service warnings can have
multiple levels, depending on the service level selection.
This will be set prior to the compressor being shipped from the factory. When
a service warning occurs, contact your local Ingersoll Rand service provider.
Initial check trips:
The following trips will only occur when the compressor is not running. These
trips are related to high temperature, power loss, and sensor calibration. They
will have the same display mode as other trips.
HIGH AIREND DISCH TEMP- Will occur if the airend discharge temperature is
greater than 95% of 109° C (228° F).
CHECK SETPOINTS - Will occur if the controller has determined that some of
the data stored in memory contains unacceptable values.
INVALID CALIBRATION - Will occur if the sensor zero value is -10% to +1% of
its scale. See Sensor Calibration.
Trips
Figure 12: Trip Screen
When a trip occurs, a large exclamation mark in a triangle will ash on the
display screen. The display message will indicate what caused the trip.
The compressor will stop and cannot be re-started again until the trip
condition no longer exists and the trip message reset.
Pressing the STATUS button will display the STATUS screen. The presence of
the TRIP button indicates that a trip condition still exists. Trip Status is the list
of compressor operating conditions that existed at the time of the trip.
The name and value of each of the items listed can be seen by moving the list
up and down using the arrow buttons. Pressing the TRIP button will return
the display to the trip screen and the RESET button.
The trip needs to be reset by the operator by pressing the RESET button
twice. Any exceptions to this are explained in the trip descriptions.
The possible trip messages are as follows;
EMERGENCY STOP- This will occur if the emergency stop button is engaged.
The button shall be disengaged before the trip can be cleared.
BLOWER FAULT- This will occur if a blower fault is sensed.
HIGH AIREND DISCH TEMP- This will occur if the airend discharge
temperature is greater than 109° C (228° F).
REMOTE START FAILURE- This will occur if the remote start button is pressed
after the compressor is running or if the remote start button remains closed.
REMOTE STOP FAILURE- This will occur if the remote stop button remains
open and either start button is pressed.
SENSOR FAILURE - This will occur if a sensor is recognized as missing or
broken.
VSD FAULT - The VSD fault is read from the drive. The controller will read the
status menu of the variable speed drive. If a fault condition is returned in the
status information, the controller will issue a VSD FAULT trip and display the
number of the fault condition.
STOP FAILURE - This will occur if the compressor should be stopped but the
motor is still running above minimum speed 4 seconds after the stop signal
is given.
HIGH START PRESSURE - If the sump pressure is above 6.9 bar (100 psi)
when the compressor starts, the controller will open the blowdown valve
during the rst few seconds of starting (3 to 7 seconds). If the sump pressure
does not fall to 6.9 bar (100 psi) during that time period, this shutdown will
occur.
CHECK MOTOR ROTATION - This will occur if the controller reads a negative
speed from the VSD when starting.
VSD COMMUNICATION FAILURE - This will occur if the controller does not
receive a response from the VSD when requesting information. This trip will
take about 8 seconds to occur.
VSD INITIALIZATION FAULT - Will occur if the controller is unable to
establish communications with the VSD after a power up.
LOW SUMP PRESSURE - Will occur if the compressor is operating at or above
the minimum speed and the sump pressure drops below 1 bar (15 psi) for
15 seconds.
REPLACE COOLANT FILTER - This will occur if the coolant lter is blocked
and requires changing.
INCORRECT VSD TYPE - Will occur at power up if the VSD type does not
match the size of the compressor.
CHECK INCOMING POWER - This will occur if the compressor should be
running and the AC input voltage, as read from the VSD, falls below 100 VAC.
There is a delay of 2 seconds on this trip in case the power quickly returns.
Phase monitor can also cause this trip.
HIGH INTERSTAGE PRESSURE - If the interstage pressure is over 7 bar
(100 psi) while the compressor is running and the compressor is a two stage
compressor.
HIGH COOLANT FILTER PRESSURE DROP - Occurs if the compressor has
been running for at least 7 seconds, the compressor is warm, already has a
change coolant lter warning, the motor is running, and the coolant lter
pressure drop is greater than 2.5 bar (35 psi).
HIGH INLET VACUUM - Occurs if the compressor is running loaded, the
motor is running, and the inlet vacuum is greater than 0.1 bar (1.8 psi)
(vacuum).
HIGH SUMP PRESSURE - Occurs if the compressor is running, the
compressor is warm, and any one of the three following conditions exist.
1. The sump pressure is above the maximum oine pressure by
25 psi.
2. The separator pressure drop is measured to be more than 25 psi
and the package discharge pressure is at least 65 psi.
3. The sump pressure is above 170 psi.
110812.16.23

EN
80446339 Rev B EN-16
OPERATING INSTRUCTIONS FOR FIXED SPEED (FS)
Figure 13: Controller Interface
SG Controller Controls (Fixed Speed)
1. EMERGENCY STOP
Pressing this switch stops the compressor immediately. The compressor
can not be restarted until the switch is manually reset. Turn the switch knob
clockwise to reset.
The controller display will illuminate, indicating that the line and control
voltages are available.
2. START
Pressing this button will start the compressor if the display shows READY TO
START. The compressor will start and load if there is sucient demand for air.
3. STOP
Pressing this button will activate the unloaded stop sequence. If the
compressor is running loaded, it will unload and continue to run unloaded
for an adjustable 10 to 30 seconds and then stop. If the compressor is running
unloaded, it will stop immediately.
4. UNLOAD
Pressing this button will cause the compressor to unload and remain
unloaded. The display will indicate that the compressor is RUNNING
UNLOADED and MODE:UNLOAD.
5. LOAD
Pressing this button will cause the compressor to load if the compressor is
running and if the DISCHARGE PRESSURE is less than the ONLINE PRESSURE.
This also returns the compressor to the operating mode that is specied by
the MODE OF OPERATION set point.
The other ve buttons provide access to various operator–selectable
functions and compressor operating conditions. The purpose of each of these
buttons is dened by the display screen and the particular function being
performed at that time.
6. ARROWS
These up and down buttons have multiple functions relating to the right half
of the display screen. When lists are presented, the buttons are used to move
up or down through the items on the list. The small arrow(s) displayed in the
upper right hand corner of the display screen indicate when you can move
up (designated by arrow head pointing up) and/or down (designated by
arrow head pointing down) through the list.
When the value of a specic compressor operating parameter is highlighted
on the display screen for the purpose of changing that value, the buttons are
used to change the value itself.
7. DISPLAY BUTTONS
The functions of the three buttons below the display screen change and
are dened by the words immediately above them in the bottom line of
the screen. Each function, such as MAIN MENU, STATUS, etc., is described in
appropriate sections in this manual.
Display screen
Figure 14: Display Screen
The display screen is divided into three functional areas, as seen in the typical
CURRENT STATUS screen shown here.
The left side continuously shows the package discharge pressure in large
numbers showing the running condition of the compressor and the line
below that showing the present mode of operation.
The right side shows various items or lists such as the compressor’s CURRENT
STATUS readings, the MAIN MENU, the OPERATOR SETPOINTS list, etc. Any of
the lists can be moved up or down by pressing the arrow buttons to the right
of the screen. The small arrow(s) displayed in the upper right corner of the
screen indicate when you can move up and/or down through a list. The arrow
buttons are also used to change an individual item’s value. At certain times,
items and/or their values are “highlighted”. This means that they are displayed
as light characters on a dark background.
110812.16.23

EN-17 80446339 Rev B
EN
The bottom of the screen is divided into thirds with the words in each small
box showing the function of the button directly beneath it. The words will
change in these boxes depending on what actions are permitted at any
particular time. The action resulting from pressing each of these buttons is
indicated in the Operator Panel Flow Diagram later in this section. This can
be used as a quick reference of how to step the controller screen through any
desired function.
Current status
Figure 15: Current Status Screen
The CURRENT STATUS screen is considered to be the “normal” display that the
controller shows.
The following items and their present values can be displayed on the right
side of the screen by pressing the up and down arrow buttons.
CURRENT STATUS ITEMS
Package Discharge Temperature
Airend Discharge Temperature
Injected Temperature
Sump Pressure
Separator Pressure Drop
Coolant Filter
Coolant Filter IN PR
Coolant Filter OUT PR
Inlet Vacuum
Inlet Filter
Total Hours
Loaded Hours
Software Title and Version
•
•
•
•
•
•
•
•
•
•
•
•
•
Figure 16: Operator Panel Flow Diagram
The controller automatically returns the display to this CURRENT STATUS
screen from other screens if no buttons are pressed within 30 seconds.
The MAIN MENU screen can be accessed from the CURRENT STATUS screen by
pressing the MAIN MENU button, identied by the words “MAIN MENU” in the
bottom line of the screen directly above the centre button.
NOTICE
Use the UP and DOWN arrows to move between selections. Items will
be highlighted in inverse display mode.
(1) Selecting the highlighted item will display the corresponding menu.
(2) Selecting the highlighted item will place the value in edit mode. This is
indicated by only the value being displayed in inverse display mode.
(3) The UP and DOWN arrows will alter the value.
Depressing “Cancel” will exit the edit mode and leave the value unchanged.
Depressing “Set” will save the new value and ash the value to indicate
acceptance.
(4) Depressing “Cancel” will exit the calibration mode.
Depressing “Calibrate” will calibrate the selected sensor.
110812.16.23

EN
80446339 Rev B EN-18
Ensure that the compressor is stopped and fully depressurised rst.
(5) Use the UP and DOWN arrows to scroll through the list of status items.
Main menu
Figure 17: Main Menu Screen
The MAIN MENU screen is the point from which various operator functions
can be accessed. Refer to the Operator Panel Flow Diagram.
Each of the functions can be chosen by using the up and down arrows to
highlight it on the screen.
The controller will go to the highlighted function if the SELECT button is
pressed or will return to the CURRENT STATUS screen if the STATUS button is
pressed.
Operator setpoints
Figure 18: Operator Setpoints Screen
Setpoints are user–adjustable variables in the controller logic that can be set
using the OPERATOR SETPOINTS screen.
The name and value of each of the setpoints listed below can be seen on the
screen by moving the list up and down using the arrow buttons.
Table 6: Operator Setpoints Settings
OPERATOR
SETPOINTS
RANGE STEP UNIT
Oine Pressure 75 to RATED +10 1 PSIG
Online Pressure 65 to OFFLINE – 10 1 PSIG
Mode of Operation MOD/ACS, ON/OFF LINE, MODULATION ONLY
Condensate Release 2 to 20 1 SEC
Condensate Inverter 90 to 270 1 SEC
Stop Delay Time 10 to 30 1 SEC
Star–Delta Time* 5 to 30 1 SEC
(Screen) Contrast 0 to 10 1 –
*Does not apply to automatic across the line starters.
Setpoints associated with options are described in the OPTIONS sections.
A setpoint’s value can be changed by rst highlighting the item and its value
and pressing the SELECT button to highlight just the value. When the value
line is highlighted by itself, the value can be adjusted using the up and down
arrow buttons. The CANCEL and SET buttons appear at this time. Press the
SET button to enter the new value or press the CANCEL button to return the
value of the setpoint prior to using the arrows. The displayed value will ash
twice to indicated that it has been entered into the setpoint and the pair of
setpoint item and value display lines will again be highlighted together.
Operator set points can be exited by pressing the STATUS or MAIN MENU
buttons. If no buttons are pressed within 30 seconds, the display will return
to the CURRENT STATUS screen.
Options
Figure 19: Options Screen
Options are turned on or o and their associated values are set using the
OPTION screen.
Some options require additional compressor hardware and the correct
“Option Module” to plug into the controller. Descriptions of the options
operations can be found later in this section. The name and value of each of
the following options can be seen by moving the list up and down using the
arrow buttons.
Table 7: Options Settings
OPTIONS Items RANGE STEP UNIT
Power Out Restart ON/OFF – –
Power Out Restart
Time
10 to 600 1 SEC
Low Ambient ON/OFF – –
An Option item’s value can be changed the same way that OPERATOR
SETPOINTS values are changed.
OPTIONAL FEATURES
Modulation hardware extends the control types to modulation (capacity
control) and Automatic Control System when the compressor switches
between “On-O line’ and modulation as demand varies.
Safety of the operation is provided for as the compressor will shut down
if excessive temperatures, electrical overload conditions, or system over
pressure should occur.
LOW AMBIENT OPTION (STANDARD & ENHANCED COMPRESSORS)
When the low ambient option is installed and selected and the A/E Discharge
temperature is measured to be at or below 2˚C (35˚F), the compressor will
be started when commanded but will not load until the airend discharge
temperature is above 2˚C (35˚F). After the conditions are met the controller
will adjust the fan speed to maintain proper operating temperatures. When
the low ambient option is not installed, the compressor will not start if the
A/E discharge temperature is below 2˚C (35˚F).
NOTICE
If PORO or Scheduled Start/Stop are installed, additional hardware is
required to provide an audible warning of pending re-start. Contact
Ingersoll Rand for details.
POWER OUT RESTART OPTION (PORO)
(Dependent on installed operations and/or installed controls)
For PORO to execute , the PORO option shall be installed and the PORO
set point shall be set to ON. If power is lost to the compressor while the
compressor is running or is stopped in auto start/stop, the controller will
store the current opening conditions in memory.
When power is restored, the controller will energize the horn and start
a countdown on the display. The red LED will ash indicating a warning
condition and the horn will blow for the number of seconds set in the PORO
time set point. At the end of the countdown, the horn will stop blowing and
the compressor will start.
The PORO countdown may be stopped at any time by pressing the Stop /
Reset button on the user interface. Pressing any button will cause the horn to
stop blowing and the countdown to stop. The control will power up normally
in a ready to start mode.
110812.16.23

EN-19 80446339 Rev B
EN
Sensor Calibration
Figure 20: Sensor Calibration Screen
Pressure sensor calibration is done through the SENSOR CALIBRATION screen.
Sensor calibration can only take place when the compressor is stopped.
Calibration needs to be done only after a sensor has been replaced or the
controller has been replaced.
Each of the sensors listed below can be chosen by using the up and down
arrow buttons to highlight it on the screen.
SENSOR CALIBRATION Items
Sensor 1AVPT
Sensor 3APT
Sensor 4APT
Sensor 5CPT
Sensor 6CPT
Select the highlighted sensor by pressing the SELECT button. Press the
CALIBRATE button to start the automatic calibration procedure, or press the
CANCEL button to not calibrate it and return to the sensor list.
The calibration screen can be exited by pressing either the STATUS or MAIN
MENU buttons. If no buttons are pressed within 30 seconds, the display will
return to the CURRENT STATUS screen.
Scheduled Start / Stop
(Dependent on installed options and/or installed controls)
The scheduled start / stop option enables starting and stopping the
compressor at specied times. This mode of operation can be turned on and
o by selecting the desired mode in the scheduled start stop on / o set
point.
When enabled, the horn will blow for 10 seconds to warn anyone in the
surrounding area that the compressor is about to start. The display screen
will display the warning message “Scheduled Start in X seconds”, where “X”
is a countdown from 10 to 0 seconds. After 10 seconds, the compressor will
automatically start as long as the compressor is not in a fault condition or
manually stopped by pressing the stop / reset button.
When a scheduled stop occurs, the compressor can be manually re-started by
pressing the control panel start button or closing the remote start signal.
Trip history
Figure 21: Trip History Screen
Trip History displays each of the Trip messages for the last 15 Trips
experienced by the compressor. It also gives access to displaying the
compressor operating conditions that existed at the time of each Trip. The
rst one shown, “Trip History 1”, was the most recent Trip to occur. Note that
multiple, consecutive EMERGENCY STOP Trips are not recorded as separate
Trips, only the rst one will be shown.
Each of the last 15 Trip messages can be seen by moving the Trip History list
up and down using the arrow buttons. Pressing the SELECT button when
one of the Trips is highlighted will display the list of compressor values that
existed at the time that particular Trip occurred.
•
•
•
•
•
Figure 22: Trip History Screen Detail
The name and value of each of the items listed below can be seen by moving
the list up and down using the arrow buttons. Pressing the TRIP HIST. button
will return the display to the TRIP HISTORY screen.
TRIP HISTORY ITEMS
Package Discharge Pressure
Coolant Filter
Package Discharge Temperature
Inlet Vacuum
Airend Discharge Temperature
Inlet Filter
Injected Temperature
Total Hours
Sump Pressure
Loaded Hours
Separator Press. Drop
% Load Modulation
Trip histories can be exited by pressing either the STATUS or MAIN MENU
buttons. If no buttons are pressed within 30 seconds, the display will return
to the CURRENT STATUS screen.
When a Warning occurs, the word WARNING will ash on the display screen
and appear in large letters as shown. The display message will indicate what
caused the warning.
Figure 23: Warning Screen
If multiple Warnings exist, the small up/down arrows will appear in the upper
right corner of the display screen. The multiple Warnings can be seen by
pressing the up and down arrow buttons. Pressing the STATUS button will
display the CURRENT STATUS screen with the WARNING button indicating
that a Warning still exists.
Figure 24: Status Screen with Warning
Pressing the WARNING button will return the display to the WARNING screen
and the RESET button.
A Warning needs to be reset by the operator by pressing the RESET button
twice.
•
•
•
•
•
•
•
•
•
•
•
•
110812.16.23

EN
80446339 Rev B EN-20
The possible Warning messages are as follows;
AIREND DISCHARGE TEMP – This will occur if the Airend Discharge (2ATT)
exceeds 97% of the alarm limit, 228°F (109°C) and is not adjustable.
CHANGE COOLANT FILTER – This warning will occur if the high side pressure
is 20 psig (1,4 bar) greater than the low side pressure of 1 DPS and the
Injected Coolant temperature (2CTT) is greater than 120°F (49°C).
CHANGE INLET FILTER – This will occur if the Inlet Vacuum (1AVPT) is greater
than 0,7 psig (0,05 bar) and the compressor is fully loaded (inlet valve is
completely open).
CHANGE SEPR ELEMENT – This warning will occur if the pressure on the
Separator (3APT) is 15 psig (1,0 bar) greater than the pressure at the Package
Discharge (4APT) and the compressor is fully loaded.
HIGH DISCHARGE PRESS – This can occur if the compressor’s loading
function is being controlled by a host device such as a sequencer or an ISC.
This warning will occur when the package discharge pressure is above the
maximum oine pressure (rated pressure plus 3 psig (0,2 bar)) for more than
3 seconds. This warning will cause the compressor to unload. The host device
will not be able to load the compressor until the package discharge pressure
falls to the rated pressure of the compressor.
SENSOR FAILURE 4ATT – This will occur if the Package Discharge
Temperature Sensor (4ATT) is missing or broken.
TRIPS
When an Trip occurs, the word TRIP will ash on the display screen and
appear in large letters as shown. The display message will indicate what
caused the Trip.
Figure 25: Trip Screen
Pressing the STATUS button will display the STATUS screen. The presence of
the TRIP button indicates that an Trip condition still exists. Trip Status is the
list of compressor operating conditions that existed at the time of the Trip.
Figure 26: Trip Screen Detail
The name and value of each of the items listed can be seen by moving the list
up and down using the arrow buttons. Pressing the TRIP button will return
the display to the Trip screen and the RESET button.
The Trip needs to be reset by the operator by pressing the RESET button
twice. Any exceptions to this are explained in the Trip descriptions.
The possible Trip messages are as follows;
CHECK MOTOR ROTATION – This will occur if the compressor is started and
the compressor has incorrect rotation.
CONTROL POWER LOSS – This will occur if the controller detects a loss of the
110 VAC control power.
EMERGENCY STOP– This will occur if the Emergency Stop button is engaged.
The button shall be disengaged before the trip can be cleared.
FAN MOTOR OVERLOAD– This will occur if a fan motor overload is sensed.
HIGH AIREND DISCH TEMP– This will occur if the airend discharge
temperature is greater than 228°F (109°C).
HIGH SUMP PRESSURE– This will occur if the sump pressure is above oine
pressure by 25 psig and sump pressure drop is more than 25 psig. Can also
occur if sump pressure is above 165 psig.
LOW SUMP AIR PRESSURE– This will occur if the compressor is running fully
loaded and the sump pressure drops below 20 psig (1,4 bar).
LOW UNLOAD SUMP PRESS– This will occur if the compressor is running
unloaded and the sump pressure is less than 15 psig (1,0 bar) for 15 seconds.
MAIN MOTOR OVERLOAD– This will occur if a drive motor overload is
sensed.
MEMORY FAULT– This will occur if the controller has determined some of the
data stored in memory contains unacceptable values. When this occurs, the
sensors should be calibrated and all the set points checked. It is normal for
this trip to occur after changing controller software.
REMOTE START FAILURE– This will occur if the Remote Start button is
pressed after the compressor is running or if the Remote Start button remains
closed.
REMOTE STOP FAILURE– This will occur if the Remote Stop button remains
open and either Start button is pressed.
SENSOR FAILURE 1AVPT (or 3APT, 4APT, 2CPT,5CPT,6CPT 2ATT)– This will
occur if a sensor is recognised as missing or broken. This does not apply to
sensor 4ATT.
HIGH INLET VACUUM – This will occurs if inlet vacuum is greater than
1.8 psig for compressors with high dust factor, the threshold is 1.8 psig.
Prior to starting
1. Check the coolant level in the sight tube/glass. Add coolant if
necessary.
2. Ensure that the discharge air isolation valve is open.
3. Switch on the main electrical isolation switch. The power on
indicator will illuminate, indicating that the line and control
voltages are available.
110812.16.23
/