6 80448574 Rev A
GENERAL INFORMATION
GENERAL OPERATION
The Sierra compressor is an electric motor driven, two stage,
dry screw compressor complete with accessories piped, wired
and baseplate mounted. It is a totally self–contained oil free
air compressor package. A standard compressor is composed
of the following:
Inlet air ltration
Compressor and motor assembly
Pressurised oil system with cooler
ON/OFF line capacity control system
Motor starting control system
Instrumentation
Safety provisions
Intercooler
Aftercooler
Moisture separation rst and second stage
Automatic condensate removal rst and second stage.
The motor and airend are integrally mounted. This assembly
is isolated from the base by rubber isolation mounts. Flexible
pipe connections are utilised where necessary to isolate the
main base and customer connections.
DESIGN PRESSURES
The normal operating pressures for Ingersoll Rand Sierra
compressors are 7.0 bar, 8.5 bar and 10.0 bar (100 psi, 125 psi
and 150 psi). The maximum allowable pressure is 0.2 bar (3
psi) above the normal operating pressure and is shown on the
compressor name plate.
The inter–stage safety valve is set at 3.1 barg (45 psi)
90–150 kW, 125–200 hp or 3.8 barg (55 psi) 200–300 kW,
250–400 hp. The second stage safety valve is set at
11.4 barg (165 psi) max. The design of the pressurised system
is well above the safety valve settings.
DESIGN TEMPERATURES
The standard compressor is designed for operation in
an ambient range of 2 °C to 46 °C (35 °F to 115 °F). When
conditions other than the design levels described are
encountered, we recommend you contact your nearest
Ingersoll Rand Distributor or Air Centre for additional
information.
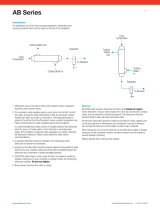
COMPRESSED AIR SYSTEM
The compressor air enters the compressor through an
opening at the right end of the enclosure. It travels through
a passageway lined with sound–absorbing material to the
air lter. Via a round exible hose, the air passes through the
inlet/unloading valve into the rst stage of the compressor.
The helical rotors compress the air to a pressure of between
1.7 to 2.6 barg (25 to 38 psig). It is discharged into a venturi,
which dampens any pressure pulsations that may be present.
The intercooler then reduces the air temperature before it
enters the second stage. A safety relief valve is also positioned
in this system to guard against an abnormally high inter-
stage pressure. A moisture separator is supplied immediately
•
•
•
•
•
•
•
•
•
•
•
•
•
•
•
following the intercooler to remove any condensation that
may occur under certain conditions of ambient humidity and
temperature.
An expansion joint is utilised between the moisture separator
and the second stage.
The second stage further compresses the air to the desired
pressure. The pressure pulsations being dampened in a
venturi. An expansion joint prevents transmitted vibrations. A
poppet type check valve is provided to prevent any backow
of air into the compressor. The aftercooler cools the air to a
suitable temperature, while the discharge moisture separator
removes signicant amounts of condensation.
During unloaded operation, the inlet/unloading valve closes,
via mechanical linkage, the blowdown valve opens, expelling
any compressed air from the package.
CONDENSATE REMOVAL SYSTEM
A moisture separator is located immediately after the
intercooler and aftercooler to collect and eject any
condensation formed from the compressed air.
The condensate is drained through electrically operated
solenoid valves. The opening duration is preset at three (3)
adjustable between 2 and 20 seconds, the interval between
openings may be altered between 60 and 360 seconds,
depending on ambient conditions. If the environment
consists of high temperature and/or high humidity, then the
interval may have to be reduced. The factory set interval is
180 seconds.
The bosses for the manual valves are located on the outside
and rear of the sub–base. These valves are supplied loose
inside the compressor enclosure and need to be connected to
the ports as indicated in the general arrangement drawing. To
check operation of solenoid valves, open the manual bypass
valves momentarily once per day. For extended shutdown
periods, the manual valves should be opened and left open.
Strainers are provided upstream of the condensate valves
to prevent any particles from plugging the solenoid valves.
Before any maintenance is performed on the strainers or
solenoid valves, the strainer service valves should be closed,
in order to isolate from possible high pressure.
LUBRICATION SYSTEM
The oil sump is integral within the gearcase. The oil pump is
a positive displacement gear–type pump, and is driven by
the compressor driven shaft. Therefore, it rotates at the main
motor speed.
See MAINTENANCE section for lubricant specication.
From the pump, the oil travels past a pressure relief valve to
the oil cooler. The pressure relief valve’s function is to prevent
over–pressure of the system. It also regulates oil pressure and
may divert some oil ow back to sump.
At the discharge side of the oil cooler is a thermostatic valve.
This valve mixes the cold oil with hot oil that bypasses the
cooler to provide oil at the optimum temperature to the
bearings and gears.
•
•