HP F Series User f800g Car Camcorder Quick Start

Type
Quick Start

This manual is also suitable for

1
Battery warning
The battery for this car camcorder is sealed internally. DO NOT
attempt to disassemble the camcorder and remove the battery.
Always charge using the provided system. Improper charging of the
battery may result in explosion.
The battery is designed for this camcorder and is not customer
replaceable.
Batteries may explode if exposed to naked fire. Never expose the
car camcorder in a fire.
Recycle the camcorder observing local regulations.
Notes on Installation
1. Install the device near the rear-view mirror to obtain the best
open-field view. Do NOT install the camcorder in a location that will
obstruct your required driving view.
2. Make sure that the lens is within the wiping range of the
windscreen wiper to ensure a clear view even when it rains.
3. Do not touch the lens with your fingers. Finger grease may be left
on the lens and will result in unclear videos or snapshots. Clean the
lens on a regular basis.
4. Do not install the device on a tinted window. Doing so may damage
the tint film.
5. Make sure that the installation position is not hindered by the
tinted window.
2
1 Introduction
1.1 Package Contents
The package contains the following items. In case there is any missing or
damaged item, contact your dealer immediately.
Camcorder Bracket
CD-ROM Quick start guide Car adapter
3
1.2 Product Overview
No. Item No. Item
1 Bracket Socket 6 GPS Antenna
2 Memory Card Slot 7 Wide Angle Lens
3 Power Switch 8 Speaker
4 LED Indicator 9 Microphone
5 USB / Power Connector 10 LCD Touch Panel
Top and Bottom Views
Side (Left and Right) Views
Front View
Rear View
2
8
9
1
10
4
5
7
6
3
4
2 Getting Started
2.1 Inserting the Memory Card
Insert memory card with the gold section facing upward and the screen
of the camcorder facing upward too, as illustrated. Push the memory
card in until a click sound is heard, indicating the card is in position.
To remove the memory card
Push to eject the memory card out of the slot.
Note:
1. Do not remove or insert the memory card when the camcorder is turned on. This
may damage the memory card.
2. Please use a Class 6 or higher rating Micro SD card, max. up to 32GB.
3. Please format the micro SD cards before the initial use.
4. When removing the memory card, be careful that the card may spring out and get
lost. The memory slot has this spring-out feature for easy removal of the card.
5
2.2 Installing in Vehicles
2.2.1 Mount to Windshield
1. Push the bracket into bracket slot on top of
camcorder, until a click sound is heard.
2. With the suction-cup laying flat,
position the suction-cup on the
windshield.
3. Hold the base firmly on the windshield
and press down the clamp to mount the
car holder to the windshield. Make sure
the base is securely locked in place.
6
2.2.2 Adjust the Camcorder position
1. Loose the knob to swivel the
camcorder vertically.
2. Loose the knob to swivel the
camcorder horizontally up to
360°.
3. Then tighten the knob to make sure the camcorder is securely
locked in place.
Knob
Knob
7
2.3 Connecting to Power
Use only the supplied car adapter to power up the camcorder and
charging the built-in battery.
1. Connect one end of car adapter to USB/Power connector port on the
camcorder.
2. Plug the other end of the car adapter to the cigarette lighter socket
of your vehicle. Once the vehicle engine is started, the camcorder
automatically powers on.
Note:
This product shall be installed near the rear mirror, at the center of windshield, if
possible, for optimal viewing.
8
2.4 Powering the Camcorder On / Off
2.4.1 Auto Power On/Off
Once the vehicle engine is started, the camcorder automatically turns on.
If the Automatic Record function is enabled, the recording will
automatically start right after the camcorder powers on.
2.4.2 Manual Power On/Off and Reset
2.4.2.1 Manual Power On
Slide the power switch and make sure that the power switch locks on the
memory card slot.
On
2.4.2.2 Power Off
The power switch to the edge and make sure that the memory slot is
released and the camcorder starts power off sequence. Do not power on
the camcorder when it is in the power-off sequence, or the recorded file
may become corrupt.
O
ff
9
2.5 Initial Settings
Before using the camcorder, we recommend you to enable the
Automatic Record function and set up the correct Date and Time.
2.5.1 Setting the Universal Time Code (UTC)
Depending on your location, you may need to change the current UTC
setting of the camcorder so that the correct date and time are updated
when a GPS signal is detected.
* Be sure to adjust for daylight saving time (DST) by adding +1 hour to the UTC offset.
** These areas may observe half hour increments and daylight saving time (DST).
10
3 Using the Car Recorder
3.1 Recording Videos
3.1.1 LDWS (Lane Departure Warning Systems)
When LDWS is enabled after satellite positioning, camcorder will give a
voice alert and display an alarm screen if vehicle speed reaches or
exceeds 50 km/h (31 mile/h) and the vehicle deviates from the original
lane.
To set the LDWS (Lane Departure Warning Systems), do the following:
1. Ensure the camcorder is
connected to the power adapter
and is receiving power.
2. Touch to enter Main
Menu.
3. Touch to switchover to
Driving Safety Main Menu.
4. Touch / to select
for entering LDWS function menu,
then touch again to
enable the function (on).
5. Touch to return to record screen.
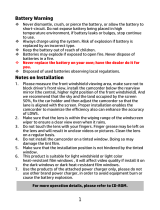
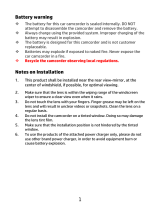
6. After enabling LDWS, the screen will display align icon ,
please adjust the camcorder so that the horizontal line and the eye
level are overlapped and the slash lines are centered in the driving
lane. Make sure that align icon will not be obscured (e.g. hood)
during installation, it may cause misjudgment if the endpoint is
obscured.
11
Eye Level
Horizon
Vanishing Point
7. When satellite positioning is in ready state, camcorder will give a
voice alert and an alarm screen if vehicle speed reaches or exceeds
50 km/h (31 mile/h) and the vehicle deviates from the original lane.
Note:
1. LDWS is only applicable when satellite positioning is in ready state. Make sure
satellite positioning of your camcorder is ready if you want to activate this function.
Satellite positioning function is dependent on the model purchased.
2. When enable the LDWS, please follow this self-aligned approach in order to increase
the accuracy.
3. The all Driving Safety functions such as LDWS, Speed Cam Alert, Speed Limit Alert,
Driver Fatigue Alert and Collision Detection will be disabled, if the product doesn’t
connect with the external power supply.
12
3.1.2 Motion Detection
If Motion Detection is activated, when the camcorder is powered on, a
message Wait for 10 seconds to enter Motion Detection or touch the
screen to power off” will be displayed on the screen. This means the
system will enter Motion Detection automatically in 10 seconds; when
the camcorder detects any motion in front of lens, Video Record will be
activated for a duration the same as the length setting.
To set the motion detection, do the following:
1. Touch to enter main
menu.
2. Touch to switch over
to Driving Safety Main Menu.
3. Touch / to select
for entering Motion
Detection menu, touch
again to activate (on).
4. Touch to return to record screen.
Note:
1. When the battery is fully charged and is in good condition, Motion Detection can
record continuously for about 30 minutes.
2. As the camcorder is used, the battery storage capacity will decrease gradually. This
is a normal phenomenon for the battery.
13
3.1.3 Emergency Recording
Start the Emergency Recording, do the following:
1. During video recording, touch
to enter emergency
recording mode, the “Emergency”
message will be shown
immediately on the lower left
corner of the screen, and the
recorded file will be protected.
2. Touch again, to halt the recording.
Note:
1. If the Collision Detection function is enabled and a collision is detected, the
camcorder will automatically trigger the emergency recording.
2. The emergency recording file is created as a new file, which will be protected to
avoid being overwritten by normal looping recording. 8G (or above) memory card
can save up to 8 emergency video files. The alert message of “Emergency files are
full” will pop up on the screen when the emergency recording files are full, and the
oldest emergency file will be automatically deleted when a new emergency
recording file is created.
14
3.2 Playing Videos and Viewing Pictures
3.2.1 Playing Videos and Emergency Recording
Playback video record files as follows:
1. Touch to enter main menu.
2. Touch to switch over to File / Position menu.
3. Touch / to enter Video/
Emergency function menu.
4. Touch / to browse for
required video file, touch selected preview of video to enter
Playback Mode
5. Touch repetitively to return to Record Screen.
15
3.2.2 Viewing Pictures
View pictures as follows:
1. Touch to enter Main Menu.
2. Touch to switch over to File / Position main menu.
3. Touch to enter Picture
function menu.
4. Touch / to browse for required picture files, touch
selected preview of picture to enter Picture Playback Mode.
5. Touch repetitively to return Record Screen.
16
3.2.3 Deleting Files
To delete file(s), do the following:
1. Touch to enter Main Menu.
2. Touch to switch over to File / Position main menu.
3. Touch / / to enter Video/Picture/Emergency menu.
4. Touch / to browse for required video or picture file; touch
selected preview image to enter Video/Picture Playback Mode.
5. Touch to enter File Deletion menu, select / to
delete one file or all files; touch / to confirm or cancel
the selection.
Item Description
Delete One Delete the current file.
Delete All Delete all files.
6. Touch repetitively to return to Record Screen.
Note:
Deleted files cannot be recovered. Ensure the files have backup before deletion.
1
電池
電池電池
電池意事項
注意事注意事
注意事
僅可使用本系統充電,未正確處理電池可能會引發爆炸。
請勿自行拆裝、穿刺電池,或使電池短路。
電池接觸明火可能會引起爆炸,請勿將電池丟棄到火中。
請根據當地法規妥善處理使用過的電池。
此電池為內置
此電池為內置此電池為內置
此電池為內置嚴禁自行更換電池
嚴禁自行更換電池嚴禁自行更換電池
嚴禁自行更換電池,
,欲更換電池請洽經銷商
欲更換電池請洽經銷商欲更換電池請洽經銷商
欲更換電池請洽經銷商。
安裝須
安裝須安裝須
安裝須
1. 本產品之安裝應靠近後視鏡,以獲得最佳的視野。
2. 確定鏡頭是在擋風玻璃雨刷的範圍內,確保視野良好,即使雨
天亦然。
3. 不要用手指碰觸鏡頭。手指上的油垢可能會留在鏡頭上,導致
錄像或攝影不清楚。定期清潔鏡頭。
4. 不要將產品安裝在有色車窗上。因為這樣會損壞淺色薄膜。
5. 確定安裝位置不會受有色車窗的阻礙。
2
1 導論
導論導論
導論
1.1 包裝
包裝包裝
包裝內容
內容內容
內容
以下為包裝內容物。若有任何遺漏或損壞項目,請立即聯絡您的經銷
商,外觀請依內容物實際狀況為主。
行車記錄器 托架
光碟
快速使用手冊 電源連接器
3
1.2 產品概要
產品概要品概要
產品概要
編號
編號編號
編號
項目
項目項目
項目
編號
編號編號
編號 項目
項目項目
項目
1
托架插孔
6
衛星定位天線
2
記憶卡插槽
7
廣角鏡
3
電源開關
8
揚聲器
4
LED 指示燈
9
麥克風
5
USB / 電源連接孔
10
LCD 觸控螢
頂視圖與底視圖
側視圖 (左側與右側)
前視圖
後視圖
2
8
9
3
10
4
5
7
6
1
  • Page 1 1
  • Page 2 2
  • Page 3 3
  • Page 4 4
  • Page 5 5
  • Page 6 6
  • Page 7 7
  • Page 8 8
  • Page 9 9
  • Page 10 10
  • Page 11 11
  • Page 12 12
  • Page 13 13
  • Page 14 14
  • Page 15 15
  • Page 16 16
  • Page 17 17
  • Page 18 18
  • Page 19 19
  • Page 20 20
  • Page 21 21
  • Page 22 22
  • Page 23 23
  • Page 24 24
  • Page 25 25
  • Page 26 26
  • Page 27 27
  • Page 28 28
  • Page 29 29
  • Page 30 30
  • Page 31 31
  • Page 32 32
  • Page 33 33
  • Page 34 34
  • Page 35 35
  • Page 36 36
  • Page 37 37
  • Page 38 38
  • Page 39 39
  • Page 40 40
  • Page 41 41
  • Page 42 42
  • Page 43 43
  • Page 44 44
  • Page 45 45
  • Page 46 46
  • Page 47 47
  • Page 48 48
  • Page 49 49
  • Page 50 50
  • Page 51 51
  • Page 52 52
  • Page 53 53
  • Page 54 54
  • Page 55 55
  • Page 56 56
  • Page 57 57
  • Page 58 58
  • Page 59 59
  • Page 60 60
  • Page 61 61
  • Page 62 62
  • Page 63 63
  • Page 64 64
  • Page 65 65
  • Page 66 66
  • Page 67 67
  • Page 68 68
  • Page 69 69
  • Page 70 70
  • Page 71 71
  • Page 72 72
  • Page 73 73
  • Page 74 74
  • Page 75 75
  • Page 76 76
  • Page 77 77
  • Page 78 78
  • Page 79 79
  • Page 80 80
  • Page 81 81
  • Page 82 82
  • Page 83 83
  • Page 84 84
  • Page 85 85
  • Page 86 86
  • Page 87 87
  • Page 88 88
  • Page 89 89
  • Page 90 90
  • Page 91 91
  • Page 92 92
  • Page 93 93
  • Page 94 94
  • Page 95 95
  • Page 96 96
  • Page 97 97
  • Page 98 98

HP F Series User f800g Car Camcorder Quick Start

Type
Quick Start
This manual is also suitable for

Ask a question and I''ll find the answer in the document

Finding information in a document is now easier with AI