Masport R12000 Operating instructions

Type
Operating instructions

This manual is also suitable for

Masport R12000 is a fan designed to improve air circulation and heat distribution in your home when used with a Masport heater. It can be installed in pedestal, leg, or wood stacker models. The fan features two speed settings allowing for better control of airflow and heat distribution. With simple installation and easy maintenance, the Masport R12000 fan enhances the performance of your Masport heater, providing a more comfortable and efficient heating experience.

Masport R12000 is a fan designed to improve air circulation and heat distribution in your home when used with a Masport heater. It can be installed in pedestal, leg, or wood stacker models. The fan features two speed settings allowing for better control of airflow and heat distribution. With simple installation and easy maintenance, the Masport R12000 fan enhances the performance of your Masport heater, providing a more comfortable and efficient heating experience.

AU MODELS:R5000 PED, R5000 LEG, R5000 WOOD STACKER,
R12000
NZ MODELS:R5000 PED, R5000 LEG & R10000 MACKENZIE
(Rural Only)
INSTRUCTION FOR FAN INSTALLATION
583271 15.10.2015
CAUTION:
YOU NEED A POWER POINT ON THE WALL, SO THAT YOU CAN PLUG IN THE
FAN. NO POWER POINT SHALL BE LOCATED IMMEDIATELY ABOVE THE
HEATER. IF ANY ELECTRICAL WORK IS REQUIRED, IT MUST BE CARRIED
OUT BY A LICENSED ELECTRICIAN. IN SOME REGIONS POWER POINTS ARE
NOT PERMISSIBLE WITHIN THE FLOOR PROTECTOR AREA, PLEASE CHECK
WITH YOUR LOCAL AUTHORITY.
FAN BOX INSTALLATION OF :
AUS MODELS - R5000PED / R12000 PED VERSION (Figure1)
NZ MODELS - R5000PED & R10000 MACKENZIE (Rural only) (Figure1)
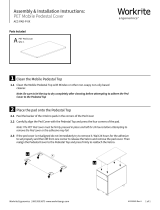
Figure 1. Pedestal version installation
1. Break out the ‘knock out’ part on the left face of the pedestal (looking from the
front) to allow the switch to be inserted.
2. Remove the sharp tabs left in the hole with a file.
3. Stick the fan operation label next to this hole.
4. Fit the EARTH TAB RIVET BN11 ...inside the right bend at the bottom hole
size 5.2.mm if supplied . (This may have already done in the factory).
5. Stick the earth decal next to the earth tab. (This may have been already done
in the factory).
6. Remove switch from wiring loom.
7. Feed the wiring loom up the cavity next to the ash box.
8. Feed the end through the knockout fan switch hole, shown in Detail A.
9. Refit the switch to the wiring loom.
10. Ensure wires to be connected in Figure 2, and then press the switch into the
rectangular knocked off rectangular hole, ‘II’ should be above ‘0’. It should
snap firmly into place.
EARTH TAB RIVET BN11 Figure 2. Fan switch
11. Connect the loose earth wire (green) to the brass tab at rear of the left side of
pedestal, this is a push-on connection.
12. Lift the fan assembly and secure to the back of the pedestal with 4 black
screws supplied. For ease of fitment, put the top screws first, then the bottom
ones as shown in Figure 1.
13. Plug the 3-pin plug into the wall outlet and test the operation of the fan.
FAN BOX INSTALLATION OF :
AUS MODEL - R5000 LEG & NZ MODEL - R5000LEG (Figure 3)
1. Break out the ‘knock out’ part on the left side of the leg (looking from the front)
to allow the switch to be inserted.
2. Remove the sharp tabs left in the hole with a file.
3. Stick the fan operation decal next to this hole. Remove the rear brace from the
back of the heater, as shown in Figure 3 and discard this part.
4. Fit the EARTH TAB RIVET BN11 ...from inside the back leg channel - hole
size 5.2.mm if supplied . (This may have already done in the factory).
Figure 3. Leg version installation
5. Remove switch from wiring loom.
6. Remove bottom heatshield by unfastening 6 black screws ref. Fig 3.
7. Lift and support the fan whilst feeding the wiring loom through square hole in
rear channel of the leg.
8. Continue to feed the end through the knockout fan switch hole, shown in Fig 3
Detail B.
9. Fasten fan assembly into position and fit to the back of the leg with 4 black
screws supplied. For ease of fitment, put the top screws first, then the bottom
ones as shown in Fig 3.
10. Refit the switch to the wiring loom.
11. Ensure wires to be connected in Fig 2, and then press the switch into the
knockout rectangular hole, ‘II’ should be above ‘0’. It should snap firmly into
place.
12. Connect the loose earth wire (green/yellow) to the earth tab at rear channel of
the leg, this is a push-on connection.
13. Refit the bottom heat shield by fastening 6 black screws ref. Fig 3.
14. Plug the 3-pin plug into the wall outlet and test the operation of the fan.
FAN BOX INSTALLATION OF :
AUS MODEL - R5000 WOOD STACKER (Figure 4)
Figure 4. Wood Stacker version installation
1. First, remove the ash tray for ease of access for fan installation.
2. Remove the switch bracket and break out the ‘knock out’ part on the front left
side Detail “C” to allow the fan switch to be inserted.
3. Remove the sharp tabs left in the hole with a file.
4. Stick the fan operation decal under the switch bracket as shown in figure 6
Figure 5. Wood Stacker Wiring Details
Circuit Diagram (Figure 6)
Figure 6. Circuit DiagramRevision A (Prior to Nov 2013)
The circuit diagram is shown as follows in Figure 6.
5. Remove switch from wiring loom.
6. Mount the fan assembly at the rear of firebox using 4 screws as shown in
Figure 5.
7. Feed the end of the loom trough knockout fan switch hole, shown in Fig 5
8. Refit the switch to the wiring loom.
9. Ensure switch wires are connected as shown in Fig 2, and then press the
switch into the knockout rectangular hole, ‘II’ should be above ‘0’. It should
snap firmly into place.
10. Screw switch bracket in place. Endure all cables are tucked properly as
shown in Fig 5 i.e. gap between side panel and the inner side panel.
11. Connect the loose earth wire (green) to the rivet tab at rear panel , this is a
push-on connection.
12. Plug the 3-pin plug into the wall outlet and test the operation of the fan.
Figure 7. Circuit DiagramRevision B (After Nov 2013)
II
O
I
AIRSLIDE REPLACEMENT FOR : NZ MODELS - R5000 LEG/PED ONLY):
Figure 8. Step one
Step One (Figure 8):
1. Remove the door from the heater.
2. Remove 2 x (M6X10) screws which
fasten the louver in position.
3. Remove the louver from the heater.
Figure 9. Step two
Step Two (Figure 9):
1. Remove 2 x M6 nuts from the back of
the air deflector, remove bolts and
spacers from front, hold air deflector in
place as you do this.
2. Remove the Airslide from the heater
and discard this part marked 983221.
Figure 10. Step three Step Three (Figure 10):
1. Discard Airslide part 983221 air and
replace it with Airslide part 983278.
In New Zealand, a special Airslide marked 983278 must be fitted if the fan is
installed. Procedure for replacing Air Slide is shown as follows:
983221
Figure 11. Step
Step Four (Figure 11):
1. While holding the deflector in correct
position ref detail D of Fig 9, refit the
new Air slide (983278) to the front of
the heater.
2. Refit 2 spacers and 2 x (M6X50) bolts
back to the top front of the heater.
3. Tighten the 2 x M6 nuts to the back of
the air deflector to secure all the parts
together.
Figure 12. Step five
Step Five (Figure 12):
1. Refit the louver to the top of the
heater using the 2 x (M6X10) screws.
SAFETY:
THE APPLIANCE IS NOT INTENED FOR USE BY YOUNG CHILDREN OR
INFIRM PERSONS WITHOUT SUPERVISION.
SUPERVISE YOUNG CHILDREN TO ENSURE THEY DO NOT PLAY WITH THE
APPLIANCE.
IF A SUPPLY CORD IS DAMAGED, IT MUST BE REPLACED BY THE
MANUFACTURER, ITS SERVICE AGENT OR A SUITABLY QUALIFIED
PERSON, IN ORDER TO AVOID ELECTRICAL HAZARD.
MAINTENANCE:
THE FAN SHOULD NEED LITTLE ATTENTION OTHER THAN OCCASIONALLY
(PERHAPS ONCE A YEAR) REMOVING IT TO CLEAN DUST AND LINT FROM
THE IMPELLER. FIRST UNPLUG THE MAINS LEAD FROM THE POWER POINT.
REMOVE THE FAN BY UNDOING THE 4 SCREWS HOLDING IT INPOSITION.
CLEAN THE IMPELLER BLADES CAREFULLY BY BLOWING OR VACUUMING.
DO NOT APPLY FORCE TO THE IMPELLERS. REINISTALL THE FAN.
OPERATING HINTS FOR CLEAN BURNING AND BEST EFFICIENCY:
SWITCH OFF THE CIRCULATING FAN WHEN THE FIRE IS BURNING AT LOW
HEAT OUTPUTS. USE ONLY THE SLOW FAN SPEED AT MEDIUM HEAT
OUTPUT, MOVING TO THE HIGHER SPPED ONLY WHEN FULL HEAT OUTPUT
HAS BEEN REACHED.
PLEASE REFER ALSO TO THE OWNERS MANUAL FOR THE FIRE FOR MORE
INFORMATION.
  • Page 1 1
  • Page 2 2
  • Page 3 3
  • Page 4 4
  • Page 5 5
  • Page 6 6
  • Page 7 7
  • Page 8 8
  • Page 9 9
  • Page 10 10

Masport R12000 Operating instructions

Type
Operating instructions
This manual is also suitable for

Masport R12000 is a fan designed to improve air circulation and heat distribution in your home when used with a Masport heater. It can be installed in pedestal, leg, or wood stacker models. The fan features two speed settings allowing for better control of airflow and heat distribution. With simple installation and easy maintenance, the Masport R12000 fan enhances the performance of your Masport heater, providing a more comfortable and efficient heating experience.

Ask a question and I''ll find the answer in the document

Finding information in a document is now easier with AI