Whirlpool ADP 650 IX User guide
- Category
- Dishwashers
- Type
- User guide
This manual is also suitable for
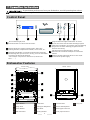
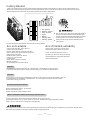
Whirlpool ADP 650 IX is a dishwasher equipped with a water softener, adjustable salt and rinse aid consumption, and a choice of seven wash programs. It features a 3-in-1 function for detergent tablets, a delayed start option up to 9.5 hours, and indicator lights for salt and rinse aid refill. The dishwasher has a capacity of 9 place settings, a cutlery basket, and a cup shelf.
Whirlpool ADP 650 IX is a dishwasher equipped with a water softener, adjustable salt and rinse aid consumption, and a choice of seven wash programs. It features a 3-in-1 function for detergent tablets, a delayed start option up to 9.5 hours, and indicator lights for salt and rinse aid refill. The dishwasher has a capacity of 9 place settings, a cutlery basket, and a cup shelf.


-
 1
1
-
 2
2
-
 3
3
-
 4
4
-
 5
5
-
 6
6
-
 7
7
-
 8
8
-
 9
9
-
 10
10
-
 11
11
-
 12
12
-
 13
13
-
 14
14
-
 15
15
-
 16
16
-
 17
17
-
 18
18
-
 19
19
-
 20
20
-
 21
21
-
 22
22
-
 23
23


Whirlpool ADP 650 IX User guide
- Category
- Dishwashers
- Type
- User guide
- This manual is also suitable for
Whirlpool ADP 650 IX is a dishwasher equipped with a water softener, adjustable salt and rinse aid consumption, and a choice of seven wash programs. It features a 3-in-1 function for detergent tablets, a delayed start option up to 9.5 hours, and indicator lights for salt and rinse aid refill. The dishwasher has a capacity of 9 place settings, a cutlery basket, and a cup shelf.
Ask a question and I''ll find the answer in the document
Finding information in a document is now easier with AI
Related papers
Other documents
-
Groupe Brandt 1LF-451IT Owner's manual
-
-
BOMANN GSP 848 IX Owner's manual
-
Teka DW1 455 FI User manual
-
White-Westinghouse WDFC12JGCWD Owner's manual
-
White Knight DW1260IA Full Size Dishwasher Owner's manual
-
-
Brandt VH1472J User manual
-
White Knight DW0945WA User manual
-