Page is loading ...

ANDERSON GREENWOOD MARVAC FIG. 920 LOW PRESSURE PILOT OPERATED RELIEF VALVE
InstallatIon and MaIntenance InstructIons
Emerson.com/FinalControl
Incorporating the MWP pilot, the Figure 920 is capable of providing both
pressure and vacuum relief
1 INSTALLATION
Refer to Figures 1 and 2
1. This equipment will be supplied in a packing
case and should be kept in the case for
protection until the engineer is ready to
install it.
2. Prior to installation the engineer should
check that the equipment is not damaged,
particularly the total pressure sensing tube.
(item 17)
3. Remove the vacuum breaker cover and
check there is no packing or foreign matter
present inside the valve. Replace vacuum
breaker cover and secure with cover
screws.
4. Visually check inside the upper casting and
remove any packing or foreign material if
present.
5. When lifting the equipment care should
be taken not to damage the stainless steel
tubing (item 17) the protruding studs and
the actual pilot valve itself (item 16).
6. Sizes 2” x 3”, 3” x 4” and 4” x 6” can be lifted
manually or by slings. Care should be taken
not to hold the stainless steel tubing and
actual pilot valve whilst lifting. All other
sizes have three tapped bosses for lifting
bolts.
7. The valve inlet should be gasketed and
bolted to a flat machined horizontal flange.
8. The valve outlet should be gasketed and
bolted to a flat machined vertical flange.
NOTE
On no account should the exhaust pipework be
supported by the valve. These valves are not designed
to carry external loads.
© 2017 Emerson. All Rights Reserved. VCIOM-01940-EN 18/02
2 MAIN VALVE MAINTENANCE
Upper casting (pressure relief)
Refer to Figures 1 and 2
1. Remove pilot valve (Item 16) by releasing the
upper nut (Item 25) and unscrew pilot valve
from dome spinning (Item 10).
2. Release the cover screws (item 2) from the
dome spinning (item 10) and remove the
dome spinning without damaging the pilot
diaphragm (item 11).
3. Remove the complete piston / pressure
pallet assembly, taking care not to damage
the dome seal (item 15) on the elastomer
diaphragm. The PTFE seal tape will need
replacing on the PFA diaphragm and the
spinning will need cleaning.
4. Check the pilot diaphragm (item 11) and the
PFA diaphragm under the pressure pallet
for damage. Replace as necessary.
5. Release the bolts from the pressure seat
(item 20) and remove the seat. Replace the
PTFE seal (item 19).
6. Clean the inside of the casting, removing
any dust or grit.
7. If necessary, replace pressure seat with new
seal.
8. Clean the seating surfaces thoroughly with a
suitable solvent.
9. If installed, remove the casing from the
non-return valves, check the 2 x O-rings and
replace if necessary.
10. Re-assemble the unit in reverse order.
11. If damaged or scratched, the exterior of
the valve should be painted to prevent
corrosion.

2
ANDERSON GREENWOOD MARVAC FIG. 920 LOW PRESSURE PILOT OPERATED RELIEF VALVE
InstallatIon and MaIntenance InstructIons
3 SPARES
When spare parts are required the customer
should quote the valve size, the serial number
and the item number and material of the parts
required. The valve size and serial number can
be obtained from the valve identification label.
The item number and description of the part
can be obtained from the general arrangement
drawing. Care should be taken to quote the
correct material as the materials quoted in the
general arrangements are not for hazardous
conditions. The following items may require to
be replaced periodically:
Lower casting (weight loaded vacuum relief)
1. Remove cover (item 28) and remove pallet
assembly, inspect the discs under the pallet
seating for wear and replace as necessary.
Inspect the valve seating and re-grind or
replace as necessary.
2. Clean seating surface thoroughly with a
suitable solvent.
3. Generally clean inside of valve and remove
any foreign material.
4. Assemble pallet onto seat with lead disc if
fitted.
5. Fit cover plate and secure with screws.
Lower casting (spring loaded vacuum relief)
1. Remove bonnet and note position of the
adjustment screw.
2. Release lock nut and unscrew adjustment
screw.
3. Remove spring bonnet and spring assembly.
4. Inspect pallet seating for wear, regrind as
necessary. Clean surfaces thoroughly with a
suitable solvent.
5. Generally clean inside of valve and remove
any foreign material.
6. Assemble pallet onto seat, refit spring
assembly and spring bonnet.
7. Reset adjustment screw to original position
and tighten locknut, refit cap.
8. Check pressure relief setting. Test run and
adjust as necessary.
NOTE
The efficiency of the valve depends on maintaining
good seating surfaces and on the condition of the pilot
diaphragm. Maintenance periods should be adjusted
to suit service conditions. The exterior of all castings
should be painted periodically to prevent corrosion.
FIGURE 1
Main valve with fluoropolymer diaphragm
(suitable for cryogenic & light loaded
applications)
FIGURE 2
Main valve with rolling diaphragm
`Vacuum seating
`Vacuum seating
Main valve
Item 6 Spacer disc
Item 8 Pallet diaphragm
Item 9 Diaphragm backing disc
Item 11 Main valve diaphragm (elastomer) or
(PFA)
Item 15 Dome seal O-ring.
Item 19 Seat seal
Item 33 Vacuum cover O-ring
Item 36 PTFE sealing washers 2 off.
If non-return valves installed:
O-ring seals (2 off)
Pilot valve
See Figure 4.
Items, 7, 8, 9, 10, 11, 21, 27, 37, 49, 50

3
ANDERSON GREENWOOD MARVAC FIG. 920 LOW PRESSURE PILOT OPERATED RELIEF VALVE
InstallatIon and MaIntenance InstructIons
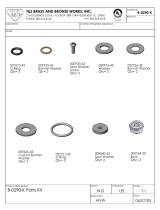
FIGURE 3 - MWP PILOT VALVE FIGURE 4 - MWP PILOT VALVE
PARTS LIST
Item Description Qty.
1 Body 1
2 Case - lower 1
3 Case - upper 1
4 Bonnet 1
5 Sense plate 1
6 Spring 1
7 Gasket - sense diaphragm 3
8 Gasket - body 3
9 Gasket - seat 1
10 Diaphragm - spindle 1
11 Diaphragm - sense 1
12 Adjusting screw 1
13 Spring plate - upper 1
16 Locknut - adjusting screw 1
17 Nut - bonnet 4
18 Bolt - bonnet 4
19 Seat 1
20 Cap 1
21 Bug screen 1
23 Spacer - hex 1
25 Nut - casing 12
27 Screen - body inlet 1
28 Spindle 1
29 Nut - spindle 1
30 Spring washer - spindle 1
31 Spring plate - lower 1
32 Insert - bonnet 1
33 Check plate 1
34 Spacer - sense 1
35 Spacer - spindle 1
36 Ball 1
37 Disc 1
38 Disc holder base 1
39 Gasket - spacer 4
40 Nameplate 1
41 Hammer drive screw 2
42 Support plate 1
43 Washer - spacer 1
44 Lead & wire seal 1
45 Bushing - blowdown 1
46 Needle - blowdown 1
47 Retaining clip 1
48 Locknut - blowdown 1
49 O-ring 1
50 Seal - blowdown 1
51 Bolt - body 4
52 Bolt - case 12
Detail A
See detail A
See detail B
See detail C
Detail B
Detail C
Item Description Qty. Item Description Qty.

4
ANDERSON GREENWOOD MARVAC FIG. 920 LOW PRESSURE PILOT OPERATED RELIEF VALVE
InstallatIon and MaIntenance InstructIons
4 PILOT VALVE MAINTENANCE
Stripdown
During strip down, check each component
carefully for wear, particularly the diaphragms
and seals. The filter needs to be washed with
cleaning solvent and blow shop air through the
filter to ensure that the orifice behind is clear.
Inspect the seat surfaces, minor scratches can
be removed with 500 grit paper. The seat can
be removed if damage is severe. If machining
is carried out, ensure that the original profile
is maintained. To facilitate assembly, place all
parts in an orderly arrangement so the correct
parts are assembled in the proper sequence.
Refer to Figures 3 and 4.
Assembly
1. Prior to assembly, all components must be
inspected visually, cleaned and de-burred
as necessary. Ensure that all pressure
transmission holes are clear.
2. Assemble the screwed fittings into both the
body (1) and bonnet (4) using PTFE tape as a
thread seal.
3. If the seat (19) has been removed, fit the
gasket (9) under the seat (19) and screw into
the body (1), tighten down securely.
4. Fit the spindle (78) / disc holder (38), ensure
that the disc holder is free to pivot and that
there is adequate movement. Fit the PTFE
disc (37) into the holder (38). Lightly polish
the disc to remove any sharp edges, the
seating face profile should be hemispherical.
5. Fit the spacing washer (43), spacer (35) and
spacer gasket (39) onto the spindle. Lightly
lubricate both sides of the gasket (39).
6. Place disc assembly inside the body (1) and
onto the seat (19).
7. Carefully assemble onto the body (1)
ensuring that all the holes are in line, in
the following order: body gasket (8) support
plate (42) and the second body gasket (8).
Placing a straight edge across the body
there should be a 0.010”/0.015” gap above
the spacer (35), shim as appropriate.
8. Fit spindle diaphragm (10), body gasket (8)
ensuring that all the holes are in line.
9. Fit the lower case (2) and carefully tighten
down onto the body (1) with 4 x bolts.
10.
Fit onto the disc/spindle assembly in the
following order: a gasket spacer (39) sense
spacer (34). Fit the check plate (33) over the
sense spacer (34), fit gasket spacer (39).
Fit the sense diaphragm gasket (7) and
diaphragm (11) fit another sense diaphragm
gasket (7). Fit the sense plate (5) gasket
spacer (39) hex spacer (23), fit the lower
spring plate (31), spring washer (30) and
spindle nut (29) and, making sure that all the
bolt holes through the gasket and diaphragm
are in line, tighten down the spindle
assembly with the spindle nut (29) until lock
washer becomes flat, do not over tighten.
Pilot set pressure adjustment
1.
Install pilot on test stand, this should consist
of a pressure vessel of approximately 3 liter
capacity with pressure gauge, see figure 5.
Turn set pressure adjustment screw clockwise
until screw is near the end of its travel.
2. Increase supply pressure to desired set
pressure and turn adjustment screw slowly
counter clockwise until flow through pilot
exhaust begins.
3. Continue to turn adjustment screw slowly
counter clockwise until dome pressure
gauge records a pressure equal to values
shown in Table 1. As flow increases through
pilot exhaust it is important to maintain
supply pressure at a value equal to the set
pressure.
4. Reduce supply pressure to 50% or less and
tighten locknut on the adjustment screw.
5. Check set pressure 3 times to ensure
consistency. Set pressure is defined as that
supply pressure where dome pressure is
equal to the values shown in Table 1.
6. Increase supply pressure to 90% of set
pressure and check seat leakage, using a
bubble tester as per API 527, there should
be no leakage.
7.
Check all gaskets and connections with soap
solution to ensure that there is NO leakage.
NOTES
Final set pressure should be checked when the pilot
is fitted onto the main valve and any necessary final
adjustments to the pilot setting to achieve nameplate
setting can then be made. Maximum difference
between pilot and main valve set pressure is shown
in Table 1. This should be checked when the pilot is
assembled onto the main valve.
Caution: do not distort the diaphragm when
tightening the spindle nut.
11. Fit bonnet nuts (17) into the upper case (3).
12. Fit the upper case (3) and tighten securely
with the 12 x bolts and nuts.
13. Assemble the spring (6) over the plate (31)
and fit the upper spring plate (13).
14. Fit the bonnet insert into the bonnet.
15. Fit the bonnet (4) and tighten securely down
with the 4 x bolts.
16. Fit the adjusting screw (12) and locknut (16).
Apply 2/3 turns to the adjusting screw.
17. Assemble the blowdown adjustment screw
assembly, parts 45/46/47/48/49 and 50.
Screw this assembly into the body (1) until
the blowdown needle (46) is screwed home
fully, turn back 1-full turn and lock in
position with the locknut (48).

5
ANDERSON GREENWOOD MARVAC FIG. 920 LOW PRESSURE PILOT OPERATED RELIEF VALVE
InstallatIon and MaIntenance InstructIons
Main valve set pressure adjustment
Fit the pilot to the main valve ensuring that
the pitot pick up pipe is clear and the pitot is in
direct line with the inlet flow stream.
Pressurize the inlet slowly. Gas will escape from
the pilot exhaust when the pilot set pressure
is reached. Continue to increase the inlet
pressure until the main valve starts to open,
adjust the pilot setting as appropriate to achieve
main valve nameplate set pressure. Note the
maximum allowable difference between pilot
and main valve set pressure in Table 1. Do not
exceed this value. If the value is exceeded adjust
blowdown screw, (part number 46) clockwise,
DO NOT SCREW FULLY IN, MINIUMUM SCREW
SETTING:
- ¼ TURN.
After test is complete, lead wire seal the cap to
the bonnet bolt, lead wire seal the blow down
adjusting screw to the body.
FIGURE 5 - OPTIONAL TEST SET-UP
Accumulator
Supply
pressure
Vent
Supply
Supply port
Pressure
adjustment
Blowdown
adjustment
Dome
pressure
¼
pipe
Neither Emerson, Emerson Automation Solutions, nor any of their affiliated entities assumes responsibility for the selection, use or maintenance of any product.
Responsibility for proper selection, use, and maintenance of any product remains solely with the purchaser and end user.
Anderson Greenwood is a mark owned by one of the companies in the Emerson Automation Solutions business unit of Emerson Electric Co. Emerson Automation
Solutions, Emerson and the Emerson logo are trademarks and service marks of Emerson Electric Co. All other marks are the property of their respective owners.
The contents of this publication are presented for informational purposes only, and while every effort has been made to ensure their accuracy, they are not to be
construed as warranties or guarantees, express or implied, regarding the products or services described herein or their use or applicability. All sales are governed by
our terms and conditions, which are available upon request. We reserve the right to modify or improve the designs or specifications of such products at any time without
notice.
Emerson.com/FinalControl
TABLE 1
Main valve set pressure
Dome pressure as a % of supply
pressure to achieve set pressure
Maximum difference between
pilot and main valve set pressure
Less than 1.0 psig
(68.9 mbar)
35 - 45% 7%
1.0 psig through 15.0 psig
(68.9 -1035 mbar)
55 - 65% 5%
/