Page is loading ...

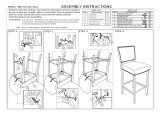
ASSEMBLY INSTRUCTION
ITEM : Oak-DC-2PK
STEP 1
NO.
NO.
PARTLIST QTY
QTY
HARDWARE
CHAIR BACK
11PC
2
3 2PCS
1PC
1PC
4
A
B
D
F
G
H
I
4PCS
4PCS
4PCS
4PCS
4PCS
8PCS
1PC
SEAT
SIDE RAIL
2
A
1
BOLT
M6 X 80
SCREW M3.5 X 14
WRENCH
NUT
D
STEP 3
50%
SCREW M3.5 X 40
M10 X 16
E
WOODEN DOWEL 8PCS
CNUT M10 X 20 4PCS
29 X 12 X 8
5
6
1PC
CHAIR FRONT
1PC
LEFT BOTTOM RAIL
RIGHT BOTTOM RAIL
C
3
3 5
4
1
D
B
F
I
4PCSJFELT MA
Insert bolt (A) into chair back (1) and chair front (2), then screw them by nut (C), 50% only.
STEP 2
Insert dowel (D) into chair back (1), then connect side rail (3) by half
moon pad (B ), nut (F) and wrench (I), Insert left/right bottom rail
(4)&(5)to chair back(1).
Insert left/right bottom rail (4)&(5)to chair front (2).Insert dowel (D) into
chair front (2), then connect side rail (3) by half moon pad (B ), nut (F)
and wrench (I).
HALF MOON PAD
L SHAPE IRON
D
D
F
I
B

ASSEMBLY COMPLETED
NOTE : AFTER A FEW DAYS OF ASSEMBLY. IT WILL HAVE ACCLIMATIZED TO THE ENVIRONMENT. PLEASE TIGHTEN ALL HARDWARE.CHECK TIGHTNESS OF
ALL SCREWS EVERY 6 - 8 WEEKS.
STEP 4
STEP 6
G
ASSEMBLY INSTRUCTION
H
6
H
E
J
Turn chair bottom up, screrw L shape iron (E) by screw (H).
STEP 5
Screw left/right bottom rail (4)/(5) by screw (G).Add felt pad (J) on leg bottom.
Turn chair.
/