Trendnet TV-IP862IC User guide

Category
Routers
Type
User guide
TRENDnet User’s Guide
Cover Page
© Copyright 2016 TRENDnet. All Rights Reserved.
TRENDnet User’s Guide
Table of Contents
i
Contents
Product Overview ................................................................................. 1
Package Contents ............................................................................................................................................ 1
Features .......................................................................................................................................................... 1
Product Hardware Features ............................................................................................................................ 2
Wall Mount Installation ................................................................................................................................... 3
Installation, Using the AutoRun Wizard ................................................. 3
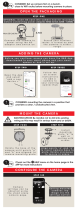
Option A, Connect camera to your network using a network cable ................................................................ 5
Option B, Connect Camera to your wireless network using WPS (Wi-Fi Protected Setup) button .................. 8
Option C, Connect Camera to your Wireless Network Manually ................................................................... 11
Starting the TRENDnet Cloud Service ................................................... 15
Cloud Mode 1: ............................................................................................................................................... 17
Cloud Mode 2: ............................................................................................................................................... 17
Cloud Mode 3: ............................................................................................................................................... 18
Cloud Service Interface and configuration .................................................................................................... 18
Mobile Apps........................................................................................ 23
Find the IP address of your camera(s) .................................................. 25
Web Browser Management ................................................................. 25
Main Web User Interface .............................................................................................................................. 30
Camera Toolbar ............................................................................................................................................. 30
Setup ............................................................................................................................................................. 31
Wizard ........................................................................................................................................................... 31
Step 1: LAN Settings ................................................................................................ 31
Step 2: Internet Settings.......................................................................................... 32
Step 3: DDNS Settings ............................................................................................. 32
Step 4: Camera Name Settings ................................................................................ 33
Step 5: Time Settings ............................................................................................... 33
Step 6: Setup Complete ........................................................................................... 34
System ........................................................................................................................................................... 34
Admin ...................................................................................................................... 34
Time and Date ......................................................................................................... 36
Network ........................................................................................................................................................ 37
LAN Settings ............................................................................................................ 37
Wireless Setup ........................................................................................................ 39
Dynamic DNS ........................................................................................................... 40
Cloud Setting ........................................................................................................... 41
Cloud Status ............................................................................................................ 42
Audio/Video Setting ...................................................................................................................................... 42
Image Setup ............................................................................................................ 44
Action ............................................................................................................................................................ 45
Recording ................................................................................................................ 45
Video Clip ................................................................................................................ 49
Snapshot ................................................................................................................. 50
Preset Position ........................................................................................................ 52
Patrol Position ......................................................................................................... 52
SD Management...................................................................................................... 52
Motion Detection .......................................................................................................................................... 53
Sound Detection ............................................................................................................................................ 54
Tools .............................................................................................................................................................. 55
System ..................................................................................................................... 55
Firmware Upgrade .................................................................................................. 56
Advanced ...................................................................................................................................................... 56
TRENDnetVIEW Pro Software .............................................................. 58
Troubleshooting ................................................................................. 59
© Copyright 2016 TRENDnet. All Rights Reserved.
1
TRENDnet User’s Guide
TV-IP862IC
Product Overview
TV-IP862IC
Package Contents
In addition to your camera, the package includes:
Multi-Language Quick Installation Guide
CD-ROM (Utility & User’s Guide)
Network cable (1.8m / 6ft)
Power adapter (12V DC, 1A) (1.5m / 5ft)
If any package contents are missing or damaged, please contact the retail store, online
retailer, or reseller/distributor that the item was purchased from.
Features
TV-IP862IC
The TV-IP862IC records at 1280 x 720 pixels (720P HD), 30 FPS (frames per second). You
can manage up to 32 TRENDnet cameras with the included complimentary camera
management software. The TV-IP862IC also includes adjustable motion detection
recording areas, email alerts, scheduled recording sessions, Pan/Tilt auto-patrol, date-
and-time overlays, two-way audio, an adjustable lens, and four times digital zoom. A
wall/ceiling mounting kit is included and the camera’s off white housing blends into
most environments.
Easy Installation
The TV-IP862IC includes a CD-ROM with a setup wizard that guides you through the
installation process.
Wide Platform Support
The TV-IP862IC supports TCP/IP networking, HTTP, and other Internet related protocols.
The TV-IP862IC can be integrated easily into other Internet/Intranet applications
because of its standards-based features.
10/100 Ethernet Support
The TV-IP862IC supports 10/100 Ethernet.
Web Configuration
Once setup is complete, administrators can use a standard web browser to access
images and video, configure the camera over an intranet or over the Internet.
Administration via web browser over the Internet means the IP camera can be accessed
and administered from anywhere in the world.
Broad Range of Applications
With today’s high-speed Internet connections, many scenarios for the application of
your network camera exist, including industrial and public monitoring of properties such
as homes, offices, banks, hospitals, child-care centers and amusement parks.
Pan & Tilt
The TV-IP862IC can pan side to side at a remarkable 330 degrees and tilt 115 degrees.
Recording Quality
The TV-IP862IC can record 1280x720 (720p HD) video resolution.
© Copyright 2016 TRENDnet. All Rights Reserved.
2
TRENDnet User’s Guide
TV-IP862IC
Product Hardware Features
Rear Panel View
Ethernet Port Connect Ethernet cables to your wired network devices.
Power Port Connect the included power adapter from your camera to an
available power outlet.
Note: Use only the adapter that came with your camera.
Reset Button Use an item such as a paperclip to push and hold this button for
5 seconds and release to reset your camera to its factory defaults.
WPS (Wi-Fi Protected Setup) Push and hold this button for 5 seconds to
activate WPS. The button LED is blinking green when WPS is activated.
Antenna 2dBi detachable antenna.
Line Out Connects an external active speaker
Micro SD Slot Insert a micro SD card into this slot to store video/image data.
Rear Air Vent This is to cool theTV-IP862IC and dissipate heat.
Front Panel View
IR LED Built-in 6 IR LED, 850nm, for night vision uses. (for TV-IP862IC)
Light Sensor Detects the light source to turn IR on or off.
Focus Ring Turn to adjust the focus of the camera.
Microphone Built-in microphone for audio can be turned on or off.
Power This LED indicator is solid blue when your camera is powered on.
Otherwise, if this LED indicator is off, there is no power to your camera.
Link This LED indicator is blinking green when there is connection/data to
your camera.
Camera Lens Focal Length: 4.6 mm, F2.0; Focal Depth: 20 cm infinity
IR LED
Line Out
Ethernet Port
Light Sensor
Microphone
Camera Lens
Antenna
WPS Button
Reset Button
Rear Air
Vents
Micro SD Slot
Focus Ring
WPS Indicator Light
Power Port
© Copyright 2016 TRENDnet. All Rights Reserved.
3
TRENDnet User’s Guide
TV-IP862IC
Wall Mount Installation
Please do not mount the camera until after you complete the installation steps from the
CD-ROM. Temporarily place the camera next to your computer.
To attach the metal plates, carry out the following:
Remove the two rubber pads under the base of the Camera.
Slide the metal plate onto the base of the camera, making sure that the two
holes on the base of the camera align with the two screw holes on the base of
the camera.
Secure the metal plate to the base of the Camera with the two screws
provided.
The camera can now be mounted to the ceiling or a wall. See the diagram
below for more information.
Installation, Using the AutoRun Wizard
Insert the included CD-ROM into your CD/DVD drive. The Install Wizard program will
run automatically.
Note: If the Install Wizard does not run, you may have autorun disabled on your
machine. In this case, browse to the CD drive and run InstallWizard.exe to begin the
installation wizard.
Begin by selecting a language from the drop-down list. There is a choice of five
languages English, French, German, Spanish, and Russian.
Next, click Install Camera and follow the on-screen steps to continue the installation.
© Copyright 2016 TRENDnet. All Rights Reserved.
4
TRENDnet User’s Guide
TV-IP862IC
1. This is TRENDnet’s Terms of Use. Click Agree to continue.
2. The next step references information on the camera itself. Go to your camera
and check the details at the bottom of the device. Click Next to continue, Back
to go to the previous screen or Home to return to the Main Menu. Also
enclosed, is a sticker with the same details attached.
3. The most important part of the setup process is the network connection type.
There are three options:
a. Connect camera to your network using a network cable
b. Connect camera to your wireless network using Wi-Fi Protected Setup
(WPS) button (Verify your router has a WPS button. If not, select the
next option).
© Copyright 2016 TRENDnet. All Rights Reserved.
5
TRENDnet User’s Guide
TV-IP862IC
c. Connect camera to your wireless network manually.
Option A, Connect camera to your network using a network
cable
1. The basic connection type is “A” using a network cable. Let’s begin the installation
process using the network cable connection first. Click this radio button and click Next
to continue, Back to go to the previous screen or Home to return to the Main Menu.
2. Follow the instructions in the next screen to Power up the Camera. Connect one end
of the power adapter to the camera and watch the LED flicker. Click Next to continue,
Back to go to the previous screen or Home to return to the Main Menu.
3. Connect one end of the network cable to your camera and the other end to your
router. Click Next to continue, Back to go to the previous screen or Home to return to
the Main Menu.
© Copyright 2016 TRENDnet. All Rights Reserved.
6
TRENDnet User’s Guide
TV-IP862IC
4. The wizard searches the network for your camera.
5. If you only have one camera on your network, the wizard will automatically
select it (as shown below). Otherwise, if you have more than one camera, it
provides several options from the list. The wizard provides the Model Name
and MAC Address of the camera. If you do not see any of your camera(s) in the
wizard, click Retry to scan for the camera again. Click Next to continue, Back to
go to the previous screen or Home to return to the Main Menu.
6. Password Settings. Follow the instructions on the screen. The default
username and password is admin. Tick the Change Password checkbox to enter
the new password details. The password should be between 8 and 16
characters. Click Next to continue, Back to go to the previous screen or Home
to return to the Main Menu.
If you have entered the incorrect admin details, you are prompted to change the
configuration, as shown below.
© Copyright 2016 TRENDnet. All Rights Reserved.
7
TRENDnet User’s Guide
TV-IP862IC
If the password length is less than 8 characters, you are also prompted to alter the
configuration, as shown below.
7. The wizard configures your parameters.
8. The initial setup is complete. The main feature is the Cloud Access accessibility
feature. Click the link(s) or icon below to create a shortcut on your desktop.
Also, below the icon is a warning. This warning is only shown when the Internet
connection is inactive or the Cloud server cannot be found. Make sure the
Internet connection is active, click Retry. If the Cloud server isn’t found, the
server may be busy or under maintenance. Under these circumstances, click
Retry later again. If there is no warning, click Next.
Please refer to Starting the TRENDnet Cloud Services section for additional
Cloud service information.
Click on the product image to create a shortcut on the desktop. A shortcut will
be created.
Click the link provided to browse the settings in the browser.
© Copyright 2016 TRENDnet. All Rights Reserved.
8
TRENDnet User’s Guide
TV-IP862IC
9. Scan the barcode to download the TRENDnet CloudView App for Apple iOS or
Android™
1
. The app can also be found by searching TRENDnet from the Apple
App Store or Google Play
2
.
Please refer to Mobile Apps section for additional app features information.
You are now ready to use your camera. Click Finish to exit.
1
Android is a trademark of Google Inc.
2
Google Play is a trademark of Google Inc.
Option B, Connect Camera to your wireless network using
WPS (Wi-Fi Protected Setup) button
Tick the WPS option
Please consider these points before using WPS.
Find the access point (AP) or wireless router you wish to connect to from the
Available AP drop down menu.
In most cases you should leave the Channel set to Auto as the AP will
determine the channel of operation.
Select the type of authentication and encryption required by the access point
and enter the Key required to connect.
Click Next to continue, Back to go to the previous screen or Home to return to the Main
Menu.
Please read the next steps carefully as it pertains to the WPS feature on your router and
camera.
© Copyright 2016 TRENDnet. All Rights Reserved.
9
TRENDnet User’s Guide
TV-IP862IC
1. Follow the instructions on the screen to Power up the Camera. Click Next to
continue, Back to go to the previous screen or Home to return to the Main
Menu.
Follow the instructions and click Next to continue. If you wish to go to the previous
screen, click Back or Home to return to the main menu.
2. The wizard will now search for your camera.
3. If you only have one camera on your network, the wizard will automatically
select it (as shown below). Otherwise, if you have more than one camera, it
provides several options from the list. The wizard provides the Model Name
and MAC Address of the camera. If you do not see any of your camera(s) in the
wizard, click Retry to scan for the camera again. Click Next to continue, Back to
go to the previous screen or Home to return to the Main Menu.
© Copyright 2016 TRENDnet. All Rights Reserved.
10
TRENDnet User’s Guide
TV-IP862IC
4. Password Settings. Follow the instructions on the screen. The default
username and password is admin. Click the Change Password checkbox to
enter the new password details. The password should be between 8 and 16
characters. Click Next to continue, Back to go to the previous screen or Home
to return to the Main Menu.
5. The wizard will now configure your parameters.
6. The initial setup has been completed. The main feature is the Cloud Access
accessibility feature. Click the link(s) or icon below to create a shortcut on your
desktop. Also, below the icon is a warning. This warning is only shown when
the Internet connection is inactive or the Cloud server cannot be found. Make
sure the Internet connection is active, click Retry. If the Cloud server isn’t
found, the server may be busy or under maintenance. Under these
circumstances, click Retry later again. If there is no warning, click Next.
Please refer to Starting the TRENDnet Cloud Services section for additional
Cloud service information.
7. Scan the barcode to download the TRENDnet CloudView App for Apple iOS or
Android™ . The app can also be found by searching TRENDnet from the Apple
App Store or Google Play™.
Please refer to Mobile Apps section for additional app features information.
You are now ready to use your camera. Click Finish to exit.
© Copyright 2016 TRENDnet. All Rights Reserved.
11
TRENDnet User’s Guide
TV-IP862IC
Option C, Connect Camera to your Wireless Network
Manually
1. Follow the instructions in the next screen to Power up the Camera. Click Next
to continue, Back to go to the previous screen or Home to return to the Main
Menu.
2. Connect one end of the network cable to your camera and the other end to
your router. Click Next to continue, Back to go to the previous screen or Home
to return to the Main Menu.
3. The wizard will now search the network for your camera.
© Copyright 2016 TRENDnet. All Rights Reserved.
12
TRENDnet User’s Guide
TV-IP862IC
4. If you only have one camera on your network, the wizard will automatically
select it (as shown below). Otherwise, if you have more than one camera, it
provides several options from the list. The wizard provides the Model Name
and MAC Address of the camera. If you do not see any of your camera(s) in the
wizard, click Retry to scan for the camera again. Click Next to continue, Back to
go to the previous screen or Home to return to the Main Menu.
5. Password Settings. Follow the instructions on the screen. The default
username and password is admin. Click the Change Password checkbox to
enter the new password details. The password should be between 8 and 16
characters. Click Next to continue, Back to go to the previous screen or Home
to return to the Main Menu.
6. The wizard will now configure your parameters.
© Copyright 2016 TRENDnet. All Rights Reserved.
13
TRENDnet User’s Guide
TV-IP862IC
7. Once your wireless network has been discovered, the wizard will provide you
with an option to select the Available Wireless Network and also to provide a
Wireless Network Password. If you do not see your wireless network details,
click the Rescan link to scan the network again.
The wizard will search for wireless Access Points. Click the Rescan button if you do not
find your AP.
Once the wizard finds the wireless AP you are looking for, select it and enter the
wireless network password of the AP. Click Next to continue.
8. Next, you will be prompted to disconnect your network cable from the
camera/router. Click Next to continue, Back to go to the previous screen or
Home to return to the Main Menu.
© Copyright 2016 TRENDnet. All Rights Reserved.
14
TRENDnet User’s Guide
TV-IP862IC
9. The camera will connect to the wireless network.
10. The initial setup has been completed. The main feature is the Cloud Access
accessibility feature. Click the link(s) or icon below to create a shortcut on your
desktop. Also, below the icon is a warning message. This warning message is
only shown when the internet connection is inactive or the cloud server cannot
be found. Make sure the internet connection is active, click Retry. If the Cloud
server isn’t found, the server may be busy or under maintenance. Under these
circumstances, click Retry again. If there is no warning, click Next.
Please refer to Starting the TRENDnet Cloud Services section for additional
Cloud service information.
11. Scan the barcode to download the TRENDnet CloudView App for Apple iOS or
Android™ . The app can also be found by searching TRENDnet from the Apple
App Store or Google Play™.
Please refer to Mobile Apps section for additional Cloud service information.
You are now ready to use your camera. Click Finish to exit.
© Copyright 2016 TRENDnet. All Rights Reserved.
15
TRENDnet User’s Guide
TV-IP862IC
Starting the TRENDnet Cloud Service
When you first purchase the TV-IP862IC, it’s already configured to run on the internet
out of the box. To do this, you will need the following:
The TV-IP862IC must be connected to the network with internet
A DHCP router, with WPS enabled (optional), or the camera connected to a LAN
connection by a network cable.
Before starting the TRENDnet Cloud Service, please properly install the camera through
the installation steps on the Quick Installation Guide.
To access the cloud service, follow the steps below
1. Open a web browser and type in the URL (eg:
http://73859116.cam.trendnetcloud.com) listed on the label located at bottom
of the camera. Write it down
2. You will reach the cloud service site
3. You will be prompted to install the plug-in needed for TRENDnet access. Click
Install.
4. The log-in screen will appear. Enter the default username (admin) and the
default password, admin, at the first time login without running installation
steps on CD-ROM ahead or soon after the camera reset. If you have done
installation via CD-ROM previously, please enter the password you have setup,
and click Login. If you don’t want to use the information that you just entered,
click Reset and reenter your data.
© Copyright 2016 TRENDnet. All Rights Reserved.
16
TRENDnet User’s Guide
TV-IP862IC
Note: For first time login, the site will prompt the Terms of Use and password change
windows as below. If you’ve configured the cameras previously, skip to Step 5.
The next is to change the username and password. Enter a username and the existing
password. Enter a new password and re-type it to confirm it. Click OK to complete.
The next screen will verify that your settings have been successfully changed. Click Login.
5. Now, login with the new username and password and click Login.
The camera will now display the Cloud view via the TRENDnet cloud service.
Depending on the network environment, you will be connecting to the cloud services
in one of the three modes. If you look under the Live View icon, you will notice Mode
1, 2, or 3. This indicates the connection mode currently in use.
© Copyright 2016 TRENDnet. All Rights Reserved.
17
TRENDnet User’s Guide
TV-IP862IC
Cloud Mode 1:
Mode 1 indicates the camera is connecting directly to the Internet or local network. This
mode offers configuration and management options, together with an Advance
Configuration mode.
Cloud Mode 2:
Mode 2 indicates the camera is connecting to media in a peer-to-peer fashion to the
Internet or local network. This mode offers configuration and management options but
not an Advanced Configuration mode.
© Copyright 2016 TRENDnet. All Rights Reserved.
18
TRENDnet User’s Guide
TV-IP862IC
Cloud Mode 3:
Mode 3 indicates the camera is connecting to the Internet or local network through a
firewall, or limited by your current network environment. This mode offers
configuration and management options but without Advanced configuration just live
streaming for 5 minutes (the last 60 seconds is in countdown format). The firewall
settings limits live streaming for each user. The “red” notification at the bottom of the
viewing area warns users of the limited time. Refresh this screen continuously if you
wish to view your camera’s live stream.
Cloud Service Interface and configuration
After you login, you will see the main Cloud Service screen. Please properly install the
camera prior to cloud service login. The cloud service provides mostly use but not full
configuration settings. For full configuration settings, please refer to the Configuration
section.
What’s on the interface?
  • Page 1 1
  • Page 2 2
  • Page 3 3
  • Page 4 4
  • Page 5 5
  • Page 6 6
  • Page 7 7
  • Page 8 8
  • Page 9 9
  • Page 10 10
  • Page 11 11
  • Page 12 12
  • Page 13 13
  • Page 14 14
  • Page 15 15
  • Page 16 16
  • Page 17 17
  • Page 18 18
  • Page 19 19
  • Page 20 20
  • Page 21 21
  • Page 22 22
  • Page 23 23
  • Page 24 24
  • Page 25 25
  • Page 26 26
  • Page 27 27
  • Page 28 28
  • Page 29 29
  • Page 30 30
  • Page 31 31
  • Page 32 32
  • Page 33 33
  • Page 34 34
  • Page 35 35
  • Page 36 36
  • Page 37 37
  • Page 38 38
  • Page 39 39
  • Page 40 40
  • Page 41 41
  • Page 42 42
  • Page 43 43
  • Page 44 44
  • Page 45 45
  • Page 46 46
  • Page 47 47
  • Page 48 48
  • Page 49 49
  • Page 50 50
  • Page 51 51
  • Page 52 52
  • Page 53 53
  • Page 54 54
  • Page 55 55
  • Page 56 56
  • Page 57 57
  • Page 58 58
  • Page 59 59
  • Page 60 60
  • Page 61 61
  • Page 62 62
  • Page 63 63
  • Page 64 64
  • Page 65 65
  • Page 66 66

Trendnet TV-IP862IC User guide

Category
Routers
Type
User guide

Ask a question and I''ll find the answer in the document

Finding information in a document is now easier with AI