Page is loading ...

1
FMS-1655M
Room Pressure Monitor
LIT-12013119
January 2019
Installation Instructions
This equipment has been tested and found to comply with the limits for a Class A digital device pursuant to Part 15 of the FCC
Rules. These limits are designed to provide reasonable protection against harmful interference when this equipment is operated in a
commercial environment. This equipment generates, uses, and can radiate radio frequency energy and, if not installed and used in
accordance with the instruction manual, may cause harmful interference to radio communications. Operation of this equipment in a
residential area may cause harmful interference, in which case users will be required to correct the interference at their own expense.
Application
These installation instructions guide the installer through the installation of the FMS-1655M Room Pressure Monitor.
Please read these instructions thoroughly before beginning installation.
North American Emissions Compliance
United States
Canada
Installation
This Class (A) digital apparatus meets all the requirements of the Canadian Interference-Causing Equipment Regulations.
Cet appareil numérique de la Classe (A) respecte toutes les exigences du Règlement sur le matériel brouilleur du Canada.
IMPORTANT: The FMS-1655M Room Pressure Monitor must be wired to 24 VAC only. Wiring the unit to 110 VAC will cause
serious damange and void the warranty.
Risk of Property Damage.
Ensure that the power source conforms to the requirements of the equipment. Failure to use a correct power source may result in
permanent damage to the equipment.
Risque de dégâts matériels.
S’assurer que la source d’alimentation électrique est conforme aux spécications de l’équipement. L’utilisation d’une source
d’alimentation électrique inappropriée risque d’endommager irrémédiablement l’équipement.
NOTICE
NOTICE
Use of the software that is in (or constitutes) this product or access to the cloud or hosted services applicable to this product, if any,
is subject to applicable terms set forth at www.johnsoncontrols.com/techterms. Your use of this product constitutes an agreement to
such terms. If you do not agree to be bound by such terms, you may return the unused product to your place of purchase.
LB-FMS1655M-S01
LB-FMS1655M-T01

FMS-1655M
LIT-12013119
2
Room Name / Number
Unit Model Number and Serial Number (ESN)
Analog Output
Operating Mode (Direct or PID)
Analog Output Range (zero based or offset)
Analog Output Upper Limit (0-100%)
Analog Output Lower Limit (0-100%)
Analog Output Action (Direct or Reverse)
PID Constants
Proportional Constant (0.5-100%)
Integral Constant (0.0-100%)
Derivative Constant (0.0-100%)
Alarm Limits
Positive Isolation High Alarm Setpoint
Positive Isolation High Warning Setpoint
Positive Isolation Low Warning Setpoint
Positive Isolation Low Alarm Setpoint
Negative Isolation High Alarm Setpoint
Negative Isolation High Warning Setpoint
Negative Isolation Low Warning Setpoint
Negative Isolation Low Alarm Setpoint
Audible Alert
Operating Mode (audible or slient)
Delay Time Base (seconds or minutes)
Delay Setting (0-60)
Alarm Quiet Period Starting Hour (0-23)
Alarm Quiet Period Ending Hour (0-23)
Engineering Units
Inches of Water or Pascals
FMS-1655M Room Pressure Monitor settings
This form should be completed during the initial conguration for each room pressure monitor. Be sure to congure
the unit for either Positive, Negative, or both using the Isolation Mode Conguration setup procedure.

FMS-1655M
LIT-12013119
3
Table of contents
General ......................................................................................................................................................................................... 4
Specications ......................................................................................................................................................................... 4
Part Number Guide ................................................................................................................................................................ 5
Overview ................................................................................................................................................................................ 8
Mounting/Wiring ..........................................................................................................................................................................9
Installation .............................................................................................................................................................................. 9
Remote sensor mounting procedure ...................................................................................................................................... 9
Display mounting procedure (surface mount) ...................................................................................................................... 10
Flush thin mount mounting procedure .................................................................................................................................. 11
Installation detail view .......................................................................................................................................................... 12
Basic programming ................................................................................................................................................................... 14
Main display screen.............................................................................................................................................................. 14
Conguring Room Pressure Monitor .................................................................................................................................... 14
Setting up alarm limits .......................................................................................................................................................... 14
Selecting displayed units ...................................................................................................................................................... 15
Conguring display options .................................................................................................................................................. 15
Adding password security .................................................................................................................................................... 16
Cleaning the display.................................................................................................................................................................. 17
Alarm setpoints ......................................................................................................................................................................... 18
Setup menu tree ........................................................................................................................................................................ 19

FMS-1655M
LIT-12013119
4
Specications
Electrical
Pressure Range ……………………………………………………………………………………………………………………… ±0.2500 “WC
Accuracy of Measurement ….....………………………………………………………………………………………………………… ±0.5% FS
*NIST Traceable / Individual certication available as option
Power Supply .....…… Class 2, 24VAC ±10%, 30VA universal 120/240 to 24 VAC, 60/50 Hz, step-down isolation transformer provided
Recommended Cable Type ....………………………………………………………………………………………...…………… Belden 1325A
Communications
BACnet® MS/TP Network……....……………………………………………………...………………Two-wire twisted pair, RS-485 signaling
Recommend Cable Type……...........…………………………………………………………………………………......…………Belden 3107A
Touchscreen User Interface
LCD Size ……………………………………………………………………………………………………………...……………… 3.2” diagonal
LCD Type ………………………………………...…………………………………………………………………......…………… Transmissive
Resolution …………………………………....………………………………………………………………………..………… 240 x 320 portrait
Viewing Area ….……………………………………………………………………………………………………...…… 50.60 mm x 66.80 mm
Color Depth …………………………………………………………………………………………………………..……… 18-bit or 262K colors
Backlight Color …....………………………………………………………………………………………………...………………………… White
Luminous Intensity …………………………………………………………………………………………….…..……………… min 2500 cd/m2
FMS-1655M Monitor Surface Mount Enclosure …..………....……………………….………………………….………… 3”W x 5”H x 1.13”D
FMS-1655M Monitor Thin Mount Enclosure .............................................................................................................. 5”W x 8”H x 0.75”D
External Remote Sensor Housing ………………………….…………….……………………………………..………… 2.3”W x 4”H x 2.7”D
Stainless Steel Cover Plate for Flow Tube ……………………………….……………………………………..……… 2.7”W x 4.5”H x 0.2”D
Stainless Steel Cover Plate for Remote Sensor ………………………….……………………………………..……… 2.7”W x 4.5”H x 0.2”D
Surface Mount FMS-1655M Monitor with Power Supply ………………..……………………………….……...….....…… approx. wt. 3.7 lb.
Flush Thin Mount FMS-1655M Monitor with Power Supply ………………....…………………………………......……… approx. wt. 5.4 lb.
FMS-1655M Monitor Mounting Options ………………………………......……………………………………………...……… Surface, Flush
Flow Tube Cover Plate Mounting …………………………..........………………………………………………...………….… Surface, Flush
Remote Pressure Sensor Mounting ……………..............……………………………………………………………......…….………… Flush
Environmental
Operating Temperature …………………………...……………………………………....…………………………… 32° to 125° F Operating
Operating Humidity ………....……………………………………………………………......……………… 10% - 95% RH, Non-condensing
General

FMS-1655M
LIT-12013119
5
Part Number Guide
UNIT
FMS = Flow Monitor Station (FMS)
01 = Standard remote sensor
REMOTE SENSOR
S = Surface mount
T = Thin flush mount
STYLE
SERIES
BRAND
LB = Johnson Controls
1655M = BACnet Monitor
- -

FMS-1655M
LIT-12013119
6
CORRECT
FAST ACTING
ELECTRONIC ACTUATOR
Controller
Actuator
120/24VAC, 30Va
Transformer
Supplied by Johnson
Controls
120/24VAC, 20Va Third Party
Transformer
CORRECT
Warning
Failure to follow the wiring diagrams could result in damage to your equipment and could void your warranty. Under no
circumstances should a single transformer be split between actuator and controller. Doing so will damage the actuator, the
transformer, the controller or all units. A single 120/24V 30Va transformer is required for the controller and a separate 120/24V
20Va transformer is required for the actuator. This equipment contains electrostatic sensitive components. To prevent possible
damage, take precautions to prevent electrostatic discharge when handling or servicing this equipment by wearing an
approved ESD grounding wrist strap connected to an earth ground source.
System Precautions

FMS-1655M
LIT-12013119
7
System Precautions
Red / 24 VAC / 30VA
connected to the FMS
Ground
}
}
120 VAC
50/60 Hz
Black
White
Stepdown Isolation Transformer
(provided with FMS-1655)
Only Class 2 wiring in this
compartment.
Note:
This product should be installed with the manufacturer provided isolated power supply and connected to an electrical circuit
protected by a minimum 20A circuit breaker. This circuit breaker should be mounted in an approved electrical enclosure located
separately, but in close proximity to this product.
}
240 VAC
50/60 Hz
Blue
1 Amp Slow Blow
Fuse
Transformer
50/60 Hz

FMS-1655M
LIT-12013119
8
Overview
The Johnson Controls FMS-1655M Room
Pressure Monitor is an ultra-sensitive
instrument used to monitor differential
pressure in hospital rooms, isolation
rooms, surgical suites, laboratories,
and clean rooms. This unit is capable of
measuring and displaying differential air
pressures as low as 0.0001” WC (0.0249
Pa).
Key features of the FMS-1655M Monitor
include:
• Full-color touchscreen display with
programmable display options and
adjustable backlight
• Safety Halo™ edge lighting
• Intuitive user interface that simplies
setup and conguration of unit
• Graphical display that indicates room
status
• Audible and visual alarms
• Multi-level password protection
• Zero calibration feature allows in-eld
recalibration of zero pressure reading
• 2 factory-calibrated analog outputs,
one for PID control and one for remote
monitoring room DP
• BACnet® BMS network comms port
The FMS-1655M Monitor is equipped
with a 3.2” full-color touchscreen display
in portrait orientation (240 pixels by 320
pixels). The password-protected menu
tree is intuitive and simplies the setup
and conguration of the unit. The menus
incorporate touch-based interfaces such
as sliders, radio buttons, and dialog pop-
ups to facilitate the ease-of-use of the
FMS-1655M Monitor.
The display has a bright background
color that changes to indicate the three
different room statuses. The background
colors indicate “Normal” when pressure
is within dened limits, “Warning”
when pressure is nearing an out-of-
limits condition, and “Alarm” when
pressure is outside dened acceptable
limits. The pressure ranges for these
conditions are easily set by the user for
the specic installation. The background
color changes provide an at-a-glance
conditions of the monitored room.
Alarm conditions may be dened by
the user, in terms of desired differential
pressure settings for the room being
monitored. When an alarm condition
occurs, it may be annunciated in three
user-denable ways:
1. On the display
2. With an audible alarm
3. Safety Halo™ edge lighting
4. Over the BMS network
The alarm will automatically reset when
the unit has sensed that the room
differential pressure has returned to
proper limits. The user may easily mute
the audible alarm by touching the Alarm
Audible button at the bottom of the
touchscreen display.
The FMS-1655M Monitor provides a
single digital input that may be used
for monitoring a door switch. The
conguration of the door switch input
is congured for normally-closed
operation, and is active-high triggered.
A SPDT magnetic door switch type is
recommended for use with function.
The user may set up multiple multi-level
passwords to prevent unauthorized
or casual access to the FMS-1655M
Monitor conguration settings. Up to
ten passwords of up to eight digits
may be programmed, with each having
one of four associated access levels.
Administrators and facility management
personnel may have unrestricted access,
while general staff may be assigned
restricted access passwords which limit
the functionality of the user menus.
Room pressure selection of Positive,
Negative, or Neutral Isolation may
be protected using limited access
passwords, thereby eliminating the
need for keylock switches and keys. In
some locales, it is prohibitive to allow
an isolation room controller to switch
between positive and negative modes
of isolation. To accommodate this
situation, the FMS-1655M Monitor may
be congured at the factory for either
Positive- and Neutral-isolation modes only
or Negative- and Neutral-isolation modes
only.
The FMS-1655M Monitor isolation monitor
is powered by a supplied universal
120/240 VAC to 24 VAC isolation power
supply that is fused at the secondary with
a 1-amp slow blow fuse. This powers both
the touchscreen display along with the
connected differential pressure sensor
module.
A 10 ft. length of 4-conductor cable is
provided with the FMS-1655M Monitor to
interface the two modules. If the distance
between the display and remote sensor
modules exceeds 10 ft, then this cable
may be substituted with the required
length of 4 conductor, dual twisted pair,
shield cable (Belden part no. 1325A).
The FMS-1655M Monitor includes a
remotely mounted sensor for measuring
the differential pressure of the monitored
room or space. This remote sensor
must be installed in the wall between
the monitored isolation room and the
adjoining corridor or anteroom. The front
port (P1) must be oriented towards the
isolation room and the rear port (P2)
towards the corridor or anteroom. Please
see the illustration on pages 8-9 for more
details.
The FMS-1655M Monitor incorporates
a PID output signal that may be used to
control a damper actuator. The factory-
calibrated analog signal is available as a
voltage between 0-10VDC or 2-10VDC
at the remote sensor connector. Refer to
page 12 and 13 for more information.

FMS-1655M
LIT-12013119
9
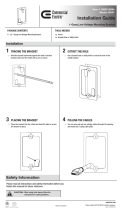
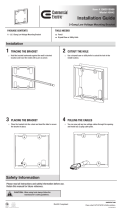
Mounting/Wiring
Installation
Remote sensor mounting
procedure
1. Cut an opening in the wall of the
isolation room to receive the supplied
single-gang “old work” low voltage
mounting bracket (Figure 1) for the
remote sensor module. Nominal
dimensions for the cutout are 3.65” H x
2.15” W. Drill a 7/16” hole through the
opposite wall for the ow tube.
2. Install the single-gang low voltage
mounting bracket in the cutout. Route
a length of supplied ow tube through
the mounting bracket and through the
7/16” hole in the opposite wall.
Separate the backplate from the
touchscreen display enclosure by
turning the set screw at the bottom of
the display enclosure fully clockwise
to release the backplate. Pull the
backplate bottom out slightly to
clear the bottom edge of the display
enclosure and slide the backplate down
away from the tabs at the top of the
enclosure. Disconnect either end of the
gray harness between the backplate
and display module by pushing down
on the locking tab, and then sliding the
connector out. Disconnect the interface
cable from the display module by
removing the terminal block from the
4 pin connector CN3 on the display
module PC board.
3. Conrm that the 4-conductor
interface cable between the remote
sensor module and the touchscreen
display module has its red and black
conductors securely attached to the
+V and GND terminals, respectively.
Route the end of the interface cable
with the 3 and 4 pin connector down
the wall to the anticipated location of
the touchscreen display module.
4. Using a suitable length of 2 conductor
20 AWG cable, connect the output of
the universal isolated power supply
module to the power input at the
remote sensor module. The output
of this power supply module is non-
polarized, so the two red wire may be
wired to power input terminals in either
orientation. Refer to page 12-13 for
power wiring details.
5. The FMS-1655M Monitor has a
factory-calibrated analog output and is
available as voltage at the Vo terminal.
The designated output (Vo) can be
used to control a damper actuator to
maintain a user set pressure setpoint
when the FMS-1655M Monitor is used
in a controller application.
6. Attach the pluggable connector to the
mating header on the remote sensor
module. Attach the end of the ow tube
to the barbed tting at back of sensor,
and then secure the remote sensor
module to the mounting bracket with
two supplied 6-32 x ¾” screws.
7. Install the louvered cover plate onto
the installed sensor module using
two supplied machine screws. On the
opposite side of the wall (corridor side),
attach the end of the ow tube to the
barbed tting of the ow tube mounting
plate.
8. Press the mounting plate into place,
allowing the excess tube length to
go into the wall space. Secure the
mounting plate with the supplied
screws and wall anchors.
9. Install a louvered cover plate
onto the mounting plate using two
supplied machine screws.
Fig 1. Single-gang, low-voltage mounting
bracket.

FMS-1655M
LIT-12013119
10
Display mounting procedure
(surface mount)
1. Cut an opening in the wall adjacent
to the door of the isolation room for
installing the supplied single-gang “old
work” low voltage mounting bracket
(Figure 1) for the touchscreen display
module. Nominal dimensions for the
cutout are 3.65” H x 2.15” W.
2. Install the single-gang low voltage
mounting bracket in the cutout.
3. Pull the loose end of the interface
cable from the remote sensor module
through the cutout in the drywall, and
then through the hole in the center of
the display enclosure backplate (Figure
2).
4. Attach the backplate to the mounting
bracket with two 6-32 x ¾” screws,
carefully aligning it using the two
mounting slots on the backplate before
tightening.
5. Connect the loose end of the interface
cable (4 pin) to the corresponding
header at the top of the display module
circuit board (see Figure 3). Conrm all
4 conductors of the interface cable are
securely attached at the terminal plugs.
Re-connect gray harness between
backplate and display module.
6. Reconnect the gray harness to the
backplate circuit board and attach the
display enclosure to the backplate
by inserting the tabs at the top of
the display into the corresponding
slots at the top of the backplate.
Secure the display enclosure to
the backplate by turning the slotted
setscrew at the bottom of the enclosure
counterclockwise until it is ush with
the enclosure bottom.
7. Finally, apply power to the monitoring
system by applying line power to the
power supply module. If the unit was
shipped with the 24VDC wall adapter
power supply, power up the system by
plugging it into an available electrical
receptacle, preferably located at a
location above the ceiling tile directly
above the surface mounted display
Fig 2. Route interface cable through center
hold at display enclosure backplate.
Fig 3. Interface connected to 4-pin header at
top of display module.
Fig 3a. Basic FMS Assembly with close up of
wall sensor connections.

FMS-1655M
LIT-12013119
11
Thin ush mount mounting
procedure
The FMS-1655M thin ush mount
model offers an attractive stainless steel
faceplate with an ultra-thin enclosure
(less than ¾” thick) that may be installed
in any application where wall depth is
either unknown or extremely limited.
New construction applications can take
advantage of the included wall box
that may be installed during the rough-
in phase. For retrot applications not
requiring electrical conduit termination,
the unit may be installed using the
retrot mounting plate that simpliesthe
installation process.
1. The FMS-1655M thin ush mount
modeloffers an attractive stainless
steel faceplate with an ultra-thin
enclosure (less than ¾” thick) that
may be installed in any application
where wall depth is either unknown or
extremely limited. New construction
applications can take advantage of the
included wall box that may be installed
during the rough-in phase. For retrot
applications not requiring electrical
conduit termination, the unit may be
installed using the retrot mounting
plate that simplies the installation
process.
2. If this is a new construction project and
the wall box has been installed, you
may skip the next two steps. If this is a
retrot application and existing drywall
is in place, then proceed with the next
step to prepare the opening for the
FMS-1655M thin ush mount model.
3. Using the retrot mounting plate (see
Figure 3b) as a template, trace the
inner outline ontothe drywall at the
desired mounting location with a pencil
or marker. Also mark the location of the
two mounting holes on the drywall. Cut
along the traced outline with a drywall
knife or saw, taking care not to make
the opening too large. Drill out the two
holes to clear access to the mounting
clip nuts. Remove the cut section of
drywall and discard. Be sure to brush
off any drywall dust or remnants from
the inside surface of the opening to
ensure proper adhesion of the retrot
mounting plate.
4. Remove the paper backing from the
two adhesive strips on the retrot
mounting plate and insert it into the
cut opening of the drywall. The retrot
plate should be oriented such that the
corner notch is located at the lower left
corner of the opening in the drywall,
with the tabs bent towards you. Using
the four tabs on the retrot mounting
plate as alignment guides, press the
mounting plate onto the inside surface
of the drywall opening rmly to ensure
maximum adhesion.
Fig 3b. Retrot Mounting Plate
5. The electrical connections must
terminated before installing the
stainless steel faceplate of the FMS-
1655M. Run the 4-conductor, dual
twisted pair, interface cable from the
FMS1655M remote sensor to the
FMS1655M display. Refer to the wiring
diagram shown at end of this manual
for details.
6. Terminate the interface cable
originating from the remote sensor
at the 4-position terminal block CN3
on the back side of the FMS-1655M
display, ensuring proper electrical
connections. Power connections
should be terminated at +V and GND
of the CN3 terminal block and sensor
comms at + & - terminals at CN3.
Insure proper polarity of the comms
wiring is maintained between sensor
and display.
7. For monitoring the FMS1655M over
a BACnet MS/TP network, terminate
the BACnet network cable at CN7 of
the FMS1655M display. Refer to wiring
diagrams at end of this manual for
details.
8. With the electrical connectionsproperly
terminated, the stainless steel
faceplate may be installed using
the two at head machine screws.
For retrot applications where the
mounting plate has been afxed to
the inside surface of the drywall, the
two mounting screws thread into the
clip nuts of the mounting plate. For
those applications where the wall box
has been installed, the two mounting
screws fasten the faceplate directly.
Fig 3c. Basic FMS1655M thin mount assembly

FMS-1655M
LIT-12013119
12
+ (RS485)
- (RS485)
GND
IN
+Vs
Io
Vo
- Vin
+Vin
+ (RS485)
- (RS485)
GND
IN
+Vs
Io
Vo
- Vin
+Vin
Installation detail view
Remote Sensor Installation Detail
(with standard 24 VAC power supply)
(Side View)
Isolation Room
Corridor
Stainless Steel
Mounting Plate
Gasket
Stainless Steel
Flow Tube
Mounting Plate
Gasket
Thin Silicone Caulking
(apply around tube and
between stainless steel
plate and wall to seal unit
penetration)
Flow Tube
When Flow Tube
mounting plate is located
directly opposite the
sensor, ow tubing
must be cut as short as
possible to prevent kinks.
To Johnson
Controls isolation
transformer
Optional Analog
Output Damper
Control
To optional
door switch
Wall Section
(cutaway view)
Terminal
For connection of
transmitter to
FMS-1655M
Monitor
Orange wall bracket
to be installed
rst by using the
rotating clamps
for secure wall
attachment.
To FMS-1655M
Monitor
Louvered
Cover Plate
Louvered
Cover Plate
Note: To maintain sensor
accuracy, Flow tube should
not exceed 36 inches.

FMS-1655M
LIT-12013119
13
+ (RS485)
- (RS485)
GND
IN
+Vs
Io
Vo
- Vin
+Vin
+ (RS485)
- (RS485)
GND
IN
+Vs
Io
Vo
- Vin
+Vin
Installation detail view
Remote Sensor Installation Detail
(Bottom View)
Isolation Room
Corridor
Stainless Steel
Mounting Plate
Gasket
Louvered Cover
Plate
Stainless Steel
Flow Tube
Mounting Plate
Gasket
Thin Silicone Caulking
(apply around tube and
between stainless steel
plate and wall to seal
unit penetration)
Terminal
For connection of
transmitter to
FMS-1655M Monitor.
Flow Tube
When Flow Tube
mounting plate is located
directly opposite the
sensor, ow tubing
must be cut as short as
possible to prevent kinks.
To FMS-1655M Monitor
monitor
Wall Section
(cutaway view)
Rotating clamps secure
assembly to wall board
Optional Analog
Output Damper
Control
To Johnson Controls
isolation transformer
To optional
door switch
Note: To maintain sensor
accuracy, Flow tube
should not exceed 36
inches.

FMS-1655M
LIT-12013119
14
Basic programming
FMS-1655M Monitor basic
programming
After the FMS-1655M Monitor unit has
been properly installed, apply power
to the unit. Upon power up, the Safety
Halo™ status indication bezel will cycle
through seven colors (red, green, blue,
yellow, magenta, cyan, and white),
followed by three action icons (normal,
caution, alarm), and nally, the Johnson
Controls splash screen indicating serial
numbers, rmware version numbers, and
BACnet MAC address. This splash screen
remains displayed for approximately 10
seconds and disappears to reveal the
main display screen. This splash screen
can be redisplayed using the About this
FMS option in the Diagnostics Menu.
Main display screen
All FMS-1655M Monitor units come
shipped from the factory in the neutral
isolation mode. The neutral isolation
mode will be represented on a blue
background (Figure 4). Information
displayed on the main screen includes the
following:
• Name of monitored room (up to 25
characters)
• Current isolation mode (positive,
negative, or neutral)
• Current differential pressure reading in
selected engineering units (default is
“WC)
• Time and date
• Door Status (If door switch is used)
While in neutral isolation mode, the
background color of the main display
screen is blue. However, while in either
positive or negative isolation modes, the
background color actively represents the
current status of the monitor. A green
background indicates that the current
differential pressure is within allowable
limits of the desired setpoint.
Fig 4. Main display shows isolation mode, room
status and differential pressure.
A yellow background indicates one of two
conditions: 1) door to monitored space
is open (if door switch is enabled), or 2)
current differential pressure has drifted
outside of the allowable limits of the
desired setpoint and are in the caution
range.
A red background indicates that the
current differential pressure has reached
a critical condition and is outside of the
allowable limits of the desired setpoint.
The FMS-1655M Monitor incorporates
a full-color touchscreen and includes
an extensive easy-to-use menu system
that allows the user to quickly setup
the monitor for immediate use. Also
integrated into the FMS-1655M Monitor
display are several hotspots that provide
quick access to various settings. Refer
to page 17 for details on using these
hotspots as display settings shortcuts.
Touching the screen anywhere other than
one of the reserved hotspots invokes
the menu system, unless one or more
security passwords have been entered.
Conguring Room Pressure
Monitor
Conguring the FMS-1655M Monitor
settings is extremely easy using the
intuitive user menus integrated in the
touchscreen display. Within minutes, the
FMS-1655M Monitor may be congured
to start displaying the real-time differential
pressure of the isolation room being
monitored.
Setting up alarm limits
To determine the various setpoints at
which the unit status changes from
normal to warning, and from warning to
alarm, the alarm limits must be congured
accordingly.
Alarm limits are only in effect while the
unit is in either positive or negative
isolation mode, as the alarms are
disabled while neutral isolation mode
is active.
In order to specify the alarm limits for
positive or negative isolation mode,
set the isolation mode accordingly by
selecting the Room Setup option from
the Unit Setup menu, and then select
the Isolation Mode option from the
Set Isolation Mode menu. Select the
desired isolation mode from the resulting
conguration popup window and press
“OK.”

FMS-1655M
LIT-12013119
15
Fig 5. Enter high alarm setpoint for positive
isolation mode using keyboard popup.
To begin specifying the alarm and warning
setpoints, select the Alarm Limits option
from the System Setup menu. The user
is prompted to sequentially enter the high
alarm and warning limits, followed by
the low warning and alarm limits, in that
order. For example, if positive isolation
mode was selected above, then the
conguration popup shown in Figure 5 will
be displayed, prompting the user to enter
the positive isolation high alarm setpoint
using the keypad.
These limits should be specied to
identify the differential pressure range
which is considered normal, as well as
the range which indicates a warning
condition, and the range which is
considered critical and indicates an alarm
condition.
The gure on page 14 shows the
relationship of these four alarm setpoints
and how they relate to the normal
operating differential pressure of the
monitored isolation room.
Conguring alarm buzzer
The FMS-1655M Monitor alarm resources
provide support for both visual and
audible alerts. The audible alert option on
the System Setup menu allows the alarm
buzzer settings to be easily congured.
Selecting this option invokes the
conguration screen shown in Figure 6.
Fig 6. Alarm buzzer may be congured for
audible or silent mode.
The alarm buzzer may be selected for
one of two modes of operation: audible or
silent mode. If audible mode is selected,
a delay may be specied in seconds or
minutes. If silent mode is selected, then
the alarm buzzer will not sound whenever
the unit encounters an alarm condition. If
audible mode is selected, the user may
specify an alarm quiet period. This feature
allows the audible alerts to be suppressed
between the specied hours every day,
thereby eliminating the potential for
nuisance alarms. Hospitals may take
advantage of this feature to minimize
nuisance alarms during non-visiting hours
in patient rooms.
Selecting displayed units
The FMS-1655M Monitor displays
differential pressure readings in one
of two units: inches of water column
(in WC) or Pascals (Pa). Touching the
differential pressure reading in the upper
LCD window of the display will invoke
the Select Engineering Units selection
screen. If the engineering units selection
is changed, the corresponding alarm
setpoints are automatically converted to
the newly selected units.
Conguring display options
The Display Setup menu provides
support for conguring all of the display
settings on the FMS-1655M Monitor.
Options are available for conguring the
main display, setting the system time and
date, adjusting the display brightness, and
setting the Safety Halo
TM
function. The
Display Options menu item allows the
main display to be congured as required
by the specic application. If desired, the
user may individually enable or disable
the display of the isolation mode, room
status, and the time/date at the bottom of
the screen.
The Safety Halo
TM
option on the Display
Setup Menu allows the user to disable or
enable this function as well as setting the
intensity of the Safety Halo
TM
brightness.
A nightly auto-dim feature can be set to
dim the Safety Halo
TM
brightness to a
user-set level at specied hours every
day.
The set time and date option on the
Display Setup menu allows the user to
specify the current time and date that may
be displayed at the bottom of the main
display. The FMS-1655M Monitor will
maintain the time and date as long as the
unit is not powered down. The time and
date can be synced to the network master
clock when the FMS-1655M Monitor is
connected to the BACnet network.
0.100

FMS-1655M
LIT-12013119
16
The set brightness option on the Display
Setup menu allows the intensity of the
display backlighting to be adjusted from
very dim to very bright. The brightness
settings are saved in nonvolatile memory
and remain in effect through a power
cycle.
Adding password security
Access to the FMS-1655M Monitor
menu system can be protected from
unauthorized tampering through the
multi-level security passwords. Up to ten
individual passwords may be entered in
the system, each with a specic access
level. A password entry may be created
by selecting the Passwords Setup option
from the System Setup menu, and then
selecting add password. The user is
prompted to enter a minimum of four and
up to eight numeric digits.
Once a password has been specied, the
user is prompted to specify one of four
access levels: Unrestricted, Standard,
Basic, and Restricted. All password
entries are saved to non-volatile memory,
and remain in effect through a power
failure. In the event that a password has
been forgotten, there is a factory-default
“back door” password that will provide
unrestricted access to the user menu
system. Please consult with the factory for
more information regarding this password.
Note: An unrestricted password must
be created rst before any restricted
passwords can be set.
Resetting Sensor Zero Offset
The FMS-1655M Monitor’s remote sensor
can have its zero offset reset to the
factory calibrated default in the event the
monitored pressure does not approach
zero when the door to the monitored
room is opened. Select the Reset Zero
Offset option on the Diagnostics menu
to begin the procedure. once the reading
stabilizes, click the OK button to proceed.
Exit to the main display and verify that the
reading goes to zero. If not, repeat the
above procedure.
Remote monitoring the FMS-1655M
Monitor
The FMS-1655M Monitor provides native
support for BACnet® MS/TP protocol over
a RS-485 serial port located on the FMS-
1655M Monitor user interface display at
CN7, a 3 pin pluggable terminal block at
back of display (see page 19). The FMS-
1655M Monitor is able to communicate
11 points of information to the building
management system. See page 18 for list
of BACnet® points. The network settings
are easily congured by selecting the
Network Setup option from the Unit
Setup menu. As an alternate means
of remote monitoring, a 4-20mA signal
representing the room DP is available
for connecting to a third party controller
on the BMS. It is located at the green
terminal block on the remote sensor
and labeled as “Io.”
PID output setup
The FMS-1655M Monitor has an analog
output which can be used to control a
damper actuator for closed loop control of
the room differential pressure. This analog
output is present at the 9 pin connector
on remote sensor and can be congured
for a 0-10Vdc or 2-10Vdc output through
the touchscreen display menu. Go to PID
Output option in Room Setup of Unit
Setup menu. Select PID Output Setup,
set operating mode, and output range.
Touch Finish to save settings and exit
back to PID Output Setup menu. If
necessary the PID loop parameters can
be changed by selecting the PID Loop
Setup option where the Proportional,
Integral, & Derivative values can be tuned
for the optimum control loop response.
For most typical applications, PID factory
settings work well.
Editing setpoints
When the FMS-1655M Monitor is used
as a controller, the target differential
pressure setpoints can be set by selecting
the Room Setup option in the Unit Setup
menu. There the Edit Setpoint option can
be selected and the setpoints for Positive,
Negative, and Neutral isolation can be set
as well as a deadband.
Diagnostic menu
The FMS-1655M monitor incorporates
several troubleshooting tools. The
Override PID Output option allows the
analog output to be overridden and
locked while test and balance makes
adjustments to the Supply and Exhaust
dampers. While in the overridden state,
the analog output is “disconnected” from
the PID control loop, if enabled. The
Real-Time View option allows the user to
see in real time the actual values for the
Pressure, Setpoint, PID Output, and Door
Status. A software reset can be invoked
through the Reset Monitor option. It is
recommended to perform this function
after installation to insure that all user
settings are properly stored to nonvolatile
memory.

FMS-1655M
LIT-12013119
17
• The cloth may be used dry, or lightly dampened with a mild cleaner or ethanol.
• Be sure the cloth is only lightly dampened, not wet. Never apply cleaner directly to touch panel surface; if cleaner is spilled onto
touch panel, soak it up immediately with absorbent cloth.
• Cleaner must be neither acid nor alkali (neutral pH).
• Wipe the surface gently; if there is a directional surface texture, wipe in the same direction as the texture.
• Never use acidic or alkaline cleaners, or organic chemicals such as: paint thinner, acetone, tolulene, xylene, propyl or isopropyl
alchohol, or kerosene.
Tapping the current room
name text brings up an
alphanumeric keyboard to
quickly change the name of
the monitored room.
Tap anywhere else on the
screen enters the Main
Setup Menu if no password
is stored. Otherwise, a
password must be entered
before the Main Setup
Menu can be accessed.
Tapping the units brings
up engineering units
selection popup to
quickly change pressure
measurement units.
Tapping Time brings up
the Time Entry popup to
quickly change the current
displayed time.
Hot-Spot Features of FMS-1655M Monitor
Touchscreen Display
Tap ALARM AUDIBLE to
toggle mode of audible
alarm. It automatically
reverts back to audible
mode when the alarm
condition is removed.
Tapping the Status line
brings up the Isolation Mode
popup to quickly change the
monitored mode of isolation.
Cleaning the display

FMS-1655M
LIT-12013119
18
Alarm setpoints

FMS-1655M
LIT-12013119
19
Setup menu tree

FMS-1655M
LIT-12013119
20
/